background image

Maintenance

54

Cleaning the Auto Cutter (Auto Cutter Model Only)

If labels, paper dust, or adhesive has adhered to the fixed blade of the auto cutter, the blade may become dull.

Clean the fixed blade following the procedure below.

1

If paper has been loaded, remove it.

(

U

"How to Remove Paper (For the Auto Cutter Model)" on page 48

)

2

Turn off the printer, and unplug the power cable.

3

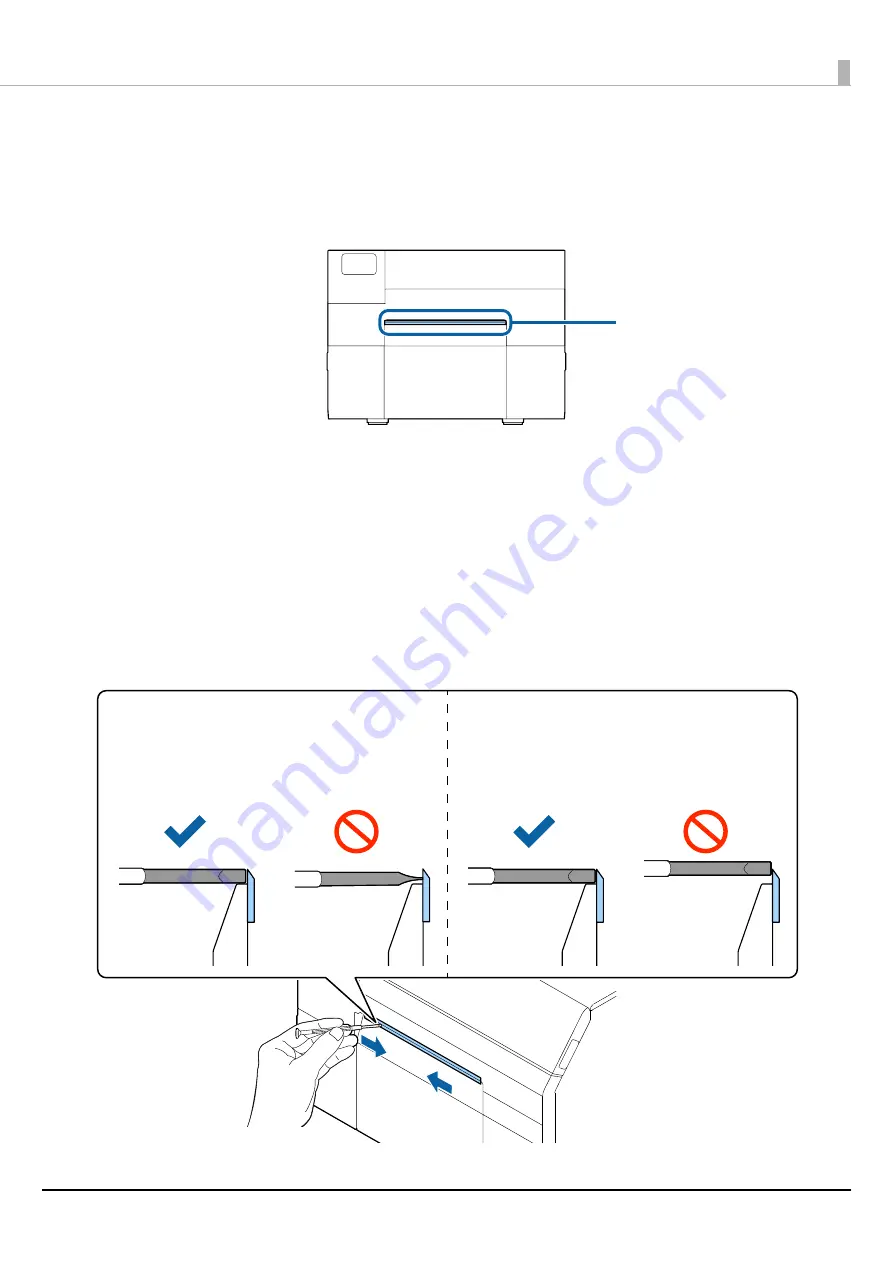
As shown in the figure below, scrape off adhered materials stuck to the fixed blade 

using a flat-blade screwdriver (blade width: 1.8 mm to 3 mm). Start scraping from 

each end toward the center.

Fixed blade

Keep the blade upright while cleaning the 
auto cutter.

Keep the blade in contact with the bottom 
of the paper ejection slot.

Summary of Contents for ColorWorks CW-C6000 Series

Page 1: ...User s Guide M00123502EN Before use Basic Operation Maintenance Troubleshooting Specifications Appendix ...

Page 2: ...ntenance Box 15 Caution Label 16 Paper That Can Be Used 17 Paper Shapes 17 Forms of Paper 17 List of Paper That Can Be Used 18 Paper That Cannot Be Used 18 Part Names and Functions 19 Front 19 Rear 20 Inside 21 Spindle and Flange 22 Operation Panel 23 Basic Operation 25 Turning On Off 25 Turning the Power On 25 Turning the Power Off 25 Opening the Paper Cover 26 Opening the Cover using the Lever i...

Page 3: ...aning the Print Head 60 Using the Operation Panel 61 Using the Printer Driver 61 Using the WebConfig 61 Troubleshooting 62 Paper is jammed 62 For the Auto Cutter Model 63 For the Peeler Model 65 Problems with Print Quality 67 Horizontal White Banding 67 Vertical White Spots Auto Cutter Model 67 White or Black Banding 67 Printed Colors Are Wrong 68 Print Position Shifts 68 Paper is Smeared or Smudg...

Page 4: ...ls about the functions and operating procedures of the product maintenance information and troubleshooting Manual viewable with PC CW C6000 Series CW C6500 Series Technical Reference Guide Provides information necessary for installing the product performing daily tasks and developing a system using the product Download this document from the following URL www epson biz com Manual viewable with PC ...

Page 5: ...fore reading this manual Symbols for General Information WARNING Handling the product improperly by ignoring this symbol can lead to death or serious injury CAUTION Handling the product improperly by ignoring this symbol can lead to injury and property damage cIMPORTANT Indicates information with which you must comply when using the product Mishandling due to ignoring this information may cause th...

Page 6: ...ries 4 inch model ColorWorks C6000Au ColorWorks C6000Ae ColorWorks C6010A ColorWorks C6020A ColorWorks C6030A ColorWorks C6040A ColorWorks C6050A CW C6500 Series 8 inch model ColorWorks C6500Au ColorWorks C6500Ae ColorWorks C6510A ColorWorks C6520A ColorWorks C6530A ColorWorks C6540A ColorWorks C6550A CW C6000 Series 4 inch model ColorWorks C6000Pu ColorWorks C6000Pe ColorWorks C6010P ColorWorks C...

Page 7: ...e the black ink type once you select the black ink type and let the printer charge the ink Name Overview Printer driver Driver to print from Windows applications The utility CW C6000 Series CW C6500 Series PrinterSetting for configuring the printer settings can be started from the driver For details on how to use the driver refer to Help or the video EpsonNet Config Tool to acquire or set network ...

Page 8: ...19K2 TS25K3 TS21K5 To get the latest version of software see Downloading the Latest Version on page 4 How to Check the Product Version You can check the version of your product firmware by printing the status sheet Check the results of status sheet printing U Printing Status Sheet on page 29 You can also check the version on the operation panel Menu Printer Status Print Firmware Version How to Che...

Page 9: ...nding on the product used and operating system Unless otherwise specified the screens in this manual are those when using Windows 10 Product Illustrations The product illustrations used throughout this manual may slightly differ from the product you are using Unless otherwise stated illustrations of CW C6500 Series are used ...

Page 10: ...r dust or in a humid location Doing so may cause electric shock or fire When lifting the product perform the work with the correct posture Lifting the product with an inappropriate posture may cause injury This is a heavy product Therefore make sure it is not carried by a single person Ensure that two or more people carry this product during unpacking or shifting See below for details on the mass ...

Page 11: ...oned in this manual Doing so may cause electric shock or burns Do not insert metal or flammable materials or allow them to fall into the product Doing so may cause electric shock or fire If the screen of the printer is damaged handle the liquid crystal inside it very carefully Should any of the following situations arise take emergency measures When any part gets onto your skin wipe off the deposi...

Page 12: ...fied service personnel for advice if the power cord is damaged Furthermore observe the following points so as not to damage the power cord Do not modify the power cord Do not place heavy objects on the power cord Do not forcibly bend twist or pull the power cord Do not lay the power cord near a heating appliance Do not insert or remove the power plug with a wet hand Doing so may cause electric sho...

Page 13: ...s Printing is not possible if even only one ink cartridge is missing Since ink cartridges are designed to stop the operation before ink runs out completely to maintain the quality of the print head some ink remains in the used ink cartridges All the ink colors are consumed also for the maintenance operations when an ink cartridge is replaced and for print head cleaning Do not turn off the power or...

Page 14: ...s charged the first time right after purchase ink is consumed for filling the print head nozzles ink discharge holes to get ready for printing Therefore the number of the sheets that can be printed may be fewer than for cartridges installed later When the printer is powered off with the power button the print head is automatically capped to prevent the ink from drying When you will not use the pri...

Page 15: ... ink contacts your skin eyes or mouth take the following actions When ink gets onto your skin immediately wash the area with soap and water When ink gets into your eyes immediately flush them with water Leaving the ink as is may result in bloodshot eyes or mild inflammation If something is wrong immediately consult with a doctor When ink gets into your mouth immediately spit it out and consult wit...

Page 16: ...ct indicate the following cautions WARNING Do not touch the roller at the bottom of the paper holder unit with your hand Doing so may cause injury CAUTION Do not touch the manual cutter at the bottom of the peeler cover with your hand Doing so may cause injury ...

Page 17: ...orms of Paper The following forms of paper can be used Label paper with adhesive Continuous label Die cut label 1 The print position is detected based on the black marks printed on the back of the paper 2 The print position is detected based on the gaps between labels Roll paper Fanfold paper Without waste parts and no black marks With waste parts and no black marks Without waste parts and with bl...

Page 18: ...e auto cutter U Cleaning the Auto Cutter Auto Cutter Model Only on page 54 Cautions on using a die cut label Depending on the shape of die cut labels the labels may peel off their backing paper inside the printer In such a case it is necessary to operate gap detectors For details on how to operate the detectors refer to the CW C6000 Series CW C6500 Series Technical Reference Guide Paper shapes For...

Page 19: ...ance box U Replacing the Maintenance Box on page 32 4 Paper cover Open this cover to load or replace paper How to open the paper cover differs depending on whether the paper is to be supplied from the inside or the outside U Opening the Paper Cover on page 26 5 Peeler cover peeler model only Open this cover to load paper By passing a backing paper through the peeler labels are printed being peeled...

Page 20: ...t disconnection of the cable 3 USB port Connect a USB cable 4 LAN port Connect a LAN cable 5 Air vent Exhausts heat generated in the printer to prevent the temperature inside the printer from rising Provide a clearance of 10 cm 3 94 or more from the area around the air vent to ensure ventilation when installing the printer ...

Page 21: ... Use this lever when removing a jammed paper By moving the lever up the paper pressure rollers are unlocked and you can remove paper jammed inside the front cover 3 Edge guide Supports paper while the paper is fed into the printer When loading paper load the paper along this guide 4 Paper guide unit Move this unit when cleaning the paper feed roller If you pull the blue lever the entire unit moves...

Page 22: ...ange Used to supply the paper from the inside 1 Flange Attach this to the spindle to fix the roll paper loaded on the spindle Squeeze the blue lever to attach or remove to from the spindle 2 Spindle Load roll paper on this spindle ...

Page 23: ...Series CW C6500 Series Technical Reference Guide power LED Stays on while the printer is on Flashes during printing or charging ink Status LED Stays on or flashes while an error or problem is occurring Pause LED Stays on or flashes while the printer is paused 2 power button Turns on off the printer 3 home button Displays the Home screen 4 back button Use to return to the previous screen Peeler mod...

Page 24: ...ven after removing printed labels For details refer to Printing is Impossible or Becomes Suddenly Impossible on page 69 9 Feed button Press this briefly to feed paper by one page Hold down to feed paper continuously 10 Back Feed button Use to replace paper Hold down this button to feed the paper backward until you can pull the paper out of the printer 11 Pause button If this button is pressed duri...

Page 25: ...printer Turning On Off Turning the Power On Hold down the power button until the power LED lights up Turning the Power Off Hold down the power button until a power off confirmation message is displayed Then select Yes on the confirmation screen The power LED goes out and the printer is turned off ...

Page 26: ...e the printer or to remove it To replace the maintenance box To clean inside the printer To remove paper jammed inside the printer Opening the Cover using the Lever in the Back Open the paper cover as shown above for the following purposes To set paper so that it is supplied from outside the printer or to remove the paper CAUTION Do not use the printer with the paper cover removed Doing so will ca...

Page 27: ... Sheet on page 29 Checking the Paper Information Information of currently loaded paper paper type paper source setting and remaining amount of roll paper is displayed on the home screen QNOTE Touch this area to directly access the Paper Settings menus You can also make the paper settings using the printer driver U Printer Driver Settings on page 34 If the settings differ between the operation pane...

Page 28: ... the nozzle check patterns you can check the print head nozzles for clogging To print the check patterns select the menu as described below Using the Operation Panel Menu Maintenance Print Head Nozzle Check Using the Printer Driver Click Nozzle Check on the Printer Utilities window Using the WebConfig Select Print Nozzle Check Pattern on the Maintenance window and then click Start ...

Page 29: ...atus Print Print Status Sheet Checking Network Connection and Settings You can check the network connection status and settings by printing a network connection check report For more details see the CW C6000 Series CW C6500 Series Technical Reference Guide Status sheet print sample Status sheet network settings print sample QNOTE You can also print a list of the fonts and bar codes that are alread...

Page 30: ...utions on handling before installing the ink cartridges U Cautions on Ink Cartridges on page 13 When replacing the black ink cartridge make sure to replace with a cartridge of the same type of black ink The printer does not work if you install a cartridge of different type of black ink Message Description You need to replace Ink Cartridge s Replace the ink cartridge To maintain the quality of the ...

Page 31: ...ink cartridge As shown in the figure below shake the cartridge horizontally Move the cartridge by about 5 cm to both directions and repeat it about 15 times for about 5 seconds 5 Install the ink cartridge in the slot 6 Close the ink cartridge cover cIMPORTANT When replacing the black ink cartridge make sure to replace with a cartridge of the same type of black ink The printer does not work if you ...

Page 32: ...ck the remaining capacity of the maintenance box on the home or an error message screen of the operation panel CAUTION Carefully read the cautions on handling before setting the maintenance box U Cautions on the Maintenance Box on page 15 Message Description The Maintenance Box is at the end of its service life You need to replace it Replace the maintenance box with a new one ...

Page 33: ...box cover 3 Take out the maintenance box When disposing of the used maintenance box put it in a plastic bag that came with the new maintenance box U Disposal of Maintenance Box on page 81 4 Take out a new maintenance box from the bag 5 Install the new maintenance box 6 Close the maintenance box cover ...

Page 34: ...ou will not need to set the paper settings of the driver when printing from an application if you register a media definition in advance If you wish to set the paper size and other settings every time without registering a media definition select Custom from the Media Name pull down menu on the General tab The various settings on the General tab will become available so that you can set the paper ...

Page 35: ...er model Can be specified from 8 to 609 6 mm Initial setting 152 4 mm For the peeler model Can be specified from 12 7 to 609 6 mm Initial setting 152 4 mm Gap between Labels When Media Form is other than Continuous Label 2 to 6 mm Initial setting 3 mm When Media Form is Continuous Label 0 to 6 mm Initial setting 3 mm Media Form Die cut Label Gap Initial setting Die cut Label BlackMark Continuous L...

Page 36: ...gh Glossy Paper Print Quality When Media Coating Type is Plain Paper Max Speed Speed Initial setting Normal Quality When Media Coating Type is Matte Paper Synthetic or Texture Paper Max Speed Speed Normal Initial setting Quality When Media Coating Type is Glossy Paper Glossy Film or High Glossy Paper Normal Quality Initial setting Max Quality QNOTE If you change the Media Coating Type the Print Qu...

Page 37: ...at specified label Cut after last page of collate page Do not cut stop at cut position Initial setting Do not cut stop at peel position Do not cut stop at the print end position For the peeler model Manual apply Initial setting Auto apply Rewind Notification For the auto cutter model None Initial setting Beep at Cut Beep at Job End Last Page at Collate End For the peeler model None Initial setting...

Page 38: ...Cut Pause at Job End Last Page at Collate End For the peeler model None Initial setting Pause at Job End Last Page at Collate End Media Detection Media source Internal roll Initial setting External feed Media Detection Gap detection Initial setting Black mark detection No detection ...

Page 39: ...supply roll paper from outside the printer prepare an external paper feeder and paper rewinder by yourself For more details see the CW C6000 Series CW C6500 Series Technical Reference Guide With the peeler model you can not supply fanfold paper from outside the printer When replacing paper with a different shape form or type of paper change the paper settings either from the operation panel or on ...

Page 40: ...e roll paper on the spindle and fix it with the flange To move the flange squeeze the two levers When loading the roll paper on the spindle take note of the winding direction The correct winding direction is marked on the spindle Fix the flange and roll paper so that there is no gap in between 5 Hold the spindle with both hands and set it in the printer Install the spindle so that both ends of the...

Page 41: ...ot be fed automatically 10 Rotate the spindle to remove looseness in the paper 11 Close the paper cover 12 Press the Pause button Loading paper auto cutter model supply from inside is now completed CAUTION If the movable edge guide is not properly slided against the paper print position may become incorrect or a paper jam may occur Make sure to follow the guidelines below There should be no gap be...

Page 42: ...3 Remove the spindle if present As shown in the figure hold the spindle and flange with both hands and remove them 4 Place the fanfold paper behind the printer Place the fanfold paper at least 100 mm away from the printer Make sure the paper is vertical in relation to the paper feed slot CAUTION Make sure not to let the fanfold paper to curl near the printer Doing so will deform the paper resultin...

Page 43: ...aper feed slot until paper feeding starts automatically Do not load backing paper that has no labels on it The paper may not be detected and not be fed automatically 9 Close the paper cover CAUTION If the movable edge guide is not properly slided against the paper print position may become incorrect or a paper jam may occur Make sure to follow the guidelines below There should be no gap between th...

Page 44: ...Basic Operation 44 10 Press the Pause button Loading paper auto cutter model supply from outside is now completed ...

Page 45: ...roll paper on the spindle and fix it with the flange To move the flange squeeze the two levers When loading the roll paper on the spindle take note of the winding direction The correct winding direction is marked on the spindle Fix the flange and roll paper so that there is no gap in between 5 Hold the spindle with both hands and set it in the printer Install the spindle so that both ends of the s...

Page 46: ... automatically 10 Rotate the spindle to remove looseness in the paper 11 Close the paper cover 12 Hold down the Feed button until the leading edge of paper touches the table on which the printer is installed CAUTION If the movable edge guide is not properly slided against the paper print position may become incorrect or a paper jam may occur Make sure to follow the guidelines below There should be...

Page 47: ...ver 15 Pass the paper through the peeler slot 16 Close the peeler cover If the paper is loose pull the leading edge of paper to remove the looseness and then close the peeler cover 17 Press the Pause button Loading paper peeler model supply from inside is now completed Peeler slot ...

Page 48: ...tton to feed the paper backward The paper can now be pulled out from inside the printer 4 Open the paper cover 5 Slide the movable edge guide away from the paper and remove the paper Removing the paper is now completed To load paper see the following pages How to Load Paper Auto Cutter Model Supply from Inside on page 40 How to Load Paper Auto Cutter Model Supply from Outside on page 42 ...

Page 49: ... paper ejection slot 4 Press the Back Feed button to feed the paper backward The paper can now be pulled out from inside the printer 5 Open the paper cover 6 Slide the movable edge guide away from the paper and remove the paper Removing the paper is now completed To load paper see the following pages How to Load Paper Peeler Model Supply from Inside on page 45 ...

Page 50: ... Hold down the Feed button until the paper is completely ejected Ejecting paper at paper end is now completed To load paper see the following pages How to Load Paper Auto Cutter Model Supply from Inside on page 40 How to Load Paper Auto Cutter Model Supply from Outside on page 42 ...

Page 51: ... the peeler cover 2 Remove the paper from the peeler slot 3 Hold down the Feed button until the paper is completely ejected Ejecting paper at paper end is now completed To load paper see the following pages How to Load Paper Peeler Model Supply from Inside on page 45 Peeler slot ...

Page 52: ...ront Rear 1 Cleaning the Auto Cutter Auto Cutter Model Only on page 54 2 Cleaning the Peeler Peeler Model Only on page 55 3 Cleaning the Platen on page 57 4 Cleaning the Paper Pressure Roller on page 59 1 Cleaning the Edge Guides on page 56 2 Cleaning the Paper Feed Roller on page 58 Peeler Model ...

Page 53: ...power cable Then wipe off any dirt with a dry cloth or non woven fabric that has been dampened CAUTION Do not use alcohol benzine thinner trichloroethylene or ketone based solvent to clean the exterior of the printer Doing so may deform or damage the plastic and rubber parts ...

Page 54: ...aded remove it U How to Remove Paper For the Auto Cutter Model on page 48 2 Turn off the printer and unplug the power cable 3 As shown in the figure below scrape off adhered materials stuck to the fixed blade using a flat blade screwdriver blade width 1 8 mm to 3 mm Start scraping from each end toward the center Fixed blade Keep the blade upright while cleaning the auto cutter Keep the blade in co...

Page 55: ...nt quality it is recommended to clean the peeler every day Clean the peeler following the procedure below 1 Make sure the printer has been turned off 2 Open the peeler cover If paper has been loaded remove it U How to Remove Paper For the Peeler Model on page 49 3 Clean the roller using a cotton swab moistened with alcohol Completely remove dirt from the roller ...

Page 56: ...y become incorrect Clean the edge guides following the procedure below 1 Make sure the printer has been turned off 2 Open the paper cover If paper has been loaded remove it U How to Remove Paper For the Auto Cutter Model on page 48 How to Remove Paper For the Peeler Model on page 49 3 Clean the edge guides using a cotton swab moistened with alcohol ...

Page 57: ...dure below 1 Check that the printer has been turned off 2 If paper has been loaded remove it U How to Remove Paper For the Auto Cutter Model on page 48 How to Remove Paper For the Peeler Model on page 49 3 Open the front cover 4 Raise the paper holder unit 5 Use a cloth or cotton swab to remove adhesive adhered to the platen 6 Lower the paper holder unit Do not clean this area Clean this area ...

Page 58: ...Model on page 49 3 Remove the spindle 4 Raise the release lever 5 Open the paper guide unit 6 Attach adhesive side of a label to the roller and peel it off slowly Repeat this action until paper dust or adhesive is completely removed from side to side of the roller If some labels have stuck on the roller carefully remove them as they can cause a paper jam 7 Rotating the roller by hand remove paper ...

Page 59: ...ler Model on page 49 3 Remove the spindle 4 Raise the release lever 5 Open the front cover 6 Attach adhesive side of a label to the roller and peel it off slowly Repeat this action until paper dust or adhesive is completely removed from side to side of the roller If some labels have stuck on the roller carefully remove them as they can cause a paper jam 7 Rotating the roller by hand remove paper d...

Page 60: ... for nozzle clogging U Printing Nozzle Check Patterns on page 28 If nozzles are clogged run a print head cleaning To run a print head cleaning select the menu as described below Run Power Cleaning only when nozzle clog is not cleared by running Print Head Cleaning QNOTE The Power Cleaning consumes ink more than Print Head Cleaning Normal Clogging Example of the nozzle check patterns with gloss bla...

Page 61: ...nu Maintenance Power Cleaning Using the Printer Driver Click Print Head Cleaning or Power Cleaning on the Printer Utilities window Using the WebConfig Select Print Head Cleaning on the Maintenance window Then select the cleaning type from Auto or Power Cleaning and then click Start ...

Page 62: ...that is not described here see the CW C6000 Series CW C6500 Series Technical Reference Guide Paper is jammed This section describes how to resolve the problem when the paper is jammed This section is also explained with the help of a video You can see the video from the link below https support epson net p_doc 790 ...

Page 63: ...e far right If there is jammed paper remove it 5 Open the paper cover 6 Raise the release lever 7 Pull the paper out from the paper feed slot 8 Lower the release lever 9 Close the paper cover 10 Close the front cover 11 Press the Pause button The paper jam error will be cleared To resume printing load the paper again U How to Load Paper Auto Cutter Model Supply from Inside on page 40 How to Load P...

Page 64: ...6500 Series Technical Reference Guide QNOTE After removing jammed paper make sure that there is no labels or adhesive left inside the printer If you use the printer without removing them it leads to frequent paper jams or may cause poor print quality If paper jam occurs frequently clean the inside of the printer U Maintenance on page 52 ...

Page 65: ...t hold it down and move it to the far right If there is jammed paper remove it 6 Open the paper cover 7 Raise the release lever 8 Pull the paper out from the paper feed slot 9 Lower the release lever 10 Close the paper cover 11 Close the front cover 12 Close the peeler cover 13 Press the Pause button The paper jam error will be cleared To resume printing load the paper again U How to Load Paper Pe...

Page 66: ...6500 Series Technical Reference Guide QNOTE After removing jammed paper make sure that there is no labels or adhesive left inside the printer If you use the printer without removing them it leads to frequent paper jams or may cause poor print quality If paper jam occurs frequently clean the inside of the printer U Maintenance on page 52 ...

Page 67: ...er the paper pressure unit This can occur when the print mode is set to Stop at Cut Position or Stop at Peel Off Position and printed labels have not been removed after each print job is finished Select a print mode option other than Stop at Cut Position or Stop at Peel Off Position or remove printed labels after each print job is finished For details on the print modes refer to the CW C6000 Serie...

Page 68: ... paper edge Check that the edge guide is properly set at the paper width position U Loading and Replacing Paper on page 39 Cause Solution and Reference The paper being used and the Media Coating Type setting differ Check the paper being used and the Media Coating Type setting of the printer driver U Printer Driver Settings on page 34 If foreign matter is adhered to the head the paper may be smeare...

Page 69: ... U Downloading the Latest Version on page 4 The printer does not turn on Check that the power cable is connected to the printer and outlet properly U Rear on page 20 Print Job is Canceled on PC but Printing Message on Printer Does Not Disappear If you cancel printing in printer queue on the computer it may cause the print data to break up and Printing may be kept displayed on the operation panel o...

Page 70: ...er on page 39 Information The size of the loaded paper is incorrect Replace the paper Load media that matches the print area size Or change the print area to match it with the media size U Loading and Replacing Paper on page 39 Information The roll paper is not loaded Load roll paper U Loading and Replacing Paper on page 39 Information The fanfold paper is not loaded Load fanfold paper U Loading a...

Page 71: ...Information You need to replace Ink Cartridge s Install an ink cartridge with a sufficient amount of ink remaining U Replacing the Ink Cartridges on page 30 Maintenance Error Cannot recognize the ink cartridge Select Next to clear the error Reinstall the ink cartridge If the error reoccurs replace the ink cartridge with a new one U Replacing the Ink Cartridges on page 30 Information You have not i...

Page 72: ...nt was not printed Delete unnecessary files Printer Error Turn on the printer again See your documentation for more details XXXXXX 1 Turn off the printer 2 Check that there is no paper jam or foreign materials near the ejection slot 3 Turn the printer on If the printer error still occurs contact qualified service personnel for advice When contacting tell the person the XXXXXXXX a 6 or 8 digit alph...

Page 73: ...hen close the paper holder unit When the paper holder unit is opened a paper jam error may occur If the paper jam error is not cleared try the solutions in the links below Auto cutter model For the Auto Cutter Model on page 63 Peeler model For the Peeler Model on page 65 Message Solution and Reference ...

Page 74: ...Max Speed 300 600 dpi width height Printing width 25 4 mm 156 mm s 156 mm s Printing width 101 6 mm 119 mm s 119 mm s Printing width 203 2 mm 85 mm s Print quality setting Speed 600 600 dpi width height Printing width 25 4 mm 125 mm s 125 mm s Printing width 101 6 mm 75 mm s 75 mm s Printing width 203 2 mm 49 mm s Print quality setting Normal 600 600 dpi width height Printing width 25 4 mm 63 mm s...

Page 75: ...width 25 4 mm 11 mm s 11 mm s Printing width 101 6 mm 8 mm s 8 mm s Printing width 203 2 mm 6 mm s Interface Wired LAN 1000BASE T 100BASE TX 10BASE T USB2 0 High Speed Weight Auto cutter model Approx 22 5 kg Approx 25 5 kg Peeler model Approx 22 8 kg Approx 26 3 kg Item CW C6000 Series CW C6500 Series ...

Page 76: ...pprox 38 6 W 100V Average of approx 39 5 W 230V Average of approx 38 7 W Standby 100V Average of approx 7 51 W 230V Average of approx 5 82 W 100V Average of approx 7 51 W 230V Average of approx 5 82 W Power off 100V Average of approx 0 08 W 230V Average of approx 0 24 W 100V Average of approx 0 08 W 230V Average of approx 0 24 W Item CW C6000 Series CW C6500 Series Height 326 mm 326 mm Width 340 m...

Page 77: ...tion When 20 C or 60 C within 120 hours With ink charged 20 to 40 C When 20 C within 120 hours When 0 to 25 C within 6 month When 40 C within 1 month With matte black ink installed 10 to 40 C Elevation 0 to 3000 m Noise Auto cutter model Approx 55 dB Peeler model Approx 60 dB Based on Epson evaluation conditions Black ink type Supported paper Gloss black ink Matte Paper Synthetic Glossy Paper Glos...

Page 78: ... SJIC38P BK SJIC38P MK SJIC38P C SJIC38P M SJIC38P Y CW C6040A CW C6040P CW C6540A CW C6540P SJIC39P BK SJIC39P MK SJIC39P C SJIC39P M SJIC39P Y CW C6050A CW C6050P CW C6550A CW C6550P SJIC40P BK SJIC40P MK SJIC40P C SJIC40P M SJIC40P Y Type 4 individual color cartridges Ink colors Black gloss black matte black cyan magenta yellow Ink type Pigmented ink Expiration date 6 months after installation ...

Page 79: ...0 Type Maintenance box with integrated waste ink absorbing material Storage temperature Transporting without unpacking 20 to 60 C within 5 days when 60 C Storage without unpacking 20 to 40 C within 1 month when 40 C Installed 20 to 40 C within 1 month when 40 C ...

Page 80: ...erformance of the printer it is recommended to use genuine Epson ink cartridges Use of non genuine Epson ink cartridges can adversely affect the printer and print quality and prevent the printer from realizing its maximum performance Epson cannot guarantee the quality and reliability of non genuine Epson products Repairs for any damage or breakdown of this product due to the use of non genuine Eps...

Page 81: ...nded to use a genuine Epson maintenance box Use of a non genuine Epson maintenance box can adversely affect the printer and prevent the printer from realizing its maximum performance Repairs for any damage or breakdown of this product due to the use of non genuine Epson products will not be free of charge even if the warranty period is still valid Epson cannot guarantee the quality and reliability...

Page 82: ...e roll paper holder When you want to use paper of a different size or frequently change the label material When you want to reduce the down time as a result of roll paper replacement Model number Paper Holder C6000 for CW C6000 Series Paper Holder C6500 for CW C6500 Series Item Paper Holder C6000 Paper Holder C6500 External dimensions H x W x D 220 206 220 mm 175 310 175 mm Weight 0 65 kg 0 65 kg ...

Page 83: ... has been taken in the preparation of this manual Seiko Epson Corporation assumes no responsibility for errors or omissions 4 Neither is any liability assumed for damages resulting from the use of the information contained herein 5 Neither Seiko Epson Corporation nor its affiliates shall be liable to the purchaser of this product or third parties for damages losses costs or expenses incurred by pu...

Reviews: