Epson C094001 - FX 870 B/W Dot-matrix Printer Specifications Download Page 10

FX-870/1170

Data Dump Mode

In data dump mode, the printer produces a printout of all the

codes it receives. To use data dump 

mode, 

follow these steps:

1. Make sure the printer is 

 off.

2. Hold down the 

PAUSE 

button while you 

 on the printer.

3. Load the paper.

4. Next, run an application program or a program you have

written in any programming language. Your printer prints
all the codes it receives in hexadecimal format and text, as

shown below.

5. To 

 off data dump mode, press the 

PAUSE 

button to

stop printing and then 

 off the printer.

By reading the characters printed in the text field on the right

side of the printout or the printout of hex codes, you can

check which codes are being sent to the printer.

In the text field, 

 appear as their true 

characters if they are printable. 

 codes, such as

control codes, are represented by dots.

Application Software

Most application programs allow you to specify the type of
printer you use so that the program can take full advantage

of the printer’s features. Many of these programs provide an
installation or setup section that presents a list of printers.

Choosing from a menu

To take full advantage of your printer’s features, choose your
printer when you set up your program. If your printer is not
listed, choose from the following list (the printers are listed in
the order of preference):

FX-870 FX-1170

FX-850 FX-1050
EX-800 EX-1000

FX-86e FX-286e
FX-80+ FX-l00+
FX-80 FX-100

Epson printer
9-pin printer

If you plan to use the IBM printer emulation mode, choose
IBM Proprinter (X for narrow carriage or XL for wide

carriage), IBM Graphics printer, or IBM printer, in that order
of preference.

To use all the features of your printer, it is best to choose a

program that lists one of the FX printers on its menu. If your
program does not list one of these printers, contact the
software manufacturer to see if an update is available.

Using Continuous Paper

You can load continuous paper through the front, rear, or

bottom paper slots, depending upon the position of the
tractor unit and the placement of your paper supply.

Your printer can handle continuous paper up to 254 

mm

(10.0 inches) wide 

on 

the standard-width carriage and up to

406 mm (16.0 inches) wide on the wide carriage.

To print on continuous paper, you can install the tractor unit

in one of the following positions: front, rear, or pull. Be sure
you set the paper-release lever correctly before you print.

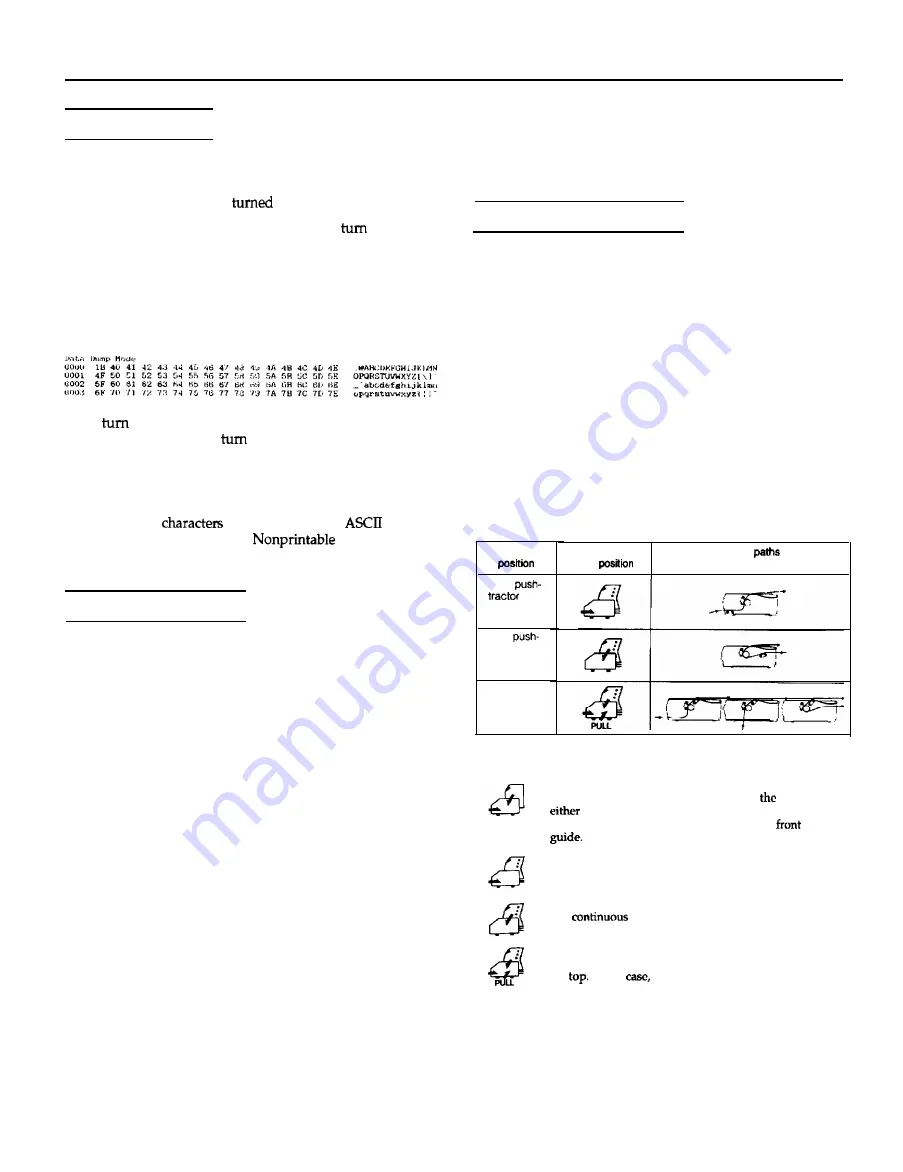
Tractor position and available paper paths

Below are the possible ways of feeding continuous paper.

Always set 

the paper-release lever to the position indicated

for the paper-feed method you want to use.

Tractor

Front 

Rear 
tractor

Pull-tractor

Paper-release

lever 

Paper 

Single-sheet position

For all single sheets, whether loaded from 

 top or

 of the optional cut-sheet feeders; also for loading

single sheets from the front with the optional 

 sheet

Front push-tractor position
For continuous paper with the tractor unit installed in
the front.

Rear push-tractor position

For 

 paper with the tractor unit installed in

the rear.

Pull-tractor position
For continuous paper with the tractor unit installed on
the 

 In this 

 you can load paper from the front,

rear, or bottom.

FX-870/1170-10

10/13/92

9-Pin Printers

Summary of Contents for C094001 - FX 870 B/W Dot-matrix Printer

Page 1: ...24 KB or 0 KB Selectable in the default setting mode Printable columns Characterfonts Draft Epson Roman or Epson Sans Serif in normal or condensed mode You can also select other font pitch combinations using E X P commands Character tables ESCIF Mode Europe One italic and 15 graphic character tables rth South One italic and 7 graphic character tables olkr One italic and 5 graphic character tables ...

Page 2: ... L zz 1 A The minimum top margin is 8 5 mm 0 33 inches 8 The mlnimum left and tight margins are 3 mm 0 12 inches However the maximum printable width is 203 mm 8 inches for the standard wtdth cantags or 345 mm 13 6 inches for the wide carriage C The minimum bottom margin is 13 5 mm 0 53 incftss Continuous paper A The minimum top and bottom mafgins above and below the perforation are 9 mm 0 35 inche...

Page 3: ...r AC 12OOV rms 1 second Environmental Temperature Operation 5 to 35 C 41 to 95 F Storage 30 to 60 C 22 to 140 F Humidity without condensation Operation 10 to 80 RH Storage 5 to 85 RH Safety Approvals Safety standards UL1950 with D3 CSA22 2 No 220 R F I FCC part 15 subpart B class B Interface Specifications Your printer is equipped with an g bit parallel interface Specifications and pin assignments...

Page 4: ...32mnl 177mm 280 g Wide C814011 48 5 mm 507mm 177mm 450 g Paper Single sheets 1 Multi psrt forms Width C814001 148 to 257 mm 5 8 to 10 1 inches C814011 14810364mm 5 8 lo 14 3 inches Paper length max 364 mm max 14 3 Inches Thickness 0 085 to 0 14 mm 0 12 too 32 mm 0 0025 to 0 0054 in 0 0047 to 0 0125 in Weight 64toQOg m2 40 to 58 g m x 4 14 to 24 lb 12 to 15 lb x 4 Printable area Single sheets Same ...

Page 5: ...he ESC R software command Country ASCII code hex 23 24 40 50 5C 5D 5E 60 70 7C 7D 7E 8 Japan 88ecwrv r 9 Norway wttItte u44it ia 10 Denmark II YS AE0AU4r0dU 11 Spaln II I diRiB f IIt36 12 Latin Amertca r diiJ Bufn66 IBM emulation mode This section lists the character tables available in the IBM emulation mode The IBM emulation mode can be selected with the default setting mode These character tabl...

Page 6: ...lems between the printer and the computer When you have finished printing on continuous paper press this button once to advance paper to the tear off position Press it again to feed the paper backward to the loading position PAPER FEED Press this button briefly to advance paper line by line Hold it down to advance continuous paper to the next top of form TOF position When the printer is out of pap...

Page 7: ...on this feature the printer provides a l inch margin between the last line printed on one page and the first line printed on the next page Because most application programs set their own top and bottom margins you should use this feature only if your program does not provide them Shape of Zero The printer prints the zero character with a slash 0 when the setting is on or no slash 0 when the settin...

Page 8: ... your selection For example if you want to change to 12 cpi press the PAUSE button once to turn the READY light on If necessary repeat this process for any other Group 1 features you want to change Exit the Group 1 default setting mode at any time by turning off the printer Any changes you have made remain in effect until you change them again Note If you want to check the new default settings ent...

Page 9: ...ng mode and you can begin printing Character Fonts Your printer has two draft fonts normal and high speed and two Near Letter Quality NLQ fonts Epson Roman and Epson ns Serif You can select these through application software and the control panel Use the default setting mode explained earlier to choose between normal and high speed draft From the control panel you can select normal or condensed ve...

Page 10: ...row carriage or XL for wide carriage IBM Graphics printer or IBM printer in that order of preference To use all the features of your printer it is best to choose a program that lists one of the FX printers on its menu If your program does not list one of these printers contact the software manufacturer to see if an update is available Using Continuous Paper You can load continuous paper through th...

Page 11: ...ntinuous paper at the same time and switch between them by moving the paper release lever Tractor positions and paper paths below are the various ways of feeding continuous paper with two tractor units Related Documentation TM FX8 1170 FX 870 1170 Service Manual PL FX870 FX 870 Parts Price List PL FX1170 FX 1170 Parts Price List SPKFX8 1170 FX 870 1170 Self Paced Kit 4001255 FX 870 1170 User s Gui...

Reviews: