background image

Windows 8.1

/

Windows 8:


Enter the application name in the search charm, and then select the displayed icon.

Windows 7

/

Windows Vista

/

Windows XP:


Click the start button, and then select 

All Programs

 or 

Programs

 > 

EPSON

 > 

EPSON Scan

 > 

EPSON Scan

Settings

Mac OS X:


Select 

Go

 > 

Applications

 > 

EPSON Software

 > 

EPSON Scan Settings

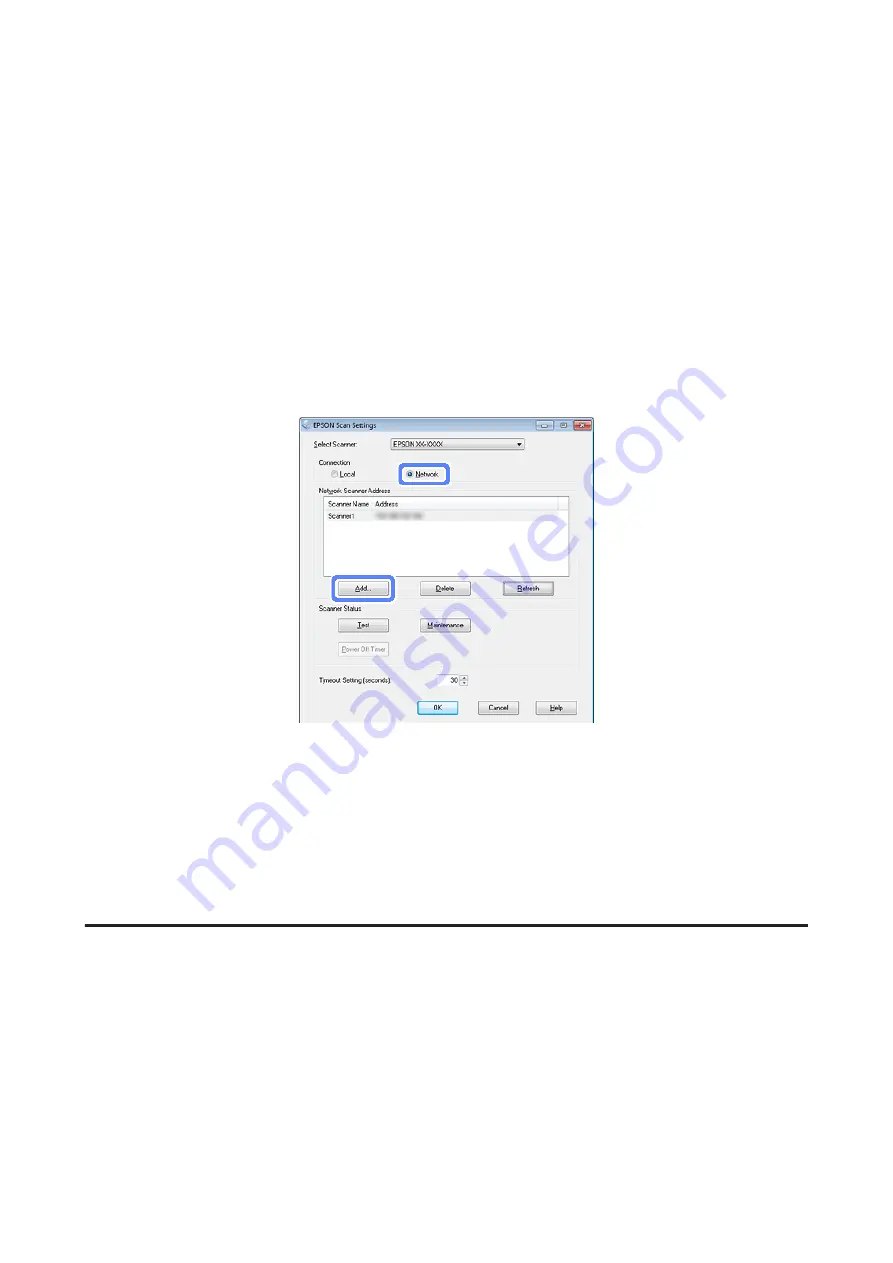
C

Select your scanner from the 

Select Scanner

 drop-down list.

D

Select 

Network

, then click 

Add

.

E

In the Add window, choose the Network Interface Panel’s IP address under Search for addresses, or select 

Enter

address

 and type in the address. Then click 

OK

.

F

In the EPSON Scan Settings window, click 

Test

 to check the connection. If everything works properly, you see a

successful connection message appears.

G

Click 

OK

 to save the settings.

Configuring Epson Scan 2

A

Obtain the IP address or host name of the Network Interface Panel from your network administrator.

B

Start Epson Scan 2 Utility.

Windows 10:


Click the start button, and then select 

All apps

 > 

EPSON

 > 

Epson Scan 2 Utility

Windows 8.1

/

Windows 8:


Enter the application name in the search charm, and then select the displayed icon.

Network Interface Panel     User's Guide

Scanning an Image

17

Summary of Contents for B12B808411

Page 1: ...Network Interface Panel User s Guide NPD4747 03 EN ...

Page 2: ...N Scan 16 Configuring Epson Scan 2 17 Scanning Over a Network 18 For Windows 19 For Mac OS X 19 Scanning from the Panel 19 About the Control Panel Menu List 21 Environment menu 21 Display menu 21 Energy saving menu 21 Network menu 21 Timeout menu 22 Restore settings menu 22 Troubleshooting Problems Indicated by Messages on the LCD Panel or Status Lights 23 Problems and Solution 23 TheLCDscreenisno...

Page 3: ...this product or unauthorized modifications repairs or alterations to this product Seiko Epson Corporation and its affiliates shall not be liable against any damages or problems arising from the use of any options or any consumable products other than those designated as Original Epson Products or Epson Approved Products by Seiko Epson Corporation EPSON is a registered trademark and EPSON EXCEED YO...

Page 4: ...twork Interface Panel Except as specifically explained in this User s Guide do not attempt to service the Network Interface Panel yourself Cautions and Notes In this document cautions and notes indicate the following Cautions must be followed carefully to avoid bodily injury Notes contain important information and useful tips on the operation of this product Network Interface Panel User s Guide Sa...

Page 5: ...cause the size of the covers differs dependingonthemodel makesureyouusethecoversthatmatchthesize of the scanner being used d Cable Clips 2 pieces Fixes the network cable to the scanner e Pin Use this to remove the screw hole covers f Allen Key Use this to tighten and remove the screws g Setup Guide The paper manual for this product Network Interface Panel User s Guide Getting to Know Your Network ...

Page 6: ...cable clips to the scanner Note Attach so that the opening of the cable clip is facing out B Use the cable clips to fix the network cable to the scanner Network Interface Panel User s Guide Getting to Know Your Network Interface Panel 6 ...

Page 7: ...thesamewayasclickingScanintheDocumentCapturePro or scanner driver window e Z Arrow button Use the arrow buttons to selectan item and then press Z to confirm the selection f Error light orange On when an error has occurred g Ready light green On when the scanner is ready Off when the scanner is not ready h LCD panel Displays the status operation and error messages i Network connector Connects the n...

Page 8: ... the USB cable B Remove the covers with the pin and then remove the screws with the allen key Caution Be careful when setting up as the pin and the allen key are sharp and may cause injury Note Use only the pin and allen key that comes with this panel Network Interface Panel User s Guide Setting Up the Network Interface Panel 8 ...

Page 9: ... scanner Note Keep the panel in a safe place You cannot use the scanner unless you replace the panel you removed in step 3 or attach the Network Interface Panel Network Interface Panel User s Guide Setting Up the Network Interface Panel 9 ...

Page 10: ...D Install the Network Interface Panel E Tighten the screws and then replace the covers Network Interface Panel User s Guide Setting Up the Network Interface Panel 10 ...

Page 11: ...el to prevent malfunction The network cable is not supplied with the product You cannot use a network cable at the same time as a USB connection G Fix the network cable using the cable clips U Using the Cable Clips on page 6 Configuring Scanning Software on Your Computer Connecting to an IPv4 Network Automatically A Turn on your scanner Network Interface Panel User s Guide Setting Up the Network I...

Page 12: ...to with the u up and d down buttons and then press the Z button F Press the F setting button to return to the home screen G After Configuring network setting is displayed restart the panel Set the password for protecting network security using Web based EpsonNet Config U Using EpsonNet Config on page 14 Connecting to an IPv4 Network Manually A Turn on your scanner Network Interface Panel User s Gu...

Page 13: ...nd d down buttons and then press the Z button G Set the IP address with the arrow buttons and then press the Z button H Repeat steps 6 and 7 to set the IP subnet mask and IP default gateway settings and then press the Z button I Press the F setting button to return to the home screen J After Configuring network setting is displayed restart the panel Set the password for protecting network security...

Page 14: ...ress the F setting button to return to the home screen F After Configuring network setting is displayed restart the panel Note Use the Web based EpsonNet Config to make manual settings for IPv6 Set the password for protecting network security using Web based EpsonNet Config U Using EpsonNet Config on page 14 Using EpsonNet Config Web based EpsonNet Config is software that is stored on the Network ...

Page 15: ... configuration utility for administrators that allows you to configure the network interface for various protocols such as TCP IP MS Network AppleTalk IPP and SNMP EpsonNet Config for Macintosh is a Macintosh based configuration utility for administrators that allows you to configure the network interface for TCP IP AppleTalk and IPP Download this software from http www epson com Operating Environ...

Page 16: ...anel You can find out the MAC address on the Network Interface Panel Note for Windows Loginasauserwithadministrator sauthority andtheninstall Ifyouareaskedtoenteranadministrator spassword enter the password and then continue with the operations Note for Mac OS X Do not use the Fast User Switching function while using your scanner You must log on to a Computer Administrator account Note You need to...

Page 17: ...dressunderSearchforaddresses orselectEnter address and type in the address Then click OK F IntheEPSONScanSettingswindow clickTesttochecktheconnection Ifeverythingworksproperly youseea successful connection message appears G Click OK to save the settings Configuring Epson Scan 2 A Obtain the IP address or host name of the Network Interface Panel from your network administrator B Start Epson Scan 2 ...

Page 18: ...D In the Scanner Settings screen click Add If the Add button is disabled click Enable Editing Windows or button Mac OS X and then click Add button E In the Add Network Scanner screen select your scanner from the Model drop down list F ChoosetheNetworkInterfacePanel sIPaddressunderSearchforNetwork orselectEnteraddressandtypein the address Then click Add G In the Scanner Settings screen select your ...

Page 19: ...o U See the user s guide of the scanner for more details D Click Scan on the Document Capture Pro Main window E Make necessary settings on Main Settings and then click Scan For Mac OS X A Turn on your scanner and the client computer B Place your original s on the document glass or in the Automatic Document Feeder ADF C Start Epson Scan U See the user s guide of the scanner for more details D Selec...

Page 20: ...a to and then press the Z button If a group is set for the scanner you need to set the same group on the computer if you want to display it on the panel E Enter the password If the password entry screen is not displayed go to the next step U See the Document Capture Pro help for more details F Select a job and then press the Z button G Check the settings and then press the start button on the scan...

Page 21: ...ween 2 darker and 2 brighter Contrast Adjusts the contrast of the LCD panel Use the u and d buttons to set the contrast between 2 lowest contrast and 2 highest contrast Restore settings SelectYesandthenpresstheZbuttontoreturnthesettingsintheDisplaymenutotheirdefault values Energy saving menu Item Description Power Off Timer Specifies the length of time before the scanner enters power off mode if n...

Page 22: ... Z button to return the settings in the Network menu to their default values Timeout menu Item Description Back to Home screen Specifies the timeout setting when the control panel is in other screen than home screen This setting is not applied when the control panel displays the some of the error message screens Restore Settings Select Yes and then press the Z button to return the settings in the ...

Page 23: ... The PC server on the network has not been recognized Blink Off Scanning Searching for or connecting to a network Blink Blink The firmware is being updated If the following messages are displayed turn off the scanner and then turn it back on again Also check the network connection and settings If this does not correct the problem see the scanner User s Guide or consult your dealer Network error Ne...

Page 24: ...g the Network Interface Panel to a Network on page 8 Turn off the scanner and make sure the Network Interface Panel is properly installed in your scanner and connected to the network U Connecting the Network Interface Panel to a Network on page 8 Check that the network cable is working correctly by connecting it to other products U Connecting the Network Interface Panel to a Network on page 8 Chec...

Page 25: ...the user s guide of the scanner for more details Check that there are several network interface panel scanner on the network On your computer recognise the scanner using MAC address of this product U Environment menu on page 21 Web based EpsonNet Config cannot be started or be made settings Check that IPv4 address is set to this product To start Web based EpsonNet Config set IP address first You c...

Page 26: ... Lion 10 9 x OS X Mavericks 10 10 x OS X Yosemite and 10 11 x OS X El Capitan Fast User Switching on Mac OS X is not supported Note Scannerdriver does not support the UNIX File System UFS for Mac OS X You must install scannerdriver on a disk or in a partition that does not use UFS Network Interface Panel Specifications Note Specifications are subject to change without notice General Product code B...

Page 27: ... 5 to 35 C 41 to 95 F Storage 25 to 60 C 13 to 140 F Humidity Operating 10 to 85 without condensation Storage 10 to 90 without condensation Operating conditions Ordinary office or home conditions Avoid operating the product in direct sunlight near a strong light source or in extremely dusty conditions Interfaces Scanner Interface USB via dedicated scanner interface connector Network Interface 10BA...

Page 28: ...European model for Russian users Australian model EMC AS NZS CISPR22 Class B Network Interface Panel User s Guide Technical Specifications 28 ...

Reviews: