background image

and temporarily stop system activity. After

you 

press 

Suspend/Resume, 

it takes a moment

for the computer to enter Suspend mode. Then
the Suspend indicator light comes on and the
screen becomes dark.

NOTE

In environments where you con perform background

tasks, the system may appear to be inactive when it

is performing one of these tasks. Check this

possibility before pressing 

Suspend/Resume.

With a fully charged battery, the computer
can remain in Suspend mode for several hours
without losing data. To resume activity, press
the 

Suspend/Resume 

button again.

Low Battery Protection

The ActionNote’s power management
features protect your data when the battery
runs low. When you have only a few minutes

of power left, the power indicator light flashes

and the computer beeps. At this point, you
should immediately save your data and

either connect the AC power adapter or turn
off the computer and replace the battery (as

described earlier in this chapter).

2-6 Powering the Computer

Summary of Contents for ActionNote 890

Page 1: ......

Page 2: ...lace a memory module see Chapter 5 of your User s Guide You want to upgrade to Memory module size to buy 12MB 8MB 20MB 16MB 24MB 20MB PC Card Software We have provided SystemSoft CardSoft and Card Wizard drivers and utilities for you to use if you select MS DOS and Windows 3 11 as your operating system If you select Windows 95 as your operating system you can use the PC Card PCMCIA utilities in th...

Page 3: ...ss for the fax modem or lrDA device when Installed Parallel Port 278h 378h 3BCh Disabled Controls the parallel port operation Audio I O 220h 230h 240h 250h Identifies the l O setting the audio card uses Audio RQ 5 7 9 10 Identifies the IRQ setting the audio card uses Pointing Device Block DE Serial 2 Enabled lets you disable the built h touchpad In Disabled case you connect a serial mouse Enabled ...

Page 4: ...rnal modem to your serial port or use a fax modem PC card See your User s Guide for instructions Where to Go for Help All ActionNote systems come with the software listed below installed on the hard disk drive If you have trouble using any of these programs first check to see if the software includes online help or an online user manual Many programs also provide support through CompuServe forums ...

Page 5: ...nt card and online help for more information press the F1 key Technical support Microsoft FastTips a free 24 hour automated service at 800 936 4200 or EPSON Connection at 800 922 8911 U S and Canada Fax back 310 782 4214 I Windows 95 installation only Microsoft Windows95 graphical user interface software installed on the hard disk drive including the Introducing Windows 95 manual and online help f...

Page 6: ... and Canada Fax back 310 782 4214 OAG Official Airline Guide FlightDisk Worldwide edition for DOS Windows 3 1 software installed on the hard disk drive send in the coupon for the latest version for Windows 95 brochure and subscription information included Technical support 800 525 1138 America Online news and information service software installed on the hard disk drive brochure subscription and f...

Page 7: ...talled on the hard disk drive printed manual included Technical support EPSON Connection at 800 922 8911 U S and Canada Fax back 310 782 4214 ARK Workspace alternative interface for Win dows installed on the hard disk drive Technical support EPSON Connection at 800 922 8911 U S and Canada Fax back 310 782 4214 EPSON is a registered trademark of Seiko Epson Corporation ActionNote is a trademark and...

Page 8: ...hen you start your ActionNote Windows Setup checks your system and records information about all the hardware devices it finds You see its progress on the System Detection screen Next you see the Welcome to Windows Setup screen Follow these steps to select your operating system 1 2 3 4 5 6 From the windows 95 setup screen choose the Next button Select your Regional Setting and choose Next Select t...

Page 9: ...2 ...

Page 10: ...ant to create for the audio application software double click the Audio Application icon 3 The process is automated Follow the instructions on the screen and insert blank pre formatted disks when prompted 4 When disk creation is complete the utility gives you a summary of its activity N O T E To receive Windows 3 1 MS DOS disks and documentation send in your Windows 95 manual with the fulfillment ...

Page 11: ...of Windows 95 system disks run create system Disks from the System Tools folder You need 30 pre formatted disks to make a complete set Maintaining System Backups As well as creating for your applications you should maintain up to date copies of the other files on your hard hand disk Your operating system includes a backup utility Use it to make backup copies of your system and data files In additi...

Page 12: ...S dollars U S banks Type of kit Windows 3 1 MS DOS User Pack diskettes and User s Guide Add shipping and handling check one only U S Canada Express U S Express Canada State Sales Tax Residents of CA MA NY TX must add state sales tax TOTAL FREE VISA MasterCard American Express Discover Card 9 95 15 50 Card No 20 00 Exp Date 30 00 Signature Date EPSDUAL ...

Page 13: ......

Page 14: ...prior written permission of Epson America Inc No potent liability is assumed with respect to the use of information contained herein Nor is any liability assumed for damages resulting from the use of the information contained herein Further this publication and features described herein are subject to change without notice TRADEMARKS EPSON is a registered trademark of Seiko Epson Corporation Actio...

Page 15: ...lugged into the wall outlet does not exceed 15 Amps Except as specifically explained in this Users Guide do not attempt to service the computer yourself Unplug the computer and refer servicing to qualified service personnel if the power cord or plug is damaged if liquid has entered the computer if the computer has been dropped or the cabinet damaged or if the computer does not operate normally or ...

Page 16: ...ure à la capacité du cordon Sassurer aussi que cette intensité ne dépasse jamais la somme de 15 ampères pour l ensemble des appareils branchés sur la prise secteur Souf dons les cas spécifiques expliqués dans ce manuel de l usager ne pas essayer d entretenir ou de réparer l ordinateur soi même Débrancher l ordinateur et contacter un technicien qualifié dans les circonstances suivantes Si le cordon...

Page 17: ...chreitet Stellen Sie ferner sicher daß der Gesamtwert aller on die Wandsteckdose angeschiossenen Geräte 15 Ampere nicht überschreitet Führen Sie keine Wartungsarbeiten am Computer durch die über das im Benutzerhandbuch beschrie bene Ausmaß hinausgehen Ziehen Sie den Computer heraus und rufen Sie qualifiziertes Wartungspersonal wenn eine der folgenden Bedingungen auftritt DOS Netzkabel oder der Net...

Page 18: ... circuit different from that to which the receiver is connected I Consult on experienced radio TV technician for help WARNING The connection of o non shielded equipment interface cable to this equipment will invalidate the FCC Certification of this device and may cause interference levels that exceed the limits established by the FCC for this equipment It is the responsibility of the user to obtai...

Page 19: ...ard Using the Fn Key Using the Embedded Numeric Keypad Creating Software Diskettes 2 Powering the Computer Using the AC Power Adapter Using the Battery Recharging the Battery Replacing the Battery Using Power Management Low Battery Protection Using Energy Wisely 3 Getting to Work Using Passwords Entering a Password Using Diskettes Resetting the Computer Working Comfortably 1 2 1 2 1 3 1 4 1 4 1 6 ...

Page 20: ... 5 11 Removing a Memory Module 5 12 Installing a Memory Module 5 13 Installing a Fax Modem or Infrared Device 5 14 Connecting a Phone Line 5 17 6 Customizing Your Computer Customizing Your ActionPoint Customizing Computer Settings Starting Setup Changing the Settings Customizing Power Management Using Instant On and Saving to Disk Using Password Security Setting or Changing a Password Setting a Pa...

Page 21: ...ly 7 13 An External Monitor Is Blank 7 14 An External Pointing Device Doesn t Work 7 14 Your Printer Isn t Working 7 16 The Memory Count Is Incorrect 7 16 Your Software Isn t Working Correctly 7 16 A Specifications CPU and Memory Controllers Interfaces Keyboard ActionPoint Touchpad Volume Control Mass Storage LCD Screen Setup Program Software Power Sources AC Power Adapter AC Power Adapter Dimensi...

Page 22: ...n the back cover of this manual illustrations of your system on the inside front cover and a place to write important information about your ActionNote on the inside back cover If you have questions this manual or the online version should provide you with answers Read the troubleshooting information in Chapter 7 or call the EPSON ConnectionalSM at 800 922 8911 for help Getting Started 1 1 ...

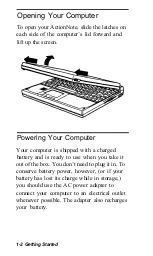
Page 23: ... is shipped with a charged battery and is ready to use when you take it out of the box You don t need to plug it in To conserve battery power however or if your battery has lost its charge while in storage you should use the AC power adapter to connect your computer to an electrical outlet whenever possible The adapter also recharges your battery 1 2 Getting Started ...

Page 24: ... side the United States you have the international AC power adapter See Using the international AC Power Adapter in Appendix B for more information Follow these steps to connect the AC power adapter 1 Plug the connector into the DC in port on the back of the computer 2 Flip the adapter s two prongs out of their compartment then plug the adapter into an electrical outlet Getting Started 1 3 ...

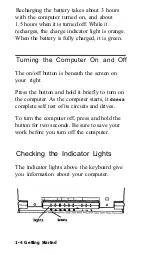
Page 25: ...he on off button is beneath the screen on your right Press the button and hold it briefly to turn on the computer As the computer starts it does a complete self test of its circuits and drives To turn the computer off press and hold the button for two seconds Be sure to save your work before you turn off the computer Checking the Indicator Lights The indicator lights above the keyboard give you in...

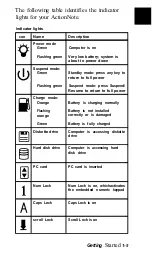
Page 26: ...green Suspend mode press Suspend Resume to return to full power Charge mode Orange Battery is charging normally Flashing Battery is not installed orange correctly or is damaged Green Battery is fully charged Diskette drive Computer is accessing diskette drive Hard disk drive Computer is accessing hard disk drive PC card PC card is inserted Num Lock Num Lock is on whichactivates the embedded numeri...

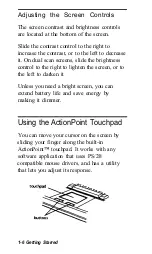
Page 27: ... control to the right to lighten the screen or to the left to darken it Unless you need a bright screen you can extend battery life and save energy by making it dimmer Using the ActionPoint Touchpad You can move your cursor on the screen by sliding your finger along the built in ActionPoint touchpad It works with any software application that uses PS 2 compatible mouse drivers and has a utility th...

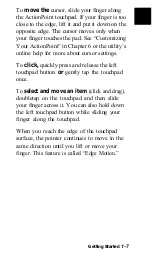
Page 28: ...t cursor settings To click quickly press and release the left touchpad button or gently tap the touchpad once To select and move an item click and drag doubletap on the touchpad and then slide your finger across it You can also hold down the left touchpad button while sliding your finger along the touchpad When you reach the edge of the touchpad surface the pointer continues to move in the same di...

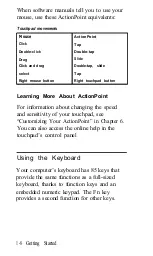
Page 29: ...ing More About ActionPoint For information about changing the speed and sensitivity of your touchpad see Customizing Your ActionPoint in Chapter 6 You can also access the online help in the touchpad s control panel Using the Keyboard Your computer s keyboard has 85 keys that provide the same functions as a full sized keyboard thanks to function keys and an embedded numeric keypad The Fn key provid...

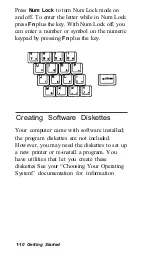
Page 30: ...ress the second key A key s special function is labeled in blue Fn key functions Key Label Function Fn F8 Set Up Displays Power Management screen Fn F9 Invert Toggles between normal and reverse video passive matrix only Fn F10 Display Toggles between displaying the image on the LCD external monitor or both Using the Embedded Numeric Keypad In Num Lock mode the keys in the embedded numeric keypad g...

Page 31: ... keypad by pressing Fn plus the key Creating Software Diskettes Your computer came with software installed the program diskettes are not included However you may need the diskettes to set up a new printer or re install a program You have utilities that let you create these diskettes See your Choosing Your Operating System documentation for information 1 10 Getting Started ...

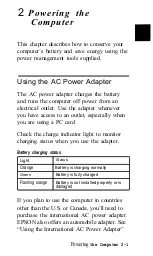
Page 32: ...ially when you are using a PC card Check the charge indicator light to monitor charging status when you use the adapter Battery charging status Light Status Orange Battery is charging normally Green Battery is fully charged Flashing orange Battery is not installed properly or is damaged If you plan to use the computer in countries other than the U S or Canada you ll need to purchase the internatio...

Page 33: ...rovide between 4 and 6 hours of power when you use your computer s power management features How long the battery lasts depends on how you use the computer It consumes more power when you do the following Use a bright screen display Access the drives often Use a PC card Your operating system may provide ways to view your battery s status and additional power management features Check your operatin...

Page 34: ...fe may be reaching its end Try letting it discharge completely then recharge it You can also use the optional external battery charger to recondition the battery Replacing the Battery If you have additional batteries keep them fully charged so you can replace your battery when it runs low This is especially useful when you re traveling CAUTION Use only the NiMH battery pock designedfor the ActionN...

Page 35: ...nformation on NiMH batteries Follow these steps to replace the battery 1 Save the files you re revising 2 Press the on off button 3 Close the screen and turn the computer over CAUTION To avoid a short do not touch the battery contacts with metal objects 4 Press the battery release lever then lift the battery up and out of the case 2 4 Powering the Computer ...

Page 36: ... the following table Power saving modes Mode Description System idle CPU clock speed reduced System CPU clock speed further reduced screen standby backlight turned off hard disk drive and other components in low power state I Suspend CPU clock stopped screen and hard disk mode drive turned off ad other components The screen and hard disk drive also have their own independent timeout periods and th...

Page 37: ...ume With a fully charged battery the computer can remain in Suspend mode for several hours without losing data To resume activity press the Suspend Resume button again Low Battery Protection The ActionNote s power management features protect your data when the battery runs low When you have only a few minutes of power left the power indicator light flashes and the computer beeps At this point you ...

Page 38: ...itely To resume activity where you left off after saving to disk replace your battery and press the on off button Your ActionNote also provides a similar Instant On feature When you set up your computer to use Instant On you can press the Suspend Resume button to save your data and turn off the power at the same time To start up again instantly without reloading your operating system or software a...

Page 39: ...ar compliant If not turn them off when you re not using them Use the print preview option in your software before you print something You ll be able to catch formatting errors before you commit them to paper If you have an electronic mail system available to you send E mail rather than memos Not only is this faster but you ll save paper and storage space too Use recycled paper and recycle your use...

Page 40: ... controls access to the Setup utility and a System password that controls access to your computer For details on setting both types of passwords see Setting a Password in Chapter 6 N O T E The passwords described here are not related to the password you may set through you operating system Entering a Password Whether the computer is configured with a System or Setup password you enter the password...

Page 41: ...er password Try typing the password again The computer allows you three tries to enter it correctly If you don t enter a System password correctly the system locks up Turn off the computer wait 30 seconds and try again If you don t enter a Setup password correctly the computer loads the operating system without letting you access Setup See Using Password Security in Chapter 6 for more information ...

Page 42: ...button and pull out the diskette CAUTION Never remove a diskette or reset or turn off the computer while the diskette drive is being accessed you could lose data Also be sure to remove the diskette before you turn off the computer Resetting the Computer Occasionally when the computer doesn t respond you may need to reset it Resetting clears the memory and is easier on the hardware than turning the...
Page 43: ...arms Follow these suggestions to relieve strain Your ActionNote is ergonomically designed with a palm rest and embedded ActionPoint touchpad Try to take advantage of these while you re working If you do a lot of typing avoid wrist strain by resting your forearms on an arm rest or other surface while you type Keep your fingers relaxed and don t press too hard on the keys Remove your hands from the ...

Page 44: ...do not subject them to extreme heat or cold To prevent damage to the LCD do not place external devices on top of the computer even when it is closed When you are not using the serial parallel video ports or the PC card slots keep their covers closed to prevent damage to the pins in the ports Be sure you turn off the computer before you connect devices other than PC cards that support hot swapping ...

Page 45: ...n it is copying data to or from the hard disk drive the indicator light is on Never remove the hard disk drive when the computer is on After turning the power off wait 20 seconds before moving the computer This allows the disks in the drive to stop spinning and the read write heads to lock in place Although the hard disk drive is very reliable be sure to back up your files regularly 4 2 Caring for...

Page 46: ... keep your computer well within that range to prevent damage If you will not be using your ActionNote for a while store it in a dry place protected from dust and moisture The ActionNote can tolerate storage temperatures from 4 to 140 Fahrenheit or 20 to 60 Centigrade Also if temperatures change more quickly than 5 Centigrade per hour it may damage your hard disk drive or screen CAUTION When travel...

Page 47: ...ment Use a soft lint free cloth to clean the ActionPoint If you need something stronger lightly moisten the cloth with glass cleaner Do not spray the cleaner directly onto the ActionPoint and make sure its surface is completely dry before you use it Cleaning the Diskette Drive It s a good idea to clean the diskette drive occasionally The drive heads are exposed to magnetic contaminants in the air ...

Page 48: ...ading the Hard Disk Drive If you need to remove the existing drive just follow the instructions below You won t need any tools Your ActionNote supports EPSON qualified IDE hard disk drives with a 2 5 inch form factor and a maximum height of 19 mm Contact the EPSON Connection or your dealer to find out about the latest upgrade options CAUTlON Before you replace your hard disk drive be sue to make b...

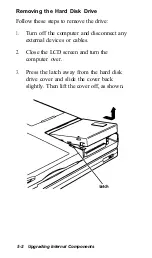
Page 49: ...Turn off the computer and disconnect any external devices or cables 2 Close the LCD screen and turn the computer over 3 Press the latch away from the hard disk drive cover and slide the cover back slightly Then lift the cover off as shown 5 2 Upgrading Internal Components ...

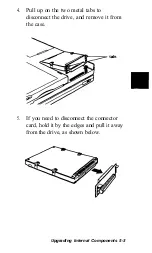
Page 50: ...e two metal tabs to disconnect the drive and remove it from the case 5 If you need to disconnect the connector card hold it by the edges and pull it away from the drive as shown below Upgrading Internal Components 5 3 ...

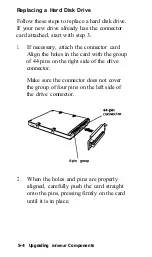
Page 51: ...card Align the holes in the card with the group of 44 pins on the right side of the drive connector Make sure the connector does not cover the group of four pins on the left side of the drive connector 4 pin group 2 When the holes and pins are properly aligned carefully push the card straight onto the pins pressing firmly on the card until it is in place 5 4 Upgrading Internal Components ...

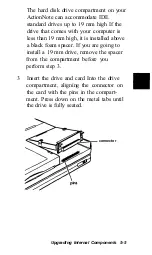
Page 52: ... is installed above a black foam spacer If you are going to install a 19 mm drive remove the spacer from the compartment before you perform step 3 3 Insert the drive and card Into the drive compartment aligning the connector on the card with the pins in the compart ment Press down on the metal tabs until the drive is fully seated connector Upgrading Internal Components 5 5 ...

Page 53: ...until it snaps shut notch 5 6 Run Setup as described under Customizing Computer Settings in Chapter 6 to make sure the computer recognizes your new drive After installing the operating system run the PHDISK utility to create a 25MB partition on the drive See Using Instant On and Saving to Disk in Chapter 6 for more information 5 6 Upgrading Internal Components ...
Page 54: ...n t need to disconnect the keyboard cables Removing the Keyboard Follow these steps to remove the keyboard 1 Turn off the computer and disconnect the AC power adapter 2 Disconnect any attached external devices and cables 3 Open the screen to 180 or as wide as you can Upgrading Internal Components 5 7 ...

Page 55: ...Use a small screwdriver to pry each cap loose and then slide it off as shown 5 Use a small screwdriver to gently pry up the plastic strip above the keyboard You can pry in the center as shown here or in front of the left and right hinges 5 8 Upgrading Internal Components ...

Page 56: ...it from the case 7 Being careful not to pull on the keyboard cables gently lift the keyboard holding it by the top edge Remove it from the case and place it on a flat surface in front of the computer Upgrading Internal Components 5 9 ...

Page 57: ...ake sure the flat cables are not caught under the edge of the keyboard The top edge of the keyboard should not overlap the bronze colored ledge of the case If you have difficulty aligning the keyboard try the following approach hold the top of the keyboard in the center with the keyboard at a 45 angle and line up the clips on the bottom of the keyboard with the case Gently lift up the keyboard unt...

Page 58: ...strip If the keys still stick repeat the keyboard replacement procedure Upgrading Your Memory Your ActionNote comes with 8MB of memory You can increase your computer s memory to up to 24MB by installing a 4 8 or 16MB snap in memory module If you are using Instant On or Save to Disk you need to rerun the PHDISK utility after you have changed the amount of memory See Chapter 6 for more information C...

Page 59: ... doesn t have a module installed see the next section Installing a Memory Module to Install one 1 Remove the keyboard as described In the previous section 2 Press each of the retaining clips toward the side of the memory module socket and lift the module until it is released 3 Pull the module out of the socket You are now ready to install the new memory module 5 12 Upgrading Internal Components ...

Page 60: ...e memory module Keep it safe inside its anti static packaging until you are ready to installit Remain as stationary as possible while you install it 1 Holding the memory module with the notch on the upper right corner align it with the connector at the edge of the socket 2 Insert the memory module Into the socket at an angle pressing along the edge until it clicks into place Upgrading Internal Com...

Page 61: ...ry When you turn on the computer it might warn you of a memory size mismatch Installing a Fax Modem or Infrared Device If your computer did not come with the internal fax modem you can install either a fax modem or an infrared device yourself If you have a fax modem already installed you can replace it with an infrared device Follow these steps to install the device 1 Remove the keyboard as descri...

Page 62: ...g the port opening on the left side of the computer next to the PC card slots Insert the tip of a screwdriver through the slot in the plastic cover and carefully pry the cover off You may need to use gently Increasing pressure to pull the cover away from the case and push it out Upgrading Internal Components 5 15 ...

Page 63: ...connector on the system boar4 as shown below Make sure the pins in the connector are directly over the holes in the connector on the system board Then gently push the card straight into the connector If you are installing an infrared device you must cover the port opening with the clear plastic cover provided with the device 5 16 Upgrading Internal Components ...

Page 64: ...ion about using your fax modem see the following section For more information on using an infrared device see Appendix B in the online manual Connecting a Phone Line You can connect your telephone line directly to the fax modem in your ActionNote with a standard RJ 11 telephone cable Before you connect the phone line you need to install the software that came with your fax modem See your software ...

Page 65: ...es that can damage the fax modem If in doubt check before connecting Insert the cable into the phone jack Connect the other end of the cable to the modular jack outlet for your phone line NOTE You fax modem also has an internal modem command set that you may need in certain situations to control data transmission See the manual that came with you modem for more information 5 18 Upgrading Internal ...

Page 66: ...el utility Then use the table below to change your settings ActionPoint configuration panels Panel Features Pointer Color ad settings size Description Lets you choose from nine pointers in three color schemes and three sizes Pointer growth When enabled medium or large pointers grow to the selected size while moving and shrink back to a small size while at rest Pointer tails When enabled ghost imag...

Page 67: ...porarily into one of four special purpose operating modes slow motion freeze motion horizontal motion and vertical motion Orientation settings Set rotation Set buttons Adjusts the direction of the cursor Lets you swap left and right buttons Shortcuts settings Autojumps Sets the pointer to jump to a predefined location whenever a dialog box opens Hotspots Sets the pointer to jump to a predefined lo...

Page 68: ...he button for that setting then adjust the controls When you ve made changes click OK to exit Your settings take effect immediately Customizing Computer Settings Setup configures your ActionNote and stores the settings in the computer s CMOS ROM read only memory Because this area of memory is backed up by a battery it is not erased when you turn off or reset the computer The current configuration ...

Page 69: ... the computer and try again Changing the Settings When the computer starts Setup you see the Page 1 screen which displays your computer s memory configuration in addition to other settings you can change Base memory plus extended memory is total system memory Use the right left down and up arrow keys to move the cursor from option to option Once you have highlighted an option you want to change pr...

Page 70: ...ally Sets the type of drive detected installed of allows you to define the type user None CPU Speed Fast Sets the processor speed slow Quick Boot Disabled Enabled Boot Drive C A A C Lets you skip non essential diagnostic tests at startup Sets the drive from which the operating system will be loaded at startup Password Disabled Enabled S e c u r i t y S e t u p system See Setting or Changing a Pass...

Page 71: ...ress Disabled Fax Modem 3F8h COM1 2F8h COM2 Assigns the port address for the fax modem when Disabled it is installed Parallel I 378h LPT1 Controls the parallel port Port Disabled operation Audio I O 220 Identifies the I O address 230 the audio card uses 240 Audio IRQ 5 Identifies the IRQ setting 7 9 the audio card uses 10 Pointing Device Enabled Disabled Lets you die the built in touchpad in case ...

Page 72: ... 1 to 15 minutes 2 minutes The table below lists the power management options Additional information about power management follows the table Power management options Setup page 2 Lets you disable the Idle mode Lets you disable or set the period of inactivity before the Standby mode takes effect Lets you disable or set the period of inactivity following the Standby period before the Suspendmode ta...

Page 73: ...Exits Setup without saving your settings Customizing Power Management In addition to the timeout options listed above the Power Management screen also lets you press one of the following function keys to configure your timeout options Function key Description F2 Selects Maximum Performance mode maximizes system performance in al power management states but allows some features to power down F3 Sel...

Page 74: ...stant On and Saving to Disk The Low Battery option in Setup allows you to select Suspend or Save to HDD which perform the following functions Mode Description Suspend The computer continues to use a very small amount of power If you select Suspend ad leave your system suspended the battery eventually runs down and your data will be lost Save to HDD Contents of your system and video memory are save...

Page 75: ... you need to partition a drive for example if you install a new one copy the utility into the PM directory then run the PHDISK utility program by typing the following commands at the DOS prompt CD PM PHDISK CREATE The PHDISK program formats the partition on your hard disk drive After you run this program you can use the Save to Disk and Instant On functions available on the Power Management screen...

Page 76: ...for assistance Setting or Changing a Password You can set two types of passwords for your computer a system password and a Setup password If you set a system password the computer prompts you to enter it each time you turn on or reset your computer If you set a Setup password the computer prompts you to enter it each time you press F8 to run Setup Follow the instructions in the next sections to se...

Page 77: ...nter an incorrect password you must start the process over again Keep trying until you have entered the password correctly twice in a row Press any key to continue The Password option setting is enabled You can now highlight the Security option and select SETUP which applies the password to the Setup program You can also select SYSTEM If you select SYSTEM you are prompted to enter the password whe...

Page 78: ... key The Password option setting is changed to Disabled If you are changing your password type the new password You see only squares displayed on the screen Press Enter Type the password again and press Enter Press any key to continue Using Video Drivers and Utilities Your system includes high resolution video display drivers for Windows installed on your hard disk drive If you are using Windows 3...

Page 79: ...he screen pans to show the entire display NOTE Your Action We is configured to display in standard VGA resolution on your LCD or an external monitor You can toggle between displaying on the LCD on the external monitor or on both screens simultaneously bypressing Fn F10 You can also set the default video mode by using Setup see Charging the Settings for more information To check on the availability...

Page 80: ...ustomer support and service through a network of Authorized EPSON Customer Care Centers EPSON also provides the following services when you dial 800 922 8911 Technical information on the installation configuration and operation of EPSON products Assistance in locating your nearest Authorized EPSON Reseller or Customer Care Center Customer relations EPSON technical information library fax service P...

Page 81: ...support and service If you need help with any application program you are using see the documentation for that program for technical support information Electronic Support Services If you have a modem the fastest way to access helpful tips specifications drivers application notes and bulletins for EPSON products is through the online services below NOTE To access electronic support services you mu...

Page 82: ...maintains the EPSON America Forum on CompuServe If you have questions about your EPSON product this is a good place to get them answered Your computer includes the CompuServe WinCIM Information Manager installed on your hard disk drive and a free trial subscription to CompuServe s services and forums The brochure that comes with your ActionNote describes all the CompuServe services and how to acce...

Page 83: ...em BIOS version displayed during startup System configuration information from Setup Operating system version number Hardware configuration connections to external devices memory size and so on Names and version numbers of software you re using Any installed options Any error message displayed Once you gather this information write it down at the back of this manual to keep it handy whenever you n...

Page 84: ...r is serious the error message remains on the screen and the computer locks up If this happens contact your Authorized EPSON Servicer or the EPSON Connection Troubleshooting Your ActionNote If you have trouble with your ActionNote look through the headings in this chapter to see if the problem is covered Then follow the suggestions to see if you can solve the problem If your computer is still not ...

Page 85: ... are not turned down If an external monitor is connected make sure it s turned on If you replaced your hard disk drive make sure you installed it correctly Turn off the computer If you are using the battery remove it and reinstall it If you are using an AC power adapter disconnect it and then reconnect it Then turn the power on again You have trouble running the computer from a battery The battery...

Page 86: ...ave not used the battery in a long time three months or more you may need to recharge it When you find that over time the battery is losing its charge faster it may be reaching the end of its life You may need to replace it with a new battery NOTE When you need to discardyour battery contact you local government agency for information about recycling NMH batteries The computer doesn t work properl...

Page 87: ...elected in Setup and the setting in the video display control panel utility are correct for your system See Using Video Drivers and Utilities in Chapter 6 The computer may be in Suspend mode press any key or the Suspend Resume button to resume Press the on off button to resume if you are using Instant On See Chapter 2 for more information You may have set a timeout period for the LCD screen in Set...

Page 88: ...he computer is probably locked up You may be able to resume activity by cancelling the current operation Press Ctrl Alt Del Then follow any instructions on the screen Turn off the computer wait thirty seconds and turn it back on Your Password Isn t Working If you type the password and then see the password prompt again type the password again and press Enter If the computer locks up turn it off wa...

Page 89: ...ged use a backup copy to repeat the operation If you need the files on the original diskette try copying one file at a time Try cleaning the diskette drive heads See Cleaning the Diskette Drive in Chapter 4 Try formatting a new blank diskette to determine whether the problem is with the diskette or the drive See your operating system documentation or online help for instructions The Diskette Drive...

Page 90: ...e Hard Disk option is set correctly in Setup If your hard disk drive is not detected you will have to configure the appropriate hard disk drive parameters yourself If you replaced or upgraded the hard disk drive make sure it is installed correctly and that the operating system is installed See Upgrading the Hard Disk Drive in Chapter 5 A PC Card Isn t Working The PC card slots on your computer sup...

Page 91: ...er is set up to work with most PC cards but some cards require that you install other software drivers See the documentation that came with your card The ActionNote comes with PCMCIA drivers and utilities that you can use with your card Your operating system may also include drivers For details see Using PC Cards in Appendix B You may need to restart your computer and select the appropriate option...

Page 92: ...ssistance The ActionPoint Isn t Working Correctly Make sure the touchpad has not been disabled in Setup See Changing the Settings in Chapter 6 for instructions Make sure the touchpad drivers are loaded and the ActionPoint is configured the way you want See Customizing Your ActionPoint in Chapter 6 for more information The touchpad is highly sensitive to moisture Clean the ActionPoint see Cleaning ...

Page 93: ...ave switched your display to LCD mode Press Fn F10 until you see the display on your external monitor If the monitor still does not work turn off both the computer and the monitor Then check the electrical outlet for power Contact your Authorized EPSON Servicer or the EPSON Connection for assistance An External Pointing Device Doesn t Work If you have disabled the pointing device in Setup make sur...

Page 94: ...d the device to the external keyboard mouse port or serial port before you turned on the computer as described in Using an External Keyboard Mouse or Other Pointing Device in Appendix B If the device is connected to the computer s serial port make sure the device and the serial port options in Setup are set to use the same memory address or COM port See Changing the Settings in Chapter 6 for more ...

Page 95: ...lected The Memory Count Is Incorrect Reinsert the memory module following the instructions under Installing a Memory Module in Chapter 5 Your Software Isn t Working Correctly If the application program does not start check that you are following the correct procedure for starting the program and that it is installed correctly If it s available see the software s online to help you diagnose the pro...

Page 96: ... seconds and then turn it back on and restart your application program If none of these solutions solves your software problem contact the software manufacturer for technical support Your Optional Infrared Port Isn t Communicating Make sure you have the infrared utility software running and check the software utility s communications indicator to see if the port is active The IrDA device polls for...

Page 97: ...IrDA port There must be a clear line of sight between the two communicating ports Make sure that the communicating IrDA ports are within three feet of each other and are positioned at a 30 angle Check that the IrDA port s COM assignment is correct The default setting is COM2 7 18 Troubleshooting ...

Page 98: ...MB RAM on the system board expandable up to 24MB using a 4 8 or 16MB memory expansion module 128KB Flash ROM device containing the system and video BIOS and Setup program code The BIOS is shadowed in DRAM for faster access 512KB DRAM supports resolutions up to 640 by 480 in 256 colors on LCD and up to 1024 by 768 in 16 colors or 800 by 600 in 256 colors on external monitor 8KB internal Real time c...

Page 99: ...controller for one internal 3 5 inch diskette drive supports 720KB and 1 44MB formats Hard disk Super I O controller has interface for one internal hard disk drive automatically recognizes and configures drives that support the IDE interface PCMCIA Built in Vadem VG 468 controller for two stacked slots supports two Type I or II cards or one Type III PCMCIA version 2 01 and JElDA 4 1 compatible sup...

Page 100: ...ected and turned on at system start up Serial RS 232C programmable asynchronous 9 pin D sub male connector External keyboard mouse Auto sensing 6 pin mini DIN connector for a PS 2 type external keyboard keypad or pointing device Phone jock Standard RJ 11 connector with optional internal send receive fax modem installed Infrared Supports optional IrDA compliant interface up to 115 2 kbits second to...

Page 101: ... is installed IRQ 5 default 7 9 or 10 I O address of 220 default 230 or 240 Connector for ActionPort Replicator Connector for security cable 85 keys 101 key keyboard compatible embedded numeric keypad Fn key for hot key commands ActionPoint Touchpad Built in pointing device with two buttons compatible with PS 2 mouse driver software can be disabled with Setup Volume Control Knob adjusts sound of i...

Page 102: ...skette drive 720KB or 1 44MB format supports lower power consumption LCD Screen Screen type Resolutions Active area diagonal all backlit and color measurement Monochrome 640 by 480 9 5 inches 64 gray shades Passive color 640 by 480 10 4 inches 256 colas Active color 640 by 480 10 4 inches 256 colors Setup Program Stored in ROM accessible by pressing F8 at system startup includes power management u...

Page 103: ...tional international AC power and automobile adapters Battery Rechargeable 12 Volt NiMH battery current regulation by thermistor AC Power Adapter Specification Lightweight AC International AC power adapter power adapter AC Connection 2 folding 6 ft 1 8 meter connectors cable DC cable 6 ft 1 8 meters 6 ft 1 8 meters Input voltage 100 VAC to 100 VAC to 250 VAC 250 VAC Input frequency 40 63 Hz 40 63 ...

Page 104: ...ON Use on y the adapters and replacement batteries designed for use with the ActionNote 890 series Fax Modem Specifications Characteristic Compatibility speeds Command set Data correction Data compression Dialing type Fax Modem Group 3 CCITT G3 Bell 103 212A V 2 1 V 27ter V 29 CCITT send only V 22 V 22 Bis 14 4K 9600 7200 14 4K 9600 4800 2400 300 2400 1200 300 baud baud Class 1 I Enhanced AT MNP 2...

Page 105: ...e 35 dB at 1 meter maximum CAUTION When traveling by airplane take the computer into thepassenger compartment as carry on luggage to prevent it from being stored in an unpressurized storage compartment Physical Dimensions D i m e n s i o n s U S Depth 8 8 in Width 11 7 in M e t r i c 220 mm 292 mm Height 1 7 in 1 6 in 43 mm 40 mm Weight 6 lb 5 5 lb 2 5 kg 2 5 kg Dimensions for monochrome ActionNot...

Page 106: ...nput output A 4 volume control A 4 Automobile power adapter 2 2 B backing up files 4 2 Battery charging 1 2 2 1 2 3 2 4 checking status 1 4 configuration 2 7 conserving power 1 6 2 2 2 5 external charger 2 3 2 4 indicator light 1 5 2 1 Instant On 5 6 losing power 2 3 low power protection 2 6 NiMH 2 3 operating in Suspend mode 2 6 recharging 1 4 2 3 reconditioning 2 3 recycling 2 5 replacing 2 3 2 ...

Page 107: ...mputer specifications A 1 A 8 Contrast 1 6 Controllers A 2 CPU specifications A 1 Customization computer settings 6 3 6 8 power management 6 8 6 10 security 6 11 6 13 touchpad 6 1 D DC in port 1 3 Dimensions computer A 8 hard disk drive 5 1 Disk Creation Utility 1 10 Diskette drive cleaning 4 4 controller A 2 indicator light 1 5 problems accessing 7 10 specifications A 5 Diskettes inserting 3 2 si...

Page 108: ...1 Ergonomics 3 4 Error messages 7 5 External battery charger see Battery External monitor see Monitor external External pointing device see Pointing device External VGA see VGA F Fax modem command set 5 18 connecting phone 5 17 FDISK utility 5 6 Features 1 1 Files backing up 4 2 Fn key functions 1 8 Function keys F8 6 4 Power Management 6 9 sticking 5 11 G Green light flashing 2 6 Index 3 ...

Page 109: ...red 5 14 5 17 A 3 Instant On feature 2 7 6 9 6 10 Interface specifications A 3 A 4 IrDA 5 14 5 17 A 3 K Keyboard embedded numeric keypad 1 9 external A 3 Fn key functions 1 8 layouts 1 8 removing 5 7 5 9 replacing 5 10 5 11 specifications A 3 A 4 using 1 8 Keypad embedded 1 9 L LCD screen cleaning 4 4 drivers and utilities 6 13 precautions 4 1 resolution 6 13 specifications A 5 timeout 2 5 Low Bat...

Page 110: ...rnal 6 14 7 14 Mouse problems 7 14 Moving the computer 4 3 N NiMH battery 2 3 Num Lock indicator light 1 5 key 1 9 O On off button 1 4 Opening your computer 1 2 P Parallel interface A 3 Parallel port enabling 6 6 Password changing 6 13 deleting 6 13 entering 3 1 incorrect 3 2 losing 6 11 problems 7 9 setting 6 11 6 12 setup 6 11 system 6 11 types 3 1 6 11 using 3 1 3 2 Index 5 ...

Page 111: ...umption with battery 2 2 function keys 6 9 hard disk drive 4 2 Instant On feature 2 7 6 7 6 9 6 10 Low Battery option 6 9 low battery protection 2 6 2 7 managing 2 5 2 6 6 8 6 10 precautions 4 1 recharging 2 3 replacing battery 2 7 resume mode 2 6 saving to disk 6 9 6 10 sources A 6 suspend mode 2 5 turning on and off 1 4 Power modes 2 5 Precautions computer 4 1 diskette drive 4 4 hard disk drive ...

Page 112: ...placing the battery 2 4 ROM A 1 S Save to HDD mode 6 9 Screen controls 1 6 Screen timeout 2 5 Scroll Lock indicator light 1 5 Scrolling 6 14 SCU password 6 12 Self test 1 4 Serial interface A 3 Serial number 7 4 Serial port enabling 6 6 Software diskettes 1 10 problems 7 16 Speaker A 4 Specifications computer A 1 A 8 Storing the computer 4 3 Strain avoiding 3 4 Suspend Resume function 2 5 6 10 in ...

Page 113: ...lecting an item 1 7 specifications A 4 using 1 6 Troubleshooting 7 1 7 17 error messages 7 5 function keys sticking 5 11 Turning computer on and off 1 4 4 1 Typing avoiding strain 3 4 U Upgrading hard disk drive 5 1 V VGA A 3 resolution 6 14 Video controller A 2 drivers and utilities 6 13 RAM A 1 resolution 6 13 6 14 specifications A 5 Volume control A 4 W Wrist rest 3 4 8 Index ...

Reviews: