


2. Set the head adjustment lever all the way forward. This lever may be moved easily
by pushing it outward.
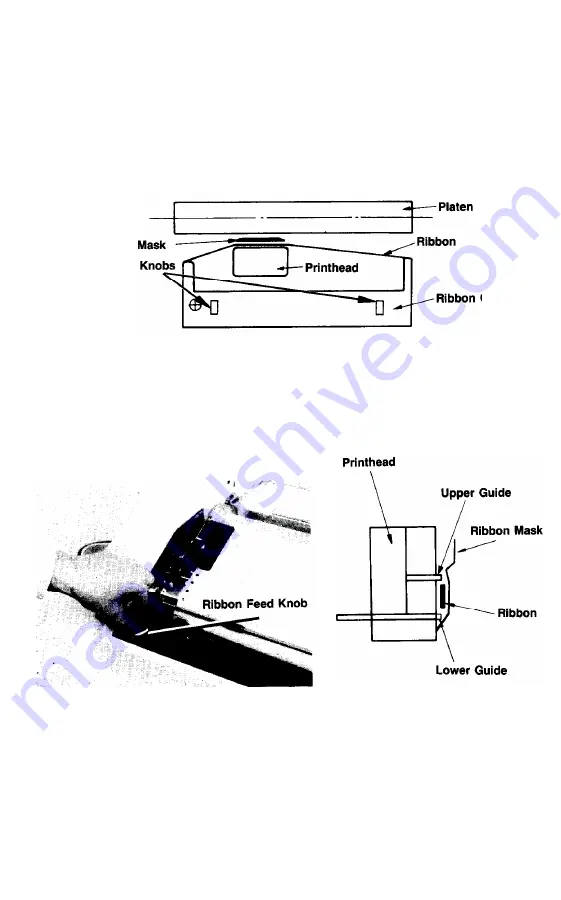
3. To attach the ribbon cassette to the printer, hold the ribbon cassette knobs in both
hands and press the ribbon into position between the ribbon mask and the printhead.
Make sure that the ribbon is not twisted.
Fig. 2
4. Tighten the ribbon by twisting the ribbon feed knob in the direction of the arrow
(Fig. 3). Make sure that the ribbon is properly positioned in the guide as shown below.
Fig. 3
Fig. 4
5. The installation is complete once the head adjustment lever has been returned to
position 2, 3 or 4, any of which is a position for a single sheet of paper. The higher
the number that the lever is set on, the greater the distance between head and platen.
This greater distance is desirable since it reduces ribbon wear.
7
Summary of Contents for 420i
Page 1: ...HIGH S BUSINESS PEED PRINTER USER S GUIDE EPSON AMERICA INC SERVICE DIVISION ...
Page 8: ...Detailed Summary of Character Fonts 2 ...
Page 21: ...SELF TEST PRINT EXAMPLE EPSON MODE ...
Page 22: ...16 ...
Page 37: ...CODE TABLE IBM CHARACTER SET 1 31 ...
Page 38: ...CODE TABLE IBM CHARACTER SET 2 Note Encircled characters are selected by the DIP switches 32 ...
Page 40: ...34 ...
Page 56: ...PROGRAM EXAMPLES 50 ...
Page 57: ......
Page 58: ...52 ...
Page 59: ......
Page 60: ......
Page 62: ...1 5 Elite double strike italic 16 Bold 1 7 Termination of bold Refer to 16 56 ...
Page 63: ...18 Double strike 1 9 Termination of Double strike Refer to 18 5 7 ...
Page 64: ...20 High quality 21 High quality ON OFF 56 ...
Page 65: ...2 2 Italic 2 3 Termination of Italic Refer to 22 59 ...
Page 66: ...24 IBM character Set 1 25 IBM character Set 2 60 ...
Page 68: ...3 0 Standard graphic 31 Double density graphic 32 High density graphic 62 ...
Page 69: ...33 Selected density dot graphics 63 ...
Page 70: ...34 High speed double density dot graphics 35 Quadruple density dot graphics 64 ...
Page 71: ...3 6 Horizontal tab setting 37 Horizontal tab 38 Right margin 65 ...
Page 73: ...4 3 Channel vertical tab setting 44 Channel selection of vertical tab Refer to 43 67 ...
Page 74: ...45 1 8 inch line feed 46 7 60 inch line feed 47 1 6 inch line feed 88 ...
Page 75: ......
Page 76: ...50 n 120 line spacing 70 ...
Page 77: ...51 Underline 5 2 Buffer clear 5 3 Back space 71 ...
Page 78: ...5 4 8th bit 0 Epson only 55 8th bit 1 Epson only 72 ...
Page 79: ...56 8th bit valid Epson only 57 skip over perforation 73 ...
Page 80: ......
Page 82: ...62 Buzzer 63 Reset 76 ...
Page 85: ...EPSON EPSON AMERICA INC ...


