


SWITCHES AND LAMPS
1. POWER Switch
The power switch is located at the rear,
right-hand side of the printer.
2. ON-LINE Switch
Pressing this switch selects either ON-LINE (green indicator on) or OFF-LINE (green
indicator off) state. If in the OFF-LINE state, the printer outputs a busy signal. The
print-head returns to the home position when entering the ON-LINE state from the
OFF-LINE state.
3. LF Switch (LINE FEED)
Each time this switch is pressed, a 1/6 inch line feed is performed. If held down,
continuous line feeds are performed. This command is valid only in the OFF-LINE
state.
Note: Refrain from performing continuous line feed for one minute or more. It may
affect the longevity of the line feed motor.
4. FF Switch (FORM FEED)
If the FF switch is pressed in the OFF-LINE state, a one page form feed is performed.
The page length is selected by the FORM dial switch or by code designation.
5. TOF SET Switch (TOP OF FORM)
If the TOF SET switch is pressed in the OFF-LINE state, the existing paper position
becomes the TOP OF FORM. The page length is designated by the FORM dial switch.
The buzzer sounds for 0.1 second after this switch is pressed.
6. FORM Dial Switch
This switch selects the length of the page. If the switch is set to “0”, the page length
designated by an external device code, becomes valid. The page length can be
altered by pressing the TOF SET switch in the OFF-LINE state. A page length of
11 inches is automatically selected when the TOF SET switch is pressed for a dial
setting of “0”.
Dial
Page Length
Dial
Page Length
0
CODE SET 5
14 INCH
1
8 INCH
6
15 INCH
2
8.5 INCH
7
16 INCH
3
11 INCH
8
17 INCH
4
12 INCH
9
22 INCH
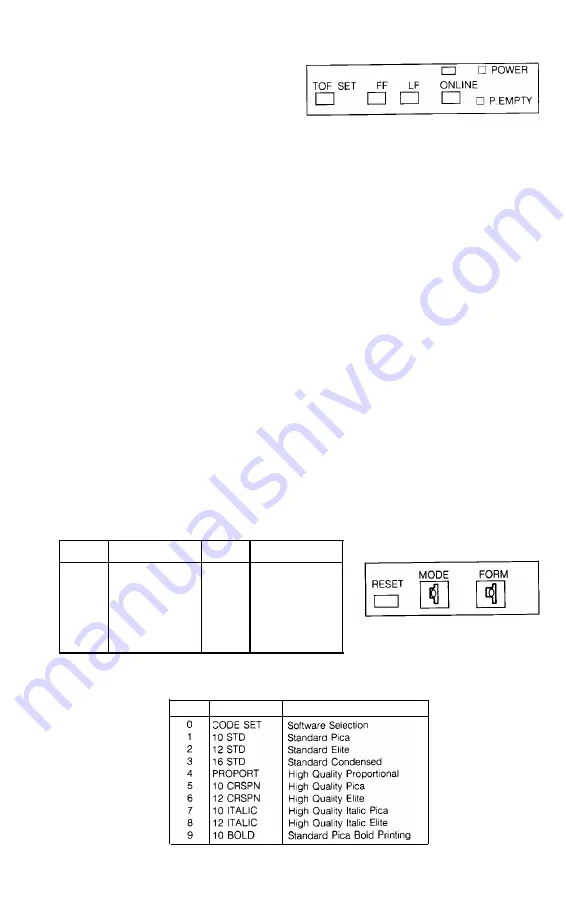
7. MODE Dial Switch
Each character font may be selected by this switch.
Dial
Code
Selected Character Font
4
Summary of Contents for 420i
Page 1: ...HIGH S BUSINESS PEED PRINTER USER S GUIDE EPSON AMERICA INC SERVICE DIVISION ...
Page 8: ...Detailed Summary of Character Fonts 2 ...
Page 21: ...SELF TEST PRINT EXAMPLE EPSON MODE ...
Page 22: ...16 ...
Page 37: ...CODE TABLE IBM CHARACTER SET 1 31 ...
Page 38: ...CODE TABLE IBM CHARACTER SET 2 Note Encircled characters are selected by the DIP switches 32 ...
Page 40: ...34 ...
Page 56: ...PROGRAM EXAMPLES 50 ...
Page 57: ......
Page 58: ...52 ...
Page 59: ......
Page 60: ......
Page 62: ...1 5 Elite double strike italic 16 Bold 1 7 Termination of bold Refer to 16 56 ...
Page 63: ...18 Double strike 1 9 Termination of Double strike Refer to 18 5 7 ...
Page 64: ...20 High quality 21 High quality ON OFF 56 ...
Page 65: ...2 2 Italic 2 3 Termination of Italic Refer to 22 59 ...
Page 66: ...24 IBM character Set 1 25 IBM character Set 2 60 ...
Page 68: ...3 0 Standard graphic 31 Double density graphic 32 High density graphic 62 ...
Page 69: ...33 Selected density dot graphics 63 ...
Page 70: ...34 High speed double density dot graphics 35 Quadruple density dot graphics 64 ...
Page 71: ...3 6 Horizontal tab setting 37 Horizontal tab 38 Right margin 65 ...
Page 73: ...4 3 Channel vertical tab setting 44 Channel selection of vertical tab Refer to 43 67 ...
Page 74: ...45 1 8 inch line feed 46 7 60 inch line feed 47 1 6 inch line feed 88 ...
Page 75: ......
Page 76: ...50 n 120 line spacing 70 ...
Page 77: ...51 Underline 5 2 Buffer clear 5 3 Back space 71 ...
Page 78: ...5 4 8th bit 0 Epson only 55 8th bit 1 Epson only 72 ...
Page 79: ...56 8th bit valid Epson only 57 skip over perforation 73 ...
Page 80: ......
Page 82: ...62 Buzzer 63 Reset 76 ...
Page 85: ...EPSON EPSON AMERICA INC ...


