background image

Software Installation

 ~ 41 ~

Installation GuideInstallation GuideInstallation GuideInstallation GuideInstallation Guide


Click to enter 

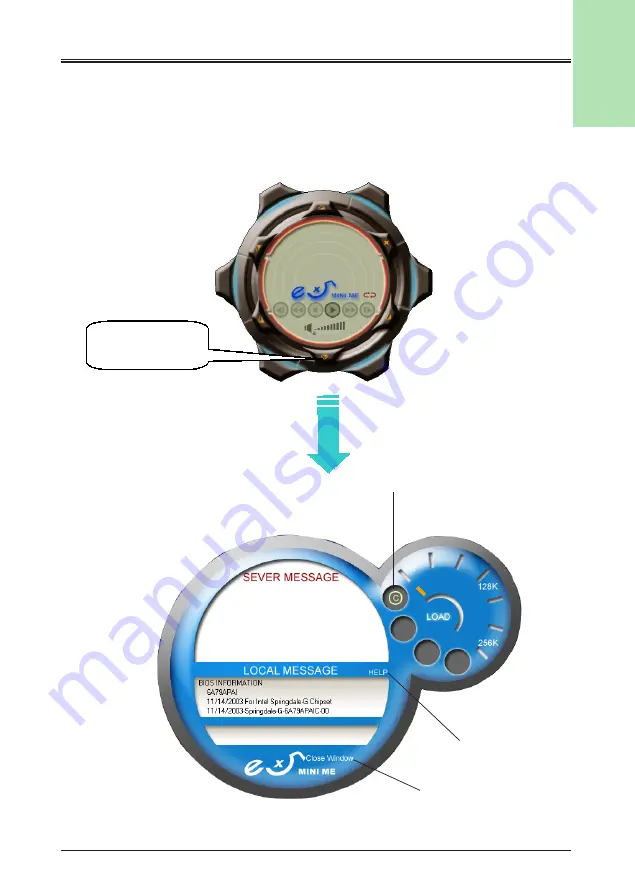
Magic Flash 

4.2.4.4  Magic Flash

This feature allows user to update system BIOS via internet when necessary.

NOTE : 

It is required to connect to internet before utilizing this function.


Connect to internet and update BIOS

Help

To exit

Summary of Contents for eX5 Mini Me Series

Page 1: ...ademarks of their respective holders These specifications are subject to change without notice Manual Revision 1 0 March 29 2004 600E00B300S10 Installation Guide Installation Guide Installation Guide...

Page 2: ...RER LIMITED WARRANTY THE MANUFACTURER EXPRESSLY EXCLUDES ALL OTHER WARRANTIES EXPRESS OR IMPLIED REGARDING ITS PRODUCTS INCLUDING ANY IMPLIED WARRANTIES OF MERCHANTABILITY FITNESS FOR A PARTICULAR PUR...

Page 3: ...nstallation of peripheral 23 3 8 Completion of installation 29 4 Software Installation 31 4 1 Installation of eX5 Application program 31 4 2 eX5 Music On Now Functions 32 4 2 1 eX5 DJ Music On Now mod...

Page 4: ...iv Installation Guide Installation Guide Installation Guide Installation Guide Installation Guide...

Page 5: ...ockability the eX5 Mini Me incorporated Music On Now Technology OS un reli ant CD and MP3 CD audio players with full LCM module and GUI interaction and 3G Tek cooling technology making the system stab...

Page 6: ...es Motherboard 200W or 250W Power supply 3G Tek cooling tube 7 in 1 Flash Card Reader Music On Now utility LCM display CD ROM IDE cable Accessories 1 3G Tek cooling kit CPU heatsink x 1 2 HDD IDE cabl...

Page 7: ...3 Introduction Installation Guide Installation Guide Installation Guide Installation Guide Installation Guide Optional Features Speaker Set eX5 Mini Me Backbag Different types for selection...

Page 8: ...rated Cooling Technology eX5 Mini Me patented cooling system which combines copper heatsink silent smart fan and intelligent docking keeping eX5 amazingly cool stable and ultra quiet easy assembly Mus...

Page 9: ...r x 2 1394A connector PS 2 Mouse connector Keyboard connector LCM Display Panel and Music ON Now control eX5 Windows GUI AP 5 1 4 bay CD ROM DVD ROM Power Resume button AGP slot Power Supply COM port...

Page 10: ...stallation Guide Installation Guide Installation Guide Installation Guide Model eX5 320S eX5 320N Front View Door Switch DJ Music On Now Mode Power button Note The control buttons are located on top o...

Page 11: ...7 Introduction Installation Guide Installation Guide Installation Guide Installation Guide Installation Guide Model eX5 300N eX5 320N Rear View...

Page 12: ...8 Introduction Installation Guide Installation Guide Installation Guide Installation Guide Installation Guide...

Page 13: ...GHz For K7 Series Supports 462 pin SocketA for AMD Athlon XP and Barton processors with 266 333 400MHz Front Side Bus w Memory For P4 Series Supports the following System Bus and Memory combination FS...

Page 14: ...er system it requires ALL of the following CPU An Intel Pentium 4 Processor with HT Technology OS An operating system that supports HT Technology Performance varies depending on the specific hardware...

Page 15: ...backside of chassis Please refer to the following procedure to remove top cover 1 Turn all screws clockwise to loose 2 Lift the top cover and pull back 3 Take out drive bay by loosing the screws and f...

Page 16: ...ation 12 Installation Guide Installation Guide Installation Guide Installation Guide Installation Guide c Loosing screw d To move HDD driver bay e Loosing screw with a screw driver f Remove Card reade...

Page 17: ...of CPU You need to locate CPU pin 1 position before installing CPU The pin1 location is shown below 1 Pull the CPU socket handle up to vertical position Unless the handle is vertically positioned P4...

Page 18: ...allation Guide 3 After inserting CPU properly push handle back to horizontal position until click sound is heard Please note that firmly press CPU while pushing back the handle 4 Spread T I M Thermal...

Page 19: ...er vertical side to the docking and gently leave it on top of CPU Note The black conducting pad is not allowed to remove from the bottom of the heat sink Conducting Pad 3 3 Installation of CPU fan 3 3...

Page 20: ...lation Guide Installation Guide Installation Guide Installation Guide Installation Guide 3 Insert long clip a P4 type Insert long clip by clicking on the retension module Note Make sure clips are full...

Page 21: ...on 17 Installation Guide Installation Guide Installation Guide Installation Guide Installation Guide b K7 type Insert long clip by clicking on the CPU s Socket Note Make sure clips are fully inserted...

Page 22: ...Guide 4 Simply insert two power connectors by matching connector color as shown below 3 4 How to remove clips 3 4 How to remove clips 3 4 How to remove clips 3 4 How to remove clips 3 4 How to remove...

Page 23: ...Installation Guide 3 5 Installation of Memor 3 5 Installation of Memor 3 5 Installation of Memor 3 5 Installation of Memor 3 5 Installation of Memory y y y y Please follow the procedure to install the...

Page 24: ...tallation Guide Installation Guide Installation Guide Installation Guide 3 Please insert memory module gently into DIMM socket You will encounter difficulty if memory module is improperly placed 4 Mou...

Page 25: ...How to install e 3 6 How to install e 3 6 How to install expansion card xpansion card xpansion card xpansion card xpansion card This chapter is to explain the procedure of installing expansion card 1...

Page 26: ...ponent contacts any metal on chassis There is possibility that if your expansion card happens to be a very long one which may cause the contact It is recommended to use the insulation pad provided in...

Page 27: ...ome ATAPI Devices CD RW DVD etc may be too large to fit into the chassis resulting in difficulty in ejecting discs This problem may be resolved by using one of the follow ing methods Remove DVD CD ROM...

Page 28: ...ove marked red arrow to make it easy to press CD ROM EJECT and PLAY button Remove front bezel from the chassis A To install CD ROM Please use the screws originally shipped with CD ROM or you can find...

Page 29: ...own below to plug CD ROM into drive bay 5 Firmly use one screws to hold CD ROM drive then adjust EJECT and PLAY button position until it s evenly placed 6 Press CD ROM EJECT and PLAY button and to che...

Page 30: ...into CDIN 1 header Refer to page 3 10 of EP 4GPF mainboard manual for more details B To install Hard Drive Please use the screws originally shipped with Hard drive or you can find spare screws in the...

Page 31: ...Installation Guide Installation Guide Installation Guide Installation Guide 3 Plug HDD with drive bay back into chassis and tighten screw firmly 4 Plug in power cable and interface cable in proper dir...

Page 32: ...n the Mini Me package Care should be taken when use Mini Me screws that screws size must be the same or your hard drive may be damaged 1 Properly put the hard drive onto drive bay in the direction sho...

Page 33: ...able into proper positions as shown above 3 8 Completion of installation 3 8 Completion of installation 3 8 Completion of installation 3 8 Completion of installation 3 8 Completion of installation Cov...

Page 34: ...Hardware Installation 30 Installation Guide Installation Guide Installation Guide Installation Guide Installation Guide...

Page 35: ...PSET INF FILES to install chipset driver Step 2 Click AC 97 AUDIO DRIVER to install audio driver Step 3 Click GRAPHICS DRIVER to install graphical driver Step 4 Click REALTEK LAN DRIVER to install LAN...

Page 36: ...ower button left side of front panel is pressed machine was off eX5 play list will be displayed on the screen if screen is turned on However it is required that at least one MP3 music file has to be i...

Page 37: ...for music file from CD ROM and USB flash Disk if there is no music file stored in HDD Play List 6 Play Mode Allows user to play music in different way They are Sequential_Repeat Play music one by one...

Page 38: ...7 Play Mode Allows user to play music in different way They are Sequential_Repeat Play music one by one sequentially out of all 9 play lists Random Music is randomly selected by eX5 Repeat_One Play sa...

Page 39: ...are total of 6 functions are designed in this product The purpose of this designed to allow user to setup how LCM information displayed input music file etc User can activated any of this function by...

Page 40: ...ing B Button Time required to detect pressed LCM buttons C Resolution Display resolution D Storage HDD capacity E Temperature System temperature Note The reference time is from Windows As shown A RTC...

Page 41: ...ton is continuously pressed longer than the time set here Default value is set for one second C Resolution The feature is designed to display resolution information on LCM and time period to detect re...

Page 42: ...nt HDD capacity volume from BIOS and Windows area It is normal that shown Windows HDD capacity is less than that from BIOS E Temperature This feature allows user to select CPU temperature and show suc...

Page 43: ...r USDM 4 2 4 2 Hardware USDM Unified System Diagnostic Manager This feature is designed to show hardware status such as fan speed system CPU temperature and voltage Hardware Information USDM Menu Temp...

Page 44: ...Installation Guide Installation Guide Installation Guide 4 2 4 3 Magic Screen This feature allows user to setup your own screen when turn on system NOTE Supports only 640X480 16 or 256 color BMP file...

Page 45: ...Installation Guide Installation Guide Click to enter Magic Flash 4 2 4 4 Magic Flash This feature allows user to update system BIOS via internet when necessary NOTE It is required to connect to intern...

Page 46: ...e Installation Guide Installation Guide Installation Guide Installation Guide 4 2 4 5 eX5 Media Player PlayList The feature allows user to setup edit and maintain your own play lists Click to enter Me...

Page 47: ...Software Installation 43 Installation Guide Installation Guide Installation Guide Installation Guide Installation Guide c Add New Play List a Add b Add Folder...

Page 48: ...Software Installation 44 Installation Guide Installation Guide Installation Guide Installation Guide Installation Guide d Edit e Remove f Import...

Page 49: ...e you successfully installed eX5 MINI ME Application Program 2 Once activated music will be chosen from HDD media player 3 It is required to have music CD in CD ROM or DVD drive or USB Flash Disk inse...

Page 50: ...on Guide Installation Guide 2 Press DJ Music On Now mode button 3 eX5 Mini Me display DJ Music On Now mode menu on screen 4 Music starts to play and LCM will show music source By default Music source...

Page 51: ...lease check if any music CD in CD ROM before choosing 6 Press DOWN and UP button at the same time allows user to select music play type Sequential_Repeat Play music one by one sequentially out of all...

Page 52: ...tallation Guide 7 Other LCM buttons 8 To exit DJ Music On Now mode Press DJ Music On Now mode button again to turn off or you can press Windows button to enter Windows mode as shown in next section ne...

Page 53: ...Application Program 2 Examine if eX5 icon is shown on the right bottom corner of the screen when Windows is operating after installation 3 You may encounter difficulty when playing those music which...

Page 54: ...d start to enjoy music 3 Please refer to section 4 2 2 for detail operating description 4 To turn off Mini Me Player Press DJ Music On Now mode button of LCM 5 To hide the Mini Me Player Click on X ma...

Page 55: ...ws mode The Remote Controller can be used with various models 1 eX5 320S 2 eX5 320N 3 eX5 300SR 4 eX5 300NR 1 Power To turn eX5 Mini Me power On Off 2 DJ Mode Press to enter eX5 DJ mode If you want to...

Page 56: ...atly_Single playlist Note It is normal that volume will be turned up while pressing Repeat button in DJ mode 9 Volume up 10 Volume down Power Green Access Orange 4 5 4 5 4 5 4 5 4 5 Card Reader Introd...

Page 57: ...the reader To remove a card simply press on the eject button on the reader and pull the card out of the reader Note Be careful not to insert the CompactFlash card in the wrong direction If the card ju...

Page 58: ...retrieved from it like any other storage card Warning To avoid improper shutdown never remove a memory card or any of the USB cable connectors while data trans mission is occuring If you can open the...

Reviews: