


Installation
EP-3WXA/4/4Y
Page 3-3
Easy Installation Procedure
Easy Installation Procedure
The following must be completed before powering on your new system:
3-1.
Configure Jumpers to match your hardware
3-2.
System Memory Configuration
3-3.
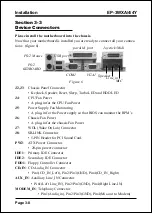
Device Connectors
3-4.
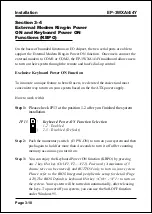
External Modem Ring-in Power ON and Keyboard Power ON
Functions (KBPO)
Section 3-1
Configure Jumpers
The EP-3WXA/4/4Y designs all motherboards with the fewest jumpers to make
your installation fast and easy.
The following will describe all of the jumpers that you are required to set before
moving on to step 3-2.
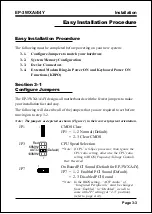
Note: The jumpers as depicted as shown (Figure 1) in their correct physical orientation.
1
JP1
CMOS Clear
JP1 = 1-2 Normal (Default)
= 2-3 Clear CMOS
CPU Speed Selection
JP3
100MHz
Rsd
66MHz
AUTO
1
(Default)
* Note: If CPU is S-Spec processor, than ignore the
CPU ratio setting, otherwise the CPU ratio
setting in BIOS (Frequency/Voltage Control).
Rsd: Reserved
JP7
On Board PCI Sound (Default for EP-3WXA4Y)
JP7 = 1-2 Enabled PCI Sound (Default)
= 2-3 Disabled PCI Sound
1
* Note: In the BIOS setting, “AC97 Audio” of
“Integrated Peripherals” must be changed
from “Enabled” to “Disabled” as well to
come with JP7 setting (at “2-3” position).
(refer to page 4-14).
Summary of Contents for EP-3WXA
Page 6: ...EP 3WXA 4 4Y Page Left Blank ...
Page 14: ...Introduction EP 3WXA 4 4Y Page 1 8 Figure 5 System Block Diagram System Block Diagram ...
Page 17: ...Installation EP 3WXA 4 4Y Page 3 1 Section 3 INSTALLATION ...
Page 18: ...Installation EP 3WXA 4 4Y Page 3 2 Figure 1 EP 3WXA 4 4Y Detailed Layout ...
Page 28: ...Installation EP 3WXA 4 4Y Page 3 12 Page Left Blank ...
Page 54: ...BIOS EP 3WXA 4 4Y Page 4 26 Page Left Blank ...
Page 56: ...Drivers Installation EP 3WXA 4 4Y Page 5 2 Page Left Blank ...