background image


Section 3:  Getting Started  


23 

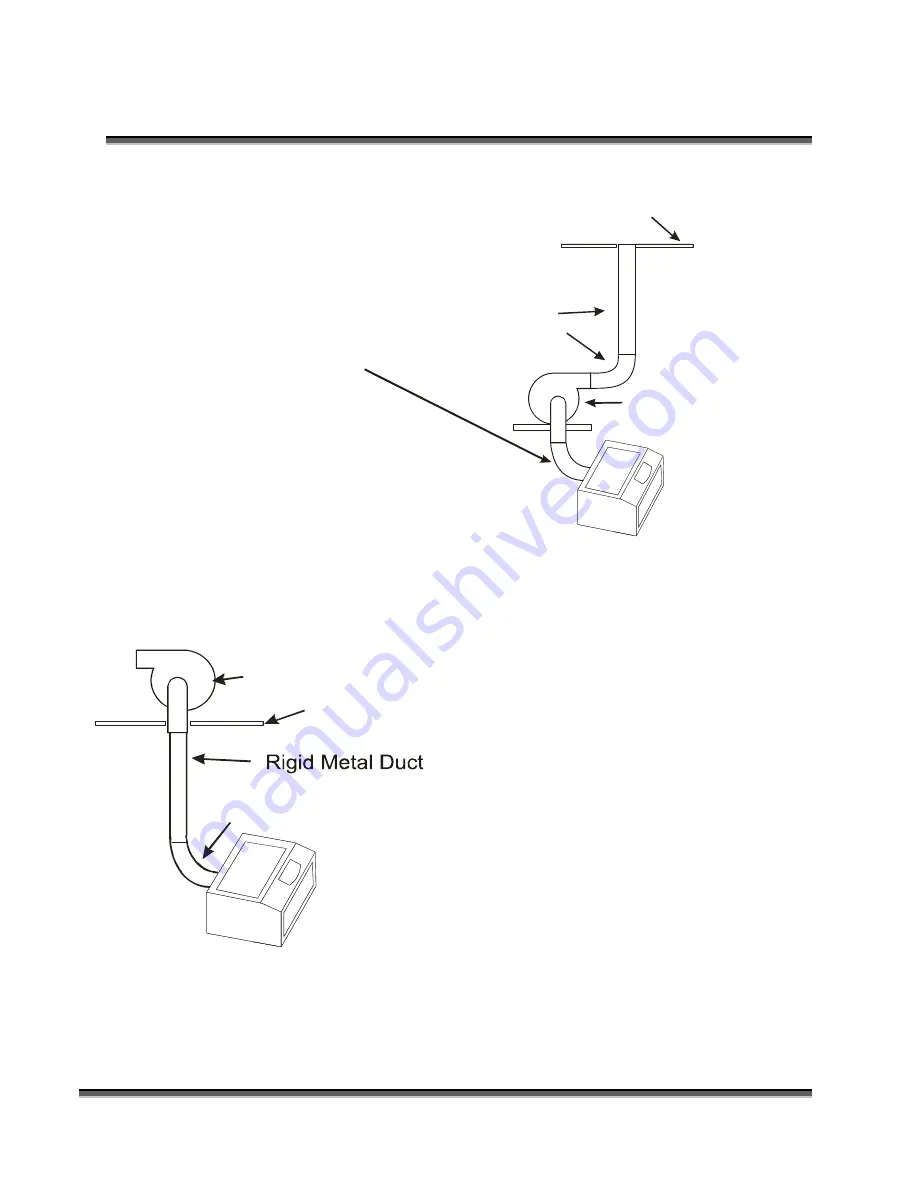
4” (100 mm) flexible aluminum duct
                     or rigid galvanized sheet
                     metal (Do not use vinyl, 

                     plastic or “soft” flexible duct).

Exhaust Blower

Roof or exterior wall


Exhaust Blower

Roof or exterior wall

4” (100 mm) flexible aluminum duct
or rigid galvanized sheet

metal (Do not use vinyl, 
plastic or “soft” flexible duct). 

Summary of Contents for FiberMark Fusion 13000

Page 1: ...t D hnical Supp Technical ww epilogla epiloglase NUAL F on M found in el Drivers and with your la 30 20 e Mountain en CO 804 303 277 1 03 277 96 Direct Line port tech Support O aser com se er com dow FOR E MODE lectronic fo d Documen aser system 013 n Parkway 403 1188 669 303 215 epiloglas Online ervice htm wnloads htm EPILO EL 130 ormat on th ntation m 5 9171 ser com m OG 000 he ...

Page 2: ...ii THIS PAGE WAS INTENTIONALLY LEFT BLANK ...

Page 3: ... Easy Setup 95 Section 8 Using the Front Control Panel 105 Section 9 Using the ECC Epilog Control Center 119 Section 10 Standard Optional Machine Features 123 Section 11 Engraving Machine Cleaning 127 Section 12 Speed and Power Recommendations 137 Technical Support Troubleshooting and Specifications 149 Section 13 In Case of Difficulty 151 Section 14 Specifications 153 Section 15 Upgrading the Ope...

Page 4: ...Contents at a Glance iv THIS PAGE WAS INTENTIONALLY LEFT BLANK ...

Page 5: ...trical Power 24 Section 4 Installing the ECC 27 Section 5 Installing the Epilog Dashboard Print Driver 33 Installing the Dashboard Driver Using the USB Connection using XP or Vista 34 Installing the Dashboard Driver Using the USB Connection using Windows 7 34 Installing the Dashboard Driver Using an Ethernet Connection and a Crossover Cable Windows 7 43 Section 6 Using the Epilog Dashboard 55 Gene...

Page 6: ... 124 Emergency Stop 125 Optional Vector Grid Vacuum Hold down Table 125 Section 11 Engraving Machine Cleaning 127 Cleaning Important 127 Fire Warning 127 Laser Tube 136 Section 12 Speed and Power Recommendations 137 Speed 137 Power 138 Frequency 138 Recommendations 139 General Metal Engraving Base Settings 140 10 Watt FiberMark 145 20 Watt FiberMark 146 30 Watt FiberMark 147 50 Watt FiberMark 148 ...

Page 7: ...onal Firmware 159 Upgrading Your Firmware 159 Installing New Firmware onto Your Computer 160 Transferring New Firmware from Your Computer to Your Laser 161 APPENDIX A WARRANTY STATEMENT 165 APPENDIX B ADDITIONAL DASHBOARD PRINT DRIVER INSTRUCTIONS 167 Windows 8 Installing the 64 bit Epilog Dashboard Print Driver 167 Installing the Dashboard Driver for an Ethernet Connection Windows 8 170 Installin...

Page 8: ...Table of Contents viii THIS PAGE WAS INTENTIONALLY LEFT BLANK ...

Page 9: ...es or volatile solvents such as acetone alcohol or gasoline ALWAYS keep a properly maintained and inspected fire extinguisher on hand Epilog recommends a Halotron fire extinguisher or a multi purpose dry chemical fire extinguisher The Halotron extinguishers are more expensive than a dry chemical but offer certain advantages should you ever need to use an extinguisher The Halotron extinguisher disc...

Page 10: ...Fire Warning x THIS PAGE WAS INTENTIONALLY LEFT BLANK ...

Page 11: ...nformation you need to know before you use it the Do s and Don ts of operating the laser configuring your computer to run the Epilog Dashboard print driver configuring CorelDraw and a brief user s guide to running your first job Part II Basic Operations Sections 7 through 14 explain Using the Epilog Dashboard Print Driver basic Epilog laser operations and maintenance machine features speed and pow...

Page 12: ...nformation to assist with the topic currently being discussed This Icon highlights current contact information for receiving help This Icon signifies advice you can try out with your machine right away This Icon signifies advice you can try that will save you significant time Running into trouble can be detrimental to your success so we ve marked Warnings and Cautions with this Icon Indicates page...

Page 13: ...troduction xiii Indicates pages including information regarding connecting your laser system to your computer using an Ethernet connection Indicates the potential for fire danger when operating the laser ...

Page 14: ...Introduction xiv THIS PAGE WAS INTENTIONALLY LEFT BLANK ...

Page 15: ...Epi ilog 1 M g La 1 anual ase er S Setu up ...

Page 16: ...2 THIS PAGE WAS INTENTIONALLY LEFT BLANK ...

Page 17: ...the embedded laser is fully contained The laser cabinet has safety interlocks that turn the laser off if any access door is opened during operation and no special precautions are necessary to operate the laser safely Access doors are interlocked and can be opened without the use of a tool Any interlocked door that is opened while the machine is operating will immediately stop the laser from firing...

Page 18: ...radiation exposure The standard reference for laser safety is the American Standard for the Safe Use of Lasers Z136 1 2000 developed by the American National Standards Institute ANSI This reference is the basis for many of the federal regulations for laser and laser system manufacturers and for the Occupational Safety and Health Administration OSHA laser safety guidelines It contains detailed info...

Page 19: ...s potentially lethal and is fully contained within the cabinet DO NOT open any of the machine s access panels while the unit is plugged in Opening a panel may expose the operator to the unit s AC input power DO NOT make or break any electrical connections to the system while the unit is turned on ...

Page 20: ...e unattended KEEP the area around the machine clean and free of unnecessary clutter combustible materials explosives or volatile solvents such as acetone alcohol or gasoline ALWAYS keep a properly maintained and inspected fire extinguisher on hand Epilog recommends a Halotron fire extinguisher or a multi purpose dry chemical fire extinguisher The Halotron extinguishers are more expensive than a dr...

Page 21: ...e s cabine n 1 S 7 d Reg ecific safety requirement e safety featu abinet whic ock systems dication whe There is an 825 1 requir aser product ollow with t ion Label T et afety gulato y features in ts of 21 CFR ures include ch fully enclo that turn off n the Laser D LED indicat re that cert ts Reproduc their location This engrave ory nto the Mod R 1040 and oses the eng f the engravi Diode Point tor ...

Page 22: ...is located on the rear of the machine s cabinet beside the Warning Label above LASER RADIATION DO NOT STARE INTO BEAM CLASS 2 LASER PRODUCT 1 mW CW MAXIMUM 600 700 nm 4 Non interlocked Protective Housing Safety Labels 4 Two of these labels are located on the rear of the machine beside the edges of each of the cabinet s end covers The other two labels are located on the cabinet walls under the cove...

Page 23: ...mirror cover inside the machine s cabinet beside the aperture where the laser beams enter the cabinet 7 Electrical Safety Label This label is located on the access panel on the rear of the machine s cabinet 8 Fire Safety Label This label is located on the machine s cabinet door in the upper right hand corner HIGH VOL T AGEINS IDECABINET DIS CONNECTPOWER BEFOREOPENING P ANEL FIREHAZARD DO NOTOPERAT...

Page 24: ...R ADDITIONAL INFORMATION REGARDING FIRE SAFETY DO NOT OPERATE MACHINE UNATTENDED DANGER FIRE HAZARD USE EXTREME CAUTION WHEN CUTTING FLAMMABLE MATERIALS SUCH AS WOOD OR ACRYLIC A PROPERLY MAINTAINED FIRE EXTINGUISHER SHOULD BE KEPT NEAR THE MACHINE AT ALL TIMES EPILOG RECOMMENDS A CO FIRE EXTINGUISHER 2 PERIODICALLY REMOVE THE VECTOR CUTTING GRID AND REMOVE DEBRIS FROM THE TABLE PAN PERIODICALLY R...

Page 25: ...The follo owing diagra S ams show the Section 1 e location of n 1 S 11 f each specif afety fic label desc cribed above e ...

Page 26: ...S Section 1 n 1 S 12 afety ...

Page 27: ...oid if your machine is damaged by corrosion from engraving or cutting PVC or Vinyl NEVER operate your machine unattended There is a significant risk of fire if the machine is set improperly or if the machine should experience a mechanical or electrical failure while operating NEVER vector cut any material while the machine is unattended Because vector cutting moves relatively slowly compared to ra...

Page 28: ...low a few minutes a week for cleaning your machine Just a small amount of effort at the end of the week will pay off with years of trouble free operation of your machine See the Engraving Machine Cleaning section of this manual for specifics ...

Page 29: ...l Center Installing the Dashboard Print Driver Setting Up Your Laser System Setting up your Epilog Laser System is easy to do If you ve ever installed a paper printer this is only slightly more difficult The following information will help you understand the entire system and how it works Your Fusion laser system consists of the following components 1 Fusion laser system 2 Computer and a graphics ...

Page 30: ...ed The following shows how software and connection methods work Connection Method Software Compatibility USB Dashboard Driver ECC Ethernet Dashboard Driver Only As you can see the USB provides the most versatility The most popular choice is to use the USB for both printing and accessing the ECC This choice is the simplest and the most versatile One advantage of having two connection options that i...

Page 31: ... net conn Gettin 17 the Etherne is not availa enter ogram that p r settings an from the Da rder to opera rs find quite C prior to in C section of NLY wo ECC ca nection ng Star et connection able through provides job nd other job shboard driv ate your Fus e valuable nstalling the f this manual orks th annot be rted n Most user h the Etherne b manageme b manageme ver ion laser bu print driver l for ...

Page 32: ...ection e USB c Gettin 18 print driver imary interf er paramete Dashboard ashboard P an be use n nt to ins hey will orks thro is to in n This m connectio ng Star face between ers to the las d driver P Print Driver ed with stall the l also wa ough the nstall the method on for th rted n the compu er Your Fu Please refer section of either t print dr ant to us USB co e print d allows y he ECC uter and ...

Page 33: ...ser to talk to each other The Fusion has both Ethernet and USB connections 7 Exhaust fan The exhaust fan is mandatory and is used to remove smoke and debris from the Fusion work area The exhaust air can be ported to the outside or into a filter box a ir flow exhaust fan From Fusion ...

Page 34: ...50 60 Hz Follow these steps to set up your Fusion laser system 1 Remove it from the crate 2 Connect the exhaust system to your laser 3 Connect electrical power 4 Install the ECC Epilog Control Center 5 Install the Epilog Dashboard Print Driver 6 Connect both the USB and Ethernet cables from your computer to your laser system ...

Page 35: ...derations Ideally the blower should not be more than twenty feet 6 meters from the laser You should provide a metal duct flexible aluminum or galvanized sheet metal from the blower to the laser All Epilog model 13000 laser systems require an exhaust fan that is rated at a minimum of 650 CFM Note Remember to put the blower switch for the laser system in an obvious and accessible place so it can be ...

Page 36: ...r leaks Most small leaks can be remedied with duct tape DO NOT OPERATE your laser with inadequate or leaking exhaust The drawings below show the typical exhaust setup The top drawing shows the exhaust on the roof and the bottom drawing shows the exhaust fan near the machine Where the exhaust fan is placed is a choice of personal preference Some users like the exhaust fan outside because of noise c...

Page 37: ...or rigid galvanized sheet metal Do not use vinyl plastic or soft flexible duct Exhaust Blower Roof or exterior wall Exhaust Blower Roof or exterior wall 4 100 mm flexible aluminum duct or rigid galvanized sheet metal Do not use vinyl plastic or soft flexible duct ...

Page 38: ... Hz Epilog supplies the appropriate power cord for all of our equipment The electrical cord is found in the accessory package with your machine It is recommended that a dedicated 15 amp circuit be used if available but it is not required The 60 watt and 75 watt machines draw more current than the lower wattage lasers These two systems can operate on 110 volts but most users find that a 200 V conne...

Page 39: ...vents should always be clear of restrictions and should never be covered Warning The cooling fans and vents are located at the back of the Fusion and should never be covered or blocked in any way Lasers that overheat will not operate properly and may begin to produce erratic laser output or possibly complete failure Ambient air temperature where the laser system is operating should not exceed 90 d...

Page 40: ...Section 3 Getting Started 26 THIS PAGE WAS INTENTIONALLY LEFT BLANK ...

Page 41: ...ions throu 27 stal ntro enter provid ne configura vides many ugh the USB ling ol Ce des Job Man ation options user feature B connection To in Epilog compu Auto S windo the ente nagement fe s The ECC es that mak n nstall the E g install d uter s disk Start and w should ap ECC er eatures as w is not requir ke operating ECC insert disk into drive It sh the follo ppear C ell as red to your t the your ...

Page 42: ...l on Epilog 2 bit and 64 n 4 In 2 screen appe appear Control Cen bit driver ba nstallin 28 ears click o nter Installa ased on your ng the on Run fusi ation You w r computer s e ECC ion_driver e will need to s operating s exe and then o choose bet ystem n the tween ...

Page 43: ...S Click The n Yes Select Click Section on Install next screen w t Repair and on Finish n 4 In 2 will prompt d then Next nstallin 29 you to allow ng the w Windows e ECC to install the software Click ...

Page 44: ...reen he ECC you Dashboard p Ethernet con nstallin 30 ng three win and you w icon will be are now rea print driver nnection The ng the ndows and th will find the e in your Sys ady to conne You can p e following e ECC hen click on ECC icon o stem tray lo ect your com print throug combination n Close in th on your des ower right c mputer to the gh either a ns can be use he last sktop corner laser USB...

Page 45: ...chine from a systems cann ection If you each Fusion he accessory have differen the laser and computer A rd 10BaseT c ed The Ethe r has all of many differ A direct co ng the USB port for for all print a driver can ugh the Ethe u choose yo ws you to p USB connec ed to a sing seful for runn ECC cannot t you have m our ECC will a single com not be opera u are using th laser system y kit The U nt conne...

Page 46: ...ress from g the Front C ddress and S ECC go t b and type want to use net Mask ain blank ange the sett ess setting e int driver nstallin 32 escribed in d then plug th he Fusion th nd Subnet M tion tab in th m the Fusio Control Pan Subnet to the in the along The ting in established y ng the this manua he other end hrough the E Mask in the F he ECC or fr on keyboard el of this ma you are read e ECC a...

Page 47: ...ion rocess for W rocess for W s both 32 bit an be used 33 Inst oard t Driver Usin t Driver Usin print driver t either the U luded in the r com Ins pages ng the Ether board print e Windows XP Windows 7 or t and 64 bit d tallin d Pri ng an USB C ng an Ethern that allows y USB or Eth accessories stall the D rnet connect driver and or Vista is e r 8 takes add drivers Win ng th nt D Connection net Conn...

Page 48: ... Your computer will prompt you to install the driver 5 Follow the prompts Installing the Dashboard Driver Using the USB Connection using Windows 7 The process of installing a USB printer when using Windows 7 is more complicated than when using XP or Vista Windows 7 will not automatically walk you through the installation process so it is important to follow the instructions below Please follow the...

Page 49: ...o your com dow above an em It will lizes it will on the USB r screen w a small w as successful u will see an cessful This rocess Epilog er disk into y r the USB in mputer to au ver is a much mputer and y nd connectin take about start the pro B icon in yo window in l This is onl nother smal s is what we g Dash your compu nstallation y utomatically h more robu your Fusion ng the USB a minute f ocess...

Page 50: ...he E nt Drive 36 nnected to th play these w mputer finish point wil cation go t r screen Cl Fusion icon Epilog er he Internet i windows Pl h trying to in ll require u to the Wind lick on Devi n Then click g Dash it will take a lease be pa nstall the driv us to resta dows start b ices and Prin k on Properti board a few minute atient during vers Interru art the pro button lowe nters ties es for g th...

Page 51: ...Se ection 6 7 5 Ins Select the H Select the d stallin Prin 3 Hardware tab evice Epilog g the E nt Drive 37 b gEngraverF Epilog er Fusion Then g Dash n click on Pr board roperties ...

Page 52: ...Se ection 8 9 5 Ins Click on Ch Click on the stallin Prin 3 hange Settin e Driver tab g the E nt Drive 38 ngs Epilog er g Dashboard ...

Page 53: ...Se ection 10 11 5 Ins Click on Up Click on Br stallin Prin 3 pdate Driver rowse my Co g the E nt Drive 39 r omputer for Epilog er driver softw g Dash ware board ...

Page 54: ...d stallin Prin 4 rowse button e Epilog driv cument we s g the E nt Drive 40 n to direct ver disk that show the DV Epilog er your compu you inserted VD RW driv g Dash uter to your d earlier in th ve as the driv board r disk drive his process ve where the e that e disk ...

Page 55: ...s w You will th this Driver A stallin Prin 4 e the proper window will hen be asked Anyway g the E nt Drive 41 disk drive s l appear d if you wan Epilog er showing clic nt to install g Dash ck on the Nex this driver board xt button Click on In nstall ...

Page 56: ...a port ose in the ne en see your F X in the uppe ou are ready g the E nt Drive 42 ashboard pri ext window a Fusion drive er right corne y to print to y Epilog er int driver ha and then Clo er in the Dev er of this pag your Fusion g Dash as been succ ose again vices and Pri ge board cessfully inst inters page talled Click ...

Page 57: ...ions work only for a direct connection from the computer to the Epilog laser using a Crossover cable This procedure does not work with a hub or a server For Ethernet connections that require a hub server or multiple machines computers please consult with your network administrator Windows 8 instructions are included in Appendix C Additional Dashboard Print Driver Instructions of this manual Hardwa...

Page 58: ...dress fr ore convenie nel for keyb ress you wan 192 168 3 4 k of 255 25 remain blan will enabl ion electroni ting up Window et the IP Ad PC g the E nt Drive 44 Ethern Address on nfiguration t rom the Fusi ent to use th board instruc nt to use Type in 55 255 0 nk le these ics the Co ws 7 ddress at the Epilog er net IP Ad the Fusion i tab on keyboard he ECC Se ctions ompute e laser you g Dash ddress...

Page 59: ...ick adapte 5 Ins on Netw ng Center on Chang er settings stallin Prin 4 From mon work and ge g the E nt Drive 45 m the Start m nitor select C Epilog er menu at the b Control Pan g Dash bottom left c nel board corner of you ur PC ...

Page 60: ...en 5 Ins t the ection optio on Propertie ight Interne e sure to se on 6 click on Pro stallin Prin 4 Local A on and then r es et Protocol V elect Versio operties g the E nt Drive 46 Area right Version 4 T n 4 Do no Epilog er TCP IP ot select g Dashboard ...

Page 61: ...than th et in your las the OK butt ow s it The IP o your laser a stallin Prin 4 following I following I net mask not an erro he IP addres w must b e IP addres ser system ton in this w Address in after you ins g the E nt Drive 47 IP IP or ss be ss window and t your compu stall the prin Epilog er then click on uter is set Y nt driver wh g Dash n the Close b Your comput ich is the ne board button in ...

Page 62: ...oar Epilog Laser and the follo wing screen creen will ap g the E nt Drive 48 g the D tion tions are rd Print r CD into y owing windo n appears cl ppear Epilog er Dashboa Window e include Driver your comput ow should ap lick on Run g Dash ard Dri ws 7 ed in A Instructi ter s disk d ppear n fusion_dri board ver for Appendix ions of device It sh iver exe and an C this hould d then ...

Page 63: ...ernet Dash dd Local Pri reate New P TCP IP Port P Address y 192 168 3 4 g the E nt Drive 49 hboard Drive inter Port and then you want to 4 which is w Epilog er er Install n click on th use Most what we use g Dash he dropdown Epilog user e in this docu board n menu and s s will use th ument Wha select he IP atever ...

Page 64: ...ng Wait while stallin Prin 5 u use it mus usion laser k g in the IP A the compute g the E nt Drive 50 st be the sam keypad or the Address click er identifies t Epilog er me number th e ECC k on Next the port g Dash hat you set a board as the IP Ad ddress ...

Page 65: ...stallin Prin 5 om and then ol to LPR T atly increased g the E nt Drive 51 n Settings th This is a ver d if LPR is n Epilog er hen click on ry importan not selected g Dash Next nt step You Type L Queue N Click OK board ur download Laser into Name K d time o the ...

Page 66: ...Se ection 9 10 11 5 Ins Click on Ne Click on Ha Click on Br stallin Prin 5 ext ave Disk rowse g the E nt Drive 52 Epilog er g Dashboard ...

Page 67: ... Select the d Click on the stallin Prin 5 sk drive with river folder e EpilogWin g the E nt Drive 53 h the Epilog and then clic nALLFusion Epilog er install disk a ck on Open n file and the g Dash and click on en click on O board Open Open ...

Page 68: ...e your but many u ey are using computer Next For e driver Fusi Finish and th You are ready g the E nt Drive 54 r printer he users like to Especially xample we ion 192 168 he driver ha y to print Epilog er ere We ha o associate t if there is m e might 3 4 as been g Dash ave not cha the driver n more than on board anged it for name with th e laser conn r this he IP nected ...

Page 69: ... detailed und th a simple keys to print to Properties 55 Using hboa es s he print driv r to the laser ow and can b an also be d are just gett tting just a derstanding o engraving jo t select the s Set the la g the ard ver that sen r be installed f downloaded ting started a couple of p of what diffe ob type you e Dashboard aser parame e Ep nds your ar from the driv from the E and are in a parameter...

Page 70: ...be a more complex der bars the ent methods ndows softw using the a nts of ten by n your compu d box outlini nts of ten C lso bring up r box by clic easing your the number b de detailed aving and cu Print Driver Advanced tab pilog D job you a options ava accomplishe x jobs can b ere are sever s all follow ware applicat and icons y clicking cl uter keyboar ing the slider Clicking dire the dashed o c...

Page 71: ...t necessa the Ep 57 used for bot n the driver to both but e that functi elected Las g is Grayed ary or possib pilog D th CO2 lase that only ap if a function ion will be g er Type as d out This s ble to set it Dashbo er and the Fib pply to one n does not a grayed out CO2 Notic setting is on with CO2 la oard ber laser sou laser type o apply to the For instanc ce that the nly used wit aser selected u...

Page 72: ...ne ne weight o in the DashB e and which the DashBoa on themselve ne 0 003 a t there is a ve mode will on mode mode will on mode y properly s this mode pilog D to know is h ecision is bas ed in your of your obje Board driver h will cut ard driver R es most use and make th ector line in nly engrave nly vector R etting up yo Dashbo how the las sed on sever graphic im ect will dete r will also h Raste...

Page 73: ...the job the laser will beep once and be finished because the line is too small to be recognized as an engraving line Line weight 0 003 inch Vector Vector mode is used for thin line marking as well as cutting applications The Vector Speed Power and Frequency bars will be enabled when you have selected Vector or Combined under Job Type Note Artwork such as scanned images photos JPEGs etc will not ve...

Page 74: ...er and Vector functions in the same job setup When you are in Combined mode all Raster operations will be performed first with the Vector operations second Note on Vectors If you are in Vector or Combined mode all thin lines will be vector cut This can be disconcerting because even if the lines are not visible in your artwork they will still cut Usually this happens when incorporating a clipart im...

Page 75: ... othe dependent o ster line at 6 PI has the ef material like w you will at 3 pilog D Resolution n is expresse dots that are rred to as a hat can be a n determining n have a big low quality Also keep some image ers on resolution 600 DPI tha ffect of lase wood you w 300 DPI if y Dashbo n and is one ed in dots pe e engraved a raster line achieved Ke g image qua gger influenc artwork is in mind that e...

Page 76: ... other materials that don t require a lot of power in combination with large block lettering Attempting to produce really fine detail with 300 DPI is not recommended 400 DPI This resolution value is ideal for many applications It combines very good image quality with fast engraving times Many users like 400 DPI for all of their work 600 DPI When really fine detail or overall excellent results are ...

Page 77: ... as many dots and twice as many lines at 600 DPI produces a much deeper burn into materials like wood than you would see engraving the same thing at 300 DPI This is important to understand because depth of burn is closely associated with engraving resolution the higher the resolution the greater the depth of burn for a given speed The relationship between resolution depth of engraving and Speed an...

Page 78: ...Sectio 300 D 600 D on 6 U DPI DPI Using t 6 the Ep 64 pilog D Dashbo oard ...

Page 79: ...ir artwork ches the siz dges or placi elationship b works for you your graphic rs do not wa ing new Th size 32 x 2 he page prior nd it is a mat river to mat pilog D on a page ze of the p ing an image between the u set the Pie cs software ant to chang hey prefer to 20 for exam r to printing tter of person tch the page Dashbo size in Cor piece that i e in an exac material and ece Size dim ge the Pie...

Page 80: ...n the job st hen using Co s selection in wer Freq a programed whether you Focus is no about it it m ntuitive the f alled and yo ector Grid b it will autom mation Plea pilog D capability w ness of the m al thickness r down so th Auto focus w tarts olor Mappin n the Gener and Auto Fo d to move in u have auto f ot selected is makes sense first time it ou want to us box This tel matically ca se note T...

Page 81: ... tub the Ep 67 or grid If a t ector grid no accurate mea ness box in ng Auto Fo arriage and y material and illuminate t table enough en auto focu be must cle pilog D thickness is ot to the top asurement of the driver ocus and you your materia start the job the light nex h to accomm using on irr ear all edge Dashbo not specifie of your mate f your mater u know ther al you will n b To lower xt to th...

Page 82: ...aving preven ng starts from way down the Ep 68 er engraving own or the b er stamps In ing debris g f it collects nts the debris m the pilog D g only and bottom up T n standard to generated A in the area s from colle Bottom Up bottom and Dashbo allows you This is very op down eng As the debri that has jus cting in the engraving st works its wa oard to engrave helpful for graving ther is moves tow s...

Page 83: ...or s just a mat his is the ca ork For som uch more im or the amou with different materials that Since the las n the bondin he laser time pilog D speed of the 100 The ily depende d with harde eed settings w Power Reco r settings c arked at the r power M tter of adjus ase but unfo me materials mportant to p unt of laser t materials is t are actually ser interacts d ng agent yo e to properl Dashbo ca...

Page 84: ...s manual dot patterns r color The raving proje ages includi no effect on ng patterns is s that we wi Brighten an at has been default mode pattern to th number of do pilog D you can mar hat produces wered lower nt of laser en increments f Please ref l will be eng Dashboard ects The def ing photogra vector cut li s easier to th ill refer to as nd Low Res created usin e and is by f he dot pattern ots...

Page 85: ...r photograph modes with all photographs Many users prefer one of the photograph modes for many clipart images and one of the clipart modes for photographs The choice is entirely up to you We have included some sample photographs on the Epilog driver disk for you to experiment with Use these photographs to engrave on different materials using the different dithering options so you can get a feel fo...

Page 86: ...y n while the e pleasing to andard mod andard mod the Ep 72 st way to sh d the exact sa graved at 30 you can also Stucki patte the eye e e pilog D how dithering ame photo i 0 DPI As o see the S ern shows a 300 DPI 300 DPI Dashbo g is with an in Standard you can see Standard mo a much more I using Stuck I using Stuck oard n example I mode and S e the photos de shows a e random pa ki ki In the Stuck...

Page 87: ...Jarvis Many users find this mode good for engraving photographs at 300 DPI This mode produces a very nice looking pattern on almost all photos Stucki This mode produces results that are only marginally different than the Jarvis dithering pattern It is also very good for engraving photographs at 300 DPI The differences between Jarvis and Stucki are very subtle Dithering is a great way to enhance yo...

Page 88: ...Ep 74 s the travel increments cutting app avily depend ower speed Speed P ovided for d s the amoun able in 1 i The amou also heavi ease refer to pilog D speed of th from 1 to 1 plications re dent on the h settings wi Power Recom draft mode o nt of laser en increments f unt of power ily dependen o the Speed Dashbo he carriage i 100 The s equire relativ hardness and ill also prod mmendation only and...

Page 89: ...ll speed settings by For example a speed setting of 10 without Speed Comp selected will move twice as fast as a setting of 10 with Speed Comp selected In essence Speed Comp provides an alternative set of speed parameters that are the speed of the standard settings Speed Comp mode will most often be used with speed settings below 10 when very slow cutting is desired Most users will rarely use Speed...

Page 90: ...b mode While n reasons different lev cations that ge the focus lex parts sim allows user s these two t ork The fu y Focus Ra n Raster Ve te a couple o a quick note pilog D anced featur be used in e e Color map vels of focus are at diffe in a single j mple rs the ability tasks by ass unctions tha aster On Of ector or Com of examples about the us Dashbo re that mus either Raster pping is a ve s Many...

Page 91: ...l colors and the six basic colors have the following numerical definitions Color Red Color Value Green Color Value Blue Color Value Red 255 0 0 Green 0 255 0 Blue 0 0 255 Cyan 0 255 255 Yellow 255 255 0 Magenta 255 0 255 The six basic colors are easiest to use because they only use combinations of 255 and 0 255 is the highest number value and 0 is the lowest in the RGB color scheme Because all gra...

Page 92: ... 250 inch ap ows the user 3000 distance for bars For this nts of One H crement the 16 mm Th he table 630 nts of Ten b al to 0 010 in setting will a positive nu n other wor focus lens i pilog D e following l objects of th l objects of t r all objects o color This s the table he er 250 for pprox 6 mm r to change th a color Th s slider bar o Hundred by slider bar i he screen bel 0 inches 16 0 by clic...

Page 93: ...ts will be processed at the color mapped settings However this function will not allow a thin vector line to raster Vector With this box checked all vector objects will be processed at the color mapped settings However this function will not allow a raster object to be processed as a vector Air Assist With this box checked all objects will be processed with Air Assist at the color mapped settings ...

Page 94: ...the image a Color Mappin or in the Sum aser settings the Ep 80 ng is a very e y on the left si and set the ge the values the settings adjust settin on the right of all settings pping above for the ng box in th mmary area s in the Settin pilog D easy process ide of the wi laser param s You must ngs delete c side of the s e following i he upper left We selected ngs area Dashbo s The colo indow Use m...

Page 95: ...e of the hou ight be in th et in the Gen the Ep 81 have been a on buttons ar utton the sel ea ing or color map to mark on e Mapping in te areas of a nt look for e o this is a pe a simple arch Mapping we mes and a di w panes use will not he drawing w neral Tab of pilog D adjusted pre re identified lected color pping is in th ne part of t Vector mod a single piec ach mark th erfect job for hitectura...

Page 96: ...l move ow have gre he colors wil Using t 8 outlines are ng tab in the E or Mapping can set up heme we want to m w frames firs e first color a ormally the c nd color dow o move it we ve set the Gre with the colo en at the top ll be process the Ep 82 e set up in y Epilog Dash g is our mark st so at the color wn in e just select een values b ors p and red is t sed pilog D your artwork hboard it and u...

Page 97: ...ds an the Ep 83 t a higher sp he green and o it will be e e When color m d then descen sed first and processed las General tab d and green w nd powers th pilog D peed and low vector the r easier to rea mapping is u nds through d then red st and will b An examp we are mapp hat are set in Dashbo wer power th red For illu ad the values used it alway h the remaini be processed ple would be ping The bl...

Page 98: ...ample we nt to mark on s 0 250 3 m urface 1 our artwork el Number Number on Su r go to the C s distance E tion for and ue at run will ce 1 the move the Ep 84 ing y has a differ ing up color users want to or engrave at ing feature o important show a stan n both Surfa mm higher so that we on Surface urface 2 Color Mapp Everything pilog D rent purpose rs to be map o use color m at more than for raste...

Page 99: ...ng in or Vector on to account fo or mapped w de of the tab be raster en Dashboard bjects have a or order from not color m n the Genera e is a comp ashboard se pilog D to recognize Color Mapp colors are in patterns wh of the differe way for a me time combined m nly modes or when usin will be raste b Any oth ngraved using all been engr m the right mapped will al Tab of the rehensive d ettings for in...

Page 100: ...jo permanent r settings Spe b gs and identi pilog D ws you to re of trying to ob you did th record eed Power ify them wit Dashbo etrieve the jo o remember hree months Piece Size th a name go The D standar protoco configu When y Epilog was configu created need configu oard ob parameter what speed ago All of Color Map o to the adva Dashboard rd Windows ol to save uration files you installe Dashboard...

Page 101: ...figurations with a name that associates the configurations with one of two things 1 The customer For example Jones Pharmacy 04 Awards Banquet dat 2 The material size and type For example 9 x 12 Wood dat Notes on Saving Configuration Settings If you would like to expand your folder options it is best to make changes from Windows Explorer sometimes referred to as My Computer You can create as many f...

Page 102: ...on the Bro Folder wind g your fold iles will no vidual files w Folder wind Configuration the f selecte H config you w must c button clickin selecte load th oard onfiguration owse butt dow will ope der all of ow show in will not appe dow They ns window folder has ed Highlight guration file want to use click on the n Do ng on ed file wil he settings file ton en f the n the ear in only after been the...

Page 103: ...8 eral tab to se shboa ses ically engrav number of p er will auto the Ep 89 ee the setting ard Dr ve or cut a jo passes that omatically s pilog D gs that the lo river F ob multiple you want to start another Dashbo aded file bri Featu times by set o make W r pass unti oard ings up ures tting the Nu When each pa il all passes umber ass is s are ...

Page 104: ...p and print w that is set u l of the pag settings in t ages in the Pr printed to th that the last n on the LCD hrough the jo d that the fir me of the fil pilog D t multiple pa up to print a ges or you the Print rang rint Preview he laser the t page of the D not the obs on the L rst page is d le as it was s Dashbo ages The s all three page can specify ge box w screen job will be e job in this first...

Page 105: ...e 4 Job 7 Page 5 This is the job that will show after the entire file has been received If you start engraving the jobs and become uncertain about which pages are which you can refer back to your print preview screen and the Page number in the laser will correspond to the page number in the print preview see the screen shot on previous page Changing Dashboard Driver Defaults All of the Dashboard d...

Page 106: ...Section 6 Using the Epilog Dashboard 92 THIS PAGE WAS INTENTIONALLY LEFT BLANK ...

Page 107: ...Ba asic 9 M c O 93 anual per rati ions ...

Page 108: ...94 THIS PAGE WAS INTENTIONALLY LEFT BLANK ...

Page 109: ... dot matrix printing with a laser Raster engraving is used to create highly detailed graphic images The laser head scans back and forth left to right engraving a series of dots one line at a time As the laser head moves down line by line the dot pattern forms the image that was printed from your computer You can raster engrave scanned images text clipart photographs or line drawings Use your imagi...

Page 110: ...rt 96 ous path tha mally used to It can also b u can vector wn with a 0 r cut When our material a ntation of a 0 025mm s above show Cutting in w t Ea at follows th o cut compl be used for cut with the 001 inch 0 n vectoring as well as yo vector file w the results wood sy Set he outline letely throug quick mark e laser by se 0 025mm ou use the vec our table fro There is no s of tup or profile o gh ...

Page 111: ...ottom that will vector cut if you are in Combined or Vector mode If you only want to Raster engrave make sure you select Raster mode in the Epilog Dashboard For more information on Vector cutting refer to the Using the Epilog Dashboard Driver section of this manual The upper image is a complex piece of clipart The lower image shows all of the hidden lines that are in this piece of clipart If this ...

Page 112: ...mage by changing the orientation of your file Many users set up their artwork in portrait mode and then rotate the artwork 90 degrees if they are going to print from landscape mode The drawings below show the same job in portrait mode left and landscape mode right The portrait mode will engrave in less time because there is a large amount of horizontal white space between the lines of text that th...

Page 113: ...et in your graphics software On the other hand many users do not want to change the Piece Size dimensions in the Dashboard every time they print something new They prefer to use a page size that matches the table size 32 x 20 812 8 x 508 mm and place their artwork into the upper left corner of the page Both methods are effective and it is a matter of personal preference which method is used Place ...

Page 114: ...i the focus len of your ma ur material o nt methods o e V shape ce from the r Accessorie ge on the ca orner of the e light next move the tab uge The spe varying pre t Ea ble Simply Then cover e jig This w material can h magnets that are hi usual shape image your ns Setting t aterial is the on the table f focusing ed manual f focus lens es Kit that co arriage and p e machine to the word ble appropr...

Page 115: ...o focus at a point on the table other than in the upper left corner you can do so by activating the Jog feature of the machine Press the Arrow keys on the keypad until the light next to Jog is illuminated This now activates the Joystick to allow you to move the lens carriage of the laser to the desired position on the table Again varying the pressure applied to the joystick will vary the speed at ...

Page 116: ...ocus h the Dash an be done o If there is not move up d Auto Fo to the appr graving cutti u are using e Auto Focu at the vector al distance b required wh l auto focus ness of the for an accur iver t Ea s capability hboard on your com not a Check p or down w cus has be ropriate hei ing a vector gr us click the grid is insta based off thi hen using the to the top o object you rate measure sy Set for ...

Page 117: ...m a safety fea X beam k Start 03 ng Auto Fo arriage and y material and illuminate t table enough en auto focu must clear all ature that pre t Ea ocus and you your materia start the job the light nex h to accomm using on irr l edges of th events the ta sy Set u know ther al you will n b To lower xt to the wor modate your p regularly sha he work piec able from c tup re is not en need to lowe the tab...

Page 118: ...n is shown be uld be in the k Start 04 play the job e upper left ey to start the ob has printe en and doub esktop you w close the EC e icon tray is elow Your i lower right t Ea corner of th e job ed go to you le click on t will only be CC or it is no s in the lowe icon tray ma hand corner sy Set he engraving ur Icon tray i the ECC icon e able to acce ot in the ico er right corn ay look diffe r tup...

Page 119: ...orag d Com Dot Poin Keyboard C ged into func Display Function M Action Key Joystick Red Dot Po Laser On 10 8 Contr Commands Your Work ge mman nter an ommands ar ctional group Menu s inter 05 Usin rol P nds d Laser re useful to ps ng th Pane r On Ke ools for ope he F el eys rating your ront laser system t m and is ...

Page 120: ...touch sen ensitive to t e bigger your ont Co used to con s found in th ght a Functi ol move or oystick while using th splay ool that can b oystick rformed by t k provides 3 t a slight til produce a fas Center Clic k to initiate r of the Joys display to in use the curso onfig setting store XY Ho e upper left H diamond is available ons both prov ll produce a nsitive and p the degree o r impact on t ...

Page 121: ...rriage w king up spee y to the Joys oystick By You will pro panel you wil r it you will ll go just by information the different ch menu item esume a job ont Co tice ad to highlig ply tilt the J will start mo ed To slow tick Varyin flicking the obably not b ll see that th l be able to m adjusting th n associated nt informatio m ontrol ght the Jog Joystick as f oving slowly w the carriag ng the amou...

Page 122: ...raved is not moved the engraving cutting registration will not be affected Note Opening the door on the laser during engraving or cutting will stop the laser from firing however the lens carriage will continue to move It is important to STOP the job before you open the door to ensure the engraving cutting is completed If you press the STOP key while in vector mode it may take some time for the sys...

Page 123: ... 600 DPI ve the job t t 600 DPI imator is an the Fr 09 to the laser ne of the dis econd line o After pressin e displayed nted to the la ough multiple me as the file t I time estimat extremely h ont Co r and the JO splay The e of the display ng the GO bu on the secon aser the last e jobs e used to prin tor indicates handy tool fo ontrol OB menu is h estimated jo y Pressing t utton the job nd line o...

Page 124: ...menu indicator The two arrows on the left side of the second line in the display indicate whether you are in in Course or Fine focus mode In Course mode the table will move up or down in large increments In Fine mode the table will move up or down in small increments Tilt the joystick left or right to toggle between Fine and Course Course mode Double arrows A single arrow indicates that you are in...

Page 125: ...y used height when o focus will n establishe Zero posit nger referen osition rend Table Hom start using a ilt the joysti ion This is ont Co of the displa ub menu e position f ial Then do Left or Right to move th oystick down by about 2 eft to set a to set or re en using the not work pr ed tion for you nce the defau dering auto f me to re esta auto focus a ick to the rig normally do ontrol ay indic...

Page 126: ...ust more convenient to designate somewhere other than the upper left corner of the table as your starting point To set a new Home position use the following instructions 1 Go to the Jog function on the keyboard 2 Use the Joystick to move the carriage to a new position Use the red dot pointer as a visual indicator of the carriage location The display will also show a digital readout of the X and Y ...

Page 127: ...stick Up Down Left or Right to activate the associated menu item Up GO 0 Tilt the joystick up to move the carriage back to its zero zero position This function will move the lens carriage back to a new or temporary Home position Down EXIT Tilt the joystick Down to exit the sub menu Center clicking does the same thing Left SET 0 Tilt the joystick left to set a new or temporary XY Home position Righ...

Page 128: ...a description of how they are used Please keep in mind that changing most of these settings can also be accomplished from the ECC 1 Restore XY Home Center Click to restore the lens carriage to its standard home position when you are finished using a temporary home position You can RESTORE XY Home from here or you can double center click in Jog mode to do the same thing 2 Restore Table Home Center ...

Page 129: ...r has the effect of decreasing the distance between the table and the lens carriage The numeric readout shows increments of 001 Center click to gain access tilt the joystick up or down to increment or decrement Press the Go key to make your change permanent 6 Jog Laser PWR This function sets the laser power that will be used when using the Laser On feature Increasing this number increases the perc...

Page 130: ...with many different types of materials Fiber lasers are used for metal marking only This is a factory setting that is not user accessible 13 Vector Grid In This indicates if the Vector Grid is installed Center click to gain access tilt the joystick up or down to toggle between Yes and No Press the Go key to make your change permanent Most users find it is easier to make this setting from the ECC 1...

Page 131: ... calibrates the accuracy in the X axis This setting is normally a factory only setting and will not need to be adjusted by the user 23 Y Scale Adjust This setting calibrates the accuracy in the Y axis This setting is normally a factory only setting and will not need to be adjusted by the user 24 Laser TI This sets the Tickle of the laser tube This setting is normally a factory only setting and wil...

Page 132: ... sy you must be button Sim moves the l ng laser power CONFIG th Joystick Up o back to Jog rary Mem ability to sto ll jobs sent u ere is no lim ed in the la so be deleted ont Co r On Ke e switch that n the red dot ointer key w the carriage y feature bec ystem e in Jog mod multaneously laser will fir r being use hen scroll do p or Down to g mode to us mory ore multiple j until there is mit to the nu...

Page 133: ... queue rea but has not ru ling throug will show th meters that for each job 11 n 9 g Co ndard Featu ab tion Tab CC either do your system t in more deta ed to manage rameters that shows at have o the 3 is ou can meters for this next to e Run means as not s in the ady to un yet gh the e laser were 19 Usin ontro ures ouble click o tray in the lo ail in an earl e the jobs tha t were used ng th ol Ce o...

Page 134: ...ld be bet rt a job if the that are sh ed a job to th meters you new settings w ECC E 20 n the laser fro will start the pressing th need to start ng a job from ng it and leav your work p tter off starti e status of th hown You he laser and can change will override Epilog om this one e job you ha he Play butto t the job us m the ECC A ve the laser u piece If you ing the job f he machine i can also S...

Page 135: ...t c the Raster sp will run the j back to wh permanent f e change and e a job is ru ob you are cu jobs cannot driver allow s carriage an e If you clic ontrols are r Contro hange perm peed you wil job at this n hat was orig first change d the new va unning Notic urrently runn At ECC visu that of t see 2 3r been seco All auto be stored in w for perma nd the work ck on the cur real time con ol Cen ane...

Page 136: ... the E 12 ut numerical buttons at the riage back to Tab n tab allows mething you ts to your m figuration ta board nd ed ge he of is do an he ECC E 22 values if yo e bottom of o its standard s you to chan u would norm machine is ea ab are the sa Epilog ou want to m the screen to d rest positio nge the facto mally chang asy from the ame as those Contro move the carr o set a temp on ory setting f ge ...

Page 137: ...essories ny time after or Grid Vac cess D front access for easy ding of palle door is inter will not fire front acc orted by strut 12 n 10 l Ma or These opt the purchase cuum Hold D Door door is usu loading etized mater rlocked and e if the doo cess door ts 23 0 S achin tional acces e of your las Down Table ually and rials d the or is is tand ne F sories can b ser system dard Feat be purchased d u...

Page 138: ...clude vect hold oddly s ish and Simply em over ch units d to the len when the tabl he system wi ress the Rest The assem pleas top o carria Optio es wish to open right thumb table that is tor cutting shaped items ns assembly le is moving ill come to a t key on the crash bar i mbly When se make sure of the loca age Crash B onal M the door m screws to al s used as the The task pl s in place y and pre...

Page 139: ...ial te and allow netrate all th material w p onto the ba The photo grid installed dard eature 25 The emer down the the emerg the machi pop the E normal E St id Vac vacuum y used ere the though vector l off of ws the he way without ackside below d in the Fusi Optio es rgency stop e Fusion syst gency stop i ine using the E Stop back o Stop tandard Pow cuum ion onal M can be used tem in case is used ...

Page 140: ... ly in e vector grid feel a tactile e vector cutt and collect i ngerous fire basis dard eature 26 n ed so that it ust pulls air t lightly warpe s long as the mm below it stock that do ou can use a ng most of t t too severely Vector g d to these slo e click wh ting there is in the botto hazard Rem Optio es t evacuates f through the ed sheet stoc e exhaust is ts highest po oes not flatte any materia...

Page 141: ...intenance Some materials are extremely flammable and can easily ignite and burst into open flame setting the machine afire This open flame is very dangerous and has the potential to destroy not only the machine but the building in which it is housed Acrylic Persplex is one of the more highly flammable materials that are commonly processed with a laser Please read the following warnings and recomme...

Page 142: ...ee of debris Regularly remove the vector grid to clean any small pieces that have fallen through the grid The single most important thing that you can do to keep your laser working as if it were new is to keep it clean Five minutes once a day will keep the residue and debris from building up and causing problems There is almost no maintenance required for your laser if you KEEP IT CLEAN To keep yo...

Page 143: ...cotton to th prepare a fre oid any hard it and try n emove any c to dry before sembly plea e side of the Crash Machi otton swab m d the label o fingerprints d as a tempo mpurities wh thyl grain d because o t and then b daub the opti he surface u esh swab an scrubbing not to use rep cotton thread e you operat ase make sur carriage h Bar and lo ne Cle moistened wi on the bottle s If you ru orary mea...

Page 144: ...bott icating ser should b ton swab wi acks which eaning out th e months yo accessory kit ooves one nside the gro Machi or directly a or is very we a cotton swa he focus lens tom of this l the Bea be cleaned a ith some alc the optics he inside of ou should lu t apply a thi on the top a ooves on eac ne Cle above it ther ell protected ab if it does s Remove th lens aring R about once a cohol or sim m...

Page 145: ...t i cleaning th about an inc of Epilog su e into the to m grooves s rail wing photo e to greas m groove applying e to both gr he X carriage the machine Engra 13 otos show cl on cloth to clean h of the hows a ning out f the X here is on the e rail o move ut of the the rail flex in it out of not pull it becomes s he rail ch long upplied op and of the The shows se the of the g the rooves e over the g...

Page 146: ...hows locatio X axi and th bearin is beh axis b on 11 a bead of e along bottom ve of the s rail photo s the on of the s carriage he X axis ng which hind the X belt Engra 13 X axis aving M 32 X axis rail s carriage an Machi nd belt ne Cle eaning g ...

Page 147: ... cation is red n the length eft side Y a using a s n clo cation is red cleaning the machine Spe quality and Engra 13 of axis soft oth not of axis soft oth not e rails and b ending just a performanc aving M 33 bearings cle a few minut e Machi ean off the ta tes a week w ne Cle able and the will pay off eaning e rest of the in the long g inside of run with ...

Page 148: ...an ing or if the exhaust sys The photos b lso occasion ide of the m Machi Plenum are using d duct syste e smoke in th stem Chec below show nally check y machine It i wi ins Cl ne Cle m receives p em to remov he cabinet is ck for loose w where to cl your exhaust is best to use ire brush t side of the v lean the dow eaning proper main ve built up d visible in th or broken p lean the duct t blower an...

Page 149: ...a 13 eaning the in The exhaust crews that ho w the plenum oved aving M 35 nside of the t plenum ca old the exhau m partially re Machi machine yo an be compl ust plenum i emoved and t ne Cle ou should oc letely remov in place the back of t eaning ccasionally c ved from the the machine g clean the e Fusion e with the ...

Page 150: ...mount of effort The laser tubes can be refurbished and are available on an exchange basis by contacting Epilog technical support Insure that all of the laser cooling fans are properly working at all times The fans keep the laser tube cool and prevent it from overheating An overheated laser tube will produce erratic output and may fail completely If the laser system is in a dirty or dusty environme...

Page 151: ...ng the Power can be as effective as lowering the Speed in producing a darker mark Frequency is less dependent on Speed and Power and can often be determined independently of those two variables Focus can be used to affect the type of mark created For example when marking steel in Raster mode changing the focus is the most important variable in creating an annealed mark Speed Speed settings determi...

Page 152: ... of the laser and is adjustable in 1 increments The Fiber laser in your Fusion system is a pulsed laser and cannot be run as a CW Continuous Wave laser Even if you are engraving a solid black line the fiber laser source is actually outputting pulses This is very advantageous for virtually all marking applications because frequency affects the amount of power that is output with each pulse of the l...

Page 153: ...e job and start by changing only one variable at a time Changing only one variable at a time will help to determine the correct setting for your material Because there are many factors that influence the time it takes to mark a given image the Speed settings were designed to be reference numbers only The Speed setting scale of 1 to 100 is not linear i e 100 speed will not be twice as fast as 50 sp...

Page 154: ...e to be considered when deciding on the final settings Below are general guidelines for most common metals Settings will have to be adjusted based on wattage A general rule of thumb is to use less speed and lower frequency settings for 10 and 20 watt fiber lasers and less power higher frequency for higher wattage Fibers 30 and 50 watt Etching of Metals 8 30 Speed 100 Power 1 10 Frequency 020 to 02...

Page 155: ...k increase the frequency setting and try again by adjusting only the power Annealing of Steel Alloys 6 12 Speed 100 Power 1 Frequency 600 or 1200 DPI Focus see comments in next paragraph To achieve an annealed mark the focal point should be significantly away from zero The unfocused broader beam provides the heat to change the surface color without actually penetrating the metal The focal point ca...

Page 156: ...ium Ti Titanium and Ti alloys are highly amenable to marking at this wavelength Similar to aluminum a black mark from the etching process is difficult to achieve Various shades of gray can be made from very dark gray to light grey Annealed marks can also be made on titanium materials using the same processing parameter described for stainless steel Depending on the Ti alloy marks of various colors...

Page 157: ...sults will vary based on the metal used for plating thickness of plating size of mark Our recommended settings for annealing will often work for plated metals where the plating has a thicker wall and material used has high levels of carbon or metal oxides 600 or 1200 DPI works well Powder Coated Metals 20 40 Speed 80 100 Power 1 20 Frequency Up or down 030 to 050 focus 600 DPI 2 3 passes one pass ...

Page 158: ...etal results in dull white gray marks Lower frequency and higher power settings help offset the change in focal point Different grades of anodized core aluminum alloy will affect how the final marks look Finding the right printing parameters is key in achieving a highly contrasting mark Precious Metals Any rare metal alloy is deemed precious As mentioned earlier we ve yet come across a metal which...

Page 159: ... Titanium 3 5 100 1 100 0 08 to 0 1 0 05 to 0 08 Notes on Annealing Producing an annealed mark is very dependent on the material being out of focus Run the laser at slow speed and full power then adjust the focus while the machine is running until you achieve the annealed mark you need Notes on settings Don t be afraid to experiment with Speed Power and Frequency settings Many materials can be mar...

Page 160: ... 08 Titanium 5 10 100 1 100 0 08 to 0 1 0 05 to 0 08 Notes on Annealing Producing an annealed mark is very dependent on the material being out of focus Run the laser at slow speed and full power then adjust the focus while the machine is running until you achieve the annealed mark you need Notes on settings Don t be afraid to experiment with Speed Power and Frequency settings Many materials can be...

Page 161: ...0 08 Titanium 7 12 100 1 100 0 08 to 0 1 0 05 to 0 08 Notes on Annealing Producing an annealed mark is very dependent on the material being out of focus Run the laser at slow speed and full power then adjust the focus while the machine is running until you achieve the annealed mark you need Notes on settings Don t be afraid to experiment with Speed Power and Frequency settings Many materials can b...

Page 162: ...0 08 Titanium 12 17 100 1 100 0 08 to 0 1 0 05 to 0 08 Notes on Annealing Producing an annealed mark is very dependent on the material being out of focus Run the laser at slow speed and full power then adjust the focus while the machine is running until you achieve the annealed mark you need Notes on settings Don t be afraid to experiment with Speed Power and Frequency settings Many materials can ...

Page 163: ...T Te Tro S chn ubl Spe 14 M nica lesh ecif 49 Manua al S hoo fica al Sup otin atio ppo ng a ons ort and s d ...

Page 164: ...150 THIS PAGE WAS INTENTIONALLY LEFT BLANK ...

Page 165: ...1 13 I fficu t cal Su rtment at E r using you ted below th cal support available in G me t Direct Line ech epilogl e www epi g Epilog Tec l number ava machine Man pecially the can be foun ed on the ba Model 1300 n Ca ulty uppor Epilog is av ur Epilog P hen if you a department Golden Col e 1 303 21 laser com iloglaser com chnical Supp ailable any issues wi optics this nd on the C ack of the m 00 75...

Page 166: ...Section 13 In Case of Difficulty 152 THIS PAGE WAS INTENTIONALLY LEFT BLANK ...

Page 167: ...ular permanently aligned and field replaceable upgradeable Bearings Ground and polished stainless steel NeverWear bearing system Belts Advanced B style Kevlar precision drive belts Resolution User controlled choice of 75 150 200 300 400 600 or 1200 dpi Speed Power Control Computer or machine controlled Speed and Power in 1 increments to 100 Color mapping links Speed and Power setting to any RGB co...

Page 168: ...rfectly adequate There s no magical cut off that makes a computer too slow If you re comfortable with the performance and speed of your current computer there s probably no reason to purchase another one The following recommendations are just advice to consider if a new computer is necessary A new computer doesn t have to be expensive to work great Even many of today s lower cost computers work gr...

Page 169: ... This is the permanent memory in your computer Many users feel that you can never have a large enough hard drive Luckily most computer manufacturers put high capacity drives in new computers these days When in doubt buy bigger than you think you might need It s so in expensive that it s worth the peace of mind to have it available Software Many users use Corel as their graphics software Many other...

Page 170: ...age the expensive equipment computer and laser they are protecting About The Laser Your Epilog CO2 laser system uses the latest in waveguide laser technology to provide a powerful tool that is simple and safe to setup and operate The Epilog laser can mark engrave and cut a variety of non metallic materials The CO2 laser beam itself is invisible The beam is about half the diameter of a 2 pencil Unf...

Page 171: ...is repeated eventually assembling a full image Federal Communications Commission FCC Notice Note This equipment has been tested and found to comply with the limits for a Class A digital device pursuant to Part 15 of the FCC rules These limits are designed to provide reasonable protection against harmful interference when the equipment is operated in a commercial environment This equipment generate...

Page 172: ...Section 14 Specifications 158 THIS PAGE WAS INTENTIONALLY LEFT BLANK ...

Page 173: ...re upgraded The firmware is the command software in your laser system that controls how your laser system operates think of firmware as the brains of your system A firmware upgrade reprograms your laser system to take advantage of new capabilities or enhancements to the system To accomplish the reprogramming you just Print a special file to your laser system The process is explained below Upgradin...

Page 174: ...te file be automat ome availab s displayed read Version ilog web sit e location i thumb drive uter to anoth mware it com exe The X n the compu ompress it it is extracted the Op e e onto time by do glaser com u ou can conta to you Y tically notif ble The on the LCD n 1_0_X_X te download is onto you e flash drive her if you nee mes as a com X s designat uter that is at When you d to peratio o You ow...

Page 175: ...lowing ay button xtracted it ch mark1_0_X_ ision level e folder whe again in the New F Your L wing proc simple n your package example in the irmware ading mware 61 g message ap hanges from _X hex ag It is the he ere you save e next step Firmw Laser cedure to the Op e ppears m an exe form gain the a x format file ed the extrac ware fr r o transfer peratio mat to a hex actual numb e that you w cted ...

Page 176: ...e Advanc button to the fold cted file se on Open Upgra Firm 16 p is to P perties ced tab che der that co elect the h ading mware 62 Print sele ck the Upda ontains the ex file and the Op e ect the D ate Firmwar e d peratio Dashboard re box and onal d driver then click o and on the ...

Page 177: ...PROCES ebooted your ber of firmw e type of up ading mware 63 date Firmwa ill begin tran the graphic t the cursor k d Reboot s a few minu RB THE SS r laser the p ware on your pgrade you the Op e are File box nsfering to y that you crea keys will lig utes to comp E LASE process is co LCD as the may be req peratio Click OK your laser ated will not ght up Whe plete ER DUR omplete and laser power quest...

Page 178: ...Sectio Close on 15 your Corel Upgra Firm 16 page and yo ading mware 64 ou are ready the Op e for you next peratio t job onal ...

Page 179: ...tilation acts of God or other situations out of the control of Epilog failure to operate in accordance with instructions provided in the Owner s Manuals for the Epilog models 13000 including specific safety and operational warnings contained therein cosmetic damage sustained in use and damage caused by unauthorized modifications of any equipment All warranties to original purchasers are non transf...

Page 180: ...APPENDIX A 166 THIS PAGE WAS INTENTIONALLY LEFT BLANK ...

Page 181: ...forcement a hown below harms Bar a ur mouse cur 67 END L DA R INS he 64 bit Epi Driver for a Driver Usin ling th river ashboard Dri disabled On standard Wi t time you ca again The p and select Se rsor into the IX B ASHB STR ilog Dashbo an Ethernet C ng the USB C he 64 iver in Wind nce the Driv indows drive an install ne procedure to ettings The lower right B BOA UCT ard Print Dr Connection Connect...

Page 182: ...dix 2 3 4 x B Add Select Chan Select Gene Scroll to the Restart Now ditiona 16 nge PC Setti eral e bottom of t w al Dash 68 ings the General hboard page Under d Instr r Advanced ruction d Start Up s ns select ...

Page 183: ...App pendix 5 6 7 x B Add Once the PC Select Adva Select Start ditiona 16 C comes bac anced Option t Up Settings al Dash 69 ck up select ns s hboard Troublesho d Instr oot ruction ns ...

Page 184: ... a pr ing either ke e driver Dashb nectio Epilog Laser al Dash 70 n or the numb the Driver rinter driver ey your comp board on W r CD into yo hboard ber 7 key fro Signature E puter will re d Driv Windo our compute Tap the of your d Instr om your com Enforcement eboot Now ver for ows 8 r s disk devi box in the u screen ruction mputer keyb t which will Login as no r an 8 ice upper right c ns board l...

Page 185: ...ix 2 3 4 x B Add Click o The follow Driver Ins Click on S ditiona 17 on Run Fusi wing windo stall Stop al Dash 71 ion_driver ex ow should a hboard xe appear Clic d Instr ck on Ethe ruction ernet Dashb ns board ...

Page 186: ... Select Add or networ manual click Next Click on C click on th Select Stan ditiona 17 Next d a local pri rk printer settings t Create New he dropdown ndard TCP al Dash 72 inter with The Port then n menu IP Port hboard d Instr ruction ns ...

Page 187: ...e it mu Fusion laser ng in the IP A e the compu al Dash 73 you want to 4 which is w ust be the sam keypad or th Address cli uter identifies hboard o use Most what we use me number t he ECC ck on Next s the port d Instr Epilog user e in this doc that you set a ruction rs will use th ument Wha as the IP Ad ns he IP atever ddress ...

Page 188: ...iona 17 stom and the al Dash 74 en Settings hboard then click o d Instr on Next Set Protoc is a very Your dow be greatl LPR is not Type L Queue Nam ruction col to LPR important wnload time ly increase t selected aser into me ns This step e will ed if the ...

Page 189: ...App pendix 12 13 14 x B Add 2 Click on N 3 Click on H 4 Click on B ditiona 17 Next Have Disk Browse al Dash 75 hboard d Instr ruction ns ...

Page 190: ... 6 Select the 7 Click on th ditiona 17 isk drive wit driver folde he EpilogWi al Dash 76 th the Epilog r and then cl WinALLFusio hboard g install disk lick on Open on file and th d Instr k and click o n hen click on ruction on Open n Open ns ...

Page 191: ...more t comput might re nd you are re hboard n rename yo d it for this associate th s they are u than one la ter Click o ename the d eady to print d Instr our printer h s document he driver na using Espe aser connec on Next F driver Fusio t ruction here We hav but many ame with th cially if the cted to a s or example on 192 168 3 ns ve not users he IP ere is single e we 4 ...

Page 192: ...Fusion has dows 8 comp the Bar k on arch To the Bar your into ower er of ay al Dash 78 board n usin a USB prin XP or Vista process so i se instru to insta you are mputer and usion n laser syst s initialized puter that it i hboard d Driv ng Wi nter when u a Windows 8 it is importa ructions all the D using W then conne tem It will there will n is ready to in d Instr ver Us indow using Wind 8 will no...

Page 193: ... Un Engraver F ditiona 17 word Contro the Control Devices and nspecified s Fusion icon al Dash 79 ol into the se l Panel box Printers section of D hboard earch bar x under App Devices and d Instr ps in the u d Printers y ruction upper left of you will see ns f this e the ...

Page 194: ...x B Add Right click Select the 0 Select the ditiona 18 k on the Fus Hardware t e device Epil al Dash 80 ion icon Th tab logEngraver hboard hen click on P rFusion Th d Instr Properties hen click on P ruction Properties ns ...

Page 195: ...App pendix 11 12 13 x B Add 1 Click on C 2 Click on th 3 Click on U ditiona 18 Change Setti he Driver tab Update Driv al Dash 81 ings b ver hboard d Instr ruction ns ...

Page 196: ...rowse my C Browse butto he Epilog dri have the pro al Dash 82 Computer fo on to direct iver disk tha oper disk dri hboard or driver soft your comp at you inserte ive showing d Instr ftware puter to you ed earlier in click on the ruction ur disk drive this process Next button ns e that s n ...

Page 197: ...ver 9 Your Epilo on the USB ditiona 18 ess window then be aske r Anyway og Fusion D B port al Dash 83 will appear ed if you wa Dashboard pr hboard ant to install rint driver ha d Instr l this driver as been succ ruction Click on In cessfully inst ns nstall talled ...

Page 198: ...hen see d X in the up ditiona 18 Close in the e your Fusio pper right co al Dash 84 next window on driver in orner of this hboard w and then C the Devices window and d Instr Close again s and Printer d you are rea ruction rs page Clic ady to print ns ck on ...

Page 199: ...25 D Dashboard i xi 33 34 43 48 55 56 70 77 81 82 85 89 91 97 99 102 154 159 162 167 170 178 Advanced Tab 55 Color Mapping 55 56 76 77 78 79 80 81 82 83 84 85 86 Configurations 85 Dithering 70 72 73 Floyd Steinberg 71 Jarvis 71 73 Low Res 70 73 Stucki 71 72 73 Frequency 59 75 76 78 79 General Tab 55 58 81 85 Multiple Pages 90 Multiple Passes 89 137 Photograph Mode Floyd Steinberg 71 Jarvis 71 73 S...

Page 200: ... 43 44 47 167 J Jarvis 71 73 Job Storage 105 118 119 K Keyboard Commands 105 L Labels Aperture Safety Label 9 Certification Identification Label 7 8 151 Defeatably Interlocked Protective Housing Safety Label 9 Electrical Safety Label 9 Explanatory Label 8 Fire Safety Label 9 Fire Warning 10 Non Interlocked Protective Housing Safety Labels 8 Warning Label 8 10 Laser Diode Pointer 3 4 7 Laser Instit...

Page 201: ... 5 6 7 8 9 153 ANSI 4 DO NOT 4 5 22 163 Dos 13 Electrical 3 5 9 Federal Performance Standards For Light Emitting Products 3 Fire 3 6 9 NEVER ix 6 13 21 127 OSHA 4 Scanned Images 59 95 Scanner 156 Service xi Software 155 Coreldraw xi 55 63 65 90 95 154 Specifications xi 149 153 Speed 59 61 63 69 70 74 76 78 81 83 86 137 139 153 155 Stainless Steel 145 146 147 148 Standard Features Air Assist 119 15...

Page 202: ...88 W Warning ix 8 10 21 25 127 Warning Label 8 10 Warnings DO NOT 4 5 22 163 Fire Warning ix 10 127 Labels 8 10 Warranty xi 13 25 165 Windows Vista 153 154 Windows 2000 4 33 153 154 Windows XP 153 154 Wood 87 ...

Reviews: