ep ES10-10WA Operation Manual Download Page 19

14

3 Starting up the stacker

Before the stacker can be commissioned, operated or a load unit lifted, the driver must
ensure that there is nobody within the hazardous area.

Checks and operations to be performed before starting daily work

– Visually inspect the entire stacker (in particular wheels and load handler) for obvious
damage.
– Visually inspect the battery attachment and cable connections.

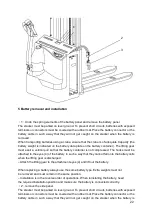
Switching on the stacker

Make sure the battery is connected
Insert the key in the key switch (3), and turn it to the right as far as it will go,
Test the warning signal switch (9).
The stacker is now operational.
The battery charge / discharge indicator (2)

shows the available battery capacity.

Test the braking operation of the tiller (4) (see section 4.2).

4 Industrial stacker operation

4.1 Safety regulations for stacker operation

Travel routes and work areas:

Only use lanes and routes specifically designated for stacker

traffic. Unauthorised persons must stay away from work areas. Loads must only be stored in
places specially designated for this purpose.

Driving conduct:

The driver must adapt the travel speed to local conditions. The stacker

must be driven at slow speed when negotiating bends or narrow passageways, when passing
through swing doors and at blind spots. The driver must always observe an adequate braking
distance between the stacker and the vehicle in front and must be in control of the stacker at
all times . Abrupt stopping (except in emergencies), rapid U turns and overtaking at
dangerous or blind spots are not permitted. It is forbidden to lean out of or reach beyond the
working and operating area.

Travel visibility:

The driver must look in the direction of travel and must always have a clear

view of the route ahead. Loads which affect visibility must be stored at the rear of the stacker.
If this is not possible, a second person must walk in front of the stacker as a lookout.

Summary of Contents for ES10-10WA

Page 1: ...1...

Page 2: ...1...

Page 3: ...so maybe there are some differences between your product and the description in this manual And the operator manual details will be different because of customer s special requirements If you have an...

Page 4: ...15 4 3 Collecting and depositing loads 17 5 Parking the stacker securely 18 6 Display instrument 18 6 1 Battery Discharge Indicator 18 6 2 Operating hours display 18 6 3 Power up test 19 7 Troublesho...

Page 5: ...ze filter Replacing the gauze filter 32 6 8 Checking electrical fuses 33 6 9 Recommissioning 34 7 Decommissioning the industrial stacker 34 7 1 Prior to decommissioning 34 7 2 During decommissioning 3...

Page 6: ...industrial stacker himself or on whose behalf it is used In special cases e g leasing or renting the proprietor is considered the person who in accordance with existing contractual agreements between...

Page 7: ...with a steered drive wheel It is designed for use on level floors to lift and transport palletised goods Open bottom pallets or roll cages can be lifted The capacity can be obtained from the data plat...

Page 8: ...ies Item Component Item Component 1 Caster wheel 7 Key switch 2 Drive wheel 8 Battery display instrument 3 Tiller and tiller arm 9 Battery panel 4 Controller 10 Front panel 5 Mast 11 Lift mechanism 6...

Page 9: ...3 0 16 0 11 0 16 m s Lowering speed laden unladen 0 19 0 18 0 22 0 13 0 32 0 23 high speed m s 0 16 0 12 low speed Maximum gradeability laden unladen S2 5 min 8 16 6 12 3 2 Dimensions Description ES10...

Page 10: ...0 3300 3700 2270 100 3530 3600 4000 2420 100 3830 3900 4300 2550 100 4090 4200 4560 Two Stage Mast Free Lifting 1819 1320 2620 2700 3119 1969 1470 2920 3000 3419 2119 1620 3220 3300 3719 Three Stage M...

Page 11: ...765 2320 100 3550 3600 4065 Three Stage Mast Free Lifting 1830 1390 3990 4000 4470 2022 1590 4490 4500 4970 ES20 WA Standard Mast Types mm Mast types Close Mast height Free height lift height Extended...

Page 12: ...7...

Page 13: ...rating at 5 C to 40 C Special equipment and authorisation is required if the stacker is to operate constantly below 5 C or in a cold store or in extreme temperatures or conditions of fluctuating air h...

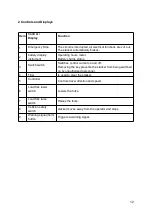
Page 14: ...9 Item Description 1 Waring decal 2 Refer to manual decal 3 Truck data plate...

Page 15: ...Max capacity 3 Model type 11 Max lift height 4 Serial NO 12 Rated capacity 5 Manufacture date 13 Load center For queries regarding the truck or ordering spare parts please quote the truck serial numb...

Page 16: ...nnel Damage and Faults The supervisor must be immediately informed of any damage or faults to the stacker stackers not safe for operation e g wheel or brake problems must not be used until they have b...

Page 17: ...us 3 Switch switch Switches control current on and off Removing the key prevents the stacker from being switched on by unauthorised personnel 4 Tiller Is used to steer the stacker 5 Controller Control...

Page 18: ...13...

Page 19: ...Only use lanes and routes specifically designated for stacker traffic Unauthorised persons must stay away from work areas Loads must only be stored in places specially designated for this purpose Dri...

Page 20: ...must enter lifts with the load in front and must take up a position which does not allow it to come into contact with the walls of the lift shaft Persons riding in the lift with the stacker must only...

Page 21: ...s the travel switch 5 in the desired direction fwd or rev The more the tiller rotates the speed is faster Driving in high speed Set the tiller 4 to the travel range k and press the travel switch 5 in...

Page 22: ...ing the stacker from rolling downhill With the travel switch set to zero the brake is automatically applied after a short jerk the controller detects the stacker is rolling back on the slope The servi...

Page 23: ...er has been released via the key switch the battery charge status is displayed The colours of the LEDs 1 represent the following conditions LED colour value Green Standard battery residual capacity 70...

Page 24: ...Check battery charge charge battery if Necessary Test fuses Interrupt charging Load can not be lifted Charge capacity below 20 40 Hydraulic oil level too low Excessive load Charging the battery Check...

Page 25: ...e covered with a non slip insulation mat Battery Disposal Batteries may only be disposed of in accordance with national environmental protection regulations or disposal laws The manufacturer s disposa...

Page 26: ...ly ventilated room When charging the tops of the battery cells must be exposed to provide sufficient ventilation Do not place any metal objects on the battery Before charging check all cables and plug...

Page 27: ...s not compressed The hooks must be attached to the eyes 4 of the battery in such a way that they cannot fall onto the battery cells when the lifting gear is discharged Attach the lifting gear to the a...

Page 28: ...e reverse order of operations After installing the battery again check all cables and plug connections for visible signs of damage Before starting the stacker the battery panel must be firmly closed C...

Page 29: ...ervice department has field technicians specially trained for these tasks We therefore recommend a maintenance contract with the manufacturer s local service centre Lifting and jacking up When an indu...

Page 30: ...More demanding conditions dust temperature require more regular lubrication The prescribed chain spray must be used in accordance with the instructions Applying grease externally will not provide suf...

Page 31: ...y acid level and battery voltage Travel 4 1 Check motor suspension 4 2 Check the transmission for noise and leakage 4 3 Replace gear oil if service life exceeded 10 000 hours 4 4 Check travel mechanis...

Page 32: ...6 7 Replace hydraulic oil filter 6 8 Replace hydraulic oil 6 9 Check wheels for wear and damage Agreed performance levels 7 1 Lubricate stacker in accordance with Lubrication Schedule 7 2 Test run 7...

Page 33: ...28 5 Lubrication Schedule Contact surfaces Hydraulic oil filler neck Transmission oil filler neck Transmission oil drain plug...

Page 34: ...with hot components or naked flames Only use clean containers when filling up with consumables Do not mix consumables of different grades The only exception to this is when mixing is expressly stipul...

Page 35: ...event the stacker from accidentally starting When working under a raised lift stacker secure it to prevent it from tipping or sliding away 6 2 Removing the front panel Open the battery panel Remove th...

Page 36: ...pends on the lift height The oil level must be checked when the load forks are lowered If necessary add hydraulic oil of the correct grade see Section 5 Installation is the reverse order 6 6 Check tra...

Page 37: ...the gauze filter Prepare the stacker for maintenance and repairs see Section 6 1 Remove the front panel see Section 6 2 Undo the union 5 Remove connection and take out the gauze filter Insert a clean...

Page 38: ...the stacker for maintenance and repairs see Section 6 1 Dismantle the front panel see Section 6 3 Check rating of all fuses in accordance with table replace if necessary Item To protect Rating 6 Tract...

Page 39: ...d If the stacker is to be out of service for more than 6 months further measures must be taken in consultation with the manufacturer s service department 7 1 Prior to decommissioning Thoroughly clean...

Page 40: ...ecial safety department with trained personnel to carry out such checks The stacker must be inspected at least annually refer to national regulations or after any unusual event by a qualified inspecto...

Page 41: ...decommissioning or disposal of the stacker must be performed in accordance with the regulations of the country of application In particular regulations governing the disposal of batteries fuels and e...

Reviews: