background image

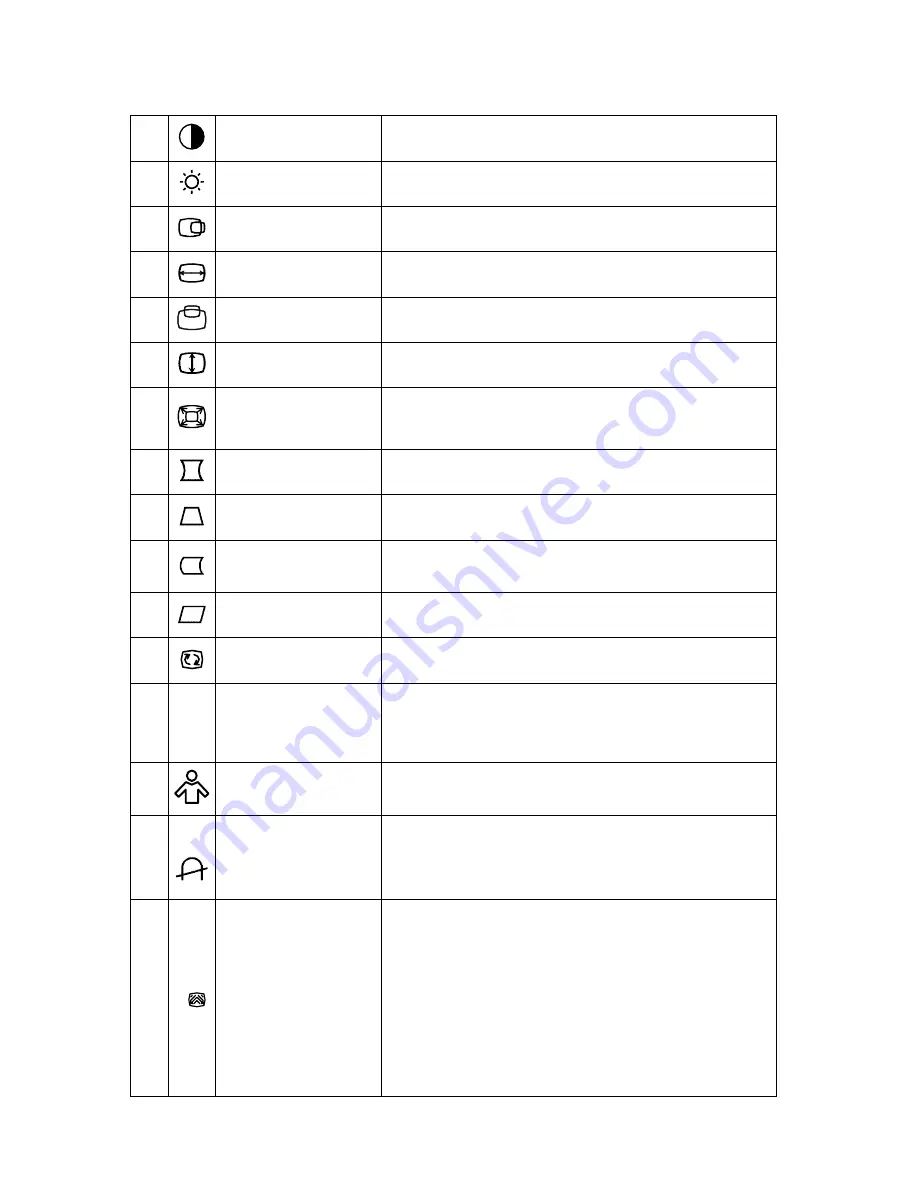
ADJUSTING THE PICTURE (see figure 4) 


1. 

  CONTRAST 

Adjust the picture contrast. 

2. 


  BRIGHTNESS 

Adjust the picture brightness. 

3. 


  H- CENTER 

Adjust the horizontal position of the picture. 

4. 


  H- SIZE 

Adjust the picture’s horizontal size. 

5. 


  V- CENTER 

Adjust the vertical position of the picture. 

6. 


  V- SIZE 

Adjust the picture’s vertical size. 

7. 


  ZOOM 

Adjust the picture’s horizontal and vertical size 
simultaneously. 

8. 


  PINCUSHION 

Adjust the pincushion and barrel. 

9. 


  TRAPEZOID 

Adjust the picture’s trapezoid distortion. 

10. 

  PIN-BALANCE 

Adjust to compensate the pincushion 
unbalance. 

11. 


PARALLELO- 
GRAM

Adjust the picture to be a rectangle. 

12. 

  ROTATION 

Adjust the picture tilt to horizontal position. 

13. 


6500°K/9300°K  
( COLOR 
TEMPERATURE )

The color temperature for 6500°K is x=0.313,  
y=0.329 and 9300°K is x=0.283, y=0.297. It 
presents two different color sets on the screen. 

14. 


USER COLOR  
( Red / Blue  ) 

If the 9300°K normal white or 6500°K warmer 
white do not satisfy your desire, properly adjust 

15. 


DEGAUSS 

It is used to clear dis-coloration on the screen 
caused by magnetic interference. 

16.       MOIRE REDUCE 

Moire is the result of interference between the 
phosphor layout and the video signal. In some 
cases, you may find the moire very noticeable. 
Press the Shuttle Knob to enter in the moire 
reduce setting. Please adjust the level to the 
optimum condition. Note: Too high of a setting  
will cause the picture to shake. 

Summary of Contents for EFT720

Page 1: ...EFT720 17 Flat CRT User s Manual By Envision Peripherals Inc www ENVISIONdisplay com...

Page 2: ...l before installing and switching on the monitor Please keep this manual in a safe place for your future reference Plug Play Drivers for the Envision Series Monitors are available at www ENVISIONdispl...

Page 3: ...relocate the receiving antenna 2 Increase the separation between the equipment and receiver 3 Connect the equipment into an outlet on a circuit different from that to which the receiver is connected 4...

Page 4: ...er company The monitor is equipped with a three pronged grounded plug a plug with a third grounding pin This plug will fit only into a grounded power outlet as a safety feature If your outlet does not...

Page 5: ...designed to conserve electrical energy by reducing power consumption when there is no video input signal present When there is no video input signal this monitor following a time out period will auto...

Page 6: ...cal devices that may cause electrical interference The power LED is ON orange but there s no video or no picture Computer Power Switch should be in the ON position Computer Video Card should be snugly...

Page 7: ...Connect the power cord into your monitor s power input socket and then plug the other end into a 3 pin AC power outlet The power cord may be connected to either a wall power outlet or the power outlet...

Page 8: ...ot install the monitor in a location near heat sources such as radiators or air ducts or in a place subject to direct sunlight or excessive dust or mechanical vibration or shock Save the original ship...

Page 9: ...ving the Swivel Base Figure 2 Connecting Cables 1 Signal Cable 2 Power Cord 3 AC Outlet Figure 3 External Controls 1 Power Indicator 2 On Off Switch 3 Menu 4 Contrast Right 5 Brightness Left 6 Exti Fi...

Page 10: ...an item on the menu Contrast With the OSD menu on press this key to either select a function or to adjust up the value of a selected function With the OSD menu off press this key to adjust the contras...

Page 11: ...icture to be a rectangle 12 ROTATION Adjust the picture tilt to horizontal position 13 6500 K 9300 K COLOR TEMPERATURE The color temperature for 6500 K is x 0 313 y 0 329 and 9300 K is x 0 283 y 0 297...

Page 12: ...17 RECALL Press RECALL to restore the monitor to factory settings 18 EXIT Close OSD window 19 SELECT LANGUAGE Select the language as you like...

Page 13: ...tically Max Resolution 1280 1024 Video Dot Rate 110MHz Factory Preset Timings 6 User mode Timings 8 Power Source Universal AC 100 240V 50Hz 60Hz Operating 0 C to 40 C ambient Humidity 10 to 85 relativ...

Page 14: ...ESA 85 800 x 600 53 7kHz 85Hz VESA 85 1024 x 768 68 7kHz 85Hz VESA 60 1280 x 1024 64 0kHz 60Hz Connector Pin Assignment 1 5 6 10 11 15 PIN NO DESCRIPTIO N PIN NO NO de Terminal PIN NO DESCRIPTI ON 1 V...

Reviews: