15
Installation
Wall framing
Wall thimble
Termination cap
Vertical section
of vent pipe
Horizontal frame
for thimble
Clean out tee
90° elbow
ENVIRO
EF3
Concrete Wall
Wall framing
Wall thimble
Termination cap
Vertical section
of vent pipe
Horizontal frame
for thimble
Clean out tee
90° elbow
ENVIRO
EF3
Wall strap
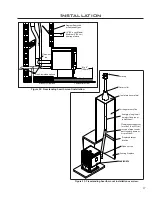
Figure 18: Venting horizontally with rise.
Figure 19: Venting with concrete wall behind unit .
o
utSide
v
ertical
i
nStallationS
- F
reeStanding
:
Non-combustible
floor protection.
Existing floor
(combustible)
6"
(15cm)
Rain cap
Flashing
24"
(61cm)
1"
(2.5cm)
Tee with
cleanout
Fresh air
intake
3" (7.5cm)
Clearance
Support
bracket
Type "L"
vent
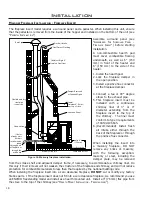
Figure 20: Outside Vertical Installation.
To accomplish a outside vertical pipe
installation, follow steps 1 through 5 in the
“
I
nsIde
V
ertICal
I
nstallatIons
- F
reestandIng
”
section and then finish it by performing
the following (refer to Figure 20).
1. Install a tee with clean out on the
outside of the house.
2. Install PL vent upward from the tee.
Make sure that you install support
brackets to keep the vent straight and
secure.
3. Install ceiling thimble and secure the
flashing as you go through the roof.
4. Ensure that the rain cap is approximately
36” (91.5 cm) above the roof.


