INSTALLATION
Before installing the keypad, the unit must be partially disassembled
to access the mounting plate.
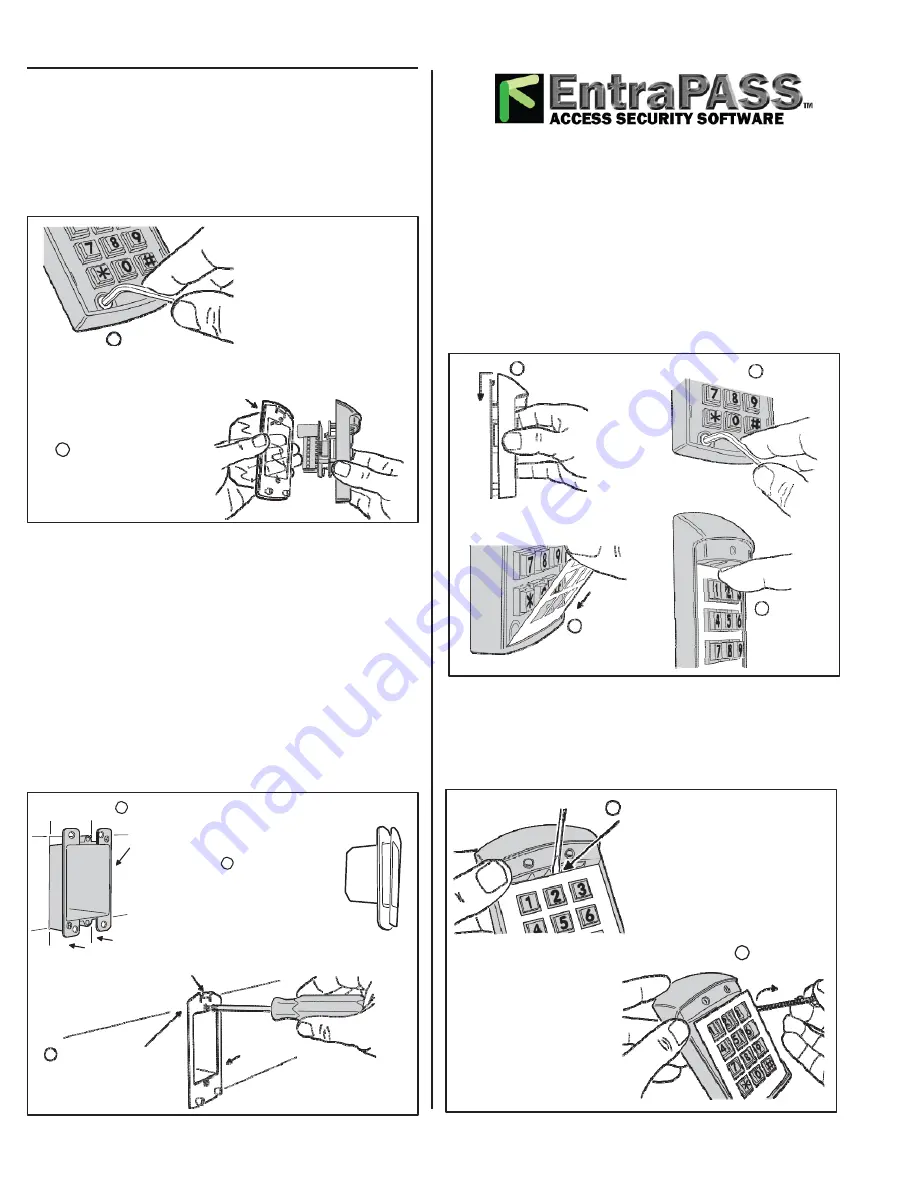
Opening the Keypad
The keypad assembly is secured with two tamper-resistant screws.
Refer to Figure 3 for disassembly details.
❑
Use the special allen wrench (supplied) to remove the two
tamper-resistant screws.
❑
Separate the mounting plate from the keypad assembly.
Final Keypad Installation
After wiring the keypad
(see next page), complete the installation
by securing the keypad to the mounting plate.
❑
If a lower beeper sound level is required, before installing
the keypad, remove Jumper JP1 (place the jumper block on
one pin to save the jumper).
❑
Hook the keypad assembly onto the mounting plate tab (see
Figure 5).
❑
Use the special allen wrench (supplied) to install the two
tamper-resistant screws.
❑
Fit the bottom tab on the faceplate into the slot on the
keypad then snap the top of the faceplate in.
1
HOOK THE KEYPAD ASSEMBLY
ONTO THE MOUNTING PLATE
2
INSTALL THE
TWO SCREWS
1
REMOVE THE
TWO SCREWS
MOUNTING
PLATE
2
SEPARATE THE
MOUNTING PLATE AND PLASTIC
ENCLOSURE FROMTHE KEYPAD
Figure 3. Opening the Keypad
3
FIT THE BOTTOMTAB OF
THE FACEPLATE INTO THE
SLOT ON THE KEYPAD
4
SNAP THE TOP
OF THE KEYPAD
INTO PLACE
Install the Electrical Box and Mounting Plate
The keypad is designed to fit into a single-gang electrical box. The
box must be deep enough to accomodate the protective plastic
enclosure. Select a location near the controlled door and choose
a convenient height for the keypad. Be sure there is good wiring
accessibility for the unit’s power and the output to the door strike
or access device.
❑
Install the electrical box in the wall.
❑
Place gasket on protective plastic enclosure and insert into
electrical box.
❑
Screw the mounting plate onto the electrical box (see
Figure 4).
Figure 5. Connecting the Keypad to the Mounting Plate
Faceplate Removal
Refer to Figure 6 for details on removing the faceplate if keypad
service is required.
1
PRY UP ON THE
FACEPLATE HERE
1
INSTALL A SINGLE-GANG
ELECTRICAL BOX AT THE
PROPER LOCATION
FOR THE KEYPAD
2
PLACE GASKET ON
PROTECTIVE PLASTIC
ENCLOSURE AND
INSERT INTO
ELECTRICAL BOX
(NOTE DIRECTIONAL
ARROWON PLASTIC)
2
REMOVE THE
FACEPLATE
MAKE SURE THE
TAB IS UP
3
ATTACH THE MOUNTING
PLATE TO THE
ELECTRICAL BOX
MOUNTING
PLATE
Figure 6. Removing the Faceplate
Figure 4. Installing the Mounting Plate
2
wwww.EntraPASS.com
8641 S. Warhawk Rd., Conifer, CO 80433 - Tel: 303-670-1099 - Email: [email protected]


