background image

 Janus HD - User’s Guide


13 

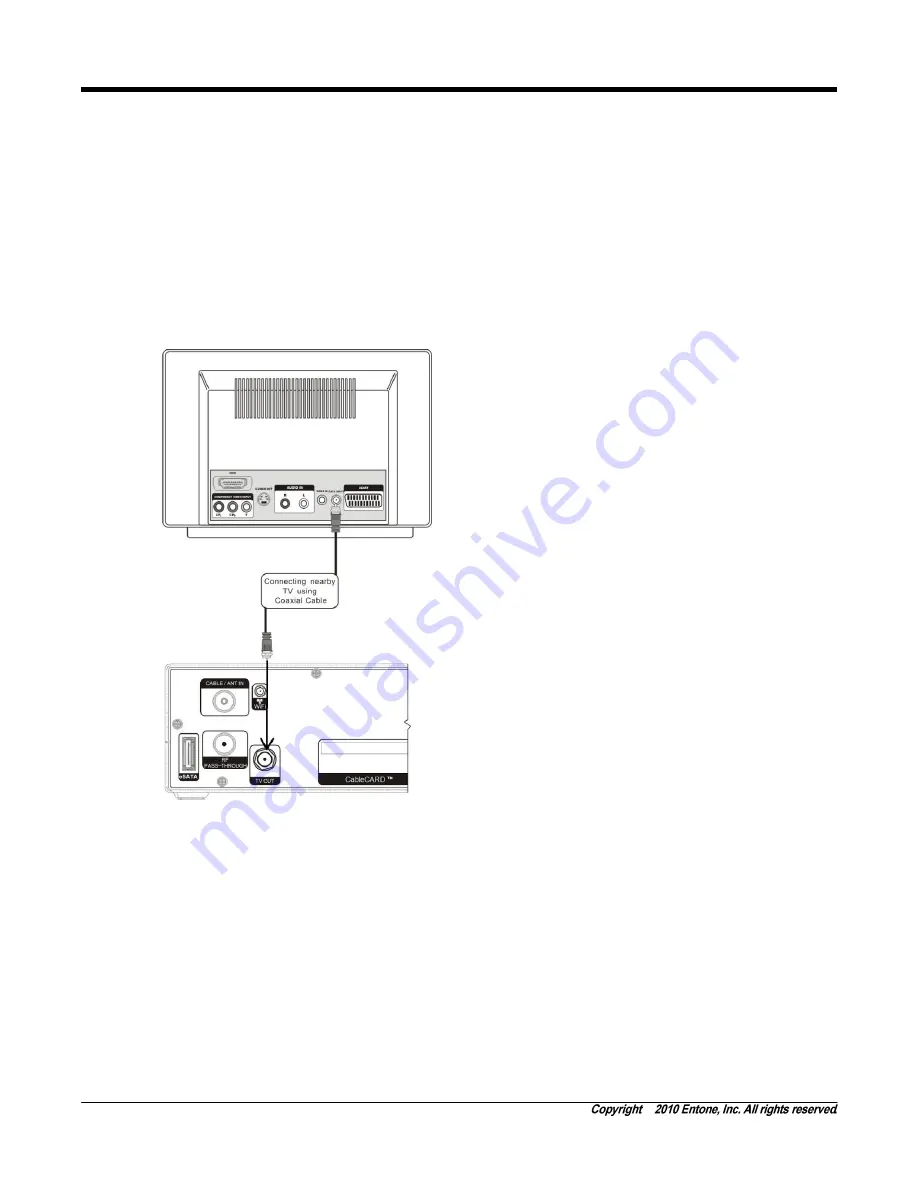
CONNECTING THE TV USING COAXIAL CABLE 

1. 

Use the coaxial cable that comes with Janus to connect your TV’s antenna input to the Janus’s “TV 
OUT” connector. 

2. 

Tune your TV to channel 3 or channel 4 to view the output (depending on selection of the on-screen 
user menu). 


NOTE

:  


In the TV OUT, factory set to use channel 3. 


You can change the channel ID by using the on-screen user menu. The new channel ID will take effect 
after restarting Janus. 


Figure 4-1 Connecting TV using Coaxial Cable 


SETTING UP TV TO USE CATV 

In order for the Janus to feed video signal to TV using RF TV, your TV must be configured to receive signal 
from CATV rather than from the antenna. 
 
Most TVs use either a physical switch located on the rear of the TV or with on-screen programming to 
configur

e to use CATV. Consult your TV owner’s manual for instruction if required. 


Summary of Contents for Janus HD

Page 1: ...V1 5 JanusHD JanusMediaHub User sGuide NorthAmerica Edition P N 95 86xxxx 06 ...

Page 2: ...MARKS Entone and the tagline Connecting the Home are trademarks of Entone Inc All other trademarks or registered trademarks belong to their respective owners CHANGES The material in this document is for information only and is subject to change without notice While reasonable efforts have been made in the preparation of this document to assure its accuracy Entone Inc assumes no liability resulting...

Page 3: ... 3 Janus Introduction 11 ABOUT THE JANUS MEDIA HUB 11 4 Connecting the TV 12 CONNECTING THE TV USING COAXIAL CABLE 13 SETTING UP TV TO USE CATV 13 CONNECTING TV USING COMPONENT 14 CONNECTING TV USING RCA COMPOSITE OR S VIDEO 15 CONNECTING THE TV USING HDMI 16 5 Connecting Audio System 17 6 Powering Up Janus 18 7 Remote Controls 20 LOADING BATTERIES 20 CONTROLLING THE JANUS USING IR 21 CONTROLLING ...

Page 4: ...al installation This equipment generates uses and can radiate radio frequency energy and if not installed and used in accordance with the instructions may cause harmful interference to radio communications However there is no guarantee that interference will not occur in a particular installation If this equipment does cause harmful interference to radio or television reception which can be determ...

Page 5: ...peripheral requirements etc IMPORTANT NOTE In the event that these conditions can not be met for example certain laptop configurations or co location with another transmitter then the FCC authorization is no longer considered valid and the FCC ID can not be used on the final product In these circumstances the OEM integrator will be responsible for re evaluating the end product including the transm...

Page 6: ...evices does not exceed 5 0 Before installing this equipment users should ensure that it is permissible to be connected to the facilities of the local Telecommunication Company The equipment must also be installed using an acceptable method of connection The customer should be aware that compliance with the above conditions may not prevent degradation of service in some situations Connection to a p...

Page 7: ...A note or a tip describes actions or conditions that can help you obtain optimum performance from STB WARNING A caution or a warning describes conditions that can result in an error IMPORTANT An important note OVERVIEW OF THIS USER S GUIDE This User s Guide provides generic information about connecting Janus Media Hub Janus to your audio and video equipments Some of the topics covered in this guid...

Page 8: ... manufacturer s instructions Do not defeat the safety purpose of the polarized or grounding type plug A polarized plug has two blades with one wider than the other A grounding type plug has two blades and a third grounding prong The wide blade or the third prongs are provided for your safety If the provided plug does not fit into your outlet consult an electrician for replacement of the obsolete o...

Page 9: ...e free slots Doing so will damage the unit can cause fire or electrical shock and can short out interior components Do not install near any heat sources such as radiators heat registers stoves or other apparatus including amplifiers that produce heat Do not block cooling vents Do not place the equipment in a closed in wall unit When you disconnect a cable pull on its connector or on its strain rel...

Page 10: ... Quantity Janus Media Hub Janus 1 RF Cable with IEC connectors 1 8 m 1 RJ45 Ethernet Cable 3m 1 RCA A V Cable 2m 1 Component Video Cable 2m 1 Power Supply with 1 8m power cord 100 240V output 12V 5A 1 WiFi 2 4GHz Antenna Optional 3 URC 4 Remote Control Universal Remote Control 1 Battery AA size 2 ...

Page 11: ...IR blaster jack Figure 2 2 Janus Rear Panel Part Name Description 1 eSATA External Serial ATA connector 2 CABLE ANT IN IEC F connector to cable antenna source tuner is optional item 3 RF PASS THROUGH IEC F connector for cable antenna source loop out tuner is optional item 4 TV OUT F Connector Male to TV coaxial connector or home coaxial network 5 CableCARD CableCARD slot 6 WiFi SMA connector for W...

Page 12: ...ates right left up down in the on screen guide 14 BACK Back button for on screen menu usage depending on middleware application 15 GUIDE Shows the electronic program guide 16 VOL Increases or decreases volume of the currently selected device 17 MUTE Turns the volume of the currently selected device off 18 NUMBER KEYS Allows direct access to specific channels and menu items 19 INPUT Changes the cur...

Page 13: ...ider providing long term sustainability and cost saving in maintenance Depending on the size of the hard drive connected Janus provides typically up to 400 hours of SD content or 200 hours of HD content Service operator can now deliver more compelling services and enhanced user experience to their subscribers With Janus subscribers can blend and connect a variety of traditional DSL broadband servi...

Page 14: ...tely to control the Janus from other rooms If your TV supports 480i 480p or 1080i pictures use the HDMI or the component output jacks to connect to your TV HDMI stands for High Definition Multimedia Interface HDMI transfers digital audio and uncompressed digital video on a single cable As a result audio cables and video cables do not need to be connected separately The HDMI output jack is fully co...

Page 15: ...annel 3 You can change the channel ID by using the on screen user menu The new channel ID will take effect after restarting Janus Figure 4 1 Connecting TV using Coaxial Cable SETTING UP TV TO USE CATV In order for the Janus to feed video signal to TV using RF TV your TV must be configured to receive signal from CATV rather than from the antenna Most TVs use either a physical switch located on the ...

Page 16: ...ables to the matching input in the TV 4 Plug in your TV and turn on the power using your TV remote control Use your TV remote control to select the respective video input that has connected to the Janus Consult your TV owner s manual for instructions as required 5 Plug in your Janus and turn on the power 6 You should now see the output from the Janus on your TV screen Figure 4 2 Connecting TV usin...

Page 17: ...t in the TV 4 Plug in your TV and turn on the power using your TV remote control Use your TV remote control to select the respective video input that has connected to the Janus Consult your TV owner s manual for instructions as required 5 Plug in your Janus and turn on the power 6 You should now see the output from the Janus on your TV screen Figure 4 3 Connecting TV using RCA Composite Video Audi...

Page 18: ...e power 6 You should now see the output from the Janus on your TV screen Figure 4 5 Connecting TV using HDMI NOTE When the HDMI connection cannot be verified by your TV disconnect the HDMI cable and then connect it again or turn off the TV and then turn it on again Analog DVI is not supported If your TV supports digital DVI but not HDMI you can use an HDMI to DVI convector cable or adaptor to conn...

Page 19: ...y Digital You can connect to your amplifier using the digital optical audio output Figure 5 1 Connecting Janus to Audio System Consult your audio system user guide for connection Take necessary precautions when working with electric equipment Remove the devices from wall power and be sure to use caution when moving equipment to prevent injury If your connected TV or A V equipment does not support ...

Page 20: ...into the wall socket and the DC jack into the power connector on the Janus 3 The Janus front panel power indicator will illuminate in blue color 4 The LINK LED indicator will illuminate in green color NOTE The HD LED indicator will illuminate only if the output resolution is 720p or higher The RECORD LED indicator will illuminate only if the DVR is enabled and recording assets to the hard disk dri...

Page 21: ...s Guide 19 5 Within 60 seconds splash screen will appear on the TV Figure 6 3 Janus Boot up Splash Screen 6 The total boot up time may vary depending on the middleware application and the service provider environment ...

Page 22: ... mix batteries of different kinds Alkaline batteries last longer than carbon zinc WARNING Mixing old and new batteries or different types of batteries poses a fire hazard To load batteries to remote control 1 Press down on the battery cover s top latch and slide the cover off 2 If you are changing out batteries take out all of the old batteries 3 Put the new batteries in Make sure you match the pl...

Page 23: ...The Janus remote controls can also be used to control TVs and other A V devices such as DVD players and recorders The remote controls use infrared IR light signals to control other devices that the remote is programmed to control IR signals travel only short distances 40 feet or less and cannot go through walls or other solid objects You must point the remote control directly at these devices with...

Page 24: ... Mode Ethernet HPNA Wireless WIFI Setting Security Setting WLAN Scan HardDisk Information HardDisk Check HardDisk Repair HardDisk Format Fan Speed High Middle Low Off NOTE The features available in User Menu may vary in different middleware application Some of the features can also be set up through the user menu of the middleware application The User Menu may even be not available in case all the...

Page 25: ...C 1 SP MP and AP level 3 HD MPEG 2 4 2 0 SD MPEG 2 4 2 0 Still picture decode MPEG4 P2 SP ASP L5 SD Progressive Interlaced DivX 3 11 4 1 5 x progressive and interlaced AVS1 P2 Jizhun profile level 6 0 Video Output Formats NTSC M NTSC J 576i 576p 720p 1080i output formats Component RGB or YPrPb Output Macrovision 7 1 HDMI with HDCP 1 2 S video and composite Audio Input Formats AAC LC AAC LC SBR Lev...

Page 26: ...uner Optional ATSC QAM Network interfaces Ethernet Ethernet 10 100Base T auto sensing Home networking Optional HPNA 3 0 Telephone wire Coaxial Cable Optional 802 11b g wireless Physical and mechanical Dimensions 260mm x 300mm x 65mm W x L x H Weight 2 2 kg Operating voltage 100 240V AC RMS Operating current 4A Max Operating frequency 50 60Hz Output voltage current 12V DC 5A Operating temperature 1...

Page 27: ...nnector Check that there is power from the power source Make sure you have pressed the Power button and that the Power indicator light is green Section 6 Powering Up Janus Power indicator on the front panel stays red for more than 60 seconds Check that the ADSL cable is properly connected between the ADSL connector and the ADSL modem The ADSL Link indicator should be orange and steady Check that t...

Page 28: ...signal Check that AC 3 is enabled in the Janus Check your TV or A V equipment for AC 3 multi channel setup Section 5 Connecting Audio System No sound poor sound or popping noise on HDMI HDMI is an evolving technology so it is possible that some TVs may not operate properly with Janus In case of problem use component video output and composite audio output to connect your primary TV Section 4 Conne...

Reviews: