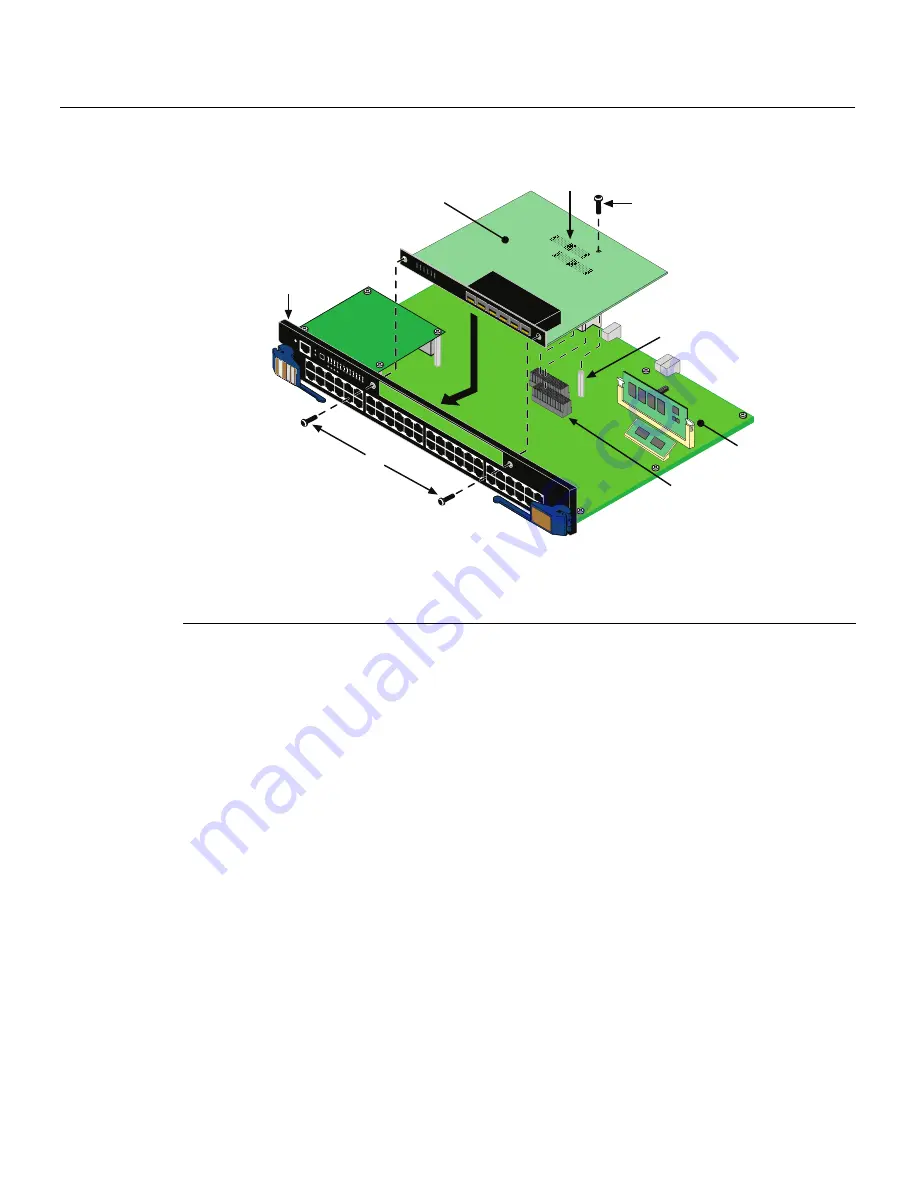
Installing Optional Network Expansion Modules
3-4 Installation
Figure 3-2 Installing the Network Expansion Module
2.
Use
the
two
saved
coverplate
screws
to
fasten
the
network
expansion
module
to
the
DFE
‐
Gold
module
front
panel.
Do
not
tighten
the
two
coverplate
screws
at
this
time.
3.
Use
the
saved
screw
from
the
standoff
to
fasten
the
network
expansion
module
to
the
standoff.
Tighten
the
screw.
4.
Tighten
the
two
front
‐
panel
coverplate
screws.
5.
This
completes
the
network
expansion
module
installation.
To
install
Mini
‐
GBICs
into
the
network
expansion
module,
proceed
to
“
Installing
an
Optional
Mini
‐
GBIC
”
on
page 3
‐
5
for
the
Mini
‐
GBIC
installation
instructions.
Otherwise,
proceed
to
“
Module
Placement
and
Rules
”
on
page 3
‐
9
to
install
the
DFE
module
into
the
chassis.
1
Screw (1)
4
Optional expansion module
7
Main board connectors
2
Main bo\ard
5
DFE-Gold module
front panel
8
Coverplate screws (2)
3
Standoff
6
Expansion module connectors
COM
OFFLINE/ RESET
MGMT
CPU
1
2
3
GR
OUP
SELECT
1X
11X
13X
4
12X
14X
23X
24X
25X
26X
35X
36X
37X
38X
47X
48X
G R
O U
P
1
G R
O U
P
2
G R
O U
P
3
G R
O U
P
4
GR
OUP
1
2
3
4
5
6
7
8
9
10
11
12
4G
42
82
-4
9
Gb ENET
DFE
Á
1
2
3
4
5
6
1
2
3
4
5
6
7G-6MGBIC-A
Ç
Ã
Ä
Å
Æ
À
Â
Summary of Contents for Matrix 6H303-48
Page 2: ......
Page 12: ...x ...
Page 20: ...Conventions Used in This Guide xvi About This Guide ...
Page 32: ...1000BASE T Network 2 4 Network Requirements ...


