background image

Air Conditioner Service Manual


73 

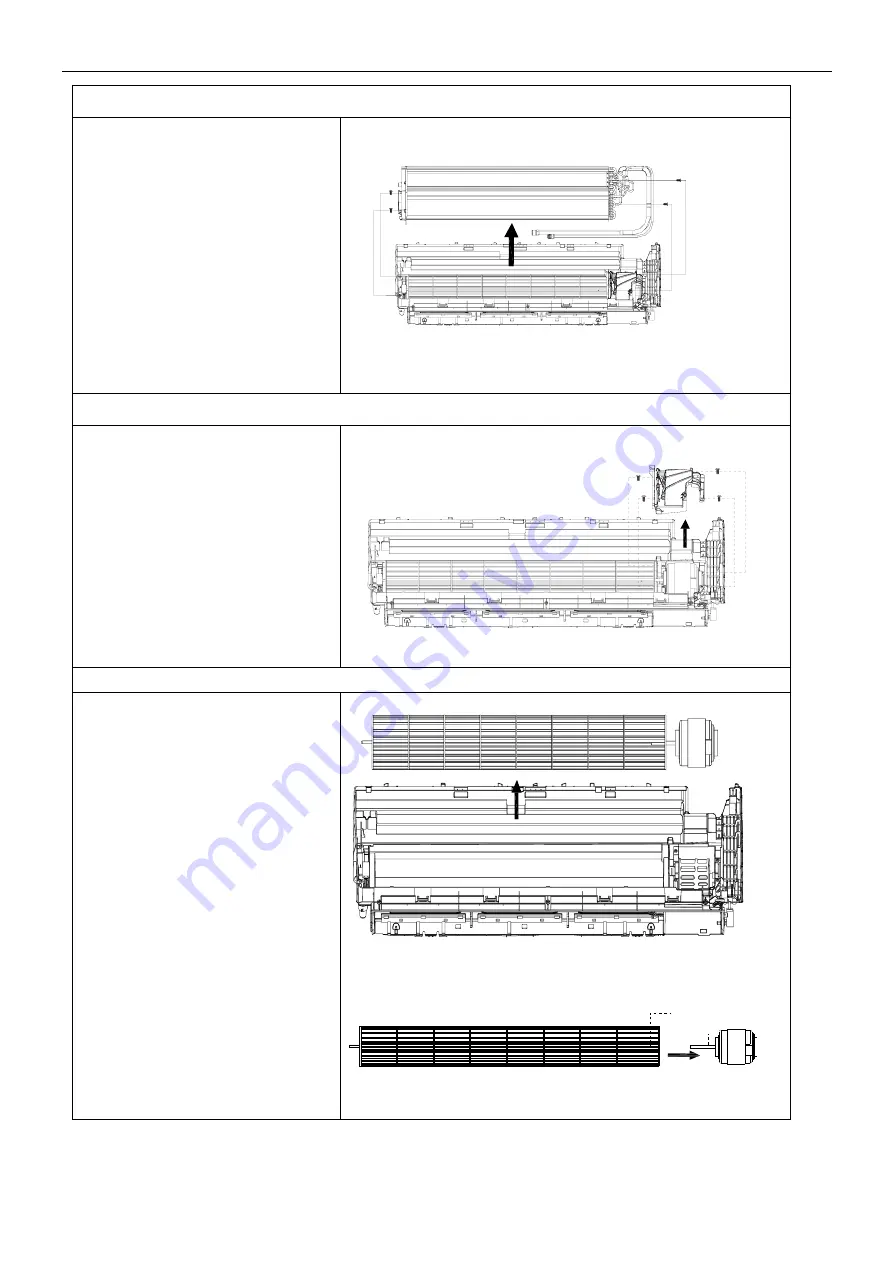
9. Disassembly the evaporator

A. Unfix 2 screws of left side shown as
picture.
B. Unfix 2 screws of right side on motor
cover/right support plate.
C. Take the evaporator out from unit by
uplifting  the  IUPUT/OUTPUT  pipes
slightly.

螺钉

螺钉/卡扣

10. Remove the MOTOR COVER

Unfix 4 screws on the motor cover with 
base frame. 

螺钉

11. Disassembly fan motor and fan blade.

A. Uplift  the  fan  blade  and  fan  motor,
take the base frame out.

B. Unfix  one  screw  on  the  axis  of  fan
motor,  and  you  can  get  fan  blade  and
fan motor separately.

screws 

motor 
cover 

screws 

screw 

Summary of Contents for ENSTAR-TSC-12HA1

Page 1: ...Air Conditioner Service Manual 1 Inverter air conditioner Service Manual Models ENSTAR TSC 12HA1...

Page 2: ...roller 15 6 2 Electronic controller 17 6 3 WIFI introduction 24 PART Installation and Maintenance 25 1 Notes for installation and maintenance 25 2 Installation 33 2 1 Dimension diagram for Installatio...

Page 3: ...to repair the appliance may result in personal injury and property damage The manufacturer or seller cannot be responsible for the interpretation of this information nor can it assume any liability i...

Page 4: ...2 72 0 69 68 3 28 0 85 73 2 81 0 72 Note The test under condition Rated Cooling IDU dry bulb27 Wet bulb 19 ODU dry bult35 wet bulb 24 The connection pipes 5m Rated Heating IDU dry bulb20 Wet bulb 15 O...

Page 5: ...Y Indoor unit Outdoor unit 0 0 10 0 20 0 30 0 40 0 50 0 Muter Low speed Mid speed High speed super speed 12K Indoor cooling noise Indoor heating noise 42 44 46 48 50 52 54 16Hz 22Hz 28Hz 34Hz 40Hz 46H...

Page 6: ...Air Conditioner Service Manual 6 3 Product Dimensions Indoor Unit Outdoor Unit...

Page 7: ...Manual 7 4 Refrigeration cycle diagram Heat pump 12K Liquid side 2 way valve Gas side 3 way valve Compressor 4 way valve Muffler Muffler Heat exchange Condenser Heat exchange Evaporator Check valve Co...

Page 8: ...5 Electric Diagram 5 1 Wiring diagram ENSTAR TSC 12HA1...

Page 9: ...4 Fuse 5 ODU AC power input 6 AC fan motor driving 7 IDU ODU wiring connection N connector 8 Power supply N connector 9 Anion connector 10 IDU ODU communication wiring 11 Left Right swing connector 12...

Page 10: ...mbient Temperature OPT Outdoor pipe temperature 1 ODU PCB Mainly relay 2 Fuse 3 L N 1 communication wiring 4 4 way valve 5 Heater 6 DC fan motor connector 7 Electronic expansion valve 8 Discharge sens...

Page 11: ...EMP UP button TIMER button SLEEP button TEMP DOWN button To select the mode of operation In cooling mode press this button the temperature will increase 2 on the base of setting temperature In heating...

Page 12: ...ST shown as table Mode t RT ST COOLING t 1 FAN 1 t 1 HEATING t 1 6 2 2 Cooling mode 1 Temperature control 16 31 and the operation of fan speed and vane position according to preset 2 Compressor and pr...

Page 13: ...t Frequency Decreasing FFD If 2 IPT 3 the frequency decreasing rate is 16Hz 90s until to the lower frequency limit 5 Unit stop a When IPT 1 for 3min continuously unit stops working for anti defrosting...

Page 14: ...ax delay for the motor should be less than 160s 2 When switch on unit on heating mode ODU fan motor will delay 5s after compressor starts up 3 in the process of defrosting the fan motor will stop oper...

Page 15: ...being discharged when the heating operation starts up 1 IDU fan motor cold air prevention When RT 24 a If ITP 31 while compressor works for 5 min fan motor will work according to preset fan speed b If...

Page 16: ...time setting within 10s the timer function will be OFF automatically 6 2 7 Sleeping mode While AC works in sleeping mode the light of POWER SUPPLY and SLEEP always ON and the temperature display will...

Page 17: ...e process of operation once the compressor runs continuously more than 6 min the counter of over load stop working protection will be reset to zero and start a new counting process The failure and tim...

Page 18: ...ess of operation once the compressor runs continuously more than 6 min the counter of over load stop working protection will be reset to zero and re start a new counting process The failure and times...

Page 19: ...PP store to download the APP and install it in the cell phone while installation achieved there would be an icon as picture created on the desktop Register the account and add the device to system cus...

Page 20: ...otective boards cable cross loop and wire clip 7 The live wire neutral wire and grounding wire of power supply must be corresponding to the live wire neutral wire and grounding wire of the air conditi...

Page 21: ...r should not exceed 1 minute If refrigerant recovery takes too much time may be cause compressor overheat resulting in injury 4 During refrigerant recovery make sure that two way valve and 3 way valve...

Page 22: ...ll an appliance with refrigerant charge M kg shall be in accordance with following Amin M 2 5 x LFL 5 4 x h0 2 Where Mmax is the allowable maximum charge in a room in kg M is the refrigerant charge am...

Page 23: ...static gloves Don t use mobile phone Installation Safety Caution The installation should be in a well ventilated condition location When you installing or maintaining an air conditioner using Refriger...

Page 24: ...ge used for Refrigerant 22 can be used for Refrigerants R290 and R161 the pressure gauge used for R410A can be used for Refrigerant 32 Fire Extinguisher It is necessary to carry fire extinguisher s wh...

Page 25: ...is a must to immediately take forced ventilation and plug up the leak source If the product is damaged to the extent that it is a must to open the refrigerating system for maintenance it is a must to...

Page 26: ...and the system has been cleaned and ensure that there has been no refrigerant in the outdoor unit It is necessary to close the stop valve of the outdoor unit when using a welding gun to do the mainte...

Page 27: ...the location It is necessary to inform near residents of evacuating for over 20 meters from the location make an alarm call set the emergency area and prohibit irrelevant personnel and vehicles from a...

Page 28: ...east 300cm Space to the wall At least 15cm Space to the wall Space to the obstruction At least 250cm Space to the floor At least 50cm Space to the obstruction At least 30cm Space to the obstruction At...

Page 29: ...Air Conditioner Service Manual 33 2 2 Accessory Remote controller Remote controller supporter Batteries Vinyl tape Drain hose Hole cover Screw Insulation material...

Page 30: ...ve the spaces as shown in the picture for The air to circulate freely Install the outdoor unit in a safe and solid place If the outdoor unit is subject to vibration place rubber gaskets onto the feet...

Page 31: ...cture by removing a screw or by breaking the hooks 3 For the electrical connections see the circuit diagram on the right part of the unit under the front panel 4 Connect the cable wires to the screw t...

Page 32: ...ng the drain hose at the indoor unit install the drain pipe Wrap the insulation material around the connecting portion Overlap the connection pipe insulation material and the indoor unit pipe insulati...

Page 33: ...nd the ice formed in the outdoor unit during heating operation can be drained away through the drain pipe 1 Fasten the drain port in the 25mm hole placed in the part of the unit as shown in the pictur...

Page 34: ...age Detection 1 With leakage detection Check if there is leakage with leakage detection 2 With soap water If leakage detection is not available please use soap water for leakage detection Apply soap w...

Page 35: ...ilure Fan motor ODU PCB EU ODU Voltage test circuit abnormal ODU PCB P0 IPM module protection ODU PCB P1 Over under voltage protection 1 ODU PCB broken 2 Power supply abnormal P2 Over current protecti...

Page 36: ...e protection Querying by press remote controller FH Limiting Reducing frequency for Compressor driving protection Querying by press remote controller FP Limiting Reducing frequency for anti condensati...

Page 37: ...re connect Check and re connect No n Check voltage from IDU terminal btw L N is there 220V Replace IDU PCB No Yes OK Yes Is the ODU PCB LED5 ON Replace ODU PCB Check voltage from IDU terminal btw L N...

Page 38: ...and or coil temperature sensor failure Start Display E1or E2 Re connect Is the sensor well connected to PCB Multi meter check the sensor is it open or short circuit Replace the sensor No Yes Yes Repla...

Page 39: ...t Multi meter check resistance of fan motor is there open or short circuit of winding Replace IDU PCB Replace fan motor Yes Yes No No End Check the fan blades by hand while power off condition Can the...

Page 40: ...unit will display failure code as E3 E7 or E8 IDU and ODU turns off When the sensor resistance recovery unit revert to be standby customer can switch on the unit directly Start Display E3 E7 or E8 Re...

Page 41: ...unit can t be recovered to operation except press ON OFF button Display E9 Re power on unit running for 30 min and check the failure code display Normal protection Display F9 or FA first then E9 Repla...

Page 42: ...r well connect to PCB Re connect 1 For built in control 5pins motor check the Vm 310V Vcc 15V 2 For external control 3pins motor test voltage btw U V W normally from DC 20 200V Replace ODU PCB Check t...

Page 43: ...failure After power relay works while tested voltage effective value less than 50V for 3s continuously unit will display EU Start Display EU Test voltage btw ODU terminal L N more than 50V End Replace...

Page 44: ...slowly Replace ODU fan motor Yes Replace compressor End Yes No Yes P0 disappear test voltage btw U V W normally from DC 20 200V Unit works normal Turn unit on to check whether the malfunction is elim...

Page 45: ...st voltage on the big size electrolytic capacitor of ODU PCB When DC busbar voltage V DC420V or V DC150V unit will recover back to previous status while DC190V V DC410V Display P1 Is the power supply...

Page 46: ...Imax it will stop and display P2 protection Note for different AC model Imax has a difference valve Display P2 ODU fan motor works Replace fan motor IDU filter or ODU condenser too dirty Clean IDU fi...

Page 47: ...denser too dirty or filter blocked IDU ODU fan motor running slowly or stopped Capillary blocked Is the unit gas pressure normal cooling0 8 1 3Mpa heating2 0 3 6Mpa Replace ODU PCB Clean IDU filter or...

Page 48: ...Switch on unit after minutes Display P5 Normal protection No Yes IDU filter dirty Yes Clean filter IDU air inlet blocked No Clean Yes Can fan blade rotate freely Check and repair fan blade Fan motor...

Page 49: ...OPT 62 MCU will switch off outdoor unit and show P6 failure code Display P6 ODU fan motor works normal Replace OPT sensor Replace ODU PCB Fan motor broken Replace fan motor End No No Yes Yes P6 disapp...

Page 50: ...2 ODU PCB will switch off outdoor unit and show P7 failure code Display P7 ODU fan motor works normal Replace IPT sensor Replace IDU PCB Fan motor broken Replace fan motor End No No Yes Yes P7 disappe...

Page 51: ...ay the IDU will show P8 failure code 1 On Cooling or Dry mode ODU ambient temperature OAT 20 or OAT 63 2 On Heating mode a OAT 40 or b 30 OAT 40 and RT 35 Display P8 Ambient temperature under spec ran...

Page 52: ...n of IDU coil temperature If there is mistake installer forgetting to open the 2 way or 3 way valve on ODU the gas can t flow in the cooling system it will show F4 protection Start Display F4 Open the...

Page 53: ...compressor current it will show F6 protection Display F6 Check compressor wiring connector is it well connected Re connect The Compressor wiring in good quality Replace the wires Compressor phase curr...

Page 54: ...d heat sink Fix the screw ODU cooling system abnormal Compressor with big running current 9 12K 6 7A 18 24K 7 9A Low pressure normal 0 8 1 2Mpa IPM temperature circuit abnormal Replace ODU PCB Is the...

Page 55: ...or even more after compressor works for 8min unit will show F8 code Display F8 Is there 220V voltage on the 4 way valve Replace ODU PCB Multimeter test the valve coil resistance does it open or short...

Page 56: ...show Fy failure code Check the pipe connection any gas leakage Repair and charge new gas as SPEC Check the room evaporator coil temperature No Is the temperature difference more than 2 btw RT IPT aft...

Page 57: ...0242 In And Out Pipe Fixer 1 13 42003 000051 Indoor Motor Cover 1 14 41105 000104 Electrical Box 1 15 31101 000265 Main PCB 1 16 Transformer 1 Soldered on PCB 17 42001 000103 Cable Clamp 1 22001 00031...

Page 58: ...007 001041 Three way valve 1 14 41201 000029 Electrical box cover 1 15 92007 002097 Capillary assembly 1 16 42011 000129 Grille 1 17 92011 000804 Condenser 1 18 41207 000040 Top cover 1 19 41205 00013...

Page 59: ...one screw and take the display box out from the panel C Release panel axis which shown in red arrows out from middle frame and take the panel out D Unscrew and take the WIFI module out from middle fra...

Page 60: ...e cover 5 Remove the filter Push the filter upwards a little you can take it out from unit 6 Disassembly the middle frame A Open the screw cover and unfix screw with cross screwdriver B Remove the mid...

Page 61: ...tors out from PCB D Unfix one screw of the control box with unit BASE FRAME and take the control box out from unit Note The right picture for your reference only for the exact model the wiring connect...

Page 62: ...the evaporator out from unit by uplifting the IUPUT OUTPUT pipes slightly 10 Remove the MOTOR COVER Unfix 4 screws on the motor cover with base frame 11 Disassembly fan motor and fan blade A Uplift th...

Page 63: ...ve the PCB Cover valve Cover and top cover A 1 Unfix one screw on the PCB cover you can take the cover out from unit 2 Unfix one screw on the valve cover you can take it out easily B Unfix screws btw...

Page 64: ...separate plate and base plate uplift front panel you can take it out from unit step3 Disassemble the Left and Right plate A Unfix screws btw Right Plate and the Electric Box assembly Valve Plate Base...

Page 65: ...Unscrew the fan blade nut and take the blade out step5 Disassemble the electric box Unfix screw btw Electric Box and motor supporter etc loosen the wiring clamp then you can take the control box out s...

Page 66: ...3 way valve Unfix screw btw Valve plate and base you can take the 2 way and 3 way valve out by welding Note 1 The welding can only place while no gas in the unit 2 Pay attention to the fire to preven...

Page 67: ...le the compressor Unscrew the nuts and take the compressor out step11 Remove the fan motor and fan supporter Unfix screws btw fan motor with supporter and supporter with base plate Note Pay attention...

Page 68: ...64 65 64 4 18 73 74 73 4 23 82 83 82 4 28 66 67 66 2 19 75 76 75 2 24 84 85 84 2 29 68 68 20 77 77 25 86 86 30 Appendix 2 The Pipe length and Gas charging Connecting pipes size and length for installa...

Page 69: ...1 5m longer than the pipe length B Burrs removal 1 Completely remove all burrs from the cut cross section of pipe tube 2 Put the end of the copper tube pipe in a down ward direction as you remove burr...

Page 70: ...7 567 4 219 31 3 981 2 192 76 0 895 0 746 13 26 239 4 186 32 3 836 2 146 77 0 869 0 728 12 24 984 4 152 33 3 697 2 101 78 0 843 0 710 11 23 795 4 117 34 3 563 2 057 79 0 819 0 692 10 22 671 4 082 35 3...

Page 71: ...1 170 7 192 5 217 33 13 25 14 18 15 17 87 1 922 1 983 2 045 20 161 6 182 1 205 34 12 72 13 6 14 54 88 1 861 1 922 1 983 19 153 1 172 3 193 7 35 12 21 13 05 13 93 89 1 802 1 862 1 923 18 145 163 1 183...

Page 72: ...117 0 7837 0 8233 0 8641 10 36 04 39 39 43 01 64 4 101 4 288 4 479 118 0 7623 0 8012 0 8413 11 34 42 37 59 41 65 3 961 4 139 4 32 119 0 7415 0 7798 0 8193 12 32 89 35 87 39 1 66 3 827 3 995 4 167 120...

Reviews: