background image

www.ensembledesigns.com

BrightEye Mitto - Page 30

DVI/VGA to 3G/HD/SD Scan Converter User Guide

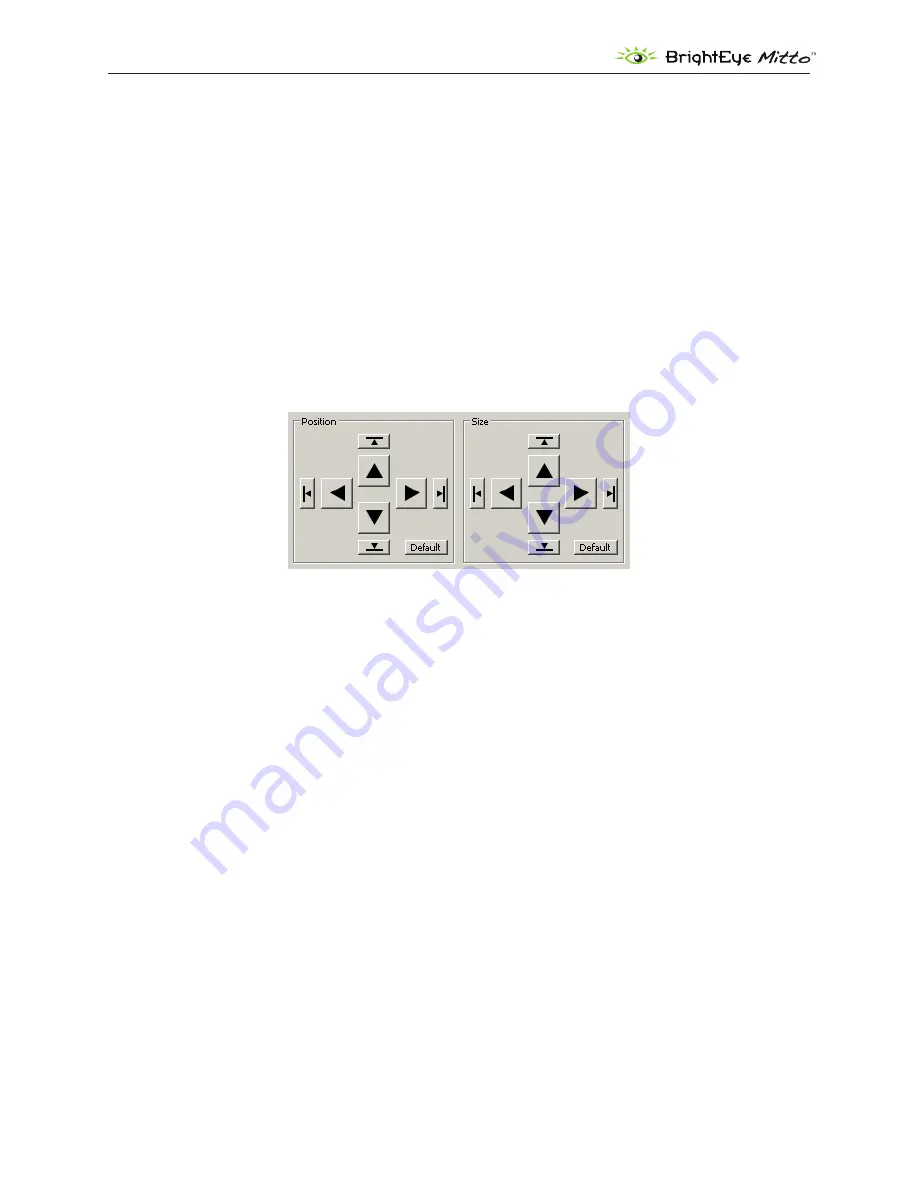
One Click to Move Selection to an Outside Edge

Clicking one of the smaller directional Position arrow buttons (with the perpendicular line) causes 

the Selection area to move immediately to the outside edge of the direction chosen with one click. 

Similarly, clicking the smaller down or right Size arrow buttons causes the Size of the Selection area 

to move to an outside edge. However, clicking the smaller left or up Size arrow buttons minimizes the 

size of the Selection. 

Position Default Button

 – Clicking the Default button for Position immediately places the position of 

the Selection area at the upper left corner. 

Size Default Button

 – Clicking the Default button for Size immediately maximizes the size of the 

Selection area within any aspect ratio contstraints, but does not change the Position of the upper left 

corner of the Selection area. 

Full Screen

 – Clicking the Full Screen button instantly maximizes the size of the Selection area. The 

Position will be moved to the upper left corner while the Size will be maximized within any aspect 

ratio constraints. 

Border

 – Lets you adjust a black border pixel width around the selected video as it appears on the 

high definition or standard definition video output.

Sharpness

 – The Sharpness control ranges from a minimum value of 1 up to a maximum value of 8. 

This is a set of variable filters used to configure the processing through which Mitto is moving the 

input video to the output. The mid-range setting of 4 is recommended as a good place to start.

Summary of Contents for brighteye mitto

Page 1: ...www ensembledesigns com BrightEye Mitto Page 1 DVI VGA to 3G HD SD Scan Converter User Guide ENSEMBLE D E S I G N S Revision 1 2 SW v1 0 0 DVI VGA to 3G HD SD Scan Converter User Guide MittoTM...

Page 2: ...6 RS 232 and GPI Control 7 BLOCK DIAGRAM 8 APPLICATIONS 10 Getting Started 10 Installing BrightEye Software 10 Connecting Mitto 11 Configuring Mitto and Your Computer Monitor Resolution 12 When using...

Page 3: ...n and Setup 23 Output Menu 23 Audio Configuration Menu 25 Input Menu 27 Position Menu 28 Selection Tool 31 Mixer Menu 34 Proc Menu 35 Timing Menu 36 Memory Menu 37 TROUBLESHOOTING 38 There is no outpu...

Page 4: ...www ensembledesigns com BrightEye Mitto Page 4 DVI VGA to 3G HD SD Scan Converter User Guide WARRANTY AND FACTORY SERVICE 40 Warranty 40 Factory Service 40 SPECIFICATIONS 41 GLOSSARY 43...

Page 5: ...g Digital and Analog Video and Audio The intuitive front panel interface makes it easy to choose the desired video output format Choices are 1 5 and 3 Gb s HD SDI and SD SDI When the digital output is...

Page 6: ...I outputs If HD is selected on the SDI outputs then the composite out BNC outputs black Alternately the Composite Out BNC can be set to output AES audio with a control in BrightEye PC Mac software Aud...

Page 7: ...e embedded SDI outputs and if desired can also be output as AES on the Composite Out BNC RS 232 and GPI Control Mitto s RS 232 GPI port can be used with third party control and automation systems GPI...

Page 8: ...n Mixing RGB to YCrCb Colorspace Conversion Frame Synchronizer Composite Encoder DAC Audio Source Select VITC Detect DVI HDMI Receiver Audio Embedder Audio Delay AES Encoder Black Gen VGA RGB A to D A...

Page 9: ...ource Select VITC Detect DVI HDMI Receiver Audio Embedder Audio Delay AES Encoder Black Gen VGA RGB A to D AES Rcvr AES Rcvr Stereo ADC TCXO Internal Precision Standard Reference Input Composite TLS 1...

Page 10: ...ree steps to setting up your Mitto as listed below Details are provided on the following pages If you plan to use BrightEye PC or Mac control software install it on your computer 1 Connect Mitto to yo...

Page 11: ...Mitto s DVI VGA Loop Out connector to the computer monitor s input Connect the computer s monitor output to the Mitto DVI VGA Input connector Connect the Mitto s SDI Out or Composite Out BNC to a vid...

Page 12: ...m the Start menu go to the Control Panel and double click Display to bring up the Display Properties window Click the Settings tab From the Screen resolution control select a resolution For the best v...

Page 13: ...r computer The computer sees Mitto as a monitor Its name will be either BE Mitto DVI or BE Mitto VGA The Mac System Preferences window From the Resolutions control set the resolution sent to the Mitto...

Page 14: ...I monitors support HDCP encryption which will not work with BrightEye Mitto If the computer handshakes with the computer monitor and HDCP is enabled the encryption will cause the Mitto output to be di...

Page 15: ...er User Guide REAR CONNECTORS All connections to the BrightEye Mitto are made on the rear of the unit Refer to the illustration below for a snapshot reference of the rear connectors A more detailed ex...

Page 16: ...ndation is to set both of these controls to 80 of their maximum value AES or S PDIF Digital Audio Mitto can accept four channels of digital audio A pair of digital audio channels is carried in an AES...

Page 17: ...switcher or broadcast monitor Composite Out This analog video output BNC provides composite PAL or NTSC and follows the SD output when SD is selected on the SDI output When HD is selected for the SDI...

Page 18: ...and upgrades to the unit BrightEye PC Mac Control application software is included on CD that came with your Mitto or the application can be downloaded at www brighteyemitto com Power Connection Conne...

Page 19: ...four pins on the right are analog If your computer has VGA out use the VGA to DVI adaptor that is included with your Mitto HDMI is supported with an HDMI to DVI adaptor not included The HDMI standard...

Page 20: ...given section of parameters or increases Right Arrow or decreases Left Arrow the value of a selected parameter Resetting to Default Values Holding the Left Arrow and Right Arrow buttons at same time r...

Page 21: ...unity It displays orange when the control is set higher or lower than unity Level The Audio level indicator reflects the level of the audio being routed to output channels 1 and 2 If the level is wit...

Page 22: ...tons simultaneously while Position or Size are active Within the constraints of the currently selected aspect ratio Mitto will instantly maximize the screen selection on the computer monitor Aspect le...

Page 23: ...on Menu 2 Input Menu 3 Output Menu The three controls along the top of the Output menu Standard Mode HD Format are used to determine Mitto s output standard Regardless of what type of input is fed int...

Page 24: ...rcles But in certain cases that may be exactly what you are intending Note If you are experiencing issues with maintaining the correct aspect ratio please see the Troubleshooting section on page 38 fo...

Page 25: ...m the audio mixer can be embedded in the SD SDI or HD SDI output 1 Embedded audio travels with the digital video through cables distribution amps and routers without the need for any additional wiring...

Page 26: ...adroom that you wish to reserve before the clipping or peak indicator illuminates For example if this control is set to 6 dB Headroom the peak indicator will not flash red unless the audio level excee...

Page 27: ...resolution setting chosen from the VGA Resolution control matches the resolution setting of the computer monitor Otherwise you may see a blue screen Input Pres The Input Present status field indicate...

Page 28: ...arker blue indicates the selected area or Selection It shows not only the size but also the position within the computer output that is being selected for scan conversion In the example shown below th...

Page 29: ...same size Moving the Selection s Size however will change the size and shape of the Selection Maintaining Aspect Ratio To adjust the size of the Selection the upper left Position corner stays in the...

Page 30: ...r left corner Size Default Button Clicking the Default button for Size immediately maximizes the size of the Selection area within any aspect ratio contstraints but does not change the Position of the...

Page 31: ...toggles into the Show Selection Tool button Click the Hide Selection Tool on the toolbar to put the Selection Tool away Click and drag the Selection Tool to move and resize the selection for outputti...

Page 32: ...ks checkbox is selected the color of the Selection Tool will brighten slightly Deselect the checkbox to restore interactivity with the Selection Tool Aspect Ratio Select 4 3 Manual or 16 9 Memory Regi...

Page 33: ...one of the sides of the tool not on a handle Resizing Selection Tool To resize the Selection Tool click and drag directly on any of the eight handles of the tool You can resize by clicking and draggin...

Page 34: ...nnel 2 For example you could route Input Channel 1 to Output Channel 1 Input Channel 2 to Output Channel 2 Input Channel 3 to Output Channel 3 and Input Channel 4 to Output Channel 4 Another configura...

Page 35: ...cts the overall video level The Proc menu also includes controls for the Chroma amplitude the Pedestal or black level and the Hue This is an NTSC style Hue rotation It can be used to make small adjust...

Page 36: ...s output be one line early with respect to the reference in order to auto time properly into a production switcher set the Vertical Timing to 1 Vert Timing Set the vertical timing in lines Use the sli...

Page 37: ...order and sharpness to the saved settings associated with that particular memory register To save settings to a memory register Select a desired position and size aspect ratio border size and sharpnes...

Page 38: ...y BrightEye Mitto to ensure pixel size and shape are maintained properly If the picture being output by Mitto is not maintaining its correct aspect ratio for example a circle is egg shaped check your...

Page 39: ...ld feed a signal to an external device or monitor so that a signal can be fed to Mitto Mitto is connected to the laptop in place of an external monitor Go to the computer s display settings menu Selec...

Page 40: ...y or not please contact Ensemble Designs and ask for customer service before you return the unit This will allow the service technician an opportunity to provide any other suggestions for identifying...

Page 41: ...el Sync Impedance 75 Return Loss 40 dB Analog Audio Inputs Number One stereo pair Connector 1 8 mini jack Impedance 15K Max Input Level 24 dBu Quantization 24 bits 128 x oversampled Sample Rate 48 KHz...

Page 42: ...sF RP211 14 15 16 23 98 24 25 Hz 3 Gb s Level A or Level B SMPTE 424M 425M 525i 625i SMPTE 259M Analog Video Output Number One BNC Type Composite PAL or NTSC when SD is selected on the SDI output Retu...

Page 43: ...accuracy Beta Sony Beta SP video tape machines use an analog component format that is similar to SMPTE but differs in the amplitude of the color difference signals It may also carry setup on the lumi...

Page 44: ...the luminance information But it is not a seamless matter to pull the signal apart again at the destination in order to display it or process it The resultant artifacts of dot crawl also referred to a...

Page 45: ...rors If they don t then an error has occurred Embedded Audio Digital Audio can be carried along in the same bit stream as an SDI or HD SDI signal by taking advantage of the gaps in the transmission wh...

Page 46: ...ideo frame which run at 25 or 30 frames per second into two fields All of the odd numbered lines are transmitted in the first field the even numbered lines in the second field In this way the repetiti...

Page 47: ...iber The fiber s core acts as a waveguide or lightpipe to carry the light energy from one end to another Optical transmission has two very significant advantages over metallic copper cables Firstly it...

Page 48: ...e Due to the arithmetic details of both PAL and NTSC this relationship is not the same at the beginning of each frame In PAL the pattern repeats every 4 frames 8 fields which is also known as the Bruc...

Page 49: ...particularly severe with consumer type heterodyne systems like VHS Time base error will render a signal unusable for broadcast or editing purposes Tri Level Sync An analog sync reference signal that...

Reviews: