background image


27

5

5


T

T

r

r

o

o

u

u

b

b

l

l

e

e

s

s

h

h

o

o

o

o

t

t

i

i

n

n

g

g


5

5

.

.

1

1


P

P

o

o

w

w

e

e

r

r


S

S

u

u

p

p

p

p

l

l

y

y


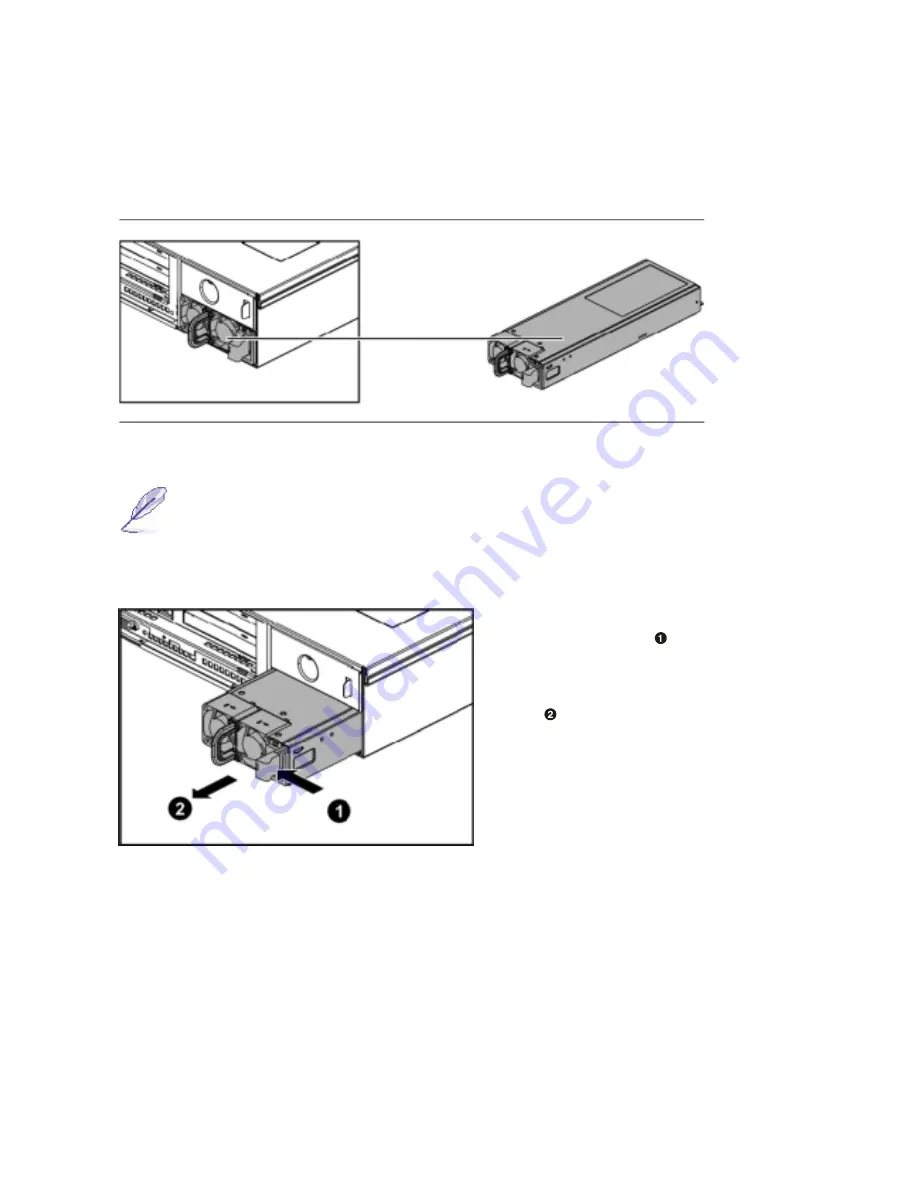
The location of the power supply on the server chassis is shown as below:


Figure 5-1 Power Supply Location


Note: 

When the server is equipped with DUAL power supplies, the 

hot-swappablefunction is provided. Otherwise, you need to power off the server.


To remove the power supply: 

Press the retaining clip 


along the direction of the 

arrow, at the same time pull the 

handle 


out of the power 

supply.


Summary of Contents for SR2042

Page 1: ...1 2U Server Barebone Quick Start Guide www enlightcorp com...

Page 2: ...6 2 4 Install System Memory 7 2 5 Install HDD 8 2 6 Install Power supply Option 9 3 Raid Function Step 9 3 1 SATA 9 3 1 1 Setup 9 3 1 2 To install the BC4000 Series RAID controller drivers in Windows...

Page 3: ...ew w Figure 1 1 Front View HDD Trays Floppy Disk Drive HDD LEDs CD ROM Drive LEDs and Button Panel 1 1 2 2 B Ba ac ck k V Vi ie ew w Figure 1 2 Back View Dual USB Port NIC1 Connector RJ45 PS 2 Mouse P...

Page 4: ...To remove the top cover Loosen the screw on the top of the cover Press down the button as the arrow shows Slide the cover toward the rear of side horizontally as the arrow shows to the back panel Figu...

Page 5: ...essor The location of the processor on the motherboard is shown as below Figure 2 3 Processor Location Processor 1 Processor 2 If SINGLE processor is intended always install the processor on the proce...

Page 6: ...k the socket by pushing down the lever Figure 2 5 Inserting the processor into the socket 2 3 2 To install the heat sink Rotate and pull up the two levers Figure 2 6 Pulling up the two levers Place th...

Page 7: ...lowing table DIMM A1 B1 A2 B2 A3 B3 2 V V 4 V V V V 6 V V V V V V Table 2 1 DIMM Installation Option Unlock a DIMM socket by pressing the retaining clips outward Figure 2 8 Pressing the retaining clip...

Page 8: ...ure 2 10 Pressing the released button Slide the HDD assembly out of the drive bay Figure 2 11 Sliding the HDD assembly out of the drive bay To install the HDD Place the HDD to the HDD tray and secure...

Page 9: ...al ll l P Po ow we er r s su up pp pl ly y O Op pt ti io on n To install the power supply Push the power supply right into the tray until it completely enters the tray Figure 2 15 Putting the power su...

Page 10: ...e disks from the BIOS Use the arrow keys to select Initialize Disk s from the Main menu Press Enter Use the arrow keys to highlight a disk and then press the Insert key to select the disk or choose al...

Page 11: ...disks in the order of your choice c After selecting the disks to be included in the array press Enter In the User Input area select an array type with the arrow keys and then press Enter Only array t...

Page 12: ...sked if you want to limit the size of the array to the 2 TB maximum b Press ESC to create a larger array c Press PAGE UP or the up arrow until you have reached either the desired size or the maximum a...

Page 13: ...een 2 At the Windows Setup screen press F6 to install the driver 3 When prompted insert the driver disk press S and then press Enter 4 Select the correct BC4000 option and then press Enter 5 Press Ent...

Page 14: ...start booting When prompted type CTRL R to access the RAIDCore BIOS Array Configuration Utility From the ARC menu select Array Configuration Utility If Configuration change has been detected in the sy...

Page 15: ...ray using the arrow keys and then press Enter Select the disks for the new array then press Insert To deselect a disk highlight the disk then press Delete When you are finished selecting disks press E...

Page 16: ...16 Type an optional label for the array then press Enter Enter the desired array size Select the desired stripe size...

Page 17: ...17 Specify whether you want to enable read and write caching for the array Specify whether you want to enable read caching for the array Specify whether you want to enable write caching for the array...

Page 18: ...pt appears at the bottom of the screen for only 5 seconds If you miss your chance to press F6 restart the computer 3 Insert the driver floppy disk and wait until prompted to install a driver Press S t...

Page 19: ...m are focus on ensuring optimized performance with your hardware platform The most important characteristic of Speedy In is installing OS because it provides a Web based interface that guides you inst...

Page 20: ...re 4 2 Figure 4 2 Install OS Windows Summary You can also have a general view of installation as below Windows System Name Recommended Value OS Information Display on Tab Sheet Service Selected See Se...

Page 21: ...uct key This is Express Installation If you want to change configuration in detail click Detail to enter detail page for Custom Installation Detail Information Panel After you enter detail page you ca...

Page 22: ...Size Operating System Default Size Minimize Size Windows 2000 Server Whole HDD Size 1500 MB Windows 2000 Advanced Server Whole HDD Size 1500 MB Windows Server 2003 Standard Edition Whole HDD Size 250...

Page 23: ...names User Full Name less than 50 chars Organization Name less than 50 chars 7 Computer Name and Administrator Password You can type computer name less than 15 chars and set administrator password 128...

Page 24: ...box to enter the user name less than 50 chars Password Confirm Password click in the text box to enter confirm the password less than 127 chars The checkbox can be chosen only when the Windows Server...

Page 25: ...time zone from drop down list box In the second box select your region Install Progress After an OS has been selected and all configurations are ready you can click Install either in Summary or Detai...

Page 26: ...ing Image and Copying Windows Files After transferred Image File Speedy In CD ejects from CD ROM and a dialog pops up to prompt you change Disc After you insert Windows Setup Disc and click OK the pro...

Page 27: ...r chassis is shown as below Figure 5 1 Power Supply Location Note When the server is equipped with DUAL power supplies the hot swappablefunction is provided Otherwise you need to power off the server...

Page 28: ...ys st te em m F Fa an ns s The system fan locates beside the power supply and maintains the ideal temperature for themotherboard backplane and disk drives The location of the system fan is shown as b...

Page 29: ...29 To remove the system fans Remove the system fan from the system fan cage To install the system fans Put the system fan right into the system fan cage...

Reviews: