19
18
C
hapter
4
C
harging
& u
sing
b
atteries
C
hapter
4
C
harging
& u
sing
b
atteries
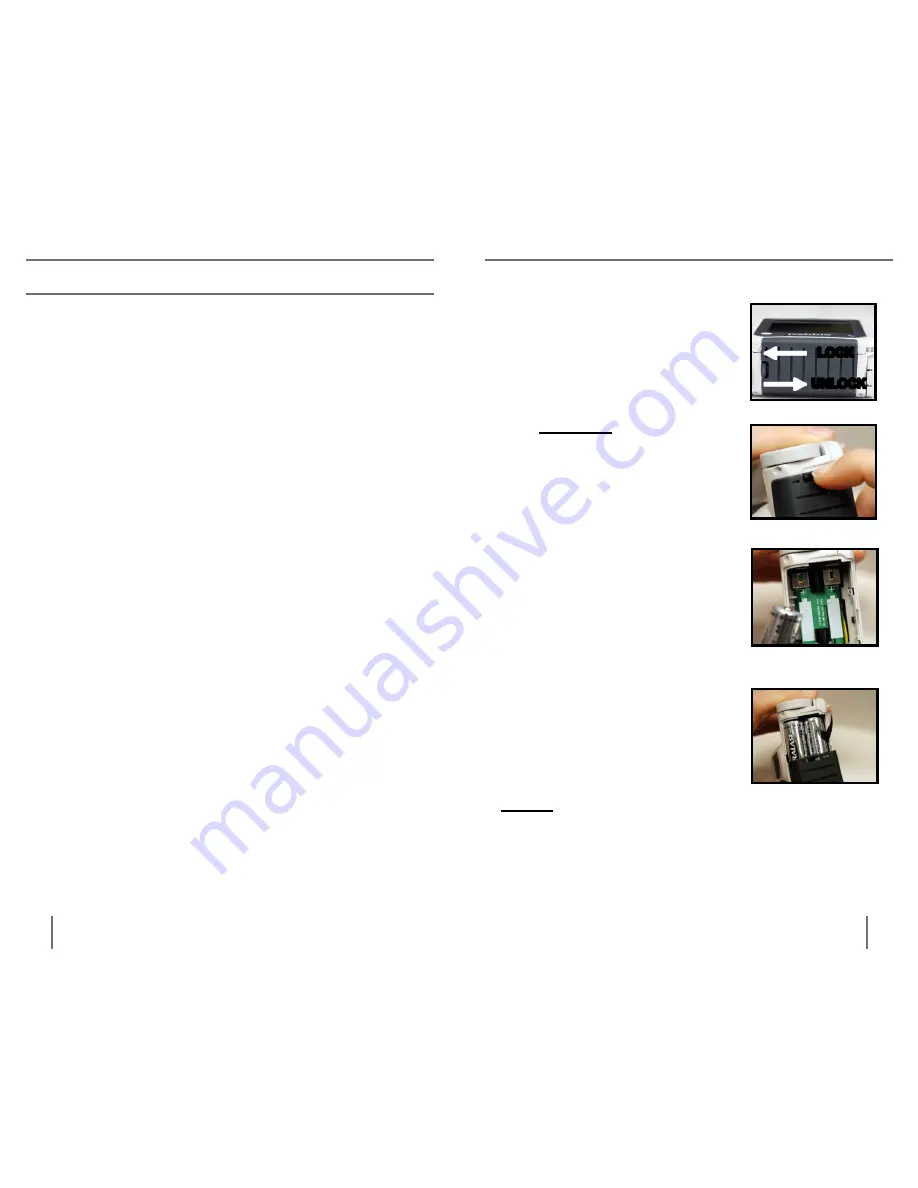
UnloCK
loCK
important points When Using Battery power
▶
If your Pebble will not be in use for 4 weeks or more,
it is recommended that you remove the batteries.
▶
The Pebble should ONLY be used with recharge-
able batteries.
▶
Rechargeable batteries should be rated at
2500mAh or greater.
▶
Rechargeable batteries should be fully charged
prior to first use.
▶
Using new batteries, your Pebble should last over
1.5 hours when fully charged. The total usage time
will gradually reduce with subsequent charges.
▶
It is not recommended to use standard “AA” batter-
ies (or alkaline) inside the Pebble. Standard batter-
ies are not capable of being recharged inside the
Pebble charging system.
Using rechargeable Batteries
Your Pebble includes two, rechargeable Nickel-Metal
Hydride (NiMH) batteries that can be continuously
charged inside the Pebble, even while the unit is in
operation (see page 10). It is recommended to leave
the unit connected with the included AC adaptor
when the unit is not in use to maintain a continuous
charge on the batteries. This way, your Pebble will
always be ready for portable use. It is not possible to
overcharge the included Nickel-Metal Hydride (NiMH)
batteries. Please refer to the instructions on the next
few pages for more information on replacing and
charging the batteries.
Figure 1
Figure 3
Figure 4
opening & Closing the Battery Compartment
1) Close the handle and locate
the battery compartment door
(See Figure 1).
2) Using your fingernail or small
coin, press down and slide the
latch downward to the “UNLOCK”
position as shown.
(See Figures 1 & 2)
3) Lift the battery cover to access
the batteries. Remove (or install)
2 rechargeable NiMH batteries.
Pay close attention to the battery
polarity markings found on the
inside of the battery
compartment.**
(See Figure 3)
4) To replace the battery cover,
align the cover as shown over
the battery compartment. Using
your fingernail or small coin,
press down and slide the latch
upward to the “LOCK” position
as shown.
(See Figures 1 & 4)
Figure 2
**Please note that each battery is inserted
with the polarity facing in the same direction.
CHarGinG & USinG BatterieS


