


E400 IP
Quick start guide
ENHANCE|
TECHNOLOGY
1.
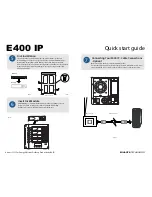
System is booting up when turn on the power.
2.
RAID controller is initializing the system to check
the hardware connection and memory. This is NOT
initializing for the hard disks.
3.
The system has booted up successfully and showing
the system IP address on the LCD screen.
Now you can login Web GUI to create a RAID Array for
your TS800
11
Preparing E400 IP for Configuration
After power-on, the power LED and hard disks LEDs will light up and your E400
will display a message showing the system is booting then change to Initializing
mode for few seconds to check the system.
192.168.0.200
Enhance Technology
System Booting
Initializing
................................
13
You will be using the Quick Install function in the Web GUI to create a RAID and
User Data Volume for your E400.
Create a RAID Array
NOTE
:
The Quick Install function is designed for set up a single RAID level with a single User Data Volume. If you
want to configurate your system with multiple RAID levels with multiple User Data Volumes please learn from
system User Manual CD for complete instructions.
NOTE
:
Depending on the capacity of your system. The RAID array initialization process may take several minutes.
Please allow plenty of time for this process. Never turn off your TS800 while initializing the array.
Step 1:
Select Quick Install then choose the RAID Level desired. After
choosing the RAID level, click NEXT.
Step 2:
In this step, the volume can be customized as needed. Volume
size, Bus ID, SCSI ID, and LUN can be assigned specified numbers to be
attributed to the volume. The maximum volume size is shown as default.
The volume can only be less or equal to the number shown. By default,
the Bus ID, SCSI ID, and LUN are set at 0. Click NEXT after desired volume
size and IDs are set.
Step 3:
Confirm if all the setting are correct then click Confirm to
finish the setup.
Done:
A summary page with the User data volume will be shown:
A RAID 0 user data volume with the UDV name “QUICK86975”, named
by the system itself, with the total available volume size 222GB.
Figure 14.
Figure 12.
14
12
Login Web GUI
To access Web GUI utility, lanuch the web browser on your computer and enter the
E400’s IP address in the address field.
Login Name: admin Password: 1234
NOTE
:
By default, the Web GUI’s network connection
type is set to
Automatic configuration - DHCP
, which
should be kept only if your network supports DHCP or
you are connecting through a dynamic IP address.
The TS2060’s IP address should be seen on the screen of
the controller. By default the IP address is
192.168.0.200
If you are required to use a permanent IP address, you
need to set a static IP address for the system.
(Please refer to User Manual CD for detail infomation)
Web GUI Sreen View
192.168.0.200
Enhance Technology
Figure 13.
8 disks iSCSI for Energy Efficient Desktop Productivity RAID