background image

EWS357-FIT Quick Start Guide 

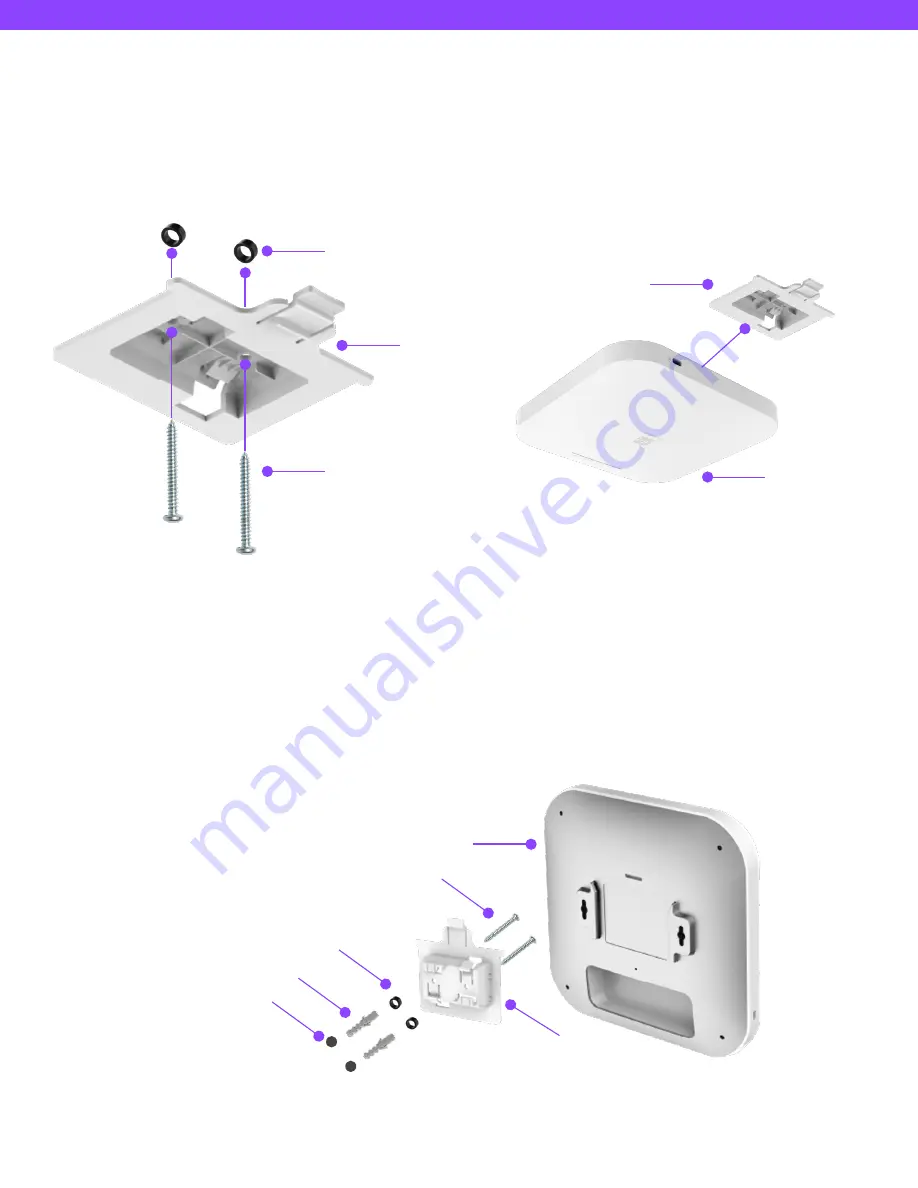
2. Slide the 

Access Point 

into the 

Ceiling Mount Base.

Ceiling Mount (Hard Ceiling)

1. 

Screw

 the included Screws into the 

Ceiling Mount 

Base

 with Spacers, and then screw the 

Screws

 into 

the surface until they are flush with the surface.

Access Point

Spacers

Screws

Ceiling Mount 

Base

Wall Mount

1. Determine where the Access Point will be placed and mark the location on the surface for the two mounting holes. 

Use the appropriate drill bit to drill two 8.1mm diagram and 26mm-deep holes on the marks.

2. Screw the 

Anchors

 into the holes until they are flush with the wall; screw the included Screws into the 

Anchors 

but 

leave the screw head sticking out so you can hang the Access Point on it.

3. Hang the 

Access Point

 against the wall onto the 

Screw heads.

Screws

Spacers

Anchors

Holes in the wall

Access Point

Ceiling Mount 

Base

Summary of Contents for EWS357-FIT

Page 1: ...int model EWS357 FIT including hardware mounting and configuration FIT Managed Indoor Access Point Mounting Kit Ceiling Mount Base 9 16 T Rail Spacer Ceiling Mount Base 15 16 T Rail Product Card Packa...

Page 2: ...lot 1Gbps LAN PoE 802 3af at Power Connector Reset Button LEDs STATUS LED COLOR LED BEHAVIOR Connecting to the management FitXpress FitController PWR Orange Flashing 0 5 Sec Management Connected FitXp...

Page 3: ...eiling and Wall Please perform the following steps to install successfully 1 Slide the Ceiling Mount Base into the designated slot on the access point slot of the Access Point Celing Mount Base Access...

Page 4: ...rmine where the Access Point will be placed and mark the location on the surface for the two mounting holes Use the appropriate drill bit to drill two 8 1mm diagram and 26mm deep holes on the marks 2...

Page 5: ...AP directly to the PoE port of the PoE switch A Connect one end of the Ethernet cable into the LAN PoE port of EnGenius FIT AP and the other end to the PoE port on the PoE Adapter B Connect the power...

Page 6: ...anagement Option B On Premises Management Option C Standalone Configuration Manage and monitor the Access Point through the FitXpress Platform with a mobile app or through the web portal FitXpress App...

Page 7: ...necting Ethernet Connect the Ethernet cable from the EnGenius Fit AP directly to the DHCP enabled network and make sure the AP can reach the Internet Gateway Router Network Switch DHCP Assigned IP EnG...

Page 8: ...tXpress platform It will automatically download the default configuration settings from FitXpress for automated provisioning When the Access Point is connected to the FitXpress Platform for the first...

Page 9: ...ller Launch your web browser to access the login page of FitController and create an account Enter the email address and password that you created and click Sign In The FitController default IP addres...

Page 10: ...ter Fit device by entering Serial Number 3 From the Inventory page Select the newly added device and click Assign to Network to add the device to your personalized network Step 4 Pairing the Device 1...

Page 11: ...r tablet to find the SSID EnMGMTxxxx and connect to it 1 EnMGMTxxxx xxxx is the last four digits of MAC MAC can be found on the device label on the back of the access point 2 Under your web browser en...

Reviews: