background image


~23~

Basic Operations 


Operation Modes 

 
Both the base station and handset have feature levels that can only be accessed 

when in certain modes. 
 

A. Base Operation Modes 

1. 

STANDBY mode

- this is the default mode. The page key is active in standby 

mode only. The base “Power” LED will light up during this mode. 


2. 

TALK mode

- the base station operates in this mode during a phone call. The 

“In Use” LED will light up only for a FXO call.  


3. 

REGISTRATION mode

- the base station enters this mode by pressing and 

holding the REG button for 3-seconds. The LED 1~4 will be blinking in 

“Registration” mode. 


B. Handset Operation Modes 

1. 

STANDBY mode

- this is the default mode.   


a.  If there is no on-going activity, the handset 

automatically goes into SLEEP/STANDBY mode to 

save battery power.  


b.  The handset can be turned off completely by holding 

down the 

 key for 3-seconds.  


c.  The standby screen display (custom name) can be 

edited.  


d.  The 2-dight number represents the handset ID. 


2. 

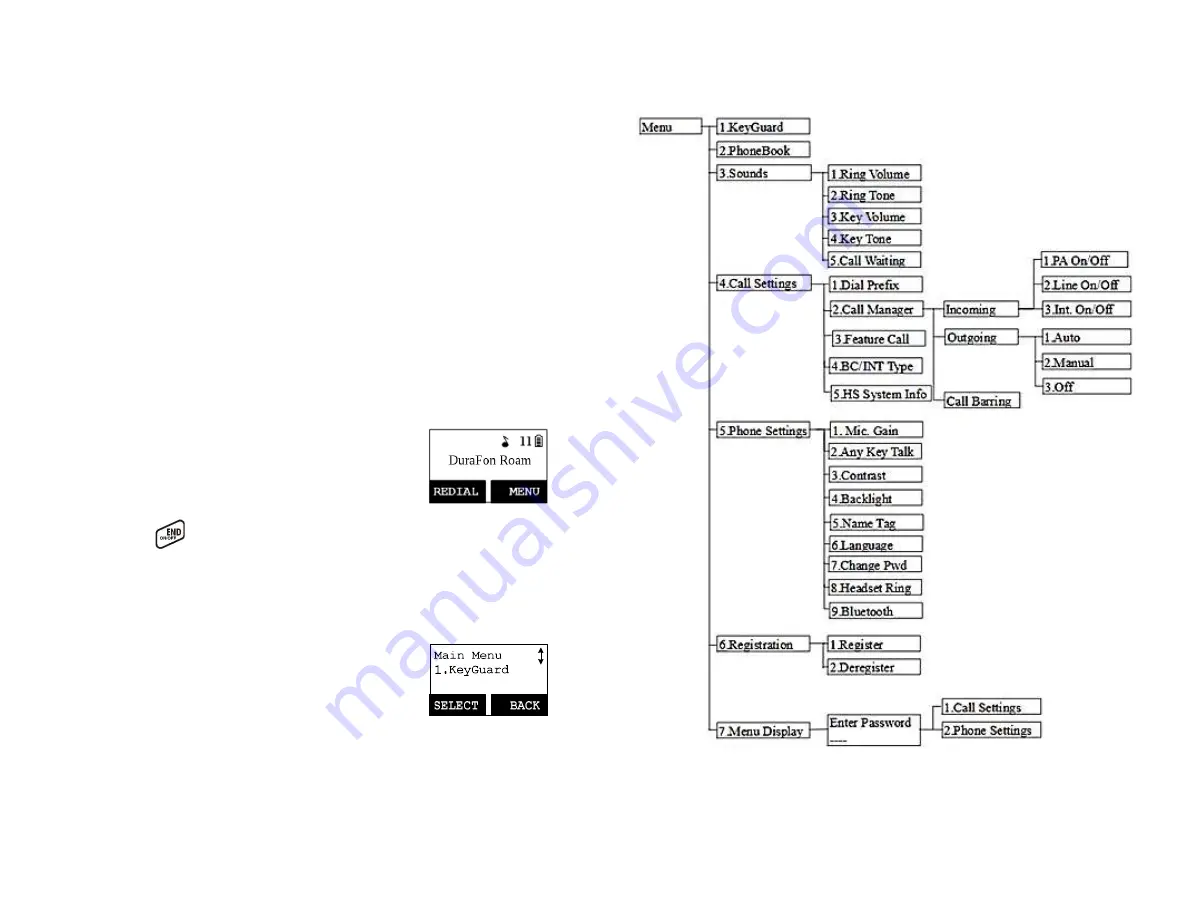
MENU mode 


a.  Press the (Right) soft function key to activate Menu 

mode. 


b.  In Menu mode, the handset settings and information 

contained in the memory can be changed.  


c.  The functions available through the Menu selection 

are covered in greater detail starting on page 63. 


d.  The Menu structure display as below: 


~24~

3. 

Menu Tree 


Summary of Contents for DuraFon Roam HC

Page 1: ...arger Installation 22 Basic Operations 23 Operation Modes 23 A Base Operation Modes 23 B Handset Operation Modes 23 Making a Telephone Call 25 Making a 2 Way Intercom Call 25 Making a Broadcast 26 Handset to Handset Calls 26 Redial 27 Receiving a Telephone Call 28 Receiving an Intercom Call 28 Ending a Call 29 Adjusting Handset Receiver Earpiece Voice Volume 29 Adjusting Handset Speakerphone Voice...

Page 2: ...l from the base it is highly probable that the call may not go through Locate the nearest landline telephone or other communications device to call for help b Emergency calls may not automatically provide emergency personnel with your name phone number or location 3 Notice to Hearing Aid Users This phone system is compatible with inductively coupled hearing aids 4 Notice to Cardiac Pacemaker Users...

Page 3: ...xpose you to dangerous voltages electrical currents or other risks Incorrect re assembling of the product may cause electric shock when the product is subsequently used 13 Avoid using the product during a storm There may be a risk of electric shock from lightning 14 Do not place the product where persons can step trip or fall on it 15 Do not place conductive objects over or near the antenna 6 16 D...

Page 4: ... including interference that may cause undesired operation 8 IMPORTANT NOTE Radiation Exposure Statement This equipment complies with FCC radiation exposure limits set forth for an uncontrolled environment End users must follow the specific operating instructions for satisfying RF exposure compliance To maintain compliance with FCC RF exposure compliance requirements please follow operation instru...

Page 5: ... compliance with FCC ISED RF exposure guidelines If you do not use a body worn accessory and are not holding the device at the ear position the handset a minimum of 10 mm from your body when the device is switched on Déclaration d avertissement sur les accessoires portés sur le corps de la FCC ISED SAR Pour un fonctionnement porté sur le corps cet appareil a été testé et répond aux directives d ex...

Page 6: ... phone line is in the OFF Hook status 2 2 Intercom in progress Indicates if Intercom mode is active Indicates the Handset ID that is sending the intercom call 3 Line Sound and Indication 3 1 Line Indicator Indicates when using line 1 or the incoming call from FXO line 3 2 SIP Indicator Indicates when using SIP or the incoming call from SIP 3 3 Enable ringer 3 4 Disable ringer 3 5 Ringer and vibrat...

Page 7: ...alf duplex broadcasting to base stations Re Press the key on the left top corner of the handset to activate the broadcast function 7 Left Right Soft Keys 14 a Make menu selection 8 Up Down Scrolling Keys a Scroll through records and menu selections b Adjust receiver voice volume when in the Talk mode c Press to enter received call log when in the Standby mode d Press to enter phonebook when in the...

Page 8: ...handsets b Outgoing Call Select the mode of line selection Auto Manual Off when you make a line call b 1 Auto A handset will select one of available lines from subscribed bases before making an outgoing call Default 16 b 2 Manual A handset will be prompted to select from a list of available lines before making an outgoing call i e 1 SIP 1 2 SIP 2 3 LINE1 b 3 Off Disable the capability to make an o...

Page 9: ...onger be displayed unless enabled by entering Menu Display again 20 PA On Off a Enable or disable the Broadcast function 18 b When PA is Off the handset cannot receive Broadcast from the base station or other registered handsets but it can broadcast to other registered handsets 21 HS System Info a The subscribed groups in the handset are assigned from web GUI You can see the handset subscribe to o...

Page 10: ...pair a Bluetooth headset To avoid pairing to wrong device you should switch off or far away all other Bluetooth devices before pairing process b In order to save power you may turn Bluetooth feature off Default if no Bluetooth headset needed to connect 20 Charger Illustration DC In Spare Battery Charging Slot Spare Battery Charging Indicator Handset Charging Slot ...

Page 11: ...letely it will take approximately one minute for the handset to auto power on 22 Getting Started Handset and Charger Installation 1 Plug the transformer end of the Charger AC DC adapter into a standard AC electric power outlet plug the other end into the DC In jack on the back of the Charger 2 Install the battery pack onto the handset 3 Make sure handset antenna well installed 4 Place the handset ...

Page 12: ...he LED 1 4 will be blinking in Registration mode B Handset Operation Modes 1 STANDBY mode this is the default mode a If there is no on going activity the handset automatically goes into SLEEP STANDBY mode to save battery power b The handset can be turned off completely by holding down the key for 3 seconds c The standby screen display custom name can be edited d The 2 dight number represents the h...

Page 13: ...base station Intercom 2 Way communication can be placed between handsets 26 1 Press key followed by a two digit handset ID or Group ID 2 Press key to end the call 3 Speed dial by accessing the entries 2 digit ID in the phone book Menu 2 a Press or scrolling key to enter the phone book b Press to dial the 2 digit number Notes 1 Intercom calls can be made regardless of the Base Station being present...

Page 14: ...selected number Note Intercom numbers Handset ID are not stored in the last 10 numbers dialed log Receiving a Telephone Call 1 When an incoming call arrives the LCD will show the Caller ID message and the ringer will ring or vibrate unless the ringer has been turned off 2 If the handset is on the charger cradle ringer will be temporarily switched to Ring if it has been set to Vibrate lift the hand...

Page 15: ...s Use or key to adjust 3 The new setting will remain effective for all future calls until changed 30 Placing a Call On Hold 1 When a call is in progress it can be put on hold by pressing OPTION Right soft key and the key 2 To return to the conversation press UNHOLD Left soft key Notes 1 Handset LCD displays when a call is on hold An alert tone a beep every 30 seconds will remind the handset that a...

Page 16: ...ended for best performance Use only the manufacturer s provided battery and charger 32 Advanced Operations Handset Registration 1 If your handset s is purchased as part of a system it has been pre registered with the base station at the factory 2 If the Handset ID is 00 this means it is a new handset or the ID has been erased You will need to register the handset with the base station 3 Registrati...

Page 17: ...on hold 2 Press XFER Right soft key followed by entering the destination number or handset ID Press key for the call to transfer directly After the call is transferred to the destination handset the original handset will go back to standby mode automatically 34 Indirect Transfer 2 way Announced Transfer If you want to talk to the destination handset before the call is transferred you can follow th...

Page 18: ...ed to enter a number for the name just entered Re Up to 26 digits can be entered as the number d After entering the number press the SAVE Left soft key to save this entry into phone book e Enter a phone book entry without a name all records without a name will be placed on the top of the phone book list f To enter the name press the corresponding keypad number one or more times according to the or...

Page 19: ... a key that corresponds to the first character of the name you are looking for c For example you are looking for EnGenius then press the number 3 twice d Use or scrolling key to locate the exact record you are looking for 38 7 To erase phone book a Use or scrolling key or the alphabetical search method to locate the record to be erased or edited b Press OPTION Right soft key to enter the option me...

Page 20: ... book Re The handset will not update any phone book when it stores up to a maximum of 50 entries Programmable Feature Call 1 If DuraFon Roam is installed behind a PBX system it is feasible to pre program some call features along with the PBX s feature code into the system 2 Up to 10 most frequently used feature call codes can be pre programmed 3 Name and enter feature call codes a Press MENU Right...

Page 21: ...hrough the numbers and names when available 2 Press OPTION Right soft key you can or key to choose save delete or clear all a Save call log 42 1 Press SELECT Right soft key you can use or key to scroll the name and press DELETE to edit the name Then press SAVE Left soft key to save the name 2 Use or key to scroll the number and press DELETE to edit the number Then press SAVE Left soft key to save ...

Page 22: ...lls via the SIP line or PSTN line 44 Re Default setting is Auto a Press 1 to Auto The hanset is able to make outgoing calls via an available line and SIP line automatically b Press 2 to Manual When pressing key in standby mode the handset LCD will show the available line Press or to scroll the options 1 SIP 2 Line Press 1 you can select the SIP line 1 to make a call c Press 3 to Off The hanset is ...

Page 23: ...ey while the handset is in the standby mode b Press 5 Phone Settings followed by 1 to enter the Mic Gain menu 46 c Use or key to scroll the Standard Medium and Low options d If you are using the handset in quiet environments like an office or meeting room the Standard level is recommended If you are using the handset in a noisy environment like a factory or outdoor place the level of Medium or Low...

Page 24: ... 47 d Once the headset is connected the screen will be back to Phone Settings 9 Bluetooth screen The connected icon will be shown on the standby mode 48 Menu Operations ...

Page 25: ...ss 4 to set Call Settings a Press 1 to set Dial Prefix 50 1 Press or to turn on or off the dial prefix feature Default Off 2 If On is selected the handset is prompted to enter the prefix number up to 14 digits can be entered 3 Use Delete Left soft key to edit prefix number 4 Press SAVE Left soft key to confirm the selection 5 When this feature is turned on the LCD will prompt the user Dial Prefix ...

Page 26: ...to set Headset Ring See Headset Ring operation on Page 46 j Press 9 to set Bluetooth See Bluetooth On Off operation on Page 46 7 Press 6 to register de register handset see Handset Registration operation on Page 32 8 Press 7 to set Menu Display To avoid mis setup of Call Settings MENU 4 Phone Settings MENU 5 and Base Settings MENU 6 you can hide these menus so that other handset users won t have c...

Page 27: ...ée aux deux conditions suivantes 1 le dispositif ne doit pas produire de brouillage préjudiciable et 2 ce dispositif doit accepter tout brouillage reçu y compris un brouillage susceptible de provoquer un fonctionnement indésirable FOR PORTABLE DEVICE USAGE 20m from body SAR needed Radiation Exposure Statement The product comply with the Canada portable RF exposure limit set forth for an uncontroll...

Page 28: ...ller ID 15 52 Caller ID 15 16 29 43 44 47 Change PIN 19 53 Charger Features 22 Charger Illustration 21 D De registration 33 Direct transfer 35 36 DND 16 56 Do Not Disturb Silent Ring 31 DTMF Duration 19 E Equipment Checklist 11 F Feature Call 18 41 51 Flash 14 42 FCC 8 54 G Group ID 15 26 27 Group Selections 34 Group Setting 18 H Handset and Charger Installation 23 Handset Charging Slot 22 Handset...

Page 29: ...31 Programmable Feature Call 41 Programmable Flash 19 R Receiving a Telephone Call 29 Receiving an Intercom Call 29 Redial 16 28 REG 24 registration mode 33 34 Ring Volume 50 Ringer 13 14 15 RSSI 13 Regulatory Information 8 S SILENT 17 29 30 31 51 speakerphone 14 27 28 30 Speed dial 26 27 28 T Talk mode 15 TALK FLASH 14 transformer 23 V Vibrator 15 View Call Log 43 Visual Message Waiting Indicator...

Reviews: