background image


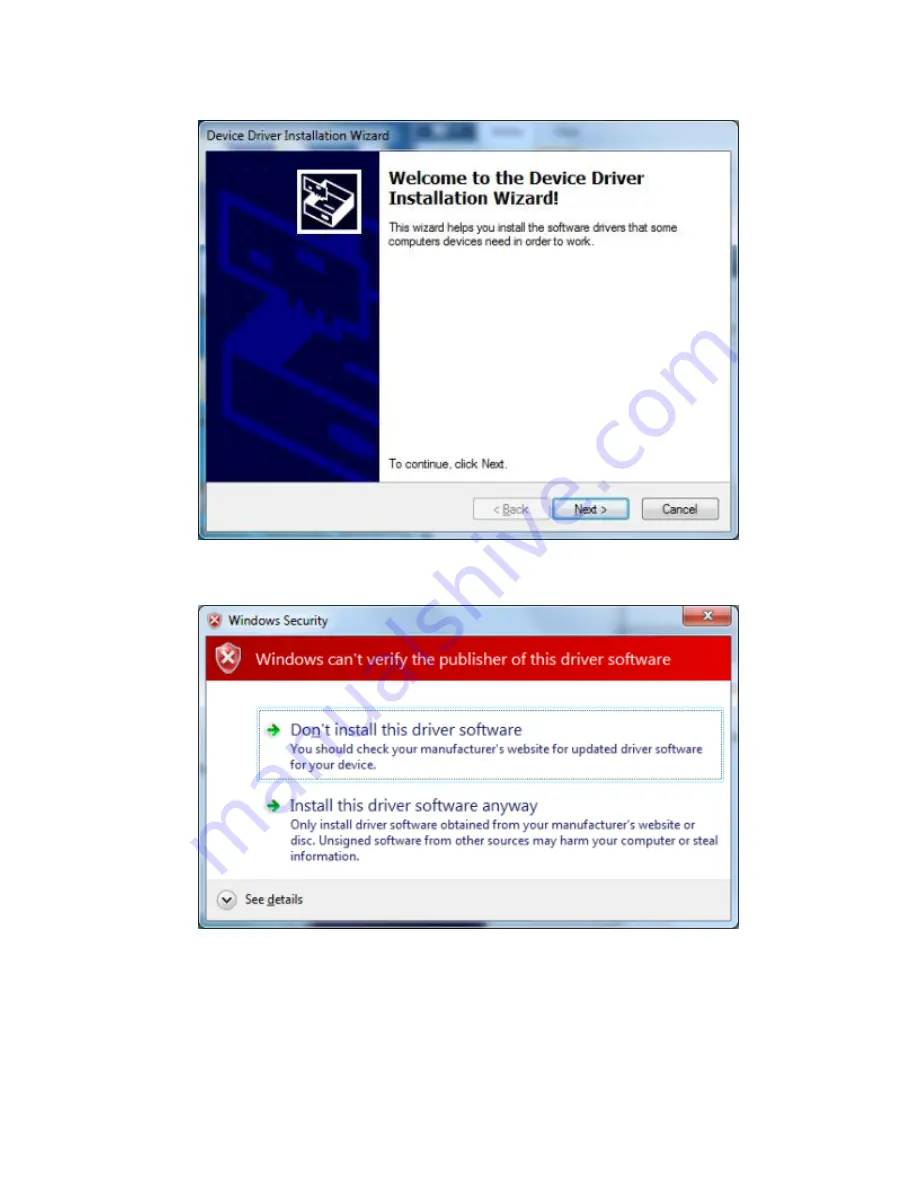
Figure: 21  - Enfora Driver Setup Utility Driver Installation  

4.


When prompted to install the device driver select the 

Next

 button. 


Figure: 22  - Windows Security Window 

During the driver install phase you may be prompted to Continue or Stop installation due to potential 
compatibility issues. Select the 

Install this driver software anyway

 button. 

Summary of Contents for Enfora Mini MT

Page 1: ... 1 Mini MT User Guide GSM2428UG001 Version 1 01 13 June 2011 ...

Page 2: ......

Page 3: ... have only a revocable and limited license to use such New Materials in connection with the products for which they are intended Distribution or modification of any New Materials without Enfora s consent is strictly prohibited IN NO EVENT WILL ENFORA BE RESPONSIBLE FOR ANY INCIDENTAL INDIRECT CONSEQUENTIAL OR SPECIAL DAMAGES AS A RESULT OF THE USE OF ANY NEW MATERIALS ENFORA S MAXIMUM LIABILITY FO...

Page 4: ...tion This limited warranty is for the benefit of the original purchaser and is not transferable During the warranty period Enfora at its expense and in its sole discretion will repair the product or replace the product with a corresponding or equivalent product if it is determined to have a covered defect provided that the purchaser first notifies Enfora directly or through its authorized distribu...

Page 5: ...rchaser or its customers as applicable shall be solely responsible for the proper configuration testing and verification of the Enfora product prior to deployment in the field and for ensuring that any end user product or system into which the Enfora product is integrated or incorporated operates as intended and meets the requirements of purchaser or its customers Enfora shall have no responsibili...

Page 6: ...tured not to exceed the emissions limits for exposure to radio frequency RF energy set by the Federal Communications Commission FCC of the U S Government These limits are part of comprehensive guidelines and establish permitted levels of RF energy for the general population These guidelines are based on the safety standards previously set by the U S and international standards bodies The standards...

Page 7: ... ne peut pas causer de brouillage et 2 ce dispositif doit accepter toutes interférence y compris le brouillage qui peut causer intempestif de fonctionnement du dispositif Le GSM2428 a été conçu pour satisfaire aux exigences de sécurité pour l exposition aux ondes radio SAR SAR essais a été réalisée conformément aux flux RSS 102 la transmission de GSM2428 à son plus haut niveau de puissance certifi...

Page 8: ...tion BATTERY INFORMATION AND SAFETY REQUIREMENTS NOTE Failure to comply with all of the following precautions could Cause personal injury or property damage Cause abnormal chemical reactions which would make the battery over heat smoke distort leak or catch on fire Destroy internal protections built into the battery Shorten battery life Reduce battery performance Precautions Read this entire manua...

Page 9: ...areas thoroughly with water Leaked materials may cause skin irritation Seek medical attention if irritation persists If it contacts your eyes do not rub your eyes Rinse the eyes thoroughly with water and see a doctor immediately Use of this battery in other devices could result in unsafe conditions Risk of explosion if battery is replaced by an incorrect type Table of Contents 1 Introduction 2 1 1...

Page 10: ...ni MT Battery Charging Guidelines 14 3 6 SIM Card Insertion 14 3 7 USB Driver Installation Windows XP 16 3 8 USB Driver Installation 64 Bit Windows 7 23 4 Configuration 31 4 1 Configuration 31 4 2 Dispatch Number 31 4 3 SMS Destination 31 4 4 Set GeoFence 32 User Definable Buttons 32 4 5 Setting the Emergency Call Number 32 4 6 Dialing the Emergency Call Number 33 4 7 Configuring the PC 33 Default...

Page 11: ...ure the Modem to Access the GPRS network 39 Verify Registration Status 40 Verify GPRS Activation 40 Configure the modem to access the Enfora Server 41 Verifying Server connectivity 42 5 GPS Operation and Verification 43 5 1 GPS Operation and Verification 43 5 2 Verification of GPS Lock 43 5 3 Verify GPS Operation 43 GPS Operation from Enfora Demo Server 43 6 Software Features 44 Additional Softwar...

Page 12: ...References GSM2428AT001 Enfora Mini MT AT Commands GSM2428CB001 Enfora Mini MT Cook Book GSM2428TG001 Enfora Mini MT Transition Guide 1 3 Requirements Getting started with the Enfora Mini MT will require the following Mini MT GSM2428 USB to mini USB cable sold separately CAW 6000 0006 Activated SIM card not supplied Personal Computer not supplied Operating Systems Windows XP or Windows 7 64 Bit US...

Page 13: ...hemes CS1 CS4 Packet Channel PBCCH PCCCH GSM Functionality Voice AMR EFR FR HR CS Data Asynchronous Transparent and Non Transparent up to 14 4 kb sec GSM SMS PDU MO MT Cell Broadcast Over The Air Commands GPS TX internal binary reporting timed reporting maximum speed exceeded status change reports GPS content event reporting distance reporting geofencing FOTA Interface Host Protocols AT Commands U...

Page 14: ...stry Canada Yes CE Mark Yes RoHS Compliant Yes Specifications subject to change 2 2 Description The Mini MT is a small ruggedized certified quad band device optimized for personal asset tracking The device has 5 buttons 4 LEDs a microphone speaker and headphone jack The device is intended to be used in either a body worn environment or remotely installed on equipement The device ships with a belt ...

Page 15: ...Figure 1 Mini MT Overview Figure 2 Mini MT Front View Showing LEDs ...

Page 16: ...d in the table below CALL Yellow ON Yellow GPS Yellow BAT Red Hibernate OFF OFF OFF If the battery charge level is 20 the BAT LED blinks slowly i e every 10 seconds OFF if the battery charge level is less than 5 Active Blinks on for 500ms off for 1s when receiving or Slow Blink on for 500 ms off Blinks on for 500ms off for 2s when locked If the battery charge level is 20 the BAT LED blinks ...

Page 17: ...en upgrading the firmware on the Mini MT 2 4 Switches Push To Call PTC The Push To Call PTC switch allows the user to place a call to a number that has been programmed Set Geo Fence Button The Mini MT ʘ button is programmable through the event engine The default state is to configure a mile radius geo fence at the current location This radius may be re defined and is retained in non volatile memor...

Page 18: ... laptop computer AC to USB power adapter or vehicle power to USB adapter Data communications with the Mini MT is also performed through the USB connector The USB connection is used to configure or customize the Mini MT operation This connection is also used to provide GPS NMEA data to a mapping or user application NOTE The device should only be connected to a USB 1 0 1 1 or 2 0 port The USB to Min...

Page 19: ...lay When switching between Headset and Speaker there is a delay of approximately two seconds Microphone A built in sensitive microphone allows the user to communicate comfortably at up to 3 feet away for hands free operation SIM A SIM card holder is located under the battery on the bottom of the Mini MT The SIM card is required to enable the voice and data communication capabilities of the Mini MT...

Page 20: ...ed To open the Mini MT the belt clip must first be removed The following steps provide instructions for how to remove the belt clip and open the Mini MT Lift the retainer clasp on the belt clip and slide the belt clip off the Mini MT Figure 5 Removal of Mini MT belt clip ...

Page 21: ...rage Figure 7 Opening the Mini MT battery door 3 2 Battery Installation The Mini MT is supplied with a 1400 mAh Lithium Ion rechargeable battery with built in safety features The battery should be removed to gain access to the SIM card and for turning the unit off shipping or travel The battery is shipped with a red protective cover over the battery terminals and must be removed before use The fol...

Page 22: ...he Mini MT Pull up on the battery using the thumb latch until the battery releases from the retention clips Slide the battery away from the contacts and remove from the Mini MT Figure 8 Mini MT Battery Cover NOTE The battery is initially provided with a red protective cover over the terminals Remove the protective cover by peeling off of the battery to expose the terminals Discard the protective c...

Page 23: ...ble optional CAW 6000 0006 connected to your desktop personal computer PC NOTE The PC must be turned on or powered up while charging the Mini MT For charging the Mini MT battery in a vehicle an optional USB to vehicle accessory power adapter is available PSA 9000 0002 for purchase NOTE Many vehicles do not provide power to the accessory jack when the vehicle ignition is off An alternate method for...

Page 24: ...st The ambient temperature The temperature cut off for charging is 45 C on the high end 0 C on the low end The battery will not charge while outside this range Once the battery reaches 100 charge the charging current to the battery will be cut off until such time as the battery may need additional charge The USB will power the unit so long as the battery is in place The charging LED blinks red whi...

Page 25: ...up 5 Slide the SIM card into SIM door Make sure the notch on the SIM is aligned with the notch in the SIM holder 6 Close the SIM door 7 Slide the SIM lock to the left The SIM card holder MUST be locked 8 Place the battery back in the Mini MT making sure the connectors are aligned properly 9 Replace the battery cover Note The SIM card is not provided with the Mini MT device The SIM must be obtained...

Page 26: ...XP using the Enfora Driver Setup Utility 1 Run the Enfora Driver Setup Utility by double clicking the EnforaDriverSetup executable file The Enfora Driver Setup Utility Extraction window will open Figure 9 Enfora Driver Setup Utility Extraction Once the contents have been extracted to memory the Welcome Window is displayed ...

Page 27: ...Figure 10 Enfora Driver Setup Utility Welcome 2 To install the drivers select the Install button The Enfora Driver Setup Utility Prepare System Window will be displayed ...

Page 28: ...ystem Window 3 Select the Next button to continue The Enfora Driver Setup Utility Installation Window will be displayed while the system installs the drivers Be sure to disconnect any Enfora devices Previous drivers will be removed during this phase ...

Page 29: ...Figure 12 Enfora Driver Setup Utility Installation Window ...

Page 30: ...Figure 13 Enfora Driver Setup Utility Driver Installation 4 When prompted to install the device driver select the Next button ...

Page 31: ...fora Driver Setup Utility Driver Installation Progress 5 During the driver install phase you may be prompted to Continue or Stop installation due to potential compatibility issues Select the Continue Anyway button ...

Page 32: ...Utility Driver Install Completion Window is displayed Figure 16 Enfora Driver Setup Utility Driver Install Completion Window 6 Select the Finish button When the installation is complete the list of Attached Devices will be displayed within the Enfora Driver Setup Utility Attached Devices Window ...

Page 33: ...4 Bit Windows 7 These instructions illustrate how to correctly install the USB drivers in Windows 7 using the Enfora Driver Setup Utility 1 Run the Enfora Driver Setup Utility by double clicking the EnforaDriverSetup executable file The Enfora Driver Setup Utility Extraction window will open ...

Page 34: ...Figure 18 Enfora Driver Setup Utility Welcome Window Once the contents have been extracted to memory the Welcome Window is displayed ...

Page 35: ...Figure 19 Enfora Driver Setup Utility Preparation Window 2 To install the drivers select the Install button The Enfora Driver Setup Utility Prepare System Window will be displayed ...

Page 36: ...tion Window 3 Select the Next button to continue The Enfora Driver Setup Utility Installation Window will be displayed while the system installs the drivers Be sure to disconnect any Enfora devices Previous drivers will be removed during this phase ...

Page 37: ...ompted to install the device driver select the Next button Figure 22 Windows Security Window During the driver install phase you may be prompted to Continue or Stop installation due to potential compatibility issues Select the Install this driver software anyway button ...

Page 38: ...ompletion Window Upon completion of the installation the Enfora Driver Setup Utility Driver Install Completion Window is displayed 5 If the Status displayes an issue click on the Correct issues button 6 At the OK to apply fix prompt click on the Yes button ...

Page 39: ... Utility Attached Devices Window Figure 25 Enfora Driver Setup Utility Apply Fix Window When the installation is complete the list of Attached Devices will be displayed within the Enfora Driver Setup Utility Attached Devices Window ...

Page 40: ...Figure 26 Enfora Driver Setup Utility Attached Devices Window ...

Page 41: ...efore proceeding 4 2 Dispatch Number The Dispatch Number is the phone number the Mini MT will call when the Push To Call PTC button is pressed To configure the Mini MT to call phone number 1 214 555 1212 enter the following command AT DSPATCH 12145551212 Enter After entering the dispatch number enter AT W Enter to save This will ensure that if the battery is removed the number will not need to be ...

Page 42: ... of generating SMS messages for Geo Fence events User Definable Buttons The Mini MT ʘ button is user definable through the event engine The default state is to configure a mile radius geo fence at the current location The Mini MT button is user definable through the event engine This button function is not defined from the factory 4 5 Setting the Emergency Call Number The Mini MT is capable of dia...

Page 43: ...on while still holding the PTC button 6 Press the user defined button again 7 The CALL LED will flash 8 Release the user defined and the PTC buttons The Mini MT will establish a call to the emergency number configured in the AT EMERNUM command 4 7 Configuring the PC NOTE The following examples use Windows XP and HyperTerminal Any Terminal program should work using the parameters shown below Defaul...

Page 44: ...em Properties window This is done through the Control Panel System or right click on My Computer and select Properties Select the Hardware Tab On Windows XP the screen looks like the following 2 Select the Device Manager button Expand the Ports section by selecting the sign beside Ports COM LPT ...

Page 45: ...he device name Record this number NOTE Make sure there is no or X next to the USB device If you see an or an X the device is not properly installed and will not work Start HyperTerminal The following configuration steps assume that you are using the Windows XP Operating System Follow these steps 1 Click Start Programs Accessories Communications HyperTerminal 2 You should see the following screen ...

Page 46: ...ora MiniMT 4 Click OK 5 The next window that will appear is the Connect To window 6 Change the Connect Using setting to the COM port that was determined in Section 7 3 2 Step 2 For the example we are using COM3 7 Click OK 8 The next window is the Port Settings window ...

Page 47: ...200 bits per second 8 data bits no parity 1 stop bit and no flow control 10 Make sure the settings match the example 11 Click OK 12 The Main Program Window should appear 13 Type the command ATI in the main window and press the Enter key ...

Page 48: ...munications capability Reset the modem to factory defaults To restore the Mini MT to factory defaults send the following command AT F CR To save the current configuration to memory send the following command AT W CR Reset the modem with the following command AT RESET CR Connecting the Mini MT to the Enfora Test Server The following information will be required from the SIM card provider refer to G...

Page 49: ...NT 1 IP isp cingular Set the username and password with the following command AT CGPCO 1 username password 0 CR NOTE Substitute the correct username and password if your cellular carrier requires a username and password Example AT CGPCO 1 ISP CINGULARGPRS COM CINGULAR1 0 CR Configure the Mini MT for auto GPRS registration with the following command AT AREG 2 CR Save the changes to memory with the ...

Page 50: ...wo responses CGREG 0 1 GPRS registered to home network OR CGREG 0 5 GPRS registered roaming Verify GPRS Activation Enter the following command to verify that the Mini MT is activated on the GPRS network AT NETIP CR The Mini MT is activated if it has been assigned an IP address Example of successful GPRS activation at netip NETIP 166 217 226 214 066 102 163 231 066 209 010 201 NOTE The above IP add...

Page 51: ...a Server To configure the modem for server interoperability several things have to be addressed Most GPRS configurations are Mobile Originate only The mobile modem must initiate a conversation with a remote server before the remote server can talk to the modem IP addresses are dynamically assigned and can change Some IP addresses are NAT and are non routable These issues are addressed with the fol...

Page 52: ...ng Server connectivity For the following tests Java Runtime must be installed on the computer To install Java Runtime please visit the Java website here http www java com en download manual jsp 1 Start Internet Explorer and enter the following URL http apitest enfora com udpapp 2 Enter the name used in the Modem ID MDMID command in the box 3 Select Connect 4 Select the tab with the modem name MMT_...

Page 53: ...its current position 5 3 Verify GPS Operation The Mini MT GPS status may be obtained locally through the USB connection or through the GPRS connection to a server The following steps allow the user to determine GPS operation through a terminal program and also through the Enfora Demonstration web server GPS Operation from Enfora Demo Server The same command can be used in the server application by...

Page 54: ...6 Software Features Additional Software Features The Mini MT supports Firmware Over The Air FOTA upgrades Details about FOTA commands can be found in the AT Command Manual ...

Reviews: