background image

7

EN

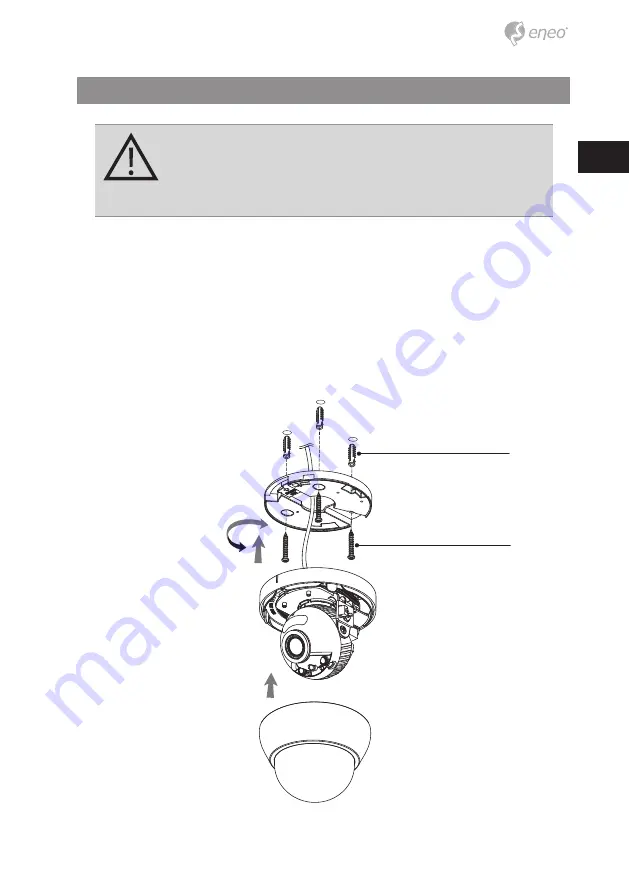
Installation instructions 

CAUTION: 

The camera’s base should be attached to a structural 

object, such as concrete, hard wood, wall stud or ceiling rafter 

that supports the weight of the camera. If necessary use appro-

priate mounting material (e.g. anchors) instead of the material 

enclosed with the camera. 


1.  Drill three holes for mounting on the ceiling or wall.
2.  Place the Easy Adaptors at the pre-drilled installation position and fix it by
     using mounting screws.
3.  Route the power/video cable to the connecting place.
4.  Attach the dome base assembly to the Easy Adaptor.
5.  Adjust the camera’s viewing angle (Pan, Tilt, Rotation)
6.  Tighten the set screw to fix a pan plate after the setting. Then remove the 
     caution sticker from the lens.
7.  Assemble the dome cover to the dome base unit.

Mounting Screw (3.5x25mm)

Plastic Anchor (6x30mm)

OPEN

LOCK

Summary of Contents for MPD-64A0003P0A

Page 1: ...User Manual EN 1 2 9 HD Dome Fixed 2560x1440 Day Night AF Zoom WDR 3 2 9mm Infrared Indoor MPD 64A0003P0A...

Page 2: ...2 EXPOSURE 16 3 SCENE ENHANCE 17 4 3D NR 19 5 DAY NIGHT 19 6 PICT ADJUST 21 7 SPECIAL 22 8 SYSTEM 24 9 EXIT 25 Open the dome cover 8 Detach the dome camera from the easy adaptor 8 Power Supply connect...

Page 3: ...mperature range indicated in the data sheet and within the defined air humidity range The camera may never be pointed directly at the Sun with the aperture open this will destroy the sensor It is unav...

Page 4: ...he environment or human health from uncontrolled waste disposal please separate this from other types of wastes and recycle it responsibly to promote the sustainable reuse of material resources Househ...

Page 5: ...supplied Indoor Dome camera Operating instruction Mounting Template Easy Adaptor Flat type Easy Adaptor Tilted type Plastic Anchor 6 x 30mm 3x Mounting Screw 3 5 x 25mm 3x Open Driver 1pc Video Sub ou...

Page 6: ...6 Part names Dome Cover Lens Bubble Shield Bubble Dome Dome Base Easy Adaptor Flat type SMD LEDs Light Sensor Power Cable 3 Axis Gimbal Tilted Easy Adaptor OSD Menu Control board...

Page 7: ...holes for mounting on the ceiling or wall 2 Place the Easy Adaptors at the pre drilled installation position and fix it by using mounting screws 3 Route the power video cable to the connecting place 4...

Page 8: ...ch the dome camera from the easy adaptor Push the hook on the dome base and swing the dome base to counter clock wise Then detach the dome camera from the installed easy adaptor 1 2 3 1 2 Open the dom...

Page 9: ...he limit to prevent from the internal damage 2 Tilt limit Tilt is limited to 25 min 90 max with reference to the ceiling when the inclination of camera module is 0 that is the image is aligned horizon...

Page 10: ...EM ANALOG MODE 1 SET Access to the menu or enter the setting To enter the main menu press the Set Key down 2 UP DOWN Choose the desired sub menu and to move the cursor up or down 3 LEFT RIGHT Set up t...

Page 11: ...AUTO C OFF ON 10 30 LOW MIDDLE HIGH OFF HALF FULL DIS 3D NR OFF LOW MIDDLE HIGH 0 10 HLC LEVEL COLOR H V POS H V SIZE BLC PICT ADJUST DAY NIGHT WHITE BAL SHARPNESS GAMMA COLOR GAIN DAY COLOR GAIN NIG...

Page 12: ...S NTSC CAM ID BAUDRATE SPECIAL OFF RIGHT UP LEFT DOWN CAM TITLE SDI MODE HD SDI EX SDI 1 0 EX SDI 2 0 OFF 1440 30P 25P 1080 30P 25P 720 30P 25P i Supported resolution according to Video format EX SDI...

Page 13: ...ut the center area of video image 1 ZOOM FOCUS H POINTER Sets the horizontal location of area to be zoomed by POI ZOOM V POINTER Sets the vertical location of area to be zoomed by POI ZOOM 1 ZOOM FOCU...

Page 14: ...tical Digital Zoom Ratio DURATION Sets the duration time for zooming by Motion SENSITIVITY Adjusts the detection sensitivity for motion High value increases the sensitivity to detect the small motion...

Page 15: ...Lens initialization is necessary during the installation or the regular operation to align the position data with the mechanical positions whose lens elements may move and deviate from its calibrated...

Page 16: ...is not recommendable at outdoor in the daytime 2 EXPOSURE llllllllllllllllllllll 10 llllllllllllllllllllll 10 llllllllllllllllllllll 8 2 EXPOSURE MODE BRIGHTNESS DAY BRIGHTNESS NIGHT SENS UP AGC RETU...

Page 17: ...ENHANCE WDR MODE ROI MODE WEIGHT RETURN DOL 3 1 WDR Wide Dynamic Range WDR is extended the gain range of the video that is mostly useful if camera takes a simultaneous picture of both indoor and outdo...

Page 18: ...rea with mask and excludes it from compensation 3 2 NORMAL 3 3 HLC High Light Compensation Optimized for the normal indoor and outdoor in the good lighting condition 3 3 1 LEVEL 0 20 Sets the HLC leve...

Page 19: ...NIGHT DAY NIGHT is used to control the setting during day time and night time operation Select the mode according to the light condition and the camera types DAY or NIGHT is determined by the built in...

Page 20: ...level avoids the saturation strongly but the corners will be darker accordingly 5 2 AUTO Used when DAY or NIGHT is determined by light level through the lens and DAY from to NIGHT is switched automati...

Page 21: ...DAY COLOR GAIN NIGHT GAMMA D WDR DEFOG SHADING RETURN AUTO llllllllllllllllllllll 5 llllllllllllllllllllll 10 llllllllllllllllllllll 10 0 55 OFF OFF OFF 6 PICT ADJUST Automatically tracks the changes...

Page 22: ...DR mode is disabled 6 6 D WDR 6 7 DEFOG 6 8 SHADING 6 7 1 MODE 6 7 2 LEVEL Sets Low Mid or High Video quality can be less in normal environments AUTO Enhance the foggy video automatically according to...

Page 23: ...s are available and each area is programmable in size color position and transparency 7 2 PRIVACY 7 1 MIRROR FLIP OFF Normal display without mirroring or flipping HV Video is reversed left and right a...

Page 24: ...ts the mask area H V position and make polygon shape which you selected zone MASK COLOR Adjusts the mask color by LEVEL 0 black 20 white 0 Black 1 White 2 Red 3 Green 4 Blue 5 Blue Green 6 Yellow 7 Vi...

Page 25: ...exit the setup menu 9 2 CANCEL Exit the setup menu without save Exits SETUP MENU and returns to the normal display 9 EXIT CAM ID Assigns the camera ID from 1 254 for the comm address BAUD RATE Select...

Page 26: ...26...

Page 27: ...27 EN...

Page 28: ...ribution through specialised trade channels only VIDEOR E Hartig GmbH Carl Zeiss Stra e 8 63322 R dermark Germany Tel 49 0 6074 888 0 Fax 49 0 6074 888 100 www videor com www eneo security com Technic...

Reviews: