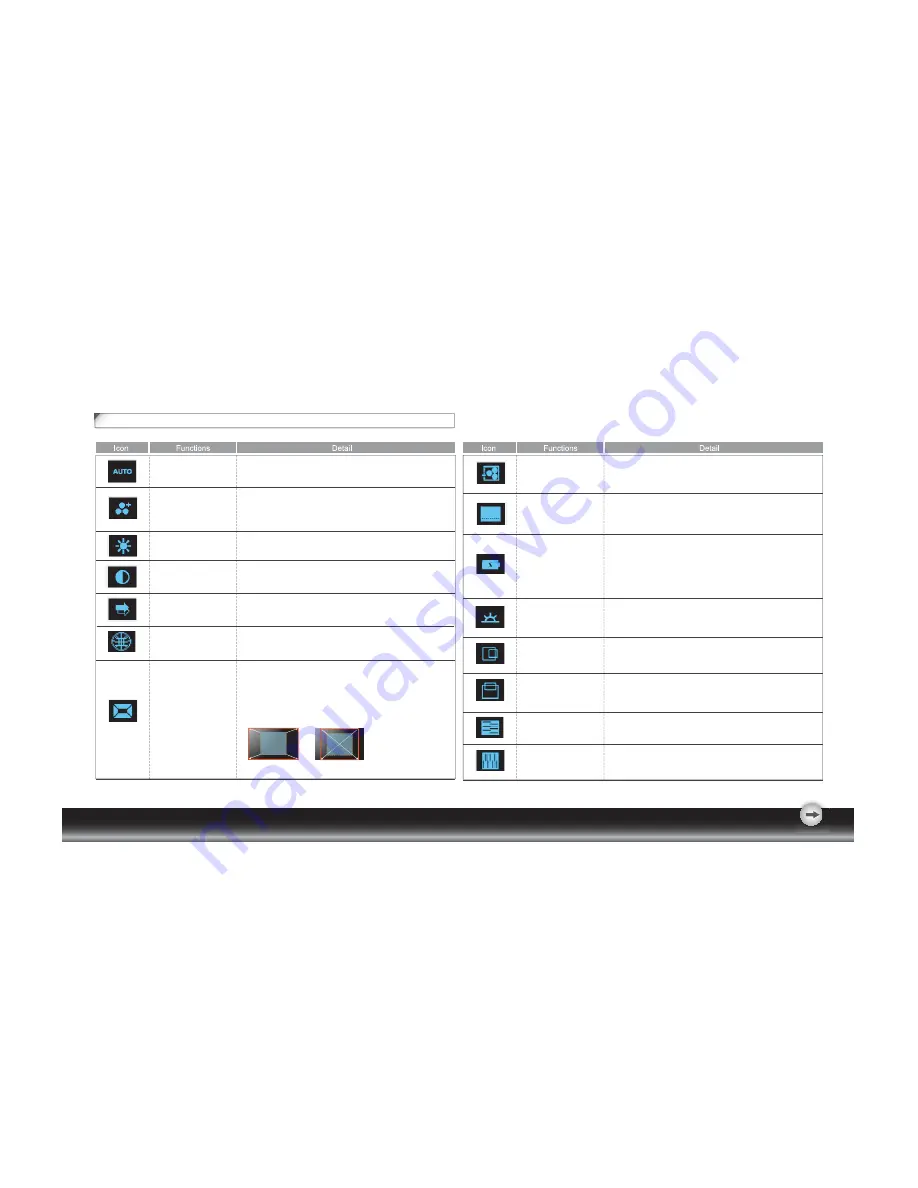
Emprex LM-2202 User Manual Download Page 8

- 5 -

OSD Icon List

AUTO 

ADJUSTMENT

POWER SAVING 

MODE

INPUT SIGNAL 

SELECT

BRIGHTNESS

  * Optimize the picture performance automatically.

* Select between Standard and Advanced power saving 

modes.

  See addendum for details.

*

 Standard: Fulfill EPA Energy Star power management 

requirement

*

 Advanced: Activate monitor Life-Extension fuction

* Adjust the luminance level of the screen.

  * Select the input signal from Analog, and Digital Inputs (Optional).
  * Factory default: Analog (VGA)

HORIZONTAL 

POSITION

VERTICAL 

POSITION

PHASE

CLOCK

* Shift the screen left or right

• Adjust the monitor internal sampling clock rate

• Shift the screen up or down

• Adjust the monitor internal signal phase

ASPECT RATIO

• Select the display ratio from Native, and Full Screen
• Full Screen: adjust and enlarge the display screen to full 

screen size (16:10)

• Native: keep the display format as the input signal (4:3, 

5:4, etc), and enlarge the display screen to the maximum 
w/o losing any content (part of the screen may be blank)

Full Screen 

(16:10)

Native 

(4:3 or 5:4)

CONTRAST

• Adjust the contrast level of the screen.

  * Activate the built-in color engine to enhance the graphic 

effects according to the different situations of the display. 
contents

THEME MODE 

OSD MENU 
LANGUAGE

* Select your own preference of language of OSD menu.

       COLOR 
TEMPERATURE

*

Adjust the mechanical specifications regarding the 
display.(Power Saving Mode, White Balance, Clock, Phase, 
Horizontal Position, Vertical Position, Information)

SYSTEM

* Select the setting of screen color-Cool, Warm or User.
* Cool: Select the setting of screen color to be bluish white.
* Warm: Select the setting of screen color to be reddish white.

Adjust the balance of the input signal.

WHITE BALANCE

Summary of Contents for LM-2202

Page 1: ...22 wide LCD Monitor User Manual English Deutsch Fran ais Italiano Espa ol 3 FF Svenska Suomi Dansk Polski Nederlands...

Page 2: ...1 Transporting the monitor 1 GETTING STARTED Package contents 2 Monitor installation 2 Identifying parts and controls 3 Customizing your Monitor 3 3 Introduction to Hotkeys 4 OSD icon list 5 Troubles...

Page 3: ...rgy saving mode after a certain time beneficial both for the user and the environment Electrical safety Emissions Electromagnetic fields Noise emissions Ecology The product must be prepared for recycl...

Page 4: ...ion or shock 3 The apparatus shall only be used between 5 tilted forward and 20 tilted backward as normal operation position If the tilt angle exceeds 20 it shall be used for wall mounting or packagin...

Page 5: ...audio cable into the AUDIO port at the rear of the monitor 3 2 Plug the other end of the audio cable into the audio port of your computer or other audio source Monitor installation Package contents Be...

Page 6: ...show that a button represents different functions in different levels of the architecture Customizing your Monitor Important Important The On Screen Display OSD system provides a full range of customi...

Page 7: ...s like a map This tree like directory can help you to become aware of the whole system During the whole process you need to know the following actions 1 Activate the OSD main menu Under the energized...

Page 8: ...en adjust and enlarge the display screen to full screen size 16 10 Native keep the display format as the input signal 4 3 5 4 etc and enlarge the display screen to the maximum w o losing any content p...

Page 9: ...s display INFORMATION DEMO RECALL Reset monitor parameters back to factory preset values 2 seconds after activation of this function some of the menus will stimulate feature grading effects 2 times ov...

Page 10: ...ress a key on the keyboard to wake up the computer 3 Check if the video signal cable is properly connected to the monitor and computer Symptom Check Items 1 Check if your computer is turned on 2 Check...

Page 11: ...of the supported timing is not requested exactly 4 Normalization of VGA card s deviation will be acceptable 5 Horizontal Frequency 6 Vertical Frequency 8 Technical Features and Specifications Interfa...

Page 12: ...not only save electricity but extend the life of the lights 3 Working principle of the Monitor Life Extension function To minimize the impact of frequent turn on and turn off of LCD monitor the Life...

Page 13: ...mode Even though comparing the advantages of both conditions we still recommend you strongly to set your monitor in Advanced Power S aving mode 5 l How to engage the Monitor Life Extension function Y...

Page 14: ...ctions may cause harmful interference to radio communications However there is no guarantee that interference will not occur in a particular installation If this equipment does cause harmful interfere...

Reviews: