background image

13

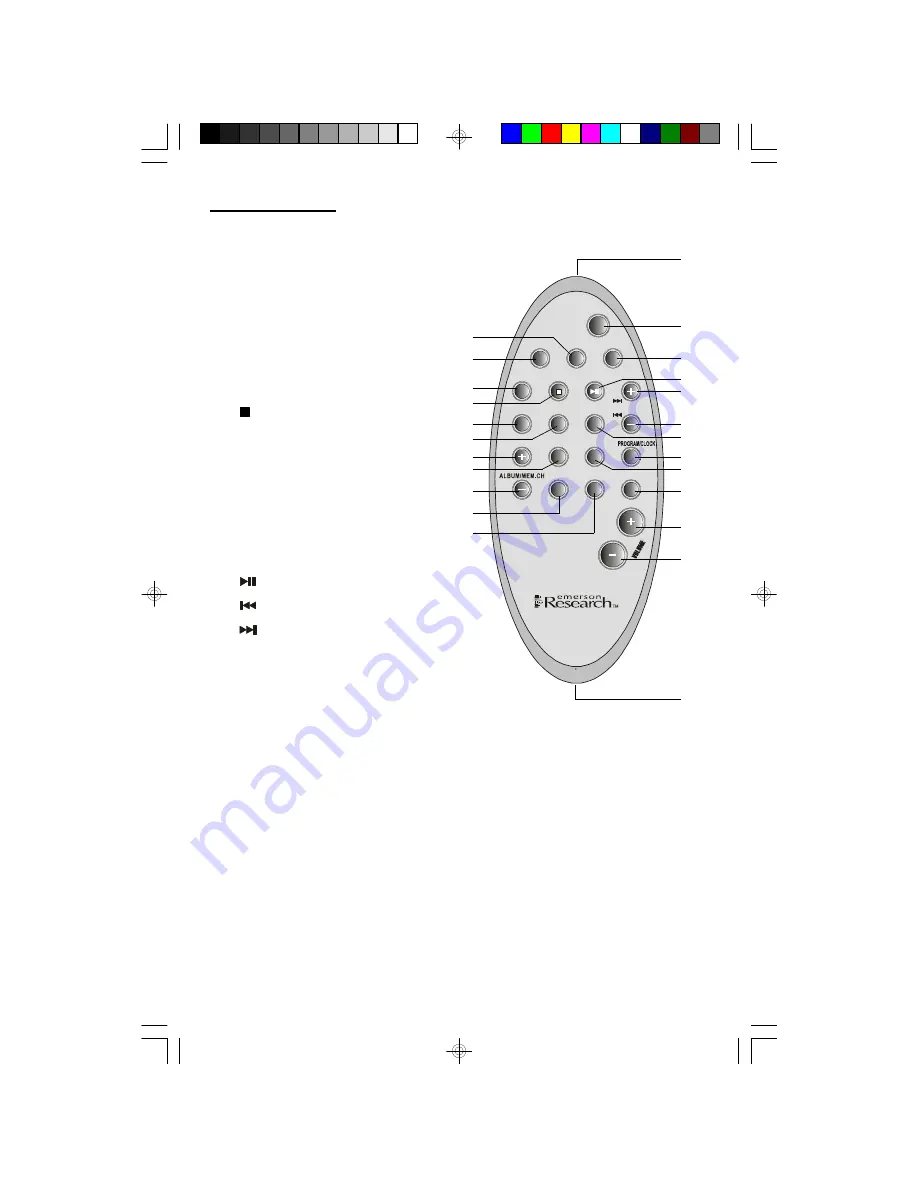
Remote Control

  1.)

DBBS

 Button.

  2.)

EQ

 Button.

  3.)

ALBUM/MEM CH. –

 Button.

  4.)

MODE

 Button.

  5.)

ALBUM/MEM CH. + 

Button.

  6.)

INTRO 

Button.

  7.)

REPEAT

 Button.

  8.)


STOP

 Button.

  9.)

FUNCTION 

Button.

10.)

AUX

 Button.

11.)

TIMER

 Button.

12.) IR (Infrared) Transmitter.

13.)

STANDBY


ON

/Off


Button.

14.)

SLEEP

 Button.

15.)


PLAY/PAUSE

 Button.

16.)

 SKIP/ 

Button.

17.) 


SKIP/TUNING – 

Button.

18.)

RANDOM

 Button.

19.)

PROGRAM/CLOCK

 Button.

20.)

TUNER/BAND

 Button.

21.)

MUTE

 Button.

22.)

 Button.

23.)

VOLUME –

 Button.

24.) Battery Compartment.

24

1

2

3

4

5

6

8

9

10

11

14

15
16

18

20

21

22

23

12

19

13

7

17

INTRO

SKIP/TUNING

MODE TUNER/BAND

DBBS

MUTE

AUX

RANDOM

REPEAT

STANDBY/ON

TIMER

SLEEP

FUNCTION

STOP PLAY/PAUSE

EQ

ES299_062905.p65

29/6/2005, 15:07

13

Summary of Contents for Research ES299

Page 1: ...ER S MANUAL ES299 Visit our web site at www emersonradio com Multi Media Audio System with Digital Tuner CD R RW MP3 Player SD MMC Flash Memory Card Reader and USB Port ES299_062905 p65 29 6 2005 15 07 48 ...

Page 2: ...ds of time 13 Refer all servicing to qualified service personnel Servicing is required when the apparatus has been damaged in any way such as power supply cord or plug is damaged liquid has been spilled or objects have fallen into the apparatus the apparatus has been exposed to rain or moisture does not operate normally or has been dropped 14 This appliance shall not be exposed to dripping or spla...

Page 3: ...tion to normal pre recorded CDs And the digital tuner will store up to 40 of your favorite stations 30 FM 10 AM for easy and immediate recall Finally all functions of this system can be operated from the comfort of your favorite chair with the ultra slim 22 key remote control Please be sure to read this manual carefully and completely to make sure you understand all of the exciting features and fu...

Page 4: ... the FCC Rules These limits are designed to provide reasonable protection against harmful interference in a residential installation This equipment generates uses and can radiate radio frequency energy and if not installed and used in accordance with the instructions may cause harmful interference to radio communications However there is no guarantee that interference will not occur in a particula...

Page 5: ... returned for service Using the original carton and packing material is the only way to properly protect the unit from shipping damage Remove any descriptive stickers or labels from the front panel of the main unit Do not remove any labels or stickers that may be affixed to the back panel of the main unit or the speakers Unwind the AC power cord on the back of the main unit and extend it to its fu...

Page 6: ...onnect the Red wires to the Red terminals Connect the Black wires to the Black terminals If the wires are connected incorrectly the sound will be muddy or distorted To make the connection completely depress the plastic levers to open the terminals insert the bare end of the speaker wire into the terminal openings and release the plastic levers to lock the wires in place R L RED BLACK ES299_062905 ...

Page 7: ...6 LINE OUT R L Jacks This system includes a pair of LINE OUT R L jacks for the connection to optional external amplifier To External Amplifier LINE IN Jacks ES299_062905 p65 29 6 2005 15 07 6 ...

Page 8: ...yer or a personal hard disc audio jukebox device such as an iPod Connect the audio output jack s or headphone jack of the external audio equipment to the AUX IN R L jacks on the back panel of this system CONNECTION CABLES ARE NOT INCLUDED You may leave your external device permanently connected to this system if you wish It is not necessary to disconnect the external device in order to listen to t...

Page 9: ...d outlet You should have your outdated outlet changed by a qualified licensed electrician Do not file the wide blade on the plug or use an adapter to make the plug fit into your outlet This defeats the safety feature and could expose you to electric shock AC Plug AC Outlet Placement Of The System The system should be placed on a stable level surface such as a table shelf or stand convenient to a 1...

Page 10: ...e Jack This system includes a stereo PHONES jack on the front panel of the main unit You may connect a set of stereo headphones not included to this jack for private listening without disturbing others The main speakers are automatically shut off when headphones are connected to the PHONES jack Make sure that the plug from your headphones is fully inserted into the headphone jack If the plug is no...

Page 11: ...10 LOCATION OF CONTROLS AND INDICATORS Front Panel 22 20 19 1 2 3 4 5 6 18 17 16 15 14 13 12 11 10 8 7 21 9 ES299_062905 p65 29 6 2005 15 07 10 ...

Page 12: ...11 Back Panel 26 25 24 23 27 ES299_062905 p65 29 6 2005 15 07 11 ...

Page 13: ... 11 STANDBY ON Off Button 12 CD Tray OPEN CLOSE Button 13 Multi Function Display 14 DBBS Button 15 VOLUME Button 16 VOLUME Button 17 USB Port 18 SD MMC Memory Card USB LED Indicator 19 PLAY PAUSE Button 20 STOP Button 21 SKIP TUNING Button 22 SKIP TUNING Button Back Panel 23 AUX IN R L Jacks 24 FM Lead Wire ANTENNA 25 LINE OUT R L Jacks 26 SPEAKER Terminals 27 AC Power Cord ES299_062905 p65 29 6 2...

Page 14: ...Off Button 14 SLEEP Button 15 PLAY PAUSE Button 16 SKIP TUNING Button 17 SKIP TUNING Button 18 RANDOM Button 19 PROGRAM CLOCK Button 20 TUNER BAND Button 21 MUTE Button 22 VOLUME Button 23 VOLUME Button 24 Battery Compartment 24 1 2 3 4 5 6 8 9 10 11 14 15 16 18 20 21 22 23 12 19 13 7 17 INTRO SKIP TUNING MODE TUNER BAND DBBS MUTE AUX RANDOM REPEAT STANDBY ON TIMER SLEEP FUNCTION STOP PLAY PAUSE E...

Page 15: ...lder out of the remote control in the direction of arrow 2 Remove the original battery from the holder and install a new CR2025 battery with the side facing up as shown in the illustration Then slide the battery holder back into the remote control Dispose of the original battery properly It should not be thrown into a fire as the battery may explode if incinerated It should not be left around wher...

Page 16: ...ress the OPEN CLOSE button to close the CD tray General Controls Most of the main functions of this system can be operated by the controls on the front panel of the main unit or by the buttons on the remote control handset If a specific function can only be operated by the remote handset or by the front panel controls this will be clearly indicated in the instructions When operating this system wi...

Page 17: ...eset equalizer allows you to adjust the sound characteristic for the most popular types of music Press the EQ button on the front panel or the remote control to cycle through the following equalizer settings PASS EQ Off CLASSIC ROCK POP JAZZ The appropriate EQ indicator briefly appears in the display to confirm your selection The system remembers the EQ setting when the power is switched Off and r...

Page 18: ...ple to answer the telephone The sound stops and the MUTE indicator flashes in the display Press the MUTE button again to cancel the mute function and restore the sound The MUTE indicator disappears The mute function will also be canceled automatically by pressing the VOLUME or VOLUME buttons ES299_062905 p65 29 6 2005 15 07 17 ...

Page 19: ...n display Press the SKIP TUNING or buttons to select between 24 HOUR or 12 HOUR modes if necessary 2 Press the PROGRAM CLOCK button again Just the Hour digits will continue flashing 3 Press the SKIP TUNING or buttons to set the display to the correct hour AM or PM 4 Press the PROGRAM CLOCK button again The Minute digits will begin flashing 5 Press the SKIP TUNING or buttons to set the display to t...

Page 20: ...d by the Automatic Tuning system Automatic Tuning Depress and hold the SKIP TUNING or buttons until the display begins to move then release the buttons The Tuner will search up or down the band for the next strong signal and stop on that station Repeat this procedure until the tuner stops on your desired station 4 If you tuned to an FM Stereo station the ST indicator will appear in the display If ...

Page 21: ...vary the direction of this antenna until you find the position that provides the best reception AM The AM bar antenna is inside the cabinet of the main unit You may need to change the position of the main unit until you find the position that provides the best reception for your favorite AM stations ES299_062905 p65 29 6 2005 15 07 20 ...

Page 22: ...channel number 01 indicator flashes in the display 2 Press the PROGRAM CLOCK button again the 01 indicator stops flashing confirming that your station has been entered in preset channel number 01 3 Tune to the next station you wish to memorize Example FM 106 70 MHz Press the PROGRAM CLOCK button The preset channel number advances to flashing 02 4 Repeat Step 2 3 until you have stored up to 30 stat...

Page 23: ...et number and frequency appears on the display Changing Preset Stations 1 Tune to the new station you want to memorize 2 Press the PROGRAM CLOCK button 3 Repeatedly press ALBUM MEM CH or button to select the preset channel number you wish change 4 Press the PROGRAM CLOCK button again The new station is entered in the memory and the previous station is deleted ES299_062905 p65 29 6 2005 15 07 22 ...

Page 24: ...or recording 100 compatibility cannot be guaranteed This is not an indication of any problems with your player Normal Playback 1 Press the STANDBY ON button to turn the system On 2 Press the FUNCTION button to select CD function 3 Press the OPEN CLOSE button on front panel to open the CD tray If you have not already done so remove the dummy CD transit protection cards and discard it You cannot pla...

Page 25: ...he ESP system turns On automatically when you press the PLAY PAUSE button and the ESP indicator begins flashing as the player stores 10 seconds of music in the memory When the memory is full the ESP indicator stops flashing and remains On If the unit is shaken or bumped for a few seconds you will not experience any skipping but the memory will be partially depleted and the ESP indicator will begin...

Page 26: ...back press the PLAY PAUSE button again The sound stops and the elapsed time flashes in the display but the disc continues spinning Press the PLAY PAUSE button once more to cancel Pause mode and resume playback at the same point the elapsed time stops flashing Skip Track and High Speed Music Search During playback repeatedly press the SKIP TUNING or buttons to skip to higher or lower numbered track...

Page 27: ...ay and the selected track will be repeated continuously All Tracks Repeat Load the disc in the player and begin playback Press the REPEAT button on the remote control twice The ALL indicators appear in the display All tracks on the disc will be repeated continuously To cancel Repeat playback mode press the REPEAT button until the ALL indicators disappear from the display Repeat mode can also be ca...

Page 28: ...nd normal playback will resume from that point INTRO Scan Playback On Remote Control Only This feature allows you to play just the first 10 seconds of each track on the disc This may be useful when you are trying to locate a specific song but you do not remember the title Load the disc as usual and wait until the display shows the total playing time and number of tracks Press the INTRO button on t...

Page 29: ... and wait until the player has read the Table of Contents of the disc 2 Press the PROGRAM CLOCK button on the remote control The PRG indicator Program Memory P 01 and Track 00 will appear in the display 3 Then press the SKIP TUNING or buttons to select the first track on the disc to be programmed Example Track 07 4 Press the PROGRAM CLOCK button again to enter Track 07 in program memory 01 The pro...

Page 30: ...CK button then the PLAY PAUSE button To cancel the programmed sequence from the memory press the STOP button at programming mode Programmed Repeat Playback You can use the Programmed and Repeat Playback functions together to continuously repeat a programmed sequence First program up to 64 tracks as described above Then press the REPEAT button twice to activate All Tracks Repeat feature Press the P...

Page 31: ...ashing READ indicator for a minute or more before playback begins This is normal and not an indication of any problem with your player Most of the normal CD operations described in this manual also apply to MP3 CDs However there are a few differences in MP3 CD playback functions and these are described on the following pages MP3 CD Reading Time And Display Information As mentioned above because MP...

Page 32: ... skip to Directory 09 Track 005 Press the ALBUM MEM CH button repeatedly to select album 09 The track will show 001 Press the SKIP TUNING button repeatedly until the display shows Track 005 Press the PLAY PAUSE button to start playback Press and hold the MODE button to scroll through the ID3 text information If the information was properly inserted when the files were created the display will show...

Page 33: ...racks contained in a single Directory Album To repeat a single track on an MP3 CD Select the track to be repeated and start playback as usual Then press the REPEAT button on the remote control once The indicator appears and the selected track will be repeated continuously To repeat all the tracks on an MP3 CD Begin playback as usual then press the REPEAT button twice The ALL indicators appear on t...

Page 34: ...leted Press the INTRO button The INTRO indicator appears in the display and begins Intro Scan playback The player will play the first 10 seconds of each track on the disc Random Playback Load your MP3 CD in the player wait until the reading process is completed Press the RANDOM button The RNDM indicator appears in the display The player will play all the tracks on the disc in Random order ES299_06...

Page 35: ...m 05 1 Press the PROGRAM CLOCK button on the remote control The display shows Album 00 flashing Track 000 Program Number P 01 and PRG indicator appear 2 Press the SKIP TUNING button repeatedly to select Album 05 3 Press the PROGRAM CLOCK button to enter Album 05 in Program Memory P 01 The track 000 flashes 4 Press the SKIP TUNING button repeatedly to select Track 003 5 Press the PROGRAM CLOCK butt...

Page 36: ...otal number of Albums Directories and Tracks Files on the disc For example in the illustration the disc contains 9 Albums and 56 Tracks 2 Press the MODE button on the remote control once The Search symbol will flash in the display and the player will enter the alphabetical and numerical title search mode beginning with the letter A The display will show the first song title beginning with the lett...

Page 37: ...m symbol ALBUM will appear in the display and the player will enter the Album Search mode beginning with Album 01 The display will show the name the Album Example Judds Note If the album name is not recognized or if the album was not properly named the display will show UNKNOWN 3 Press the SKIP TUNING button repeatedly to scroll through all the Albums on the disc in numerical order When you see th...

Page 38: ... the VOLUME EQ and DBBS controls as desired You can skip tracks with the SKIP TUNING or buttons just as you would with a normal CD You can skip Albums with the ALBUM MEM CH or buttons You may press the MODE button once to enter Album Search mode then press the SKIP TUNING or buttons to search the desired album Note If the album name is not recognized or if the album was not properly named the disp...

Page 39: ...n the device 5 Press the PLAY PAUSE button to begin playback Adjust the VOLUME EQ and DBBS controls as desired You can skip tracks with the SKIP TUNING or buttons just as you would with a normal CD You can skip albums with the ALBUM MEM CH or buttons You may press the MODE button once to enter Album Search mode then press the SKIP TUNING or buttons to search the desired album Note If the album nam...

Page 40: ...e on indicators appear and the Hour digits will begin flashing in the display 2 Press the SKIP TUNING or buttons to set the display to the desired turn On hour AM or PM 3 Press the TIMER button The Minute digits begin flashing 4 Press the SKIP TUNING or buttons to set the display to the desired turn On minute 5 Press TIMER button again The OFF appears in the display the Hour digits begins flashing...

Page 41: ... the turn On Volume level as desired 10 Press the TIMER button again to confirm The display will show the Timer settings in sequence once more The indicator remains On 11 At the selected Timer On time the unit will turn on The volume increases gradually to the preset level It will sound until the turn Off time is reached and the power shut off automatically 12 To stop the unit sooner press the STA...

Page 42: ...e indicator will reappear To re program the Timer press and hold the TIMER button until the Hour digits begin flashing Then repeat the steps 2 10 on pages 39 40 If the unit turns on to CD function it will only play until the end of the disc and then stops If your CD is only 45 minutes the unit will only play for 45 minutes but the power will remain On until turn Off time is reached ES299_062905 p6...

Page 43: ...imer operation Each time you press the SLEEP button you subtract 10 minutes to the sleep timer The minimum sleep timer operation is 10 minutes 4 After a few seconds the Sleep Time display disappears and the normal Tuner or CD display returns The small SLEEP indicator remains in the display When the Sleep Timer counts down to 00 the power shuts off automatically Notes You can shut the unit Off manu...

Page 44: ...ly When you hear the music from your external source adjust the VOLUME EQ and DBBS controls of this system as desired LINE OUT Jacks To record from the TUNER or CD player in this unit to an external recording device connect the LINE OUT jacks on the back panel of this unit refer to page 6 to the audio input LINE INPUT or RECORDING REC input jacks of the external recording device such as a cassette...

Page 45: ...the inside to the outside of the disc Small dust particles and light stains will have absolutely no effect on reproduction quality Clean the disc periodically with a soft lint free dry cloth Never use detergents or abrasive cleaners to clean the disc If necessary use a CD cleaning kit Never write on or affix labels to the surface of compact discs Care Of The Cabinet If the cabinet becomes dusty wi...

Page 46: ... TO PERFORM WARRANTY CALL TOLL FREE 1 800 695 0098 SERVICE FOR CUSTOMER SERVICE PLEASE WRITE TO Emerson Radio Corp Consumer Affairs Dept 5101 Statesman Drive Irving TX 75063 FOR ADDITIONAL SET UP OR OPERATING ASSISTANCE PLEASE CALL 1 800 898 9020 ES299_062905 p65 29 6 2005 15 07 45 ...

Page 47: ...nd handling costs and enclose a copy of your proof of purchase Send your unit to Emerson Radio Corp 5101 Statesmsn Drive Irving TX 75063 This warranty does not cover damage from negligence misuse abuse accident failure to follow operating instructions commercial use rental repairs by an unauthorized facility or products purchased used serviced or damaged outside of the United States THIS WARRANTYG...

Page 48: ...EMERSON Part No 16 2973 506 02 Printed in China ES299_062905 p65 29 6 2005 15 07 47 ...

Reviews: