7
PENBERTHY
SERIES LC FLAT GLASS GAGES
INSTALLATION, OPERATION AND MAINTENANCE INSTRUCTIONS
8 REMOVAL - DISASSEMBLY - REASSEMBLY
WARNING
Use only qualified, experienced personnel who
are familiar with liquid level gage equipment and
understand the implications of the tables and
all the instructions thoroughly. DO NOT proceed
with any maintenance unless the liquid level gage
has been relieved of all pressure or vacuum, has
been allowed to reach ambient temperature and
has been drained or purged of all fluids. Failure
to follow instructions can cause serious personal
injury and property damage.
7.2 Troubleshooting
Problem: Glass becomes etched or clouded
prematurely in service.
Cause:
Fluid being handled is not
compatible with the glass or shields.
Solution: Replace the glass and install
shields which will not be affected
by contained fluid.
Problem: Glass breaks continually in
service despite careful attention
to maintenance procedures.
Cause:
Thermal shock, hydraulic shock,
mechanical loads, exceeding design
ratings or a combination of these.
Solution: Check entire system to determine
possible sources of loads. Check
application to determine actual
operating conditions and contact an
authorized Penberthy distributor on
how to proceed.
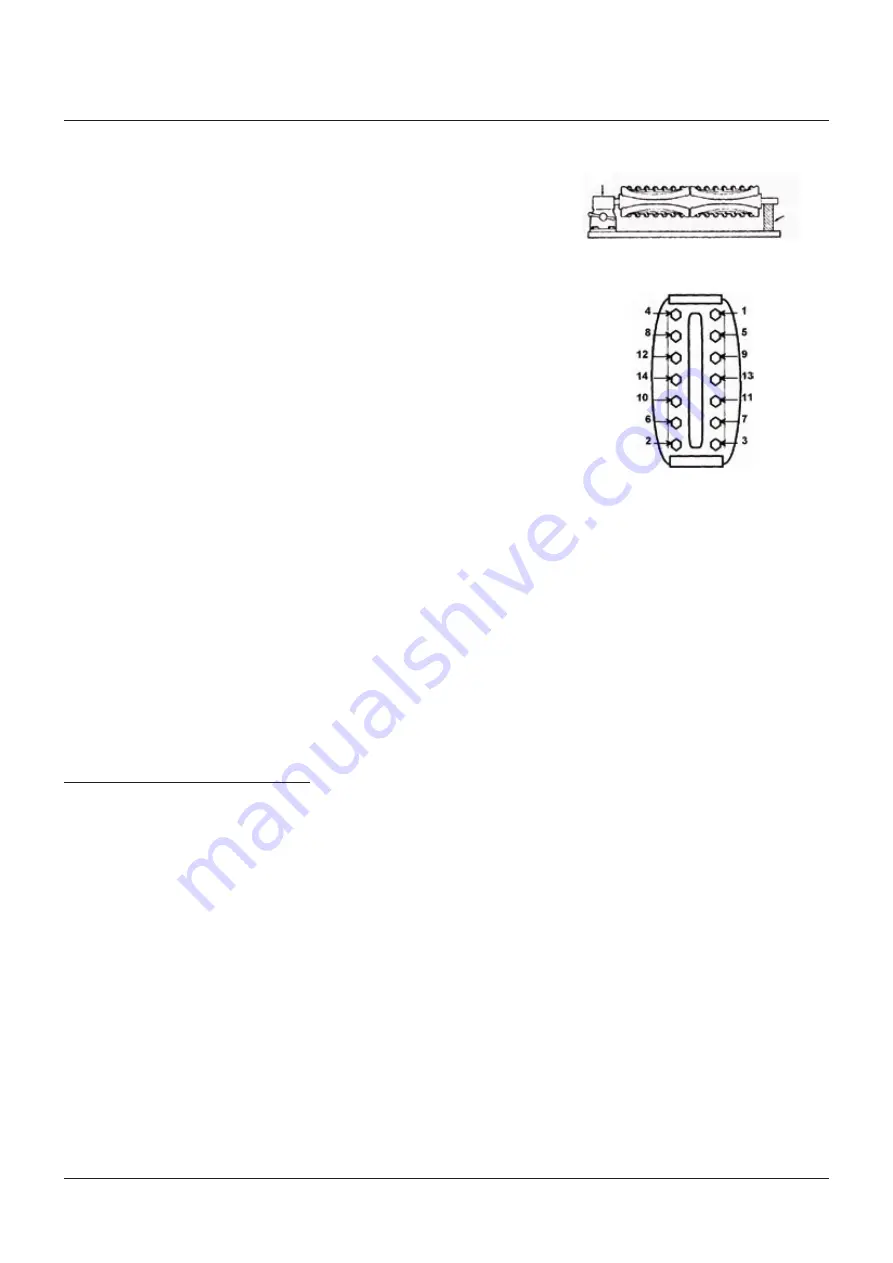
FIGURE 3
FIGURE 4
Nut loosening sequence
8.1 Disassembly
Secure a workbench, equipped with a vise at
one end, longer than the liquid level gage and
sufficiently wide to lay out parts as they are
removed. Attach and tighten a nipple to each
end connection to serve as temporary means
of supporting the liquid level gage during
disassembly and reassembly.
1. Grip nipple on one end with vise and hold up
the other end with a 2 x 4 or suitable prop as
shown in Figure 3.
2. Hold gage firmly; loosen nuts starting
at both ends of each section and then
proceeding from both ends to the center
of each section as shown in Figure 4.
3. Nut loosening sequence
- Remove nuts, washer, belleville washers
(if any) and nameplate.
- Tap covers with rubber hammer as needed
to loosen and remove.
- For belleville washer assemblies:
to remove covers, studs may need to be
removed by laying the assembly on its side
and knocking the stud/U-bolts through the
cover with a hammer and punch.
- Remove cushions, glass, shields (if any)
and gaskets.
- Tap liquid chamber or remaining covers as
necessary with rubber hammer to break
loose and remove remaining components.
- Remove, destroy and dispose of all glass,
cushions, gaskets and shields. Under no
circumstances should these components
be re-used or installed on a gage.
Note:
if size of gage is smaller than shown,
follow spiraling sequence from the ends until
all bolting is loosened.
WARNING
Once used, cushions, gaskets and shields are
deformed permanently by compression and, if
re-used, may cause leaks and high stress points
resulting in glass breakage. Glass may contain
hidden damage and internal stresses caused by
previous usage. If re-used, the glass may break
under pressure causing severe personal injury
or property damage.
Vise
Prop
Connection leaks
at a flanged or threaded
connection should be corrected by tightening
the bolting at the connection or by taking the
liquid level gage out of service and wrapping
the connection threads with PTFE tape on all
male pipe threads.
Corrosion
may occur if the user has selected
an improper material for the liquid level gage
application. It is the responsibility of the user to
choose a material of construction compatible
with both the contained fluid and the
surrounding environment. If internal or external
corrosion is present, an investigation must be
performed by the user immediately. It may be
necessary to contact an authorized Penberthy
distributor to better determine the origin of the
corrosion.


