background image

Instruction Manual

D103553X012

Large ET and ED Valves

July 2017

4

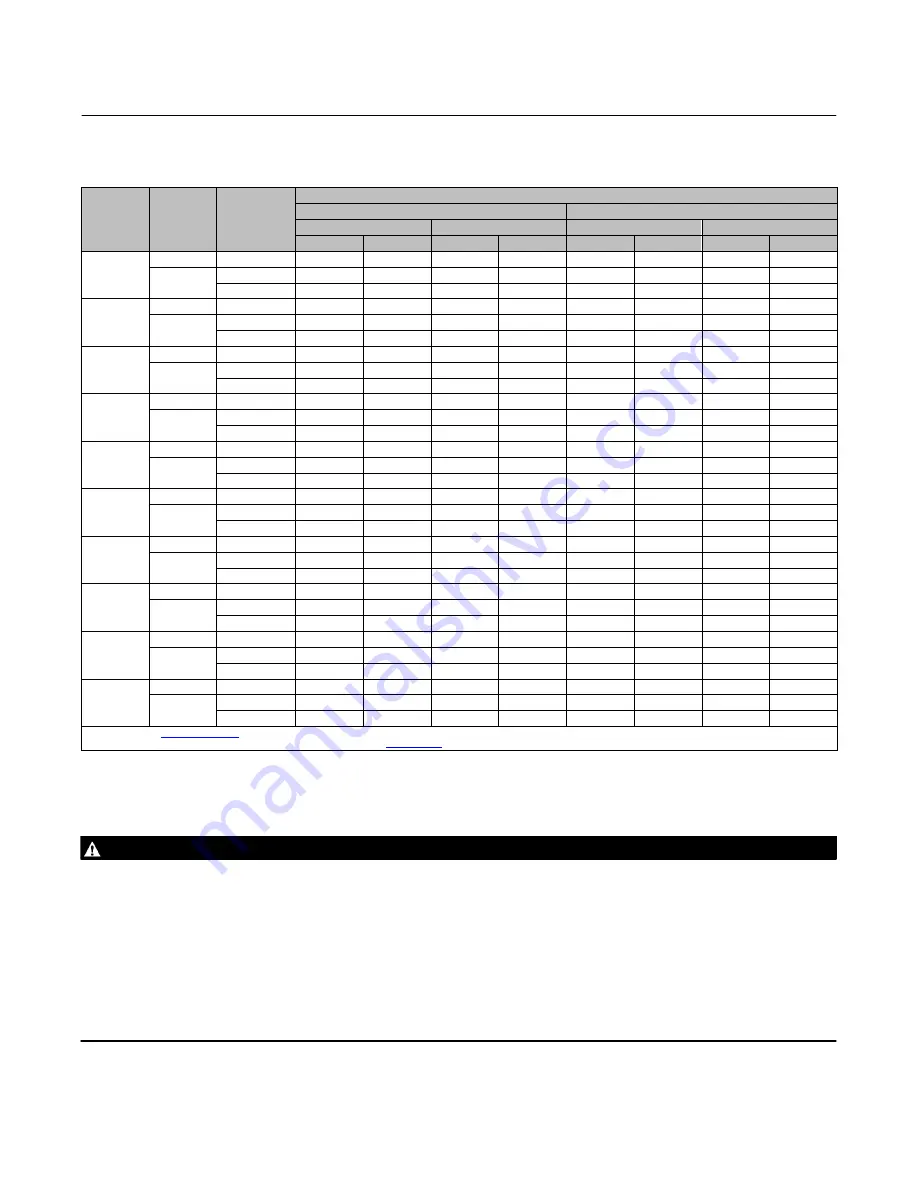
Table 2. Approximate Weights

VALVE

SIZE,

NPS

PRESSURE

CLASS

END

CONNECTION

TYPE

APPROXIMATE WEIGHT

ED/EWD and ET/EWT

ET-C/EWT-C

Short Neck

(2)

Long Neck

(2)

Short Neck

(2)

Long Neck

(2)

Kg

Lb

Kg

Lb

Kg

Lb

Kg

Lb

12

CL150-300

Flanged

950

2100

1090

2400

982

2170

1122

2470

CL600

Flanged

1270

2800

1410

3100

1302

2870

1442

3170

Buttwelding

1130

2500

1270

2800

1162

2570

1302

2870

14

CL150-300

Flanged

1130

2500

1230

2700

1162

2570

1262

2770

CL600

Flanged

1410

3100

1590

3500

1442

3170

1622

3570

Buttwelding

1180

2600

1360

3000

1212

2670

1392

3070

16x12

CL150-300

Flanged

1320

2900

1450

3200

1352

2970

1482

3270

CL600

Flanged

1680

3700

1810

4000

1712

3770

1842

4070

Buttwelding

1410

3100

1540

3400

1442

3170

1572

3470

16

CL150-300

Flanged

1720

3800

2040

4500

1752

3870

2072

4570

CL600

Flanged

2310

5100

2590

5700

2342

5170

2622

5770

Buttwelding

2090

4600

2360

5200

2122

4670

2392

5270

18

CL150-300

Flanged

2310

5100

2500

5500

2342

5170

2532

5570

CL600

Flanged

2900

6400

3130

6900

2932

6470

3162

6970

Buttwelding

2540

5600

2770

6100

2572

5670

2802

6170

20x16

CL150-300

Flanged

2500

5500

2680

5900

2532

5570

2712

5970

CL600

Flanged

3180

7000

3360

7400

3212

7070

3392

7470

Buttwelding

2770

6100

2990

6600

2802

6170

3022

6670

24x16

CL150-300

Flanged

3360

7400

3810

8400

3392

7470

3842

8470

CL600

Flanged

4260

9400

4810

10600

4292

9470

4842

10670

Buttwelding

3770

8300

4220

9300

3802

8370

4252

9370

20

CL150-300

Flanged

4122

9088

4526

9978

(1)

(1)

(1)

(1)

600

Flanged

4736

10442

5112

11269

(1)

(1)

(1)

(1)

Buttwelding

4583

10104

4808

10600

(1)

(1)

(1)

(1)

24x20

CL150-300

Flanged

5507

12140

5856

12910

(1)

(1)

(1)

(1)

600

Flanged

6796

14982

7172

15811

(1)

(1)

(1)

(1)

Buttwelding

6327

13949

6549

14437

(1)

(1)

(1)

(1)

30

CL150-300

Flanged

7390

16300

8350

18400

7535

16620

18545

18720

CL600

Flanged

(1)

(1)

(1)

(1)

(1)

(1)

(1)

(1)

Buttwelding

(1)

(1)

(1)

(1)

(1)

(1)

(1)

(1)

1. Contact your 

Emerson sales office

 or Local Business Partner for these weights.

2. Dependent on valve travel, refer to product bulletin 51.1:ET/ED (Large) (

D103554X012

) for addition details.

Installation

  WARNING

Always wear protective gloves, clothing, and eyewear when performing any installation operations to avoid personal
injury.
Personal injury or equipment damage caused by the sudden release of pressure may result if the valve assembly is installed
where service conditions could exceed the limits given in table 1 or on the appropriate nameplates. To avoid such injury or
damage, provide a relief valve for over-pressure protection as required by government or accepted industry codes and
good engineering practices.
Check with your process or safety engineer for any additional measures that must be taken to protect against process
media.
If installing into an existing application, also refer to the WARNING at the beginning of the Maintenance section in this
instruction manual.

Summary of Contents for Fisher Large ED

Page 1: ...ruction manual includes installation maintenance and parts information for NPS 12 through 30 Fisher ET EWT and ED EWD valves through CL600 ratings Refer to separate manuals for instructions covering the actuator and accessories Do not install operate or maintain ET EWT or ED EWD valves without being fully trained and qualified in valve actuator and accessory installation operation and maintenance ...

Page 2: ...0_F for oxidizing service by using the High Temperature HTS1 seal The temperature range of the ET EWT series can be extended to cryogenic temperatures as low as 198_ 325_F with the ET C and EWT C specialized versions of these valves The specialized valves feature unique trim seals and a longer extension bonnet to tolerate the extreme cold ED EWD series valves utilize a hanging cage and a seat ring...

Page 3: ... and IEC 60534 4 ET ET C EWT and EWT C Standard Class V Optional for all cages except Cavitrol III Class IV ED and EWD Standard Class IV Optional Class V Flow Characteristics Standard Cages J Linear or J Equal percentage Whisper Trim III and WhisperFlo Cages Linear Cavitrol III Cages Linear For other characteristics contact your Emerson sales office or Local Business Partner for details Flow Direc...

Page 4: ...810 8400 3392 7470 3842 8470 CL600 Flanged 4260 9400 4810 10600 4292 9470 4842 10670 Buttwelding 3770 8300 4220 9300 3802 8370 4252 9370 20 CL150 300 Flanged 4122 9088 4526 9978 1 1 1 1 600 Flanged 4736 10442 5112 11269 1 1 1 1 Buttwelding 4583 10104 4808 10600 1 1 1 1 24x20 CL150 300 Flanged 5507 12140 5856 12910 1 1 1 1 600 Flanged 6796 14982 7172 15811 1 1 1 1 Buttwelding 6327 13949 6549 14437 ...

Page 5: ...alves use a suitable gasket between the valve and pipeline flanges CAUTION Depending on valve body materials used post weld heat treating may be required If so damage to internal elastomeric and plastic parts as well as internal metal parts is possible In general if post weld heat treating is to be performed all trim parts should be removed Contact your Emerson sales office or Local Business Partn...

Page 6: ...ure that the above measures stay in effect while you work on the equipment D The valve packing box may contain process fluids that are pressurized even when the valve has been removed from the pipeline Process fluids may spray out under pressure when removing the packing hardware or packing rings or when loosening the packing box pipe plug D Check with your process or safety engineer for any addit...

Page 7: ...ng any of the following procedures inspect the valve stem and packing box wall for nicks and scratches Replacing Packing 1 Isolate the control valve from the line pressure release pressure from both sides of the valve and drain the process media from both sides of the valve If using a power actuator also shut off all pressure lines to the power actuator release all pressure from the actuator and u...

Page 8: ...move the cover protecting the valve body cavity 10 Install a new bonnet gasket key 11 making sure the gasket seating surfaces are clean and smooth Place the valve plug and stem assembly into the valve body making sure it is properly centered on the seat ring key 9 Also make sure the valve plug key 2A sealing parts are evenly engaged by the chamfer in the top inside diameter of the cage key 3 to av...

Page 9: ... to the valve stem 15 Mount the actuator on the valve assembly and reconnect the actuator and valve stem according to the procedure in the appropriate actuator instruction manual Trim Maintenance WARNING Refer to the WARNING at the beginning of the Maintenance section in this instruction manual Disassembly 1 Complete steps 1 through 5 of the Replace Packing section to remove the actuator bonnet an...

Page 10: ...IALS UPPER WIPER KEY 12 UPPER WIPER KEY 12 UPPER WIPER KEY 12 UPPER WIPER KEY 12 PACKING FOLLOWER KEY 13 PACKING FOLLOWER KEY 13 PACKING FOLLOWER KEY 13 PACKING FOLLOWER KEY 13 WASHER KEY 10 SPRING KEY 8 PACKING BOX RING KEY 11 PACKING BOX RING KEY 11 PACKING BOX RING KEY 11 PACKING BOX RING KEY 11 FEMALE ADAPTOR FEMALE ADAPTOR FEMALE ADAPTOR MALE ADAPTOR MALE ADAPTOR MALE ADAPTOR LOWER WIPER LOWE...

Page 11: ...0 61 45 91 67 27 20 41 30 Table 4 Body to Bonnet Bolt Torque BOLT SIZE INCH THREADS PER INCH BOLTING TORQUE 1 NSm LbfSft 1 1 4 8 990 730 1 1 2 8 1750 1290 1 3 4 8 2806 2070 2 8 4244 3130 1 Torque values listed apply to the following stud and nut materials lubricated with Lubriplate MAG 1 SA 193 B7 studs with SA 194 2H nuts SA 193 B7M studs with SA 194 2HM nuts SA 193 B16 studs with SA 194 7 nuts S...

Page 12: ...opriate CAUTION Be careful not to scratch the surfaces of the seal ring grooves in the valve plug key 2A or any surfaces of the replacement parts For ET EWT Valves 1 Carefully pry or cut out the plug seal ring key 28 from its groove in the valve plug key 2A Discard the old plug seal ring 2 Inspect the valve plug key 2A and stem key 2B for nicks scratches or other damage that would prevent proper o...

Page 13: ...lve plug and stem assembly key 2 3 Install the replacement plug seal ring key 28 with the open side of the seal ring facing the top or bottom of the valve plug depending on flow direction The open side of the seal ring should face up toward the actuator in flow up installations and down in flow down installations Then install the plug backup ring key 29 and retaining ring key 27 To install the par...

Page 14: ...to figure 3 orient the bore seal for correct sealing action based on the process fluid flow direction through the valve D The open interior of the bore seal must face up in a valve with flow up construction D The open interior of the bore seal must face down in a valve with flow down construction 8 Place the bore seal over the top of the valve plug The retainer will help guide the bore seal down o...

Page 15: ... Bore Seal and contact the seat ring You can correctly seat the valve plug by using the same force calculated for full load when sizing your actuator With no pressure drop across the valve this force will adequately drive the valve plug to the seat ring thus giving the Bore Seal a predetermined permanent set With full actuator force applied and the valve plug fully seated align the actuator travel...

Page 16: ... or cut out the seat ring seal ring key 223 from its groove in the seat ring key 9 Discard the old seat ring seal ring 2 Then inspect the seat ring key 9 for nicks scratches or other damage that would prevent proper operation of the valve Replace the seat ring if necessary A replacement seat ring is available individually key 9 only or as a seat ring and cage assembly key 9 and 3 If replacing indi...

Page 17: ... key 9 for nicks scratches or other damage that would prevent proper operation of the valve Replace the seat ring if necessary A replacement seat ring is available individually key 9 only or as a seat ring and cage assembly key 9 and 3 If replacing individually proceed to step 3 otherwise proceed directly to step 7 3 Make sure the bolts or cap screws that were installed in the seat ring during the...

Page 18: ...to step 5 4 An installation tool see figure 4 and table 5 must be inserted into the bore seal prior to using the retainer to guide it down the valve plug 5 Apply a suitable high temperature lubricant to the threads on the valve plug Then place the retainer onto the valve plug and tighten the retainer using an appropriate tool such as a strap wrench For flow down constructions skip to step 7 6 Remo...

Page 19: ...ual increments as specified in table 6 4 Install a new cage gasket key 11 into the valve body 5 Make sure the eye bolts that were installed in the cage key 3 or cage assembly during the Disassembly procedure are still installed Then using the eye bolts as lifting points carefully lower the cage into the valve body Any rotational orientation of the cage with respect to the valve is acceptable 6 Com...

Page 20: ...T C includes key 28 12 14 16x12 254 10 RSEALX00012 Consult factory RSEALX00042 RSEALX00062 RSEALX00082 279 11 RSEALX00022 RSEALX00032 RSEALX00052 RSEALX00072 RSEALX00092 16 18 20x16 24x16 375 14 75 RSEALX00102 RSEALX00112 RSEALX00122 RSEALX00142 RSEALX00162 413 16 25 RSEALX00132 RSEALX00152 20 24x20 18 25 RSEALX00192 RSEALX00202 RSEALX00212 RSEALX00232 RSEALX00252 19 75 RSEALX00222 RSEALX00242 30 ...

Page 21: ...to convert valves to the ENVIRO SEAL packing box construction For part numbers of individual components refer to instruction manual ENVIRO SEAL Packing System for Sliding Stem Valves D101642X012 PTFE kits include keys 200 201 211 212 214 215 217 218 tag and cable tie Graphite ULF kits include keys 200 201 207 208 209 210 211 212 214 216 217 tag and cable tie Duplex kits include keys 200 201 207 20...

Page 22: ...ew 53 Nameplate 55 Lubricant 63 Plug Anti Extrusion Ring see parts kit 64 Bore Seal 223 Seat Ring Seal Ring see parts kit 220 Seat Ring Back up Ring 219 Seat Ring Anti Extrusion Ring see parts kit 221 Seat Ring Retaining Ring Packing figure 2 PTFE V Ring Single Packing 6 Packing Set see parts kit 8 Spring 10 Special Washer 11 Packing Box Ring see parts kit 12 Upper Wiper see parts kit 13 Packing F...

Page 23: ...al D103553X012 Large ET and ED Valves July 2017 23 Figure 5 Typical Fisher ED EWD Valve FLOW DIRECTION APPLY LUBRICANT 31 31 OPTIONAL LUBRICATOR OPTIONAL LUBRICATOR ISOLATING VALVE 44B1142 B 10A9421 A AJ5428 D A0832 2 ...

Page 24: ...al D103553X012 Large ET and ED Valves July 2017 24 Figure 6 Typical Fisher ET EWT Valve 31 31 OPTIONAL LUBRICATOR OPTIONAL LUBRICATOR ISOLATING VALVE 44B1146 C 10A9421 A AJ5428 D A0832 2 FLOW DIRECTION APPLY LUBRICANT ...

Page 25: ...e ET and ED Valves July 2017 25 Figure 7 Typical Fisher ET EWT Valve Equipped with HTS1 Seals 31 31 OPTIONAL LUBRICATOR OPTIONAL LUBRICATOR ISOLATING VALVE GG12454 C 10A9421 A AJ5428 D A0832 2 VIEW A VIEW B FLOW DIRECTION APPLY LUBRICANT ...

Page 26: ...03553X012 Large ET and ED Valves July 2017 26 Figure 8 Typical Fisher ET C EWT C Valve 31 31 OPTIONAL LUBRICATOR OPTIONAL LUBRICATOR ISOLATING VALVE GE81255 A 10A9421 A AJ5428 D A0832 2 VIEW A FLOW DIRECTION APPLY LUBRICANT ...

Page 27: ...Instruction Manual D103553X012 Large ET and ED Valves July 2017 27 ...

Page 28: ...quest We reserve the right to modify or improve the designs or specifications of such products at any time without notice E 2011 2017 Fisher Controls International LLC All rights reserved Fisher FIELDVUE Cavitrol WhisperFlo Whisper Trim and ENVIRO SEAL are marks owned by one of the companies in the Emerson Automation Solutions business unit of Emerson Electric Co Emerson Automation Solutions Emers...

Reviews: