background image

50

Search

Playing discs

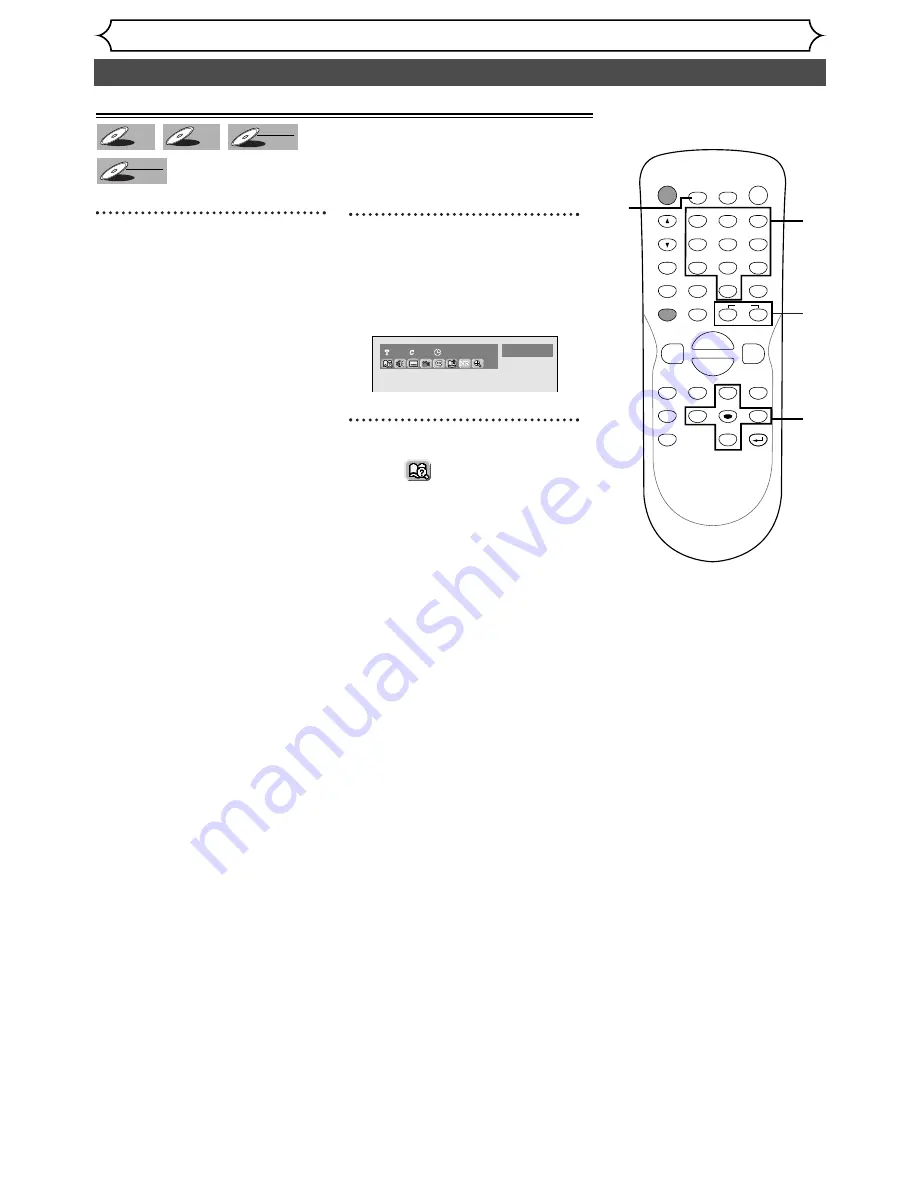
Title/Chapter search

Using SKIP 

H

G

buttons

1

During play, press SKIP 

G

button to skip the current
title or chapter and move to
the next.

The title or chapter will move
forward by one at a time.

To go back to the previous title
or chapter, press SKIP 

H

but-

ton.The title or chapter will move
backward by one at a time.

Using DISPLAY button

1

During play, press DISPLAY
button.

The display menu will appear.

Screen:

2

Select icon 

using 

{

B

buttons, then press ENTER
button.

‘T’ for title will be highlighted.

Title:
Enter a desired title number
to search using 

K

/

L

buttons

or number buttons, then
press ENTER button.

Title search will start.

Chapter:

To move to ‘C’ for chapter, press

B

button.

Enter a desired chapter num-
ber to search using

K

/

L

but-

tons or number buttons, then
press ENTER button.

Chapter search will start.

1

1

0

1:23:45

DVD-Video

DVD-RW

DVD-RW

VR

DVD-RW

DVD-RW

Video

DVD-R

DVD-R

DVD-V

DVD-V

POWER

DISPLAY

REC SPEED CLEAR

CM SKIP

SKIP

REC

PAUSE

SETUP

REPEAT

ZOOM

ENTER

RETURN

REC

MONITOR

OPEN/CLOSE

TIMER

PROG.

MENU/LIST

TOP MENU

SPACE

1

2

3

4

5

6

7

8

9

0

F

A

 {

B

FWD

g

STOP

C

PLAY

 B

REV

h

H

G

CH

.@/:

ABC

DEF

GHI

JKL

MNO

PQRS

TUV

WXYZ

K

L

2

1

2

1

Summary of Contents for EWR10D4

Page 1: ...ng this owner s manual or to order replacement accessories please call TOLL FREE 1 800 605 8457 or visit our web site at http www funai corp com Before you use this unit you need to complete connections Refer to Connections on pages 13 15 To record a program easily refer to Easy DVD recording on pages 16 17 after connections are completed You CANNOT record on any copyright protected DVD disc with ...

Page 2: ...ar installation If this equipment does cause harmful interference to radio or television reception which can be determined by turning the equipment off and on the user is encouraged to try to correct the interference by one or more of the following measures 1 Reorient or relocate the receiving antenna 2 Increase the separation between the equipment and receiver 3 Connect the equipment into an outl...

Page 3: ...ce receptacles and the point where they exit from the appliance 13 Outdoor Antenna Grounding If an outside antenna or cable system is connected to the product be sure the antenna or cable system is grounded so as to provide some protection against voltage surges and built up static charges Article 810 of the National Electrical Code ANSI NFPA No 70 provides infor mation with regard to proper groun...

Page 4: ...ngineering or disassembly is prohibited Symbol in this owner s manual Many functions of this DVD recorder are depending on the disc type or the recording mode To specify for what disc type or recording mode each function is we put the following symbols at the beginning of each item to operate Symbol Description Available to DVD Video discs Avaialble to DVD RW in Video mode Avaialble to DVD RW in V...

Page 5: ...r Audio 88 Settings for Parental lock level 90 Others 92 Troubleshooting 92 Language code 95 Glossary 96 Specifications 97 Español 98 Before you start 2 Precautions 2 Table of contents 5 Features 6 Functional overview 7 Installing batteries in the remote control 9 Using a remote control 9 SETUP DISC CD menu 10 DISPLAY menu 11 Connections 13 Connection to a TV 13 Connection to a cable box or satell...

Page 6: ...ystem Quick search for what you want to watch You can easily find the part you want to watch using search function Search for a desired point on a disc by title chapter or time Start to play from Original and Playlist Title playing is available from either an Original list or Playlist Editing Setting Clearing chapter markers You can easily add chapter markers anywhere in your recordings for easy e...

Page 7: ...th a standard video cable 15 S VIDEO INPUT jack LINE2 Use to connect the S Video output of external equip ment with an S Video cable Rear Panel 1 3 6 2 11 10 9 7 4 8 5 1 AC Power Cord Connect to a standard AC outlet to supply power to this unit 2 AUDIO OUTPUT jacks 1 2 Use to connect a TV monitor AV receiver or other equipment with standard audio cables 3 VIDEO OUTPUT jack Use to connect a TV moni...

Page 8: ...ding speed 6 CLEAR button Press to clear the password once entered or to cancel the programming for CD or to clear the selecting marker num ber in the marker setup mode or to clear the program once 14 REPEAT button Press to display the repeat setting menu 15 ZOOM button Press to enlarge the picture on the screen 16 OPEN CLOSE A button Press to open or close the disc tray 17 TIMER PROG button Press...

Page 9: ... C LO SE TIME R PRO G ME NU PL AY LIS T TOP ME NU OR IGIN AL SPA CE 1 2 3 4 5 6 7 8 9 0 k A K FW D g STO P C PLA Y B RE V h H G CH ABC DEF GHI JKL MNO PQR S TUV WXY Z Remote control 60 Within about 23feet 7m Installing batteries in the remote control Install two AA batteries supplied matching the polarity indicated inside battery compartment of the remote control 2 1 3 Note Incorrect use of batter...

Page 10: ... 5 Clock To set up the clock of the DVD recorder as you need 6 Channel To make the channel setting of the DVD recorder as you prefer 1 Edit Turns on a title list When a disc with VR mode is inserted Original or PlayList is available which shows the recorded titles on the disc 2 Format Allows you to erase all of the recorded content on the disc The disc will be completely blank 3 Finalize Allows yo...

Page 11: ... give you the information on the playing disc Some operations are available while disc is playing Details are on page 41 1 Indicates a disc type and a format mode 2 Indicates a recording mode and possible recording time 3 Indicates a title number chap ter number and the time lapse of disc play 4 Each icon means Search Audio Subtitle Angle exceptVR mode Repeat Marker Noise Reduction Zoom DVD RW SP ...

Page 12: ...W disc is inserted in the disc tray 3 Recording speed Indicates the recording speed of the disc Display message 1 2 3 4 5 6 4 Title Track and Chapter mark Appears when indicating a title track number Appears when indicating a chapter number 5 Displays the following Playing time remaining time Current title chapter track number Recording time Clock Channel number OTR remaining time 6 Appears in the...

Page 13: ...picture S VIDEO OUT COMPONENT VIDEO OUT Audio cable supplied S Video cable commercially available Component Video cables commercially available DVD Recorder AUDIO IN VIDEO RF Cable supplied Video Cable supplied Audio Cable supplied Back of TV Plug in the AC power cord of the DVD recorder or Cable Signal or Cable Signal Connect Connect Connect Connect Disconnect Antenna Antenna Back of DVD recorder...

Page 14: ...by selecting the channel on the DVD recorder You cannot record scrambled channels that require a cable box or satellite box When connecting to a cable box or satellite box with many scrambled channels If many or all the channels you receive by cable or satellite are scrambled we recommend using this setup With this setup You can record any unscrambled channel by selecting the channel on the cable ...

Page 15: ...to Stream for the Digital Out setting in the SETUP menu Refer to pages 88 89 The audio source on a disc in a Dolby Digital 5 1 channel surround format cannot be recorded as digital sound by an MD or DAT deck Unless connected to a Dolby Digital decoder set Dolby Digital to PCM for the Digital Out setting in the SETUP menu Playing a DVD using incorrect settings may generate noise distortion and may ...

Page 16: ...isc from SETUP menu Video format Video mode or Video recording format VR mode will be available depending on the disc type inserted This is necessary to prepare the disc for record ing Details are on pages 28 30 DVD disc types DVD RW VR DVD RW Video You want to Record TV programs Reuse by deleting unwanted contents Edit recorded contents Edit Record from connected equipment Copy discs for distribu...

Page 17: ...s are very accessible on a disc the proce dure is simple really as you choose a title on a chapter from the menu screen What is titles and chapters The contents of DVD disc are generally divided into some titles Titles may be further subdivided into chapters Hint 2 Edit the recorded disc You will find editing discs very easy and the DVD recorder offers convenient edit functions which are possible ...

Page 18: ... CH 18 Setup Channel Preset Auto Preset Manual Preset TV Audio Select Stereo Setup Playback Setting Note If the auto presetting is can celled during presetting some channels not yet preset may not be received The selection will depend on how you receive the TV chan nels To cancel the auto preset ting during scanning Press RETURN button or SETUP button to cancel To select a channel You can select a...

Page 19: ... Channel Preset Manual Preset CH18 Add Delete CH2 Add Delete Setup Channel Preset Manual Preset Adding deleting chan nels The channels you no longer receive or seldom watch can be deleted from the memory You also may add channels into memory 1 Press SETUP button to dis play SETUP DISC menu SETUP DISC menu will appear Screen 2 Select SETUP using B buttons then press ENTER button SETUP menu will app...

Page 20: ...layback Setting Setup Menu 4 Select TV Audio Select using K L buttons then press ENTER button Option window will appear 5 Select Stereo or SAP using K L buttons then press ENTER button Stereo Outputs main audio SAP Secondary Audio Program Outputs Sub audio Refer to the item in Glossary on page 96 for more information 6 Press SETUP button to exit Setup Channel Preset Auto Preset Manual Preset TV Au...

Page 21: ...lect Auto using K L buttons then press ENTER button If you know your PBS chan nel number select Manual using K L buttons then press ENTER button Enter your PBS channel number using Number or K L buttons then press ENTER button 6 Press SETUP button to exit 7 Press POWER button to turn off the DVD recorder This unit will search for the time only when the power is off Leave it off for several minutes...

Page 22: ...ress B button to move the cursor 6 Enter the time hour minute using K L buttons then press B buttons A cursor will move on AM or PM Setup Clock Clock Setting Auto Clock Setting Daylight Saving Time Auto JAN 12 2004 MON 09 24 AM ON Setup Clock Clock Setting Auto Clock Setting Auto Daylight Saving Time JAN 12 2004 MON 12 00AM ON Setup Clock Clock Setting Auto Clock Setting Daylight Saving Time Auto ...

Page 23: ...EC PAUSE SETUP REPEAT ZOOM ENTER RETURN REC MONITOR OPEN CLOSE TIMER PROG MENU LIST TOP MENU SPACE 1 2 3 4 5 6 7 8 9 0 F A B FWD g STOP C PLAY B REV h H G CH ABC DEF GHI JKL MNO PQRS TUV WXYZ K L 8 7 4 SETUP REPEAT ZOOM ENTER RETURN MENU LIST TOP MENU B FWD g STOP C PLAY B REV h K L 6 5 4 Select Auto Clock Setting using K L buttons then press ENTER button Option window will appear Setup Clock Cloc...

Page 24: ...ward one hour on the first Sunday in April and move back one hour on the last Sunday in October 1 Press SETUP button to dis play SETUP DISC menu SETUP DISC menu will appear Screen 2 Select SETUP using B buttons then press ENTER button SETUP menu will appear 3 Select Clock using K L B buttons then press ENTER button Clock menu will appear Setup Clock Clock Setting Auto Clock Setting Daylight Saving...

Page 25: ...ired option using K L buttons then press ENTER button 6 Press SETUP button to exit Setup Playback TV Aspect Parental Lock Disc Menu Language Audio Language Subtitle Language Digital Out Dynamic Range Control Fast Forward with Audio 16 9 Wide 8 English Original OFF ON OFF 4 3 Letter Box 4 3 Pan Scan 16 9 Wide Setup Playback TV Aspect Parental Lock Disc Menu Language Audio Language Subtitle Language...

Page 26: ...ng You cannot record copy protected video using this DVD recorder Copy protected video includes DVD Video discs and some satellite broadcasts If copy protected material is encountered during a recording recording will pause or stop automatically and an error message will be displayed on screen Video that is copy once only can only be recorded using a DVD RW disc in VR mode with CPRM see below When...

Page 27: ...pe Mode DVD RW ver 1 1 ver 1 1 CPRM compatible Video mode DVD R ver 2 0 Video mode Disc type format VR mode DVD RW ver 1 0 ver 1 1 ver 1 1 CPRM compatible Video mode DVD RW ver 1 1 ver 1 1 CPRM compatible Video mode DVD R ver 2 0 Copy free Copy once Copy prohibited Recordable Recordable only for DVD RW ver 1 1 compatible with CPRM Not Recordable Note The audio and video quality is getting poorer a...

Page 28: ...VR mode using K L buttons then press ENTER button The recording mode will be set Setup Recording Auto Chapter Timer Programming Video mode DVD Player Compatibility mode VR mode Editing possibility mode DVD RW Recording Format VR mode 10 minutes Video mode VR mode Setup Recording Auto Chapter Timer Programming Video mode DVD RW Recording Format 10 minutes Setup Playback Setting Setup Menu DVD RW DV...

Page 29: ...NTER button Chapter marks will be put as you specified 8 Press SETUP button to exit SETUP menu Setup Recording Auto Chapter Timer Programming DVD RW Recording Format VR mode 10 minutes OFF 5 minutes 10 minutes 15 minutes 30 minutes 60 minutes 6 POWER DISPLAY REC SPEED CLEAR CM SKIP SKIP REC PAUSE SETUP REPEAT ZOOM ENTER RETURN REC MONITOR OPEN CLOSE TIMER PROG MENU LIST TOP MENU SPACE 1 2 3 4 5 6 ...

Page 30: ...ut ton Formatting will start 6 Formatting is complete 100 will be indicated Formatting 100 Formatting 58 Disc Edit Format Finalize Yes No Disc Protect OFF ON Are you sure Yes No Disc Edit Format Finalize Yes No Disc Protect OFF ON Disc Edit Format Finalize Disc Protect OFF ON Setup Menu DVD RW DVD RW VR DVD RW DVD RW Video Reformatting a disc Note When you reformat the disc the contents of the dis...

Page 31: ...6 3 Make sure that the recording format is set to the desired mode Refer to Formatting a disc on pages 28 30 When a DVD RW disc is loaded You can choose Video mode or VR mode from SETUP menu Video mode has been selected as the default Refer to Settings for the recording format to a blank disc on pages 28 29 When a DVD R disc is loaded DVD R discs will always be in Video mode 4 Select a desired cha...

Page 32: ...ted If you want to change the recording speed press REC SPEED button repeatedly The recording speed will be change as you press the button as shown Refer to Recording speed on page 26 You cannot change the record ing speed during recording 2 Press REC MONITOR button again to exit XP SP LP EP SLP SEP CH 18 Rec Monitor XP DVD RW DVD RW VR DVD RW DVD RW Video DVD R DVD R Checking the recording pictur...

Page 33: ... or VR mode from SETUP menu Video mode has been selected as the default Refer to pages 28 29 Settings for the recording for mat to a blank disc When a DVD R disc is loaded DVD R discs will always be in Video mode 4 Select a desired channel to record using CH K L but tons or number buttons 5 Press REC button on the remote control or the front panel then press REC button repeatedly until a desired r...

Page 34: ...N SAT JAN 01 DEC 31 L MON FRI L SAT L FRI L SUN L L Setup Recording Timer Programming Date Start End CH Speed 1 2 3 4 JAN 01 AM AM CH8 Setup Recording Timer Programming Date Start End CH Speed 1 2 3 4 Setup Recording Auto Chapter Timer Programming Video mode DVD RW Recording Format 10 minutes Setup Playback Setting Setup Menu DVD RW DVD RW VR DVD RW DVD RW Video DVD R DVD R POWER DISPLAY REC SPEED...

Page 35: ...he list you will need 4 To clear the timer programming select your desired program using K L buttons Then CLEAR button To correct the timer program ming select your desired pro gram using K L buttons Then press ENTER button Next cor rect the timer programming by using press K L B buttons Finally press ENTER button again 5 PressTIMER PROG button to exit 6 Press POWER button to return to the timer s...

Page 36: ...he end time of the programming currently being recorded A program set previously PROG 2 has priority Hints for timer recording If there is a power failure or this unit has been unplugged for more than 30 seconds the clock setting and all timer set tings will be lost If a disc is not on the tray the indicator flashes and timer recording cannot be performed Please insert a record able disc When all ...

Page 37: ...1 Press SETUP button to display SETUP DISC menu 2 Select SETUP using B buttons then press ENTER button 3 Select Select Video then press ENTER button 4 Select L1 Rear then press ENTER button 5 Select the input jack type to connect then press ENTER button If you want to use S VIDEO INPUT select S Video In If you want to use VIDEO INPUT Composite select Video In Setup Select Video L1 Rear L2 Front Vi...

Page 38: ...0 1 on the remote control or the CH L K buttons To use the input jacks on the front of this unit select L2 position by pressing 0 0 2 on the remote control or the CH L K buttons 4 Select a recording speed using REC SPEED button Refer to Recording speed on page 26 5 Press REC button on the DVD recorder to start recording 6 Press Play button on the external source to record from 7 Press STOP Cbutton...

Page 39: ...inalizing discs in Video mode automatically create title menus 1 Press SETUP button to dis play SETUP DISC menu SETUP DISC menu will appear Screen 2 Select DISC using B buttons then press ENTER button DISC menu will appear Video mode VR mode only 3 Select Finalize using K L buttons then press ENTER button Option window will appear VR mode only 4 Select Yes using B but tons then press ENTER but ton...

Page 40: ...TER button Option window will appear 4 Select Yes using B but tons then press ENTER but ton A disc will be protected Writing to Disc 58 Disc Edit Format Finalize Disc Protect OFF ON Yes No Disc Edit Format Finalize Disc Protect OFF ON Setup Menu DVD RW DVD RW VR POWER DISPLAY REC SPEED CLEAR CM SKIP SKIP REC PAUSE SETUP REPEAT ZOOM ENTER RETURN REC MONITOR OPEN CLOSE TIMER PROG MENU LIST TOP MENU ...

Page 41: ...k for the symbols below on your DVDs If these region symbols do not appear on your DVD you cannot play the DVD in this DVD recorder The number inside the globe refers to region of the world Region 1 represents the United States Canada Bermuda the U S Virgin Islands and small regions near Australia A DVD labeled for a specific region can only play on the DVD recorder with the same region code Hint ...

Page 42: ...the title menu You can change Original or Playlist of VR mode using MENU LIST button Video mode VR mode MENU LIST button 5 Select a desired title using K L B buttons then press ENTER button Playing will start 6 Press STOP C button to stop play To eject the disc press OPEN CLOSE A button to open the disc tray then remove the disc before turn the DVD recorder off Playlist 5 4 1 1 3 2 JAN 1 12 00AM J...

Page 43: ... G CH ABC DEF GHI JKL MNO PQRS TUV WXYZ K L 1 2 5 4 For MP3 playback REC SPEED CLEAR CM SKIP SKIP REC PAUSE SETUP REPEAT ZOOM ENTER RETURN MENU LIST TOP MENU SPACE 7 8 9 0 F B FWD g STOP C PLAY B REV h H G K L 1 2 1 In stop mode press TOP MENU button to call up the MP3 menu To exit the menu press TOP MENU button again 2 Press K K L L buttons to select a desired folder group or track then press ENT...

Page 44: ...n the TV screen 2 Select an item using K L B buttons then press ENTER button to confirm Continue this step to set up all the features you want or to start playing the disc from the menu MENU LIST button Displays a DVD disc menu which varies with the disc and may be the same as the Top menu K L B buttons Moves the cursor around screen Enter button Selects the currently highlighted menu option Numbe...

Page 45: ...ilable may appear on the TV screen 2 Select a title to play using the K L B buttons then press ENTER button Play will begin at the title you selected TOP MENU button Displays the Top menu of a DVD disc which varies with the disc K L B buttons Moves the cursor around screen Enter button Selects the currently highlighted menu option Number buttons Selects a numbered menu option some discs only Press...

Page 46: ... fixed at x8 with sound For MP3 files approximate speed is fixed at x8 To return to the normal play press PLAY Bbutton x20 Normal speed playback x2 x20 x5 x40 x40 FWD g REV h FWD g REV h FWD g REV h FWD g REV h FWD g REV h FWD g REV h MP3 MP3 CD CD DVD RW DVD RW VR DVD RW DVD RW Video DVD R DVD R DVD V DVD V Note Forward reverse speed will be indicated with icons as fol lows Forward Approx Speed x...

Page 47: ...rding 30 seconds Playback will restart automatically B CM Skip 30 sec DVD RW DVD RW VR DVD RW DVD RW Video DVD R DVD R Pause 1 During play press PAUSE F button Play will pause and sound will be muted 2 Press PLAY B button to resume play MP3 MP3 CD CD DVD RW DVD RW VR DVD RW DVD RW Video DVD R DVD R DVD V DVD V POWER DISPLAY REC SPEED CLEAR CM SKIP SKIP REC PAUSE SETUP REPEAT ZOOM ENTER RETURN REC ...

Page 48: ...e changed as follows To return to the normal play press PLAY B button x1 8 Pause x1 16 x1 8 x1 16 x1 2 x1 4 FWD g REV h FWD g REV h FWD g REV h FWD g REV h FWD g REV h FWD g REV h DVD RW DVD RW VR DVD RW DVD RW Video DVD R DVD R DVD V DVD V Note Forward reverse speed will be indicated with icons as fol lows Forward Approx Speed x1 16 x1 8 x1 2 Reverse Approx Speed x1 16 x1 8 x1 4 POWER DISPLAY REC...

Page 49: ...allows you to assign a specific point on a disc to be called back later 1 During play press DISPLAY button The display menu will appear Screen 2 Select icon using B buttons then press ENTER button Marker setup menu will appear Screen for DVD Screen for CD 3 Select a desired marker num ber using B buttons When reaches the desired point press ENTER button 4 To return to the marker later select the d...

Page 50: ... button T for title will be highlighted Title Enter a desired title number to search using K L buttons or number buttons then press ENTER button Title search will start Chapter To move to C for chapter press B button Enter a desired chapter num ber to search using K L but tons or number buttons then press ENTER button Chapter search will start 1 1 01 23 45 DVD Video DVD RW DVD RW VR DVD RW DVD RW ...

Page 51: ...REC PAUSE SETUP REPEAT ZOOM ENTER RETURN REC MONITOR OPEN CLOSE TIMER PROG MENU LIST TOP MENU SPACE 1 2 3 4 5 6 7 8 9 0 F A B FWD g STOP C PLAY B REV h H G CH ABC DEF GHI JKL MNO PQRS TUV WXYZ K L 3 1 2 1 POWER DISPLAY REC SPEED CLEAR CM SKIP SKIP REC PAUSE SETUP REPEAT ZOOM ENTER RETURN REC MONITOR OPEN CLOSE TIMER PROG MENU LIST TOP MENU SPACE 1 2 3 4 5 6 7 8 9 0 F A B FWD g STOP C PLAY B REV h ...

Page 52: ...epeatedly CD MP3 only Group The current group will be played repeatedly MP3 only OFF Title Chapter A B 1 1 01 23 45 DVD Video MP3 MP3 CD CD DVD RW DVD RW VR DVD RW DVD RW Video DVD R DVD R DVD V DVD V REC SPEED CLEAR CM SKIP SKIP REC PAUSE SETUP REPEAT ZOOM ENTER RETURN REC MONITOR MENU LIST TOP MENU SPACE 1 2 3 4 5 6 7 8 9 0 F B FWD g STOP C PLAY B REV h H G CH GHI JKL MNO PQRS TUV WXYZ K L 1 2 P...

Page 53: ...B but tons then press ENTER but ton CD Playback Mode menu will appear 3 Select Program Play using K L buttons then press ENTER button Program play list will appear 4 Select a desired track using K L buttons then press ENTER button or B button A cursor will move to next 5 Press PLAY B button to start program play Program play will start CD Playback Mode Program Play Total 00 04 30 07 CD Playback Mo...

Page 54: ...dio R or a mix of both L R 1 During play press DISPLAY button The display menu will appear Screen 2 Select icon using B buttons then press ENTER button Audio menu will appear DVD Video DVD RW VR mode 3 Select a desired audio sound track using K L buttons then press ENTER button DVD Video Audio soundtrack will switch DVD RW VR mode 4 Select a desired audio chan nel using K L buttons then press ENTE...

Page 55: ...e will usually tell you which subtitle languages are available You can switch subtitle languages anytime during playback 1 During play press DISPLAY button The display menu will appear Screen 2 Select icon using B buttons then press ENTER button Subtitle menu will appear 3 Select a desired subtitle lan guage using K L buttons then press ENTER button Subtitle will be displayed in the selected langu...

Page 56: ...ttons then press ENTER button Your setting will be activated This function reduces noise in the playback picture When playing back discs recorded in long time mode such as SLP or SEP mode select Type 1 or Type 2 Type 2 is more effective When playing back discs with a few noises such as DVD Video discs select OFF 1 1 00 00 00 OFF Type 1 Type 2 DVD Video 1 1 01 23 45 DVD Video DVD RW DVD RW VR DVD R...

Page 57: ...ch can be changed to the title name you will edit 6 Time status bar of the title 7 The arrow icon which means the title list includes a next or a previous page Press Bor button by following direction of the icon 8 Playback status of the current disc Editing discs with Video mode You can edit discs withVideo mode for the following items Be sure that once you edit titles they will not remain as orig...

Page 58: ...hout losing original titles Followings are the items you can edit with a playlist Deleting titles Refer to page 72 Deleting parts of titles Refer to pages 73 74 Putting names on titles Refer to pages 74 75 Setting or clearing chapter markers Refer to pages 76 77 Setting pictures for thumbnails Refer to pages 77 78 Adding titles to a playlist Refer to page 79 Deleting a playlist Refer to page 80 Ed...

Page 59: ... using K L buttons then press ENTER button Option window will appear 5 Select Yes using B but tons then press ENTER but ton Title will be deleted 6 After writing to disc is com pleted press SETUP button to exit DISC menu This operation may take a while to be completed Disc Edit 1 Title Delete Edit Title Name Chapter Mark Yes No Writing to Disc JAN 1 1 00AM CH12 XP Disc Edit 1 0 01 25 Title Delete ...

Page 60: ...1 2 3 JAN 1 1 00AM CH12 XP Disc Edit 1 Title Delete Edit Title Name Chapter Mark 0 01 25 JAN 1 1 00AM CH12 XP Disc Edit 1 1 3 2 5 4 JAN 1 1 00AM JAN 1 4 00AM JAN 1 2 00AM JAN 1 3 00AM JAN 1 5 00AM Disc Setting DVD RW DVD RW Video Putting names on titles Press ABC DEF GHI JKL MNO PQRS TUV WXYZ space abc def ghi jkl mno pqrs tuv wxyz space space _ 2 3 4 5 6 7 8 9 0 1 ABC abc Select 123 1 1 2 3 4 5 6...

Page 61: ...vated for the title 7 After writing to disc is com pleted press SETUP button to exit DISC menu This operation may take a while to be completed Disc Edit Edit Title Name 1 A B C a b c 1 2 3 abc Yes No Writing to Disc POWER DISPLAY REC SPEED CLEAR CM SKIP SKIP REC PAUSE SETUP REPEAT ZOOM ENTER RETURN REC MONITOR OPEN CLOSE TIMER PROG MENU LIST TOP MENU SPACE 1 2 3 4 5 6 7 8 9 0 F A B FWD g STOP C PL...

Page 62: ...appear 5 Select a desired time using K L buttons then press ENTER button Option window will appear 6 Select Yes using B but tons then press ENTER but ton A chapter marker will be added 7 After writing to disc is com pleted press SETUP button to exit DISC menu 1 0 01 25 Title Delete Edit Title Name Chapter Mark OFF 5 minutes 10 minutes 15 minutes 30 minutes 60 minutes Yes No Disc Edit JAN 1 1 00AM ...

Page 63: ...t tons then press ENTER but ton Title will be deleted 7 After writing to disc is com pleted press SETUP button to exit DISC menu This operation may take a while to be completed 1 Title Delete Scene Delete Edit Title Name Chapter Mark Index Picture Protect OFF Yes No Writing to Disc JAN 1 1 00AM CH12 XP ON Disc Edit Original 1 0 01 25 Title Delete Scene Delete Edit Title Name Chapter Mark Index Pic...

Page 64: ...press ENTER button Option window will appear 6 Press ENTER button to decide a start point then press ENTER button to decide an end point A cursor will move to Preview You can check a preview 1 0 00 55 Title Delete Scene Delete Edit Title Name Chapter Mark Index Picture Protect OFF Start End Preview Delete JAN 1 1 00AM CH12 XP Disc Edit Original Disc Edit Original 1 Title Delete Scene Delete Edit T...

Page 65: ...te Yes No JAN 1 1 00AM CH12 XP Disc Edit Original Putting names on titles You can put title names on the titles and change the names from this menu The names you put on the titles will be displayed on a titlelist 1 Press SETUP button Select DISC using B buttons then press ENTER button SETUP DISC menu will appear 2 Select Edit using K L but tons then press ENTER but ton Original PlayList menu will ...

Page 66: ...riginal Edit Title Name 1 0 01 25 A B C a b c 1 2 3 JAN 1 1 00AM CH12 XP Disc Edit Original 1 Title Delete Scene Delete Edit Title Name Chapter Mark Index Picture Set Protect OFF JAN 1 1 00AM CH12 XP 0 01 25 ON Disc Edit Original 1 1 3 2 5 4 JAN 1 1 00AM JAN 1 4 00AM JAN 1 2 00AM JAN 1 3 00AM JAN 1 5 00AM Press ABC DEF GHI JKL MNO PQRS TUV WXYZ space abc def ghi jkl mno pqrs tuv wxyz space space _...

Page 67: ... will appear 5 Select Chapter Mark using K L buttons then press ENTER button Option window will appear 6 Select Add or Delete using K L buttons then press ENTER button Option window will appear Add 1 0 01 25 Title Delete Scene Delete Edit Title Name Chapter Mark Index Picture Protect OFF Yes No JAN 1 1 00AM CH12 XP ON Add Delete Disc Edit Original Chapter 1 1 F Disc Edit Original 1 0 01 25 Title D...

Page 68: ... Add Delete Disc Edit Original Chapter 2 2 F Note If a selected picture for a thumbnail is deleted by delet ing a part of a title a default picture will be selected You can set a picture to each title for a thumbnail It helps you to remember the contents of the title you are playing The begin ning picture has been selected as the default 1 Press SETUP button Select DISC using B buttons then press ...

Page 69: ...eration may take a while to be completed Disc Edit Original 1 Yes No Title Delete Scene Delete Edit Title Name Chapter Mark Index Picture Set Protect OFF ON Writing to Disc JAN 1 1 00AM CH12 XP Disc Edit Original 1 0 01 25 Yes No Title Delete Scene Delete Edit Title Name Chapter Mark Index Picture Set Protect OFF ON JAN 1 1 00AM CH12 XP F Disc Edit Original 1 Title Delete Scene Delete Edit Title N...

Page 70: ...DVD RW VR mode Only Select Disc Protect from Disc menu then select Yes This operation may take a while to be completed Disc Edit Original 1 Yes No Writing to Disc JAN 1 1 00AM CH12 XP ON Title Delete Scene Delete Edit Title Name Chapter Mark Index Picture Set Protect OFF Disc Edit Original 1 0 01 25 Title Delete Scene Delete Edit Title Name Chapter Mark Index Picture Set Protect OFF Yes No JAN 1 1...

Page 71: ...iting to disc is com pleted press SETUP button to exit DISC menu This operation may take a while to be completed Disc Edit Original 2 Yes No Writing to Disc JAN 1 2 00AM CH12 XP OFF Title Delete Scene Delete Edit Title Name Chapter Mark Index Picture Set Protect ON Disc Edit Original 2 0 01 25 Title Delete Scene Delete Edit Title Name Chapter Mark Index Picture Set Protect ON Yes No JAN 1 2 00AM C...

Page 72: ...r writing to disc is com pleted press SETUP button to exit DISC menu This operation may take a while to be completed Disc Edit Playlist 1 Title Delete Scene Delete Edit Title Name Chapter Mark Index Picture Set Yes No Writing to Disc JAN 1 1 00AM CH12 XP Disc Edit Playlist 1 0 01 25 Title Delete Scene Delete Edit Title Name Chapter Mark Index Picture Set Yes No JAN 1 1 00AM CH12 XP Disc Edit Playl...

Page 73: ...utton Playlist menu will appear 5 Select Scene Delete using K L buttons then press ENTER button Option window will appear 6 Press ENTER button to decide a start point then press ENTER button to decide an end point A cursor will move to Preview You can check a preview Disc Edit Playlist 1 0 00 55 Title Delete Scene Delete Edit Title Name Chapter Mark Index Picture Start End Preview Delete JAN 1 1 0...

Page 74: ...l be displayed on a titlelist 1 Press SETUP button Select DISC using B buttons then press ENTER button 2 Select Edit using K L but tons then press ENTER but ton Original PlayList menu will appear Screen 3 Select PlayList using B buttons then press ENTER button Playlist will appear Disc Edit Playlist 1 1 3 2 5 4 Add New Title Delete Playlist JAN 1 1 00AM JAN 1 4 00AM JAN 1 2 00AM JAN 1 3 00AM JAN 1...

Page 75: ...itle Name 1 0 01 25 A B C a b c 1 2 3 JAN 1 1 00AM CH12 XP Disc Edit Playlist Edit Title Name 1 0 01 25 A B C a b c 1 2 3 JAN 1 1 00AM CH12 XP Disc Edit Playlist 1 Title Delete Scene Delete Edit Title Name Chapter Mark Index Picture Set 0 01 25 JAN 1 1 00AM CH12 XP Press ABC DEF GHI JKL MNO PQRS TUV WXYZ space abc def ghi jkl mno pqrs tuv wxyz space space _ 2 3 4 5 6 7 8 9 0 1 ABC abc Select 123 1...

Page 76: ... appear 6 Select Add or Delete using K L buttons then press ENTER button Option window will appear Add 1 0 01 25 Title Delete Scene Delete Edit Title Name Chapter Mark Index Picture Set Add Delete Yes No JAN 1 1 00AM CH12 XP Disc Edit Playlist Chapter 1 1 F Disc Edit Playlist 1 0 01 25 Title Delete Scene Delete Edit Title Name Chapter Mark Index Picture Set Add Delete JAN 1 1 00AM CH12 XP Chapter ...

Page 77: ...icture Set Add Delete Yes No JAN 1 1 00AM CH12 XP Disc Edit Playlist Chapter 2 2 F Note If a selected picture for a thumbnail is deleted by delet ing a part of a title a default picture will be selected Setting pictures for thumbnails You can set a picture to each title for a thumbnail It helps you to remember the contents of the title you are playing The begin ning picture has been selected as th...

Page 78: ...le Delete Scene Delete Edit Title Name Chapter Mark Index Picture Set Writing to Disc JAN 1 1 00AM CH12 XP Disc Edit Playlist Disc Edit Playlist 1 0 01 25 Yes No Title Delete Scene Delete Edit Title Name Chapter Mark Index Picture Set JAN 1 1 00AM CH12 XP F Disc Edit Playlist 1 Title Delete Scene Delete Edit Title Name Chapter Mark Index Picture Set 0 01 25 JAN 1 1 00AM CH12 XP Disc Edit Playlist ...

Page 79: ...utton 6 After writing to disc is com pleted press SETUP button to exit DISC menu To delete a title from Playlist refer to Deleting titles on page 72 To delete a Playlist refer to Deleting a Playlist on page 80 Disc Edit Playlist 6 1 1 3 2 5 4 JAN 1 1 00AM JAN 1 4 00AM JAN 1 2 00AM JAN 1 5 00AM JAN 1 3 00AM JAN 12 8 00PM Disc Edit Playlist Add New Title Writing to Disc 58 Disc Edit Playlist Add New...

Page 80: ...sing B but tons then press ENTER but ton A Playlist will be erased 6 After writing to disc is com pleted press SETUP button to exit DISC menu Disc Edit Playlist Add New Title Delete Playlist 1 1 3 2 5 4 JAN 1 2 00AM JAN 1 3 00AM JAN 1 5 00AM JAN 1 1 00AM JAN 1 4 00AM Add New Title Delete Playlist Yes No Disc Edit Playlist Disc Edit Playlist 1 1 3 2 5 4 Add New Title Delete Playlist JAN 1 1 00AM JA...

Page 81: ...TER button Option window will appear 5 Select Yes using B but tons then press ENTER but ton Title will be deleted 6 After writing to disc is com pleted press SETUP button to exit DISC menu This operation may take a while to be completed Disc Edit 1 Title Delete Edit Title Name Chapter Mark Yes No Writing to Disc JAN 1 1 00AM CH12 XP Disc Edit 1 0 01 25 Title Delete Edit Title Name Chapter Mark Yes...

Page 82: ...ing to Disc Disc Edit Edit Title Name 1 0 01 25 A B C a b c 1 2 3 JAN 1 1 00AM CH12 XP Disc Edit Edit Title Name 1 0 01 25 A B C a b c 1 2 3 JAN 1 1 00AM CH12 XP Disc Edit 1 Title Delete Edit Title Name Chapter Mark 0 01 25 JAN 1 1 00AM CH12 XP Disc Edit 1 1 3 2 5 4 JAN 1 1 00AM JAN 1 4 00AM JAN 1 2 00AM JAN 1 3 00AM JAN 1 5 00AM Disc Setting DVD R DVD R Putting names on titles Press ABC DEF GHI J...

Page 83: ...ime to work the screen saver on the screen Set the type of sound signal which outputs from the digital audio output jack Set whether the sound recorded in 96kHz will be down sampled in 48kHz Compressing the range of sound volume Outputting the sound during play in fast forward Set the parental level of your DVD discs Set and change the password Audio Language Subtitle Language OSD Background Trans...

Page 84: ...tal Out Dynamic Range Control Fast Forward with Audio 4 3 Letter Box All English Original OFF ON OFF Setup Playback Setting Setup Menu Note Only the languages supported by the disc can be selected Audio Language setting may not be available to some discs You can change or switch off the subtitles on a DVD disc also from the disc menu if it is available 84 POWER DISPLAY REC SPEED CLEAR CM SKIP SKIP...

Page 85: ...back TV Aspect Parental Lock Disc Menu Language Audio Language Subtitle Language Digital Out Dynamic Range Control Fast Forward with Audio 4 3 Letter Box All English Original OFF ON OFF Original English French Spanish Other Setup Playback TV Aspect Parental Lock Disc Menu Language Audio Language Subtitle Language Digital Out Dynamic Range Control Fast Forward with Audio 4 3 Letter Box All English ...

Page 86: ... item using K L buttons then press ENTER button Setup Display OSD Background Transparency OSD Background Color OSD Language FL Dimmer Screen Saver 10 minutes Bright 1 English 35 Setup Playback Setting Setup Menu 86 POWER DISPLAY REC SPEED CLEAR CM SKIP SKIP REC PAUSE SETUP REPEAT ZOOM ENTER RETURN REC MONITOR OPEN CLOSE TIMER PROG MENU LIST TOP MENU SPACE 1 2 3 4 5 6 7 8 9 0 F A B FWD g STOP C PLA...

Page 87: ...ed Select a setting using K L buttons then press ENTER button Your setting will be activated Select a setting using K L buttons then press ENTER button Your setting will be activated OSD Background Color Default 1 Green Set the OSD screen color You can choose one among 1 Green 2 Blue and 3 Red OSD Language Default English Set the language for OSD Setup Display OSD Background Transparency OSD Backg...

Page 88: ...l Out Dynamic Range Control Fast Forward with Audio 4 3 Letter Box All English Original OFF ON OFF Setup Playback Setting Setup Menu 88 POWER DISPLAY REC SPEED CLEAR CM SKIP SKIP REC PAUSE SETUP REPEAT ZOOM ENTER RETURN REC MONITOR OPEN CLOSE TIMER PROG MENU LIST TOP MENU SPACE 1 2 3 4 5 6 7 8 9 0 F A B FWD g STOP C PLAY B REV h H G CH ABC DEF GHI JKL MNO PQRS TUV WXYZ K L 1 2 Press STOP button if...

Page 89: ...dio output Select a setting using K L buttons then press ENTER button Your setting will be activated Select a setting using K L buttons then press ENTER button Your setting will be activated Dynamic Range Control Default ON Set to ON to compress the range between soft and loud sounds Fast Forward with Audio Default OFF Set to ON to output the sound during play in fast forward of x2 5 Press SETUP b...

Page 90: ... REC SPEED CLEAR CM SKIP SKIP REC PAUSE SETUP REPEAT ZOOM ENTER RETURN REC MONITOR OPEN CLOSE TIMER PROG MENU LIST TOP MENU SPACE 1 2 3 4 5 6 7 8 9 0 F A B FWD g STOP C PLAY B REV h H G CH ABC DEF GHI JKL MNO PQRS TUV WXYZ K L 1 2 Press STOP button if you are playing a disc 3 4 5 Some DVD Video discs feature a Parental Lock level Playback will stop if the ratings exceed the levels you set it will ...

Page 91: ...tton to exit SETUP menu A password has been set already Setup Playback TV Aspect Parental Lock Disc Menu Language Audio Language Subtitle Language Digital Out Dynamic Range Control Fast Forward with Audio 4 3 Letter Box All English Original OFF ON OFF All 8 7 6 5 4 3 2 1 Change Password Yes No Setup Playback TV Aspect Parental Lock Disc Menu Language Audio Language Subtitle Language Digital Out Dy...

Page 92: ...truction manual Place the DVD recorder and TV farther apart Place the TV and any bunched antenna cables farther apart TV program reception does not fill the screen Try to set the channels with Auto Preset in SETUP menu page 18 Select a channel of any TV program using the CHo p buttons The playback picture or TV program from the equipment connected through the DVD recorder is distorted If the playb...

Page 93: ...that lasted for more than 30 seconds Reset the clock pages 22 23 Disconnect the AC power cord from the AC outlet and connect it again The program contains copy protection signals that restricts copying The timer setting overlapped with another setting that was set later or has priority The subtitle language cannot be changed or turned off Multilingual subtitle are not recorded on the DVDVIDEO The ...

Page 94: ...not recordable inVideo mode This program is not allowed to be recorded on this disc Unplayable disc is inserted in the DVD recorder Insert the standardized disc which bear the marks on page 41 Recording Error This disc is protected and not recordable Can not record on this disc Cause Error message Solution Playback is not authorized in the region of the DVD Video disc which you inserted in the DVD...

Page 95: ...4 Sesotho 6566 Setswana 6660 Shona 6560 Sindhi 6550 Singhalese 6555 Siswat 6565 Slovak 6557 Slovenian 6558 Somali 6561 Spanish 5165 Sundanese 6567 Swahili 6569 Swedish 6568 Tagalog 6658 Tajik 6653 Tamil 6647 Tatar 6666 Telugu 6651 Thai 6654 Tibetan 4861 Tigrinya 6655 Tonga 6661 Tsonga 6665 Turkish 6664 Turkmen 6657 Twi 6669 Ukrainian 6757 Urdu 6764 Uzbek 6772 Vietnamese 6855 Volapuk 6861 Welsh 497...

Page 96: ...s on this unit Finalize To make DVD discs which have done recording possible to play in DVD players With this DVD recorder it is possible to finalize DVD R DVD RW discs PCM Pulse Code Modulation The most common system of encoding digital audio found on CDs and DAT Excellent quality but requires a lot of data com pared to formats such as Dolby Digital and MPEG audio For com patibility with digital ...

Page 97: ...ing frequency Compression format 13 5MHz MPEG 48kHz Dolby Digital Video input Input level Jacks Video output Output level Jacks Component video output Output level Jacks S Video input Y Iuminance Input level C color Input level Jacks Audio input During audio input Jacks Audio output During audio output Jacks S Video output Y Iuminance Output level C color Output level Jacks VHF UHF antenna input o...

Page 98: ...los formatos de video modo deVideo o de grabación de video modo VR según el tipo de disco colocado Esto es necesario para preparar el disco para grabación Vea los detalles en las páginas 28 30 Tipos de disco DVD DVD RW VR DVD RW Video Desea Grabar programas de TV Volver a utilizar borrando partes no deseadas Editar las grabaciones Editar grabar de equipos conectados Copiar discos para distribución...

Page 99: ...l procedimiento es simple ya que sólo tiene que elegir el título en un capí tulo de la pantalla del menú Qué son títulos y capítulos La grabaciones del disco DVD se divi den generalmente en títulos Los títulos pueden subdividirse en capítulos Sugerencia 2 Edite el disco grabado La edición de discos puede ser muy fácil y el grabador de DVD ofrece conve nientes funciones de edición posibles sólo con...

Page 100: ...commercial use such as hotel rental or office use of this product or damage which results from fire flood lightning or other acts of God THIS WARRANTY DOES NOT COVER PACKING MATERIALS ANY ACCESSORIES EXCEPT REMOTE CONTROL ANY COSMETIC PARTS COMPLETE ASSEMBLY PARTS DEMO OR FLOOR MODELS FUNAI CORP AND ITS REPRESENTATIVES OR AGENTS SHALL IN NO EVENT BE LIABLE FOR ANY GENERAL INDIRECT OR CONSEQUENTIAL...

Reviews: