– 11 –
EN
1L25
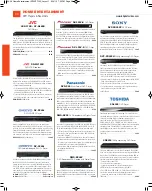
CONNECTING TO A DOLBY DIGITAL DECODER OR DTS DECODER
If using this DVD player to playback a DVD in a 5.1 channel Dolby Digital surround, DTS surround format, the
DVD player outputs a Dolby Digital, or DTS data stream from its COAXIAL DIGITAL AUDIO OUT jack. By
hooking the player up to a Dolby Digital or DTS decoder, you can enjoy a more convincing, realistic ambience
with powerful and high-quality surround sound of a professional standard such as can be heard in movie the-
aters.
Use an audio coaxial digital cables (not included) for the audio connections.
S-VIDEO
OUT
Y
VIDEO
OUT
AUDIO OUT
R
L
COAXIAL
A/V-compatible
or
wide screen TV
Front speaker
(left)
Center speaker
Front speaker
(right)
Surround
speaker
(left)
Surround
speaker
(right)
Subwoofer
or
To VIDEO
INPUT jack
To VIDEO OUT jack
To S-VIDEO INPUT jack
To S-VIDEO OUT jack
To COAXIAL DIGITAL
AUDIO OUT jack
To COAXIAL DIGITAL
AUDIO INPUT jack
Dolby Digital,
DTS decoder
Y
Cr
Cb
[Fig. 4]
S-VIDEO
OUT
VIDEO
OUT
AUDIO OUT
R
L
COAXIAL
Stereo system
A/V-compatible
or
wide screen TV
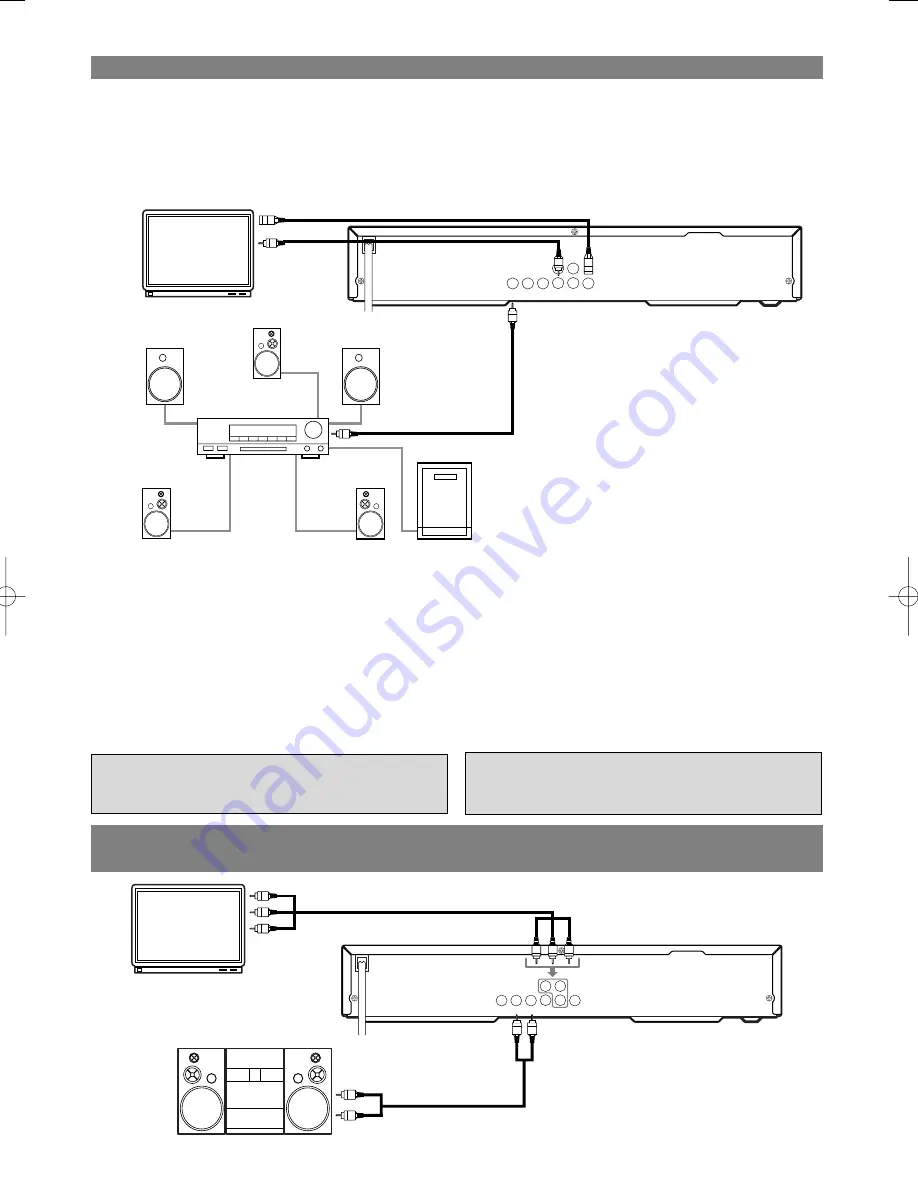
To COMPONENT VIDEO
INPUT jack
To COMPONENT VIDEO
OUT jack
To Right (red) and Left (white)
AUDIO OUT jacks
To ANALOG AUDIO INPUT jacks
Y
Cr
Cb
CONNECTING TO A TV OR A STEREO TV THAT HAS
COMPONENT VIDEO IN JACKS
[Fig. 5]
Manufactured under license from Dolby
Laboratories. “Dolby” and the double-D sym-
bol are trademarks of Dolby Laboratories.
Notes
¡
Be sure to turn off the power to all components in the system before connecting another component.
¡
Refer to the Owner’s Manuals for the components to be connected to the DVD player.
¡
If output Dolby Digital audio, connect to a Dolby Digital decoder, and set Dolby Digital to on for audio out-
put in the setup mode.
¡
If output DTS audio, connect to a DTS decoder, and set DTS to ON for audio output in the setup mode.
¡
Unless connected to a Dolby Digital decoder, or a DTS decoder, set Dolby Digital or DTS to off for audio out-
put in the setup mode. Playing a DVD using incorrect settings may generate noise distortion, and may also
damage the speakers.
“DTS” and “DTS Digital Out” are trademarks
of Digital Theater Systems, Inc.
E5662UD.qxp 02.2.7 2:18 PM Page 11
Summary of Contents for EWD7002
Page 35: ... 35 EN 1L25 MEMO ...