background image

- 3 -

EN

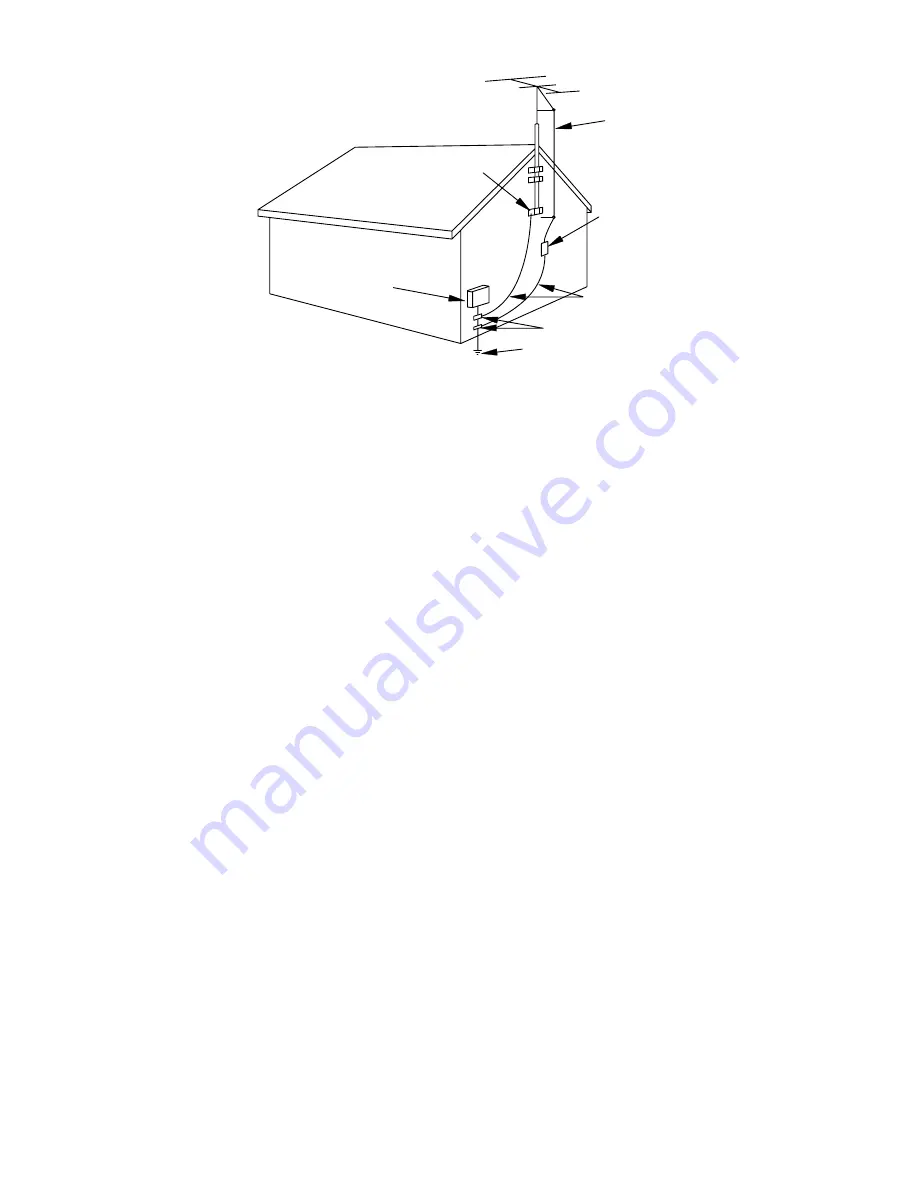
13.Outdoor Antenna grounding-

If an outside antenna or

cable system is connected to the unit, be sure the antenna
or cable system is grounded so as to provide some protec-
tion against voltage surges and built-up static charges.
Article 810 of the National Electrical Code, ANSI/NFPA
No. 70, provides information with respect to proper
grounding of the mast and supporting structure, grounding
of the lead-in wire to an antenna discharge unit, size of
grounding conductors, location of antenna-discharge unit,
connection to grounding electrodes, and requirements for
the grounding electrode. (Fig. A)

14.Lightning-

For added protection for this unit receiver dur-

ing a lightning storm, or when it is left unattended and
unused for long periods of time, unplug it from the wall
outlet and disconnect the antenna or cable system. This will
prevent damage to the unit due to lightning and power-line
surges.

15.Power Lines-

An outside antenna system should not be

located in the vicinity of overhead power lines or other
electric light or power circuits, or where it can fall into
such power lines or circuits. When installing an outside
antenna system, extreme care should be taken to keep from
touching such power lines or circuits as contact with them
might be fatal.

16.Overloading-

Do not overload wall outlets and extension

cords as this can result in a risk of fire or electric shock.

17.Object and Liquid Entry-

Never push objects of any kind

into this unit through openings as they may touch danger-
ous voltage points or short out parts that could result in a
fire or electric shock. Never spill liquid of any kind on the
unit.

18.Servicing-

Do not attempt to service this unit yourself as

opening or removing covers may expose you to dangerous
voltage or other hazards. Refer all servicing to qualified
service personnel.

19.Damage Requiring Service-

Unplug this unit from the wall

outlet and refer servicing to qualified service personnel
under the following conditions:

a. When the power-supply cord or plug is damaged or frayed.

b. If liquid has been spilled, or objects have fallen into the

unit.

c. If the unit has been exposed to rain or water.

d. If the unit does not operate normally by following the oper-

ating instructions. Adjust only those controls that are cov-
ered by the operating instructions, as improper adjustment
of other controls may result in damage and will often
require extensive work by a qualified technician to restore
the unit to its normal operation.

e. If the unit has been dropped or damaged in any way.

f. When the unit exhibits a distinct change in performance,

this indicates a need for service.

20.Replacement Parts-

When replacement parts are required,

be sure the service technician has used replacement parts
specified by the manufacturer that have the same character-
istics as the original part. Unauthorized substitutions may
result in fire, electric shock, injury to persons or other haz-
ards.

21.Safety Check-

Upon completion of any service or repairs to

this unit, ask the service technician to perform routine safe-
ty checks to determine that the unit is in proper operating
condition.

22.Heat-

This unit product should be situated away from heat

sources such as radiators, heat registers, stoves, or other
products (including amplifiers) that produce heat.

G RO UND CL AM PS

NE C -  NA TI O NAL  EL E CTRI CAL  CO DE

EXAMPLE OF ANTENNA GROUNDING AS PER

NA TIONA L  ELECT RIC AL  CODE

S 2 8 9 8 A

W I R E

DI S CHA RG E  UN I T
(NEC  SE CTI ON  8 10 -2 0)

G RO UNDI NG   CO NDUCT ORS
(NEC  SE CTI ON  8 10 -2 1)

E L E C TR O DE   S Y S T E M
(NEC A RT  2 50 ,   P ART H)

S E RV I CE
E Q U I P M E N T

C L A M P

AN TE NN A

L E A D  I N

A NTEN NA

P OWE R S E RVI C E G RO UNDI NG

GROUN D

E L E CT RI C

F IGUR E A

Summary of Contents for EWC19T5

Page 1: ...s owner s manual or to order replacement accessories please call TOLL FREE 1 800 256 2487 Or visit our WEB SITE at http www EmersonAudioVideo com Please read before using this equipment INSTRUCCIONES EN ESPAÑOL INCLUIDAS EMERSON AND THE G CLEF LOGO ARE REGISTERED TRADEMARKS OF EMERSON RADIO CORP PARSIPPANY NEW JERSEY U S A ...

Page 2: ... the cabinet and the back or bottom are provided for ventilation and to ensure reliable operation of the unit and to protect it from overheating and these openings must not be blocked or covered The open ings should never be blocked by placing the unit on a bed sofa rug or other similar surface This unit should never be placed near or over a radiator or heat register This unit should not be placed...

Page 3: ...ing covers may expose you to dangerous voltage or other hazards Refer all servicing to qualified service personnel 19 Damage Requiring Service Unplug this unit from the wall outlet and refer servicing to qualified service personnel under the following conditions a When the power supply cord or plug is damaged or frayed b If liquid has been spilled or objects have fallen into the unit c If the unit...

Page 4: ... which the receiver is connected 4 Consult the dealer or an experienced radio TV technician for help FCC WARNING This equipment may gener ate or use radio frequency energy Changes or modifications to this equipment may cause harmful interference unless the modifications are expressly approved in the instruction man ual The user could lose the authority to oper ate this equipment if an unauthorized...

Page 5: ...t your fingers or objects into the unit disc loading tray Do not place anything directly on top of the unit WARNING Moisture condensation may occur inside the unit when it is moved from a cold place to a warm place or after heating a cold room or under conditions of high humidity If a DVD is played in a unit which has moisture it may damage the DVD and the unit Therefore when the condensation occu...

Page 6: ...ME SEARCH 25 INDEX SEARCH 26 C SPECIAL FEATURES 27 REAL TIME TAPE COUNTER 27 AUTO REWIND EJECT 27 C RECORDING 28 NORMAL RECORDING 28 SKIPPING UNWANTED SCENES DURING RECORDING 28 OTR One Touch Recording 29 COPYING A VIDEO CASSETTE Requires a VCR or camcorder 29 C TIMER RECORDING 30 AUTOMATIC TIMER RECORDING 30 AUTO RETURN 32 C ON SCREEN DISPLAY 33 C CABLE CHANNEL DESIGNATIONS 33 DVD SECTION C ABOUT...

Page 7: ... reverse direction in LP and SLP mode For SP mode only high speed is avail able Three different playback tape speeds SP LP SLP Two different recording tape speeds SP SLP Auto Head Cleaner Automatically cleans video heads as you insert or remove a cassette Zero Return The tape returns to counter of 0 00 00 by rewinding or fast forwarding Still Freeze the picture at any time for close viewing of a p...

Page 8: ...t can shuffle the order of tracks to play them in random order Program playback for Audio CD You can program the order of tracks to play them in any desired order DVD menus in a desired language You can display DVD menus in a desired language if available on a DVD Screen saver Auto power off functions The screen saver program starts when there is no input from the unit for 5 minutes in the stop mo...

Page 9: ... pic ture rapidly in forward during playback mode Forward Search 16 C A STOP EJECT Button TV VCR P 22 25 Hit to stop the tape motion Hit in the stop mode to remove tape from the unit 17 Remote sensor window 18 HEADPHONE Jack To connect headphone not supplied for personal listening REMOTE CONTROL Fig 2 1 POWER Button TV VCR P 15 DVD P 35 Hit to turn the power on and off 2 VOLUME VOL K L Buttons Pre...

Page 10: ...plays the title menu 30 CLEAR Button DVD P 37 Hit to clear or cancel a setting currently entered 31 MODE Button DVD P 38 Hit to call up the program screen or the random screen in the stop mode Hit to call up the Black Level Setting screen or the Virtual Surround screen during playback 32 SEARCH MODE Button DVD P 37 Hit to locate a desired point 33 AUDIO Button DVD P 39 Hit to select a desired audi...

Page 11: ...ERY PRECAUTIONS Be sure to follow the correct polarity as indicated in the battery compartment Reversed batteries may cause damage to the device Do not mix different types of batteries together e g Alkaline and Carbon Zinc or old batteries with fresh ones If the device is not to be used for a long period of time remove the batteries to prevent damage or injury from possible battery leakage Do not ...

Page 12: ...he unit without a converter box ANT ANT AUDIO OUT COAXIAL UHF VHF VHF UHF OUT IN VHF or UHF VHF or UHF VHF UHF Combiner Flat twin lead cable From Cable System 75 ohm Coaxial Cable CATV Box or Satellite Box From Cable System or Satellite Antenna Fig 4 ANTENNA CABLE CONNECTION OR OR Bent pin Cable Plug Needs to be straightened Straight pin Note to CATV system installer This reminder is provided to c...

Page 13: ...Refer to the Owner s Manuals for the components to be connected to the unit Set DOLBY DIGITAL to PCM for audio output in the setup mode Playing a unit using incorrect set tings may generate noise distortion and may also damage the speakers Refer to page 43 ANT AUDIO OUT COAXIAL ex MD deck DAT deck etc To Coaxial digital Audio input jack To AUDIO OUT COAXIAL jack Only DVD AUDIO OUT Fig 6 POWER SELE...

Page 14: ...joyed in movie theaters Use audio coaxial digital cables commercially available for the audio connections NOTES Be sure to turn off the power to all components in the system before connecting another component Refer to the Owner s Manuals for the components to be connected to the unit If connected to a Dolby Digital decoder set DOLBY DIGITAL to BITSTREAM for audio output in the setup mode Refer to...

Page 15: ...ly mute the sound Hit it again to restore the previous sound level NOTE If you press CH K L in the DVD mode you can change the TV channels Even if you turn off the unit in the DVD mode when you turn it on again it will go into the TV VCR mode TO WATCH CABLE OR SATELLITE CHANNEL If the unit is connected to a cable box or satellite box press CH K L to select CH3 or CH4 according to the output channe...

Page 16: ...y used for a second language if available NOTES Not all programs are broadcast with closed cap tions Your unit is designed to provide error free closed captions from high quality antenna cable and VCR signals Conversely poor quality signals are likely to result in caption errors or no captions at all Common signal conditions which may cause caption errors are listed below Automobile ignition noise...

Page 17: ...ive or seldom watch can be deleted from the memory Of course you can add the deleted channel into the memory again 1 Select CHANNEL SET UP Hit SETUP Press K L to point to CHAN NEL SET UP then hit ENTER 2 Select ADD DELETE CH Press K L to point to ADD DELETE CH then hit ENTER 3 Enter the desired channel number Press CH K L or the Number buttons until your desired channel number appears You can also...

Page 18: ... first setting up the unit then set to ON the auto clock setting which will periodically correct the setting if necessary NOTE If you cannot receive a station with time signals auto clock setting cannot be performed Use manu al setting only MANUAL CLOCK SETTING Make sure The unit must be turned on In the example below the clock is to be set to DATE May 6th 2005 SETTING TIME 5 40PM 1 Select SETTING...

Page 19: ...st be turned on Confirm the unit is receiving a RF Radio Frequency signal from either an antenna or cable system connection using the ANT jack on the rear of the unit NOTES If a cable converter box is being used make sure it is powered on You must use the remote control to perform the clock setting procedure If the unit is connected directly to a cable converter box or satellite box the local PBS ...

Page 20: ...le for viewing When you set the lowest rating to VIEW all other ratings will automatically be available for viewing 5 Setting Sub Ratings When you select the ratings of TV Y7 TV PG TV 14 or TV MA you will have the option of setting sub rating categories Press K L to select a rating with sub ratings you wish to block then hit ENTER twice Press K L to select a sub rating then hit ENTER to set it to ...

Page 21: ...K the higher ratings will be blocked automatically The lower ratings will be available for viewing When you set the lowest rating to VIEW all other ratings will automatically be available for viewing 5 Exit the V Chip setting mode Hit SETUP to exit the menu Selection Rating Category Explanations G General Audience PG Parental Guidance suggested PG 13 Unsuitable for children under 13 R Restricted u...

Page 22: ...med to room temperature and the moisture has evaporated Avoid extreme heat high humidity and magnetic fields Do not tamper with the cassette mechanism Do not touch the tape with your fingers INSERTING A CASSETTE Insert the cassette in the direction as shown Push in gently but continuously on the center back of the cassette until it is drawn into the unit The unit will automatically turn on TWO DIF...

Page 23: ...ode will not be set automatically To return to the Digital Auto Tracking function stop the tape once and start playback TV VCR PLAY B STOP STILL PICTURE You can view a still picture on the TV screen during playback the still mode Hit PAUSE F during playback Only tapes recorded in the SLP mode will show the least amount of lines Hit PLAY O to return to playback NOTES You can advance the picture one...

Page 24: ... ning to a blank part which is blank for more than 10 seconds 1 Select USER S SET UP Hit SETUP Press K L to point to USER S SET UP then hit ENTER 2 Select ALL or BLANK Press K L to point to REPEAT PLAY Hit ENTER repeatedly until your desired selection ALL or BLANK appears 3 Exit the Repeat Play setting Hit SETUP to return to the TV mode 4 Start playback Hit PLAY O to start the Repeat Play REPEAT P...

Page 25: ... 1 Select TIME SEARCH Hit SETUP Press K L to point to TIME SEARCH then hit ENTER 2 Enter your desired time Press K L until your desired time appears Example 2 50 stands for 2 hours 50 minutes If you wish to cancel the Time Search at this point hit SETUP 3 Begin Time Search By pressing s B the unit will rewind or fast for ward to the specified point The time counts down during the search When the d...

Page 26: ... desired number Press K L until the number of programs that you want to skip appears Example 03 for 3 programs The Index Search mode will be canceled if the pro cedures are not activated in 30 seconds 3 Begin Index Search Press s B The unit begins rewinding or fast for warding to the beginning of desired program NOTE Every time an index signal is skipped the number in the program indicator decreas...

Page 27: ...on the tape counter TV VCR SPECIAL FEATURES REAL TIME TAPE COUNTER AUTO REWIND EJECT When the end of a tape is reached during record ing playback or fast forward the tape will auto matically rewind to the beginning After rewinding finishes the unit will eject the tape and turn itself off This function is operative when Repeat Play is set to the OFF position The tape will not auto rewind during tim...

Page 28: ... NOTE If the unit is connected to a cable box or satellite box the unit must be on CH3 or CH4 then the channel to be recorded must be selected on the cable box or satellite box 2 Select the tape speed Hit SPEED to select the desired tape speed SP SLP 3 Begin recording Hit RECORD 4 Stop recording Hit STOP C TV VCR NORMAL RECORDING Hit PAUSE F to temporarily stop recording Press PAUSE F or RECORD to...

Page 29: ...pe speed SP SLP 3 Begin OTR Hit REC OTR on the unit as many times as needed The record ing length will be determined by the number of times you hit REC OTR Each time it is hit the recording time will be increased by 30 minutes up to 8 hours TV VCR 29 EN OTR One Touch Recording Time s Display Recording length 1 time normal recording 2 times 0 30 30 minutes 3 times 1 00 60 minutes 17 times 8 00 480 ...

Page 30: ... TV VCR AUTOMATIC TIMER RECORDING 9 00AM 10 00AM 12 00PM Program 1 10 00AM 11 00AM Program 2 9 00AM 10 00AM Program 3 9 30AM 12 00PM 11 00AM Recording Sequence Recording period is SHADED 1 Select TIMER PROGRAMMING Hit SETUP Confirm TIMER PROGRAM MING is pointed by hitting K then hit ENTER If you have not yet set the clock MANUAL CLOCK SET appears If so follow steps 3 to 8 on page 18 Then set the t...

Page 31: ...Hit POWER to set automatic timer recording TO CANCEL AN AUTOMATIC TIMER RECORDING 1 Hit POWER 2 If recording is in progress hit C A STOP EJECT on the unit 3 Repeat steps 1 to 2 on page 30 and select a pro gram you want to cancel 4 Hit C RESET 5 Hit SETUP to return to TV mode 5 Set beginning hour Press K L until the desired hour appears Example 7 PM for 7 30PM Then hit B 6 Set beginning minute Pres...

Page 32: ... ON Press K L to point to AUTO RETURN then hit ENTER until ON appears 3 Auto Return will begin When all the timer recordings are completed the unit will rewind to the beginning of the recorded pro gram s NOTE If you hit POWER while tape is rewinding the Auto Return will stop 4 Watch the recorded program Hit PLAY O TO CANCEL THE AUTO RETURN MODE Repeat steps 1 to 2 and select OFF using ENTER Even i...

Page 33: ...le company The following is a chart of common cable channel designations TV Display TV Display TV Display TV Display TV Display TV Display TV Display TV Display CATV channel TV Display W 80 W 81 W 82 W 83 W 84 W 65 W 66 W 67 W 68 W 69 W 70 W 71 W 72 W 73 W 74 W 75 W 76 W 77 W 78 W 79 W 55 W 56 W 57 W 58 A 4 A 3 A 2 A 1 W 59 W 60 W 61 W 62 W 63 W 64 W 40 W 41 W 42 W 43 W 44 W 45 W 46 W 47 W 48 W 49...

Page 34: ...ft on a disc the used portion is less than 55mm across it may not play back properly 9 Do not glue paper or put stickers on to the disc These may damage the disc and the unit may not read it correctly 10 The number inside the symbol refers to a region of the world and a disc encoded in a specific region for mat can only be played back on unit with the same region code This label indicates playback...

Page 35: ...cond title or it may skip these titles During the playback of a two layered disc pictures may stop for a moment This happens when the 1st layer switches to the 2nd layer This is not a mal function GENERAL FEATURES DVD may contain menus to navigate the disc and access special features Press the appropriate Number buttons or K L s B to highlight your selection in the DVD main menu and hit ENTER to c...

Page 36: ... FAST REVERSE PAUSE 1 During playback hit PAUSE F Playback will pause and sound will be muted 2 To continue playback hit PLAY O CD DVD V SLOW FORWARD SLOW REVERSE 1 During playback hit PAUSE F 2 Press and hold g or h for a few seconds 1 or 1 appears on the screen 3 To select another speed repeat step 2 until your required speed number appears on the screen Slow forward or reverse speed varies with...

Page 37: ...e incorrect input For single digits hit 0 first if the total number of chapter or title of the disc is 10 or more DVD V _ 2 TIME SEARCH 1 During playback hit SEARCH MODE three times CD twice to display the Time Search on the TV screen 2 Within 30 seconds enter a desired disc time using the Number buttons Playback will start at the specified time Hit CLEAR to erase the incorrect input When there is...

Page 38: ...PROGRAM screen will appear 2 Press to select a track then hit ENTER Hit CLEAR to erase the most recently entered track If the entire Program cannot be displayed at once on a screen G appears to go to the next page and H appears to go back to the previous page 3 Repeat step 2 until you have selected all the tracks you want to play in the program 4 Hit PLAY O to play the programmed tracks NOTES Whil...

Page 39: ...ck The subtitle language will appear on the display bar at the top of the TV screen 2 Hit SUBTITLE repeatedly to select your desired subtitle language 3 To turn off subtitles hit SUBTITLE repeat edly until OFF appears NOTES Hitting SUBTITLE may not work on some DVDs with multiple subtitle languages In this case set it on the disc menu Operation varies between discs Refer to the manual of the disc ...

Page 40: ... make the black parts of the picture brighter 1 Hit MODE during playback 2 Hit ENTER to switch ON OFF ON Makes the dark parts brighter OFF Shows the original picture as recorded Initial setting 3 Press MODE twice or RETURN to exit NOTE The setting will be saved even if the unit is turned off DVD V BLACK LEVEL SETTING You can enjoy surround sound effect over two speak ers on this unit 1 Hit MODE tw...

Page 41: ...Layer 1 is playing 4 Hit DISPLAY again to exit THE ON SCREEN INFORMATION For Audio CDs 1 Hit DISPLAY during playback to show the current Track The elapsed and remaining playing time of the cur rent track will be displayed 2 Hit DISPLAY again to show current Total Track The elapsed and remaining playing time of the total track will be displayed 3 Hit DISPLAY again to exit NOTE When you are playing ...

Page 42: ...Bulgarian 4853 Burmese 5971 Byelorussian 4851 C E Cambodian 5759 Catalan 4947 Chinese CHI 7254 Corsican 4961 Croatian 5464 Czech 4965 Danish DAN 5047 Dutch DUT 6058 English ENG 5160 Esperanto 5161 Estonian 5166 F H Faroese 5261 Fiji 5256 Finnish FIN 5255 French FRE 5264 Frisian 5271 Galician 5358 Georgian 5747 German GER 5051 Greek GRE 5158 Greenlandic 5758 Guarani 5360 Gujarati 5367 Hausa 5447 He...

Page 43: ...guage for the on screen menus DISPLAY SETTING Follow steps 1 to 2 in the CUSTOM MENU sec tion on page 42 3 Press K L to select the below items then hit ENTER TV MODE You can change certain aspects of the DVD display screens and on screen messages on the TV screen 4 3 LETTER BOX default To show black bars on top and bottom of the screen 4 3 PAN SCAN To show a full height picture with both sides tri...

Page 44: ... to check if the parental lock function operates in the way that you have set Record the password in case you forget it IF YOU FORGET THE PASSWORD 1 Hit the Number buttons 4 7 3 7 at step 3 Then enter your new password Password will be cleared and parental level will be set to ALL 2 Proceed with steps 4 to 6 again This allows you to return all selections of SETUP except for PARENTAL and menu langu...

Page 45: ... set If outside antenna is being used check for broken wire Adjust COLOR control Poor Reception on Some Channels Try a new channel if OK then possible station trouble Ghosts in Picture Is antenna connected to jack on the back of the set If outside antenna is being used check for broken wire Check for local interference Weak Picture Try a new channel if OK then possible station trouble Is antenna c...

Page 46: ...ION mode C1 C2 or Caption OFF PROBLEM CORRECTIVE ACTION Picture OK Sound Poor Try a new channel if OK then possible station trouble Check for local interference Timer recording is not possible Make sure the timer recording is set correctly Make sure the power is off Make sure the unit s clock is set correctly Cannot go into the recording mode Make sure the tape has an erase prevention tab If need ...

Page 47: ...rt DTS audio This is not a malfunction Distorted picture There are some cases where pictures may be slightly distorted which are not a sign of a malfunction Although pictures may stop for a moment this is not a malfunction Audio or subtitle language The selected language is not available for audio or subtitles on the does not match the set up DVD This is not a malfunction The camera angle cannot b...

Page 48: ...zed Service Center NOTES Remember to read the instructions included with the video head cleaner before use Clean video heads only when problems occur SERVICING Should your unit become inoperative do not try to correct the problem by yourself There are no user serviceable parts inside Turn off unplug the power cord and please call our help line mentioned on the front page to locate an Authorized Se...

Page 49: ...otice If there is a discrepancy between languages the default language will be English TV VCR DVD GENERAL SPECIFICATIONS ELECTRICAL SPECIFICATIONS Sound output 2 speakers 1W 8 ohm OTHER SPECIFICATIONS Terminals Antenna input VHF UHF CATV 75 ohm unbalanced F type Video input RCA connector 1 Audio L R input RCA connector 2 Headphone 1 8 stereo 3 5 mm Coaxial digital audio output One pin jack 500m Vp...

Page 50: ...ámara o de una videograbadora 20 Tomas de entrada AUDIO L R Conecte aquí las tomas de salida de audio de una videocámara o de una videograbadora 21 Compartimiento del cassette 22 Botón PICTURE Presione para ajustar la imagen 23 Botones numéricos Modo TV VCR Presione dos cifras para acceder directamente al canal deseado No olvide presionar 0 antes de elegir un canal de una sola cifra Botón 100 Pres...

Page 51: ...nserte 2 pilas AA en el compartimiento de las pilas en el sentido indicado por las marcas de polaridad 3 Vuelva a poner la cubierta PARA INSERTAR LAS PILAS NOTA Antes de enchufar la antena a la toma ANT de la unidad compruebe que la clavija no esté doblada Si esta doblada póngala derecha como se muestra en la ilustración y luego conéctela en la toma ANT de la unidad PREPARACIÓN PARA LA UTILIZACIÓN...

Page 52: ...TOMAS DE ENTRADA DIGITAL para DVD Utilice un cable digital coaxial de audio disponible en el comercio para hacer las conexiones de audio Conexión a un amplificador equipado con tomas de entrada digital platina MD o platina DAT NOTAS La fuente de audio de un disco grabado en formato de sonido envolvente Dolby Digital de 5 1 canales no se puede grabar como sonido digital mediante una platina MD o DA...

Page 53: ...one 100 y después presione 2 y 5 4 Ajuste el sonido Presione VOL X X Y Y para ajustar el volumen Presione MUTE para silenciar instantáneamente el sonido Presione nuevamente para recuperar el nivel de sonido anterior NOTA Si presiona CH K L en el modo DVD puede cambiar los canales de TV Incluso si desconecta la unidad en el modo DVD cuando vuelva a conectar volverá al modo TV VCR PARA VER CANALES D...

Page 54: ... SETUP Utilice esta característica para sincronizar el reloj con la hora real GRABACIÓN SOLO puede ver el mismo programa que se está grabando 1 Seleccione el canal a grabar Presione los botones numéricos o CH K L NOTA Si la unidad está conectada a una caja de cable o caja de satélite la unidad debe estar en CH3 o CH4 y debe seleccionarse el canal a grabar en la caja de cable o caja de satélite 2 S...

Page 55: ...de títulos el menú podrá aparecer en la pantalla 5 Presione STOP C para detener la reproducción CD DVD V MENÚ DE DISCO 1 Presione DISC MENU Aparecerá el menú principal de DVD Si no existe la función puede aparecer el símbolo en la pantalla de TV Si el menú de disco existe en el disco aparecerán el idioma de audio opciones de subtítulo capítulos para el título y otras opciones para su selección 2 P...

Page 56: ...nce commercial use such as hotel rental or office use of this product or damage which results from fire flood lightning or other acts of God THIS WARRANTY DOES NOT COVER PACKING MATERIALS ANY ACCESSORIES EXCEPT REMOTE CONTROL ANY COSMETIC PARTS COMPLETE ASSEMBLY PARTS DEMO OR FLOOR MODELS FUNAI CORP AND ITS REPRESENTATIVES OR AGENTS SHALL IN NO EVENT BE LIABLE FOR ANY GENERAL INDIRECT OR CONSEQUEN...

Reviews: