background image

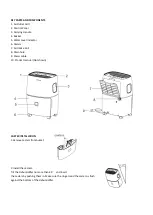
  Place dehumidifier on a level surface. 

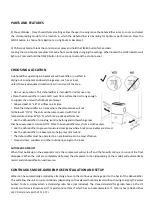
  Unscrew the cap on the back of the unit to access the garden hose nozzle 

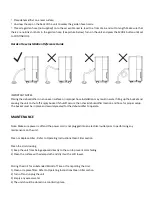
  Thread a garden hose (not supplied) onto the accessible nozzle, lead to a floor drain and cut to length. Make sure that 

there are no kinks or knots in the garden hose. (See picture below) Turn on the unit and press the MODE button until set 
to CONTINUOUS. 
 

Garden Hose Installation Reference Guide 


IMPORTANT NOTES: 
Placing the dehumidifier on an uneven surface or improper hose installation may result in water filling up the bucket and 
causing the unit to shut off. Empty bucket if shutoff occurs, then check dehumidifier location and hose for proper setup. 
The bucket must be in place and securely seated for the dehumidifier to operate. 
 

MAINTENANCE 

 
Note: Make sure power is off and the power cord is not plugged into an electrical outlet prior to performing any 
maintenance on the unit. 
 
Clean or Replace Filter - Refer to Operating Instructions Clean Filter section 
 
Clean the Unit Housing- 
1) Keep the unit from being exposed directly to the sun to prevent color fading. 
2) Clean the surface with a damp cloth and dry it with a soft towel. 
 
 
Storing the Unit for an Extended Period of Time or Transporting the Unit 
1) Clean or replace filter- Refer to Operating Instructions Clean Filter section 
2) Turn off and unplug the unit 
3) Empty any excess water 
4) The unit should be stored in a cool & dry place. 


Summary of Contents for EAD30E1

Page 1: ...EMERSON QUIET KOOL OWNER S MANUAL DEHUMIDIFIER Please read this manual carefully before operating your appliance and retain it for future reference MODEL EAD30E1 EAD50E1 EAD70E1 ...

Page 2: ...e EMERSON QUIET K00L Your new EMERSON QUIET K00L Air Dehumidifier combines high efficiency operation with portable convenience By following the operating and care instructions in this manual your dehumidifier will provide you with many years of reliable service ...

Page 3: ... Precautions 01 Electrical Safety 03 PARTS AND FEATURES Key Parts and Components 04 Caster Installation 04 Control Panel 05 CHOOSING A LOCATION 08 AUTOMATIC DEFROST 08 CONTINUOUS MODE 08 MAINTENANCE 09 TROUBLESHOOTING Before Calling for Service 10 ERROR CODE 11 ...

Page 4: ... shock Do not remove the round grounding prong from the plug It can result in a risk of electric shock This appliance is not designed for use by young children Young children should be supervised to ensure that they do not play with or climb on the unit Be sure all packaging materials are removed from the appliance before use Do not disassemble or modify the appliance or the power cord It can caus...

Page 5: ... soft cloth to clean the dehumidifier Do not use wax thinner or a strong detergent To prevent spills and property damage be sure to drain the appliance properly To prevent the coils from freezing do not operate the appliance if the room temperature is lower than 41 5 Do not position the dehumidifier so that pets or house plants are exposed to the direct air flow It can cause a risk of injury to pe...

Page 6: ...sters 7 Air Intake Grill 8 Drain hole 9 Power cable 10 Product manual Not shown CASTER INSTALLATION 1 Remove casters from bucket 2 Install the casters Tilt the dehumidifier no more than 45 and insert the casters by pushing them in Make sure the ring around the casters is flush against the bottom of the dehumidifier ...

Page 7: ...cycle through the different fan speeds High Medium and Low The fan speed can be visually distinguished by the fan speed indicators on the control panel 5 Timer Auto On To program the unit to automatically turn on press the TIMER button when the unit is off Press the or buttons to increase or decrease the timer in 30 min increments 0 5 hours up to 10 hours After 10 hours each press of the button wi...

Page 8: ...nue to run for a few minutes This is completely normal The dehumidifier will not be removing moisture from the air at this time NOTE When removing moisture from the air the dehumidifier will exhaust warm air from the side exhaust vent NOTE Do not place a full bucket on the floor because the bottom is uneven 7 Clean Filter When the filter needs to be cleaned the filter indicator will light up after...

Page 9: ...covered with frost at temperatures below 41 F 5 C which may reduce performance Use the dehumidifier in cooking laundry bathing and dishwashing areas that have excessive moisture NOTE Place the dehumidifier away from a clothes dryer Use the dehumidifier to prevent moisture damage anywhere books or valuables are stored Use the dehumidifier in a basement to help prevent moisture The dehumidifier must...

Page 10: ...ccurs then check dehumidifier location and hose for proper setup The bucket must be in place and securely seated for the dehumidifier to operate MAINTENANCE Note Make sure power is off and the power cord is not plugged into an electrical outlet prior to performing any maintenance on the unit Clean or Replace Filter Refer to Operating Instructions Clean Filter section Clean the Unit Housing 1 Keep ...

Page 11: ...ed back on Dehumidifier does not dry the air as it should Not enough time allowed for unit to remove moisture When first installed allow at least 24 hours to maintain the desired dryness Airflow is restricted Make sure there are no curtains blinds or furniture blocking the front or back of the dehumidifier See the CHOOSING A LOCATION section Dirty filter Seethe CLEAN FILTER section The Humidity Co...

Page 12: ... approximately 3 minutes and set the fan speed at the desired level Air is moving through the unit This is normal Water on the floor Hose connection may be loose Check the hose connection See the CONTINUOUS MODE GARDEN HOSE INSTALLATION AND SET UP Section Hose is attached but not draining Disconnect the hose if using the bucket place the hose near a drain ERROR CODE For any questions or Technical ...

Page 13: ...EMERSON Q U I E T K O O L ...

Reviews: