background image

15

16

21

20

11

5

4

10

19

17

18

12

3

2

6

14

13

7

8

9

1

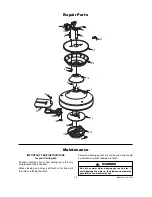
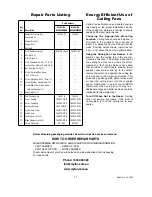
Repair Parts

Model No.: ACF552

10

Maintenance

IMPORTANT CARE INSTRUCTIONS

for your Ceiling Fan

Periodic  cleaning  of  your  new  ceiling  fan  is  the  only
maintenance that is needed.

When cleaning, use only a soft brush or lint free cloth
to avoid scratching the finish.

Abrasive cleaning agents are not required and should
be avoided to prevent damage to finish.

Do  not  use  water  when  cleaning  your  ceiling  fan.  It

could damage the motor or the blades and create the

possibility of an electrical shock.

WARNING

Summary of Contents for ACF552ORB00

Page 1: ...LECTRICIAN The warranty on this fan will be void if the appliance is not installed by a licensed electrician This ceiling fan is imported by MyFan as an agent for the USA design owners and can provide after sales service for this product if required Contact can be made by phone fax or email during normal trading hours Copies of owner s manuals for each model can be found on our web site Phone 1300...

Page 2: ...nished with the fan provides the minimum recommended floor to fan blade clearance for a 2 4 m ceiling 5 The fan must be mounted with the fan blades at least 2 1 meters from the floor to prevent accidental contact with the fan blades 6 This appliance is not intended for use by persons including children with reduced physical sensory or mental capabilities or lack of experience and knowledge unless ...

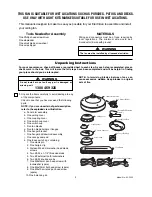
Page 3: ... stripper The fan must be installed by a licensed electrician WARNING THIS FAN IS SUITABLE FOR WET LOCATIONS SUCH AS PORCHES PATIOS AND DECKS USE ONLY WITH LIGHT KITS MARKED SUITABLE FOR USE IN WET LOCATIONS Unpacking Instructions For your convenience check off boxes are provided next to each step As each step is completed place a check mark in the box This will insure that all steps have been com...

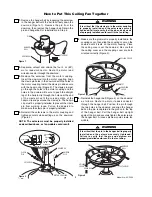
Page 4: ...ve or fan wobble could result PIN HANGER BALL SETSCREW DOWNROD Figure 1 SETSCREW CLEVIS PIN DOWNROD HAIRPIN CLIP MOTOR COUPLING SETSCREW CLEVIS PIN HAIR PIN CLIP CLEVIS PIN STRAIGHT LEG OF CLEVIS PIN MOTOR COUPLING Figure 2 DOWNROD COUPLING COVER GROMMET CEILING COVER Figure 3 It is critical that the clevis pin in the motor coupling is properly installed and the setscrews securely tightened Failur...

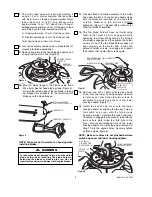
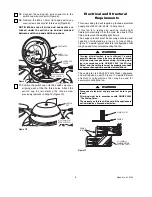
Page 5: ...n the third hole in the cover with vacant threaded hole on the lower housing adapter Re install the screw removed in Step 13 into the aligned holes Securely tighten all three screws figure 8 NOTE Make sure wires are not pinched between switch cup cover and lower housing adapter BLADE ASSEMBLY M6 x 14mm CAPTIVE SCREW WITH LOCKWASER REMOVE ONE M4 x 10mm SERRATED PAN HEAD SCREW LOWER HOUSING ADAPTER ...

Page 6: ... fuse box at this time and remove the existing light fixture The hanger bracket must be securely anchored and capable of withstanding a load of at least 40kg Figure 11 depicts typical structural configuration that may be used for securely mounting the fan Turning off wall switch is not sufficient To avoid possible electrical shock be sure electricity is turned off at the main fuse box before wirin...

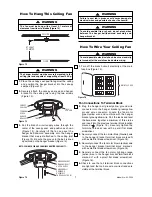
Page 7: ...ast 2 1 meters of clearance from floor to blades Figure 12 WARNING The hanger bracket must be securely mounted to the ceiling joist and capable of supporting at least 40 Kg WARNING How To Hang This Ceiling Fan MAIN FUSE BOX Figure 15 NOTE CEILING COVER AND FAN WIRES OMITTED FOR CLARITY 1 Turn off the branch circuit electricity at the main fuse box Figure 15 2 Plug the hanger ball green yellow grou...

Page 8: ...e ceiling cover 3 Secure the ceiling cover in place by sliding the 8 lockwashers over the threaded studs and installing the two knurled knobs supplied Figure 17 Tighten the knurled knobs securely until the ceiling cover fits snugly against the ceiling Your fan is now wired to be turned on and off from the wall switch 7 Securely connect the branch circuit supply cable green yellow earth wire to the...

Page 9: ... 5 Screws holding blades to blade flanges 5 Tighten screws securely are loose 3 Fan wobbles 1 Setscrews in motor coupling are loose 1 Tighten both setscrews securely in the motor excessively coupling 2 Setscrew in hanger ball downrod 2 Tighten the setscrew in the hanger ball assembly is loose downrod assembly 3 Screws securing fan blade flanges to 3 Check to be sure screws which attach the fan mot...

Page 10: ...w ceiling fan is the only maintenance that is needed When cleaning use only a soft brush or lint free cloth to avoid scratching the finish Abrasive cleaning agents are not required and should be avoided to prevent damage to finish Do not use water when cleaning your ceiling fan It could damage the motor or the blades and create the possibility of an electrical shock WARNING ...

Page 11: ...ttached to the top housing For repair parts Model No ACF552 Ceiling fan performance and energy savings rely heavily on the proper installation and use of the ceiling fan Here are a few tips to ensure quality and product performance Choosing the Appropriate Mounting Location Ceiling fans should be installed or mounted in the middle of the room and at least 2 1 m above the floor and 50 cm from the w...

Page 12: ...btain any after sales service Keep your tax invoice or other proof of purchase together with the installing electrician s details Do not uninstall or attempt to return the product to the supplier or MyFan unless advised to by MyFan You must be the original purchaser of the product and it must be installed in its original point of installation to be covered by this warranty Warranty periods begin f...

Reviews: