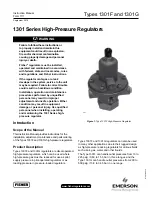

Types 1301F and 1301G
4
Installation
!
WARNING
Overpressuring a regulator or
associated equipment may cause
leakage, part damage or personal injury
due to bursting of pressure containing
parts or explosion of accumulated gas.
Do not install a regulator where service
conditions can exceed the specifications
listed on the Specifications section, or
any applicable local, state or federal
codes and regulations.
Use qualified personnel when installing, operating and
maintaining these regulators. Make sure that there
is no damage or foreign material in the regulator and
that all tubing and piping are clean and unobstructed.
The regulator may be installed in any position. Apply
pipe compound to the pipeline threads. Connect inlet
piping or tubing to the 1/4 NPT connection marked
“In” and outlet piping or tubing to one of the 1/4 NPT
connections marked “Out”. Install a pressure gauge or
pipe plug in the unused outlet connections.
If continuous operation of the system is required
during inspection or maintenance, install a three-valve
bypass around the regulator.
!
WARNING
A regulator may vent some gas to
the atmosphere. In hazardous gas
service, vented gas may accumulate,
causing personal injury or equipment
damage due to fire or explosion. Vent
a regulator in hazardous gas service to
a remote, safe location.
The optional stainless steel spring case of the
Type 1301F regulator has one 1/4 NPT internal
connection. The Type 1301G regulator spring case
has one 1/8 NPT internal connection with a screen. To
remotely vent the spring case, remove the screen, if
present, and connect 1/4 or 1/8 NPT piping or tubing
to the spring case connection. The piping or tubing
should vent the spring case to a safe location, have as
few bends as possible, and have a screened vent on its
exhaust end.
Each regulator is factory-set for the pressure setting
specified on the order. If no setting is specified, outlet
pressure is factory-set at the midpoint of the regulator
spring range. If pressure adjustment is necessary, refer
to the Startup section. In all cases, check the spring
setting to make sure it is correct for the application.
Overpressure Protection
The 1301 Series regulators have an outlet pressure
rating lower than their inlet pressure rating. If actual
inlet pressure can exceed the outlet pressure rating,
outlet overpressure protection is necessary. However,
overpressuring any portion of the regulators beyond
the limits in Specifications section may cause leakage,
damage to regulator parts or personal injury due to
bursting of pressure-containing parts.
Some type of external overpressure protection should be
provided if inlet pressure will be high enough to damage
downstream equipment. Common methods of external
overpressure protection include relief valves, monitoring
regulators, shutoff devices and series regulation.
If the regulator is exposed to an overpressure
condition, it should be inspected for any damage that
may have occurred. Regulator operation below these
limits does not preclude the possibility of damage from
external sources or from debris in the pipeline.
Startup
With installation completed and downstream
equipment adjusted, slowly open the upstream and
downstream block valves while using pressure gauges
to monitor pressure.
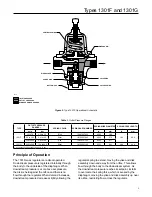
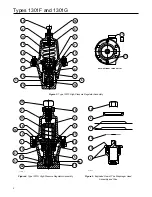
If adjustment is necessary, loosen the locknut
(key 18, Figures 3 and 4), and turn the adjusting
screw (key 15, Figures 3 and 4) clockwise to
increase the set pressure or counterclockwise to
decrease the set pressure. Monitor pressure with
gauges during adjustment. When adjustment is
complete, tighten the locknut. If the desired outlet
pressure is not within the range of the regulator
spring, install a spring with a desired range
according to the Maintenance section.
Shutdown
First, close the upstream shutoff valve, and then,
close the downstream shutoff valve. Next, open
the vent valve between the regulator and the
downstream shutoff valve and open the vent valve
between the regulator and the upstream shutoff
valve. If vent valves are not installed, safely bleed
off both inlet and outlet pressures and check that
the regulator contains no pressure.


