background image


KM-104749.2                                                                                                                                                    EN


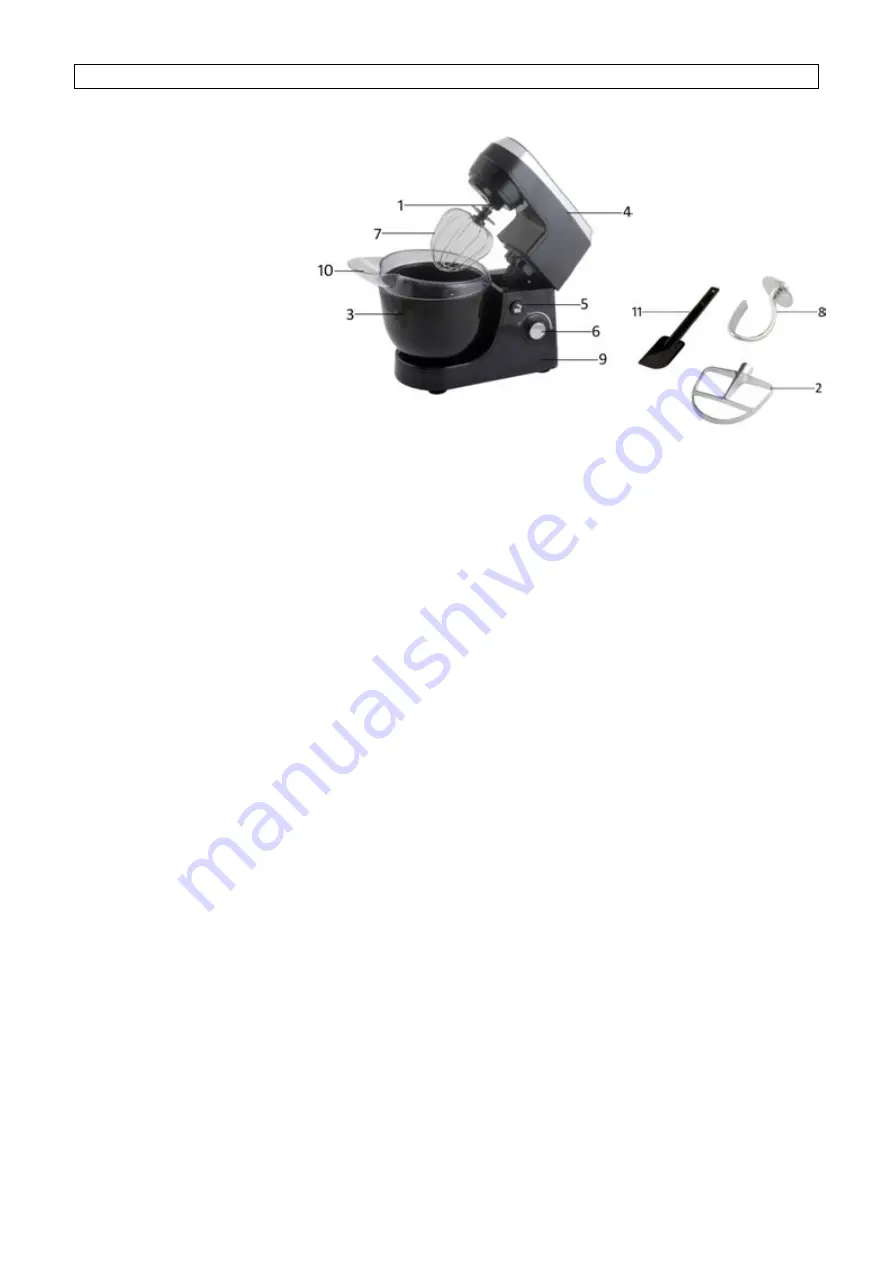
FEATURES 

 
1.


Blade connector 

2.


Mixer blade 

3.


Mixing bowl 

4.


Swivelling arm 

5.


Tilt switch 

6.


Speed Selector 

7.


Whisk 

8.


Dough blade 

9.


Base 

10.


Protective splatter cover 

11.


Spatula 

 
BEFORE FIRST USE 


All parts of the stand mixer are to be thoroughly cleaned before being used for the first time. 


Before assembling the mixer, be sure the power cord is unplugged from the power outlet and the speed 
selector is in the “OFF” position. 


Press the tilt button, the head of mixer will automatically release and lock into tilted position. 


Select  the  desired  attachments,  which  are  depending  on  the  mixing  task  to  be  performed:  beater  for 
mixing and beating egg, and dough hook for kneading, the whisk for beating and frothing egg white. 


Inserting  the  mixer  blade/dough  blade/whisk  directly  onto  the  blade  connector  (make  sure  the  mixer 
blade/dough blade/whisk is completely get through the outshoot of the blade connector, then turn it in 
anticlockwise direction until it locks firmly). 
Note:  Ensure  the  beater  or  dough  hook  or  whisk  is  fully  inserted  into  the  socket  and  locked  firmly, 
otherwise your mixing results may be affected. 


Place bowl on position. First place the bowl on the base, then turn the bowl in clockwise until it lock into 
position. 


Assemble the bowl cover onto the top of the bowl. 


To  lower  the  head,  press  the  tilt  switch,  then  place  mixer  blade/dough  blade/whisk  into  the  bowl  by 
holding the head with the one hand and ease the head down. A click sound will be heard when the head 
has reached the correct position. 

 
USING YOUR MIXER FOR MIXING 


Ensure that the speed selector is at the “OFF” position, then plug in the power source. 


Turn the speed selector to your desired setting. 
Warning: Do not stick knife, metal spoons, fork and so on into bowl when operating. 


The max operation time per time shall not exceed 5 minutes and minimum 20 minutes rest time must be 
maintained between two consecutive cycles. When kneading yeast dough, first use a low speed and then 
use high speed to achieve the best results. 
Note: during kneading, some flour may be adhered on the inside of the bowl, you shall remove the bowl 
cover, and scrape the flour on the inside wall of bowl by spatula to obtain well kneading results. 


When mixing is completed, turn the speed selector to “OFF” position, unplug the cord from power outlet. 


Hold down the tilt button, the head of the mixer will automatically lift and lock into the tilted position. 


If necessary you can scrape the excess food particles from the beaters or dough hooks by plastic spatula. 
Caution: The speed selector must be at “OFF” position and the power outlet must be unplugged before 
pulling out the beater/dough hook/whisk. 

Summary of Contents for KM-104749.2

Page 1: ...KM 104749 2 Kitchen machine EN K chenmaschine DE Robot de cuisine FR K ksassistent SE Keukenmachine NL Keitti kone FI...

Page 2: ...urer or its service agent 6 This appliance is intended to be used in household and similar applications such as Staff kitchen areas in shop offices and other working environment Farm houses By clients...

Page 3: ...the appliance malfunctions or is dropped or damaged in any manner Return appliance to manufacturer or the nearest authorized service agent for examination repair or electrical or mechanical adjustmen...

Page 4: ...ance outdoors or on wet surfaces 5 Place the appliance on a stable level surface from which it cannot fall of 6 Use the appliance on a flat dry and heat resistance surface not on varnished furniture 7...

Page 5: ...are not recommended by the producer They could constitute a danger to the user and risk to damage the appliance 18 Never move the appliance by pulling the cord Make sure the cord cannot get caught in...

Page 6: ...ist muss es durch den Hersteller oder seinen Kundendienst oder durch einen qualifizierten Techniker ersetzt werden um Gefahren zu vermeiden 6 Dieses Ger t ist f r die Verwendung im Haushalt oder f r h...

Page 7: ...W rme 1 berpr fen Sie vor dem Gebrauch ob die Netzspannung mit der auf dem Ger t angegebenen Spannung bereinstimmt 2 Schlie en Sie das Ger t nur an geerdete Steckdosen Schukosteckdosen an 3 berpr fen...

Page 8: ...ie es nciht mehr 13 Verwenden Sie das Ger t nicht in unmittelbarer N he vond W rmequellen wie Herd oder Backofen Gebrauch 1 Die Benutzung von nicht Original Zubeh rteilen kann zu Verletzungen f hren 2...

Page 9: ...Reparatur 12 Kinder k nnen die Gefahren einer falschen Benutzung elektrischer Ger te nicht erkennen Deshalb sollten Kinder niemals elektrische Haushaltsger t unbeaufsichtigt verwenden 13 Bei Benutzun...

Page 10: ...erletzungen oder einer Besch digung des Mixers Lassen Sie das Netzkabel und den Netzstecker nicht mit Wasser in Ber hrung kommen 21 Die Klingen sind scharf Vorsichtig damit umgehen 22 Der Mixer darf n...

Page 11: ...ennent bien les dangers potentiels 4 Les enfants ne doivent pas utiliser l appareil comme un jouet 5 S il est endommag le cordon d alimentation doit tre remplac par le fabricant ses agents de r parati...

Page 12: ...En cas de probl me veuillez faire parvenir l appareil au centre de services lectricit et chaleur 1 Avant utilisation assurez vous que la tension de votre r seau d alimentation correspond la tension in...

Page 13: ...liser 13 N utilisez pas l appareil proximit directe de sources de chaleur telles qu une cuisini re ou un four Utilisation 1 L utilisation d accessoires non recommand s pas le constructeur de l quipeme...

Page 14: ...des quipements lectriques Ils ne doivent donc jamais utiliser les quipements lectrom nagers sans surveillance 13 Une surveillance aigue est n cessaire pour tous les appareils utilis s par ou pr s d en...

Page 15: ...e dommage au mixeur ne laissez pas le cordon et la fiche d alimentation entrer en contact avec de l eau 21 Les lames sont tranchantes manipulez donc avec pr caution 22 Le mixeur pour m langer ne peut...

Page 16: ...k nd reparat r eller liknande kvalificerad person f r att undvika faror 6 Denna apparat mnas f r att anv ndas i hush ll och liknande bruksomr den till exempel personalk ken i butiker kontor och andra...

Page 17: ...str msladden efter skada regelbundet 4 Anv nd inte en apparat med en skadad sladd eller stickkontakt eller efter att apparaten kr nglar eller om den tappas eller skadas p n got annat s tt terl mna app...

Page 18: ...kor Det r livsfarligt p grund av elchock 4 F r att minska risken f r elchock ska du inte anv nda produkten utomhus eller p fuktiga ytor 5 Placera apparaten p en stabil j mn yta som den inte kan ramla...

Page 19: ...d i en torr milj 17 Anv nd aldrig tillbeh r som inte rekommenderas av tillverkaren De kan inneb ra fara f r anv ndaren och riskera att skada apparaten 18 Flytta aldrig p enheten genom att dra i sladde...

Page 20: ...t het vervangen worden door de fabrikant diens dealer of een gekwalificeerde technicus om risico s te voorkomen 6 Dit apparaat is bedoeld voor huishoudelijk en vergelijkbaar gebruik zoals personeelske...

Page 21: ...meld 2 Sluit het apparaat alleen aan op een geaard stopcontact 3 Controleer het snoer regelmatig op beschadigingen 4 Gebruik geen enkel apparaat met een beschadigde kabel of stekker of nadat het appar...

Page 22: ...en tot persoonlijk letsel 2 Gebruik het apparaat alleen binnenshuis in droge ruimtes en niet in de nabijheid van water 3 Dompel het apparaat of de stekker niet onder in water of andere vloeistoffen Di...

Page 23: ...15 Het is noodzakelijk om dit apparaat zuiver te houden aangezien het in direct contact komt met eetwaren 16 Neem de stekker uit het stopcontact als het toestel niet in gebruik is en laat het toestel...

Page 24: ...gebruik ervan 22 De mixer mag niet gebruikt worden voor het mixen van harde en droge ingredi nten Dit kan de onderdelen stomp maken 23 Dit apparaat is niet ontworpen voor commercieel gebruik 24 Zet he...

Page 25: ...erikoisjohtoon tai kokoonpanoon 6 T m laite on tarkoitettu k ytett v ksi kotitalouksissa ja vastaavissa paikoissa kuten kauppojen toimistojen ja muiden ty ymp rist jen ty ntekij iden keitti iss maatil...

Page 26: ...varalta 4 l k yt mit n laitetta jos sen johto tai pistoke on vahingoittunut jos laitteessa ilmenee toimintah iri it jos se on pudonnut tai jos se on vahingoittunut mill n tavalla Palauta laite valmis...

Page 27: ...nnoilla alentaaksesi s hk iskun riski 5 Aseta laite vakaalle ja tasaiselle pinnalle josta se ei voi pudota 6 K yt laitetta tasaisella kuivalla ja l mp kest v ll pinnalla ei lakattujen huonekalujen p l...

Page 28: ...ellaisia lis osia joita laitteen valmistaja ei suosittele Ne voivat aiheuttaa vaaran k ytt j lle ja laitevaurion riskin 18 l koskaan liikuta laitetta vet m ll sit johdosta Varmista ettei johto voi j d...

Page 29: ...o position Assemble the bowl cover onto the top of the bowl To lower the head press the tilt switch then place mixer blade dough blade whisk into the bowl by holding the head with the one hand and eas...

Page 30: ...e to cool down before you start to clean it To clean the exterior of the device use a moist cloth and a mild detergent When cleaning the interior and exterior and protective dust cover do not use any...

Page 31: ...ubject to a charge Defects to consumables or parts subjected to wearing as well as cleaning maintenance or the replacement of said parts are not covered by the warranty and are to be paid ENVIRONMENT...

Page 32: ...lst ndig in der Aufnahmebuchse steckt und sicher verriegelt ist andernfalls k nnen Ihre Mixergebnisse davon betroffen sein Einsetzen der Sch ssel Setzen Sie die Sch ssel zuerst auf die Basis und drehe...

Page 33: ...zahl schlagen Sie das Eiwei je nach Gr e der Eier f r maximal 5 Minuten ohne Pause bis es steif ist Die maximale Menge betr gt 19 Eier F r Schlagsahne schlagen Sie 250ml frische Sahne bei mittlerer od...

Page 34: ...nalteilen werden nicht von dieser Garantie abgedeckt Die Quittung immer aufbewahren ohne Quittung wird jegliche Garantie ausgeschlossen Bei Sch den durch Nichteinhalten der Bedienungsanleitung erlisch...

Page 35: ...s d une montre jusqu ce qu il soit solidement verrouill Note Assurez vous que le batteur crochet p trisseur ou fouet est ins r fond dans le support et verrouill solidement autrement vos r sultats de m...

Page 36: ...ufs ou de la cr me Allumez sur la vitesse moyenne ou lev e battez au fouet les blancs d oeufs sans interruption pendant 5 minutes maximum selon la taille des oeufs jusqu ce qu ils soient mont s en nei...

Page 37: ...des instructions de ce manuel rendront la garantie caduque Nous d cline toute responsabilit en cas de dommages indirects Nous d cline toute responsabilit en cas de d g ts mat riels ou de dommages cor...

Page 38: ...S tt p locket ovanp sk len Tryck p lutningsknappen f r att s nka huvudet och placera sedan mixerbladet degkroken vispen i sk len genom att h lla huvudet med en hand och f ra ner det En klick h rs n r...

Page 39: ...ljet med en n got fuktig trasa och ett milt reng ringsmedel D du reng r insidan ytterh lje eller st nkskyddet ska du aldrig anv nda starka reng ringsmedel av n got slag eller alkohol F r att reng ra...

Page 40: ...h ven skador orsakade av reng ring underh ll eller byte av tidigare n mnda delar t cks inte av garantin och ska s ledes betalas av garen MILJ V NLIG KASSERING Emerio Deutschland GmbH no service addres...

Page 41: ...garde deeghaak mixhaak volledig ingevoerd is in de houder en stevig vergrendeld is anders kunnen uw mixresultaten be nvloed worden De kom plaatsen Plaats de kom eerst op de basis en draai hem vervolge...

Page 42: ...zonder stoppen voor maximaal 5 minuten afhangend van de grootte van de eieren totdat het eiwit stijf is Maximale hoeveelheid 19 eieren Voor opgeklopte room klop 250ml verse room op middelmatige of hog...

Page 43: ...opvolgen van de gebruiksaanwijzing vervalt het recht op garantie Voor vervolgschade die hieruit ontstaat kunnen wij niet verantwoordelijk gehouden worden Voor materi le schade of persoonlijk letsel ve...

Page 44: ...ta onnistua Aseta kulho paikalleen Aseta kulho ensin jalustaan ja k nn sitten kulhoa my t p iv n kunnes se lukittuu paikalleen Laita kulhon kansi kulhon p lle Alenna laitteen p painamalla kallistinkyt...

Page 45: ...ossa tulee k ytt vispil Pirtel iden cocktailien tai muiden nesteiden sekoittaminen Sekoita ainekset reseptin mukaan n 5 minuutin ajan l k yt sekoituskulhossa suurempaa kuin 4 litran maksimim r T ss to...

Page 46: ...a vammoista jotka johtuvat laitteen ep asiallisesta k yt st tai jos k ytt ohjeita ei noudateta Vauriot lis varusteille eiv t tarkoita koko laitteen ilmaista vaihtoa T m n kaltaisessa tapauksessa ole h...

Reviews: