background image

5

. Key Layout and Definitions

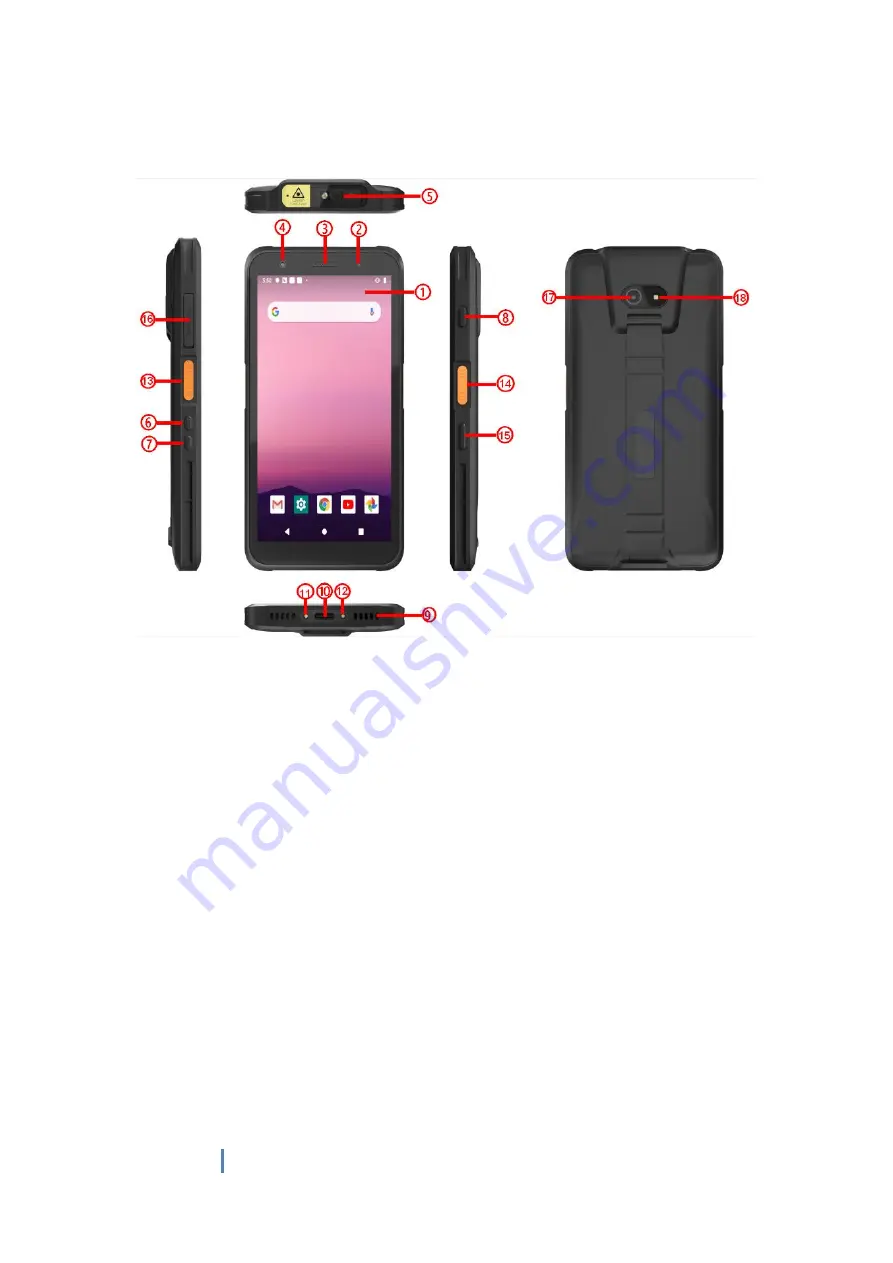
1 LCD/ Touch screen :

LCD display and Touch screen.

2

Indication LED :

Boot charge indication

3

Light sensor

:Perception of external pipeline strength, electrical signal

to CPU

Front Camera:

Camera, video.

5

6 VOL

+ :

Turn up the voice

7 VOL -

:

Turn down the voice

8

Power button:

To start or close touch screen panel. You can also let

the computer to sleep or wake up from hibernation mode.

Speaker:

Built-in speaker, so you can hear the sound without

additional link equipment.

10

Type-C Port:

Earphone

Charging and USB data transfer

Summary of Contents for EM-T60

Page 1: ...1 Rugged Handheld EM T60 Quick Start Guide...

Page 2: ...as possible Here we have made a brief introduction to the key layout and definitions in figures and words Attention This user guide is based on andriod 10 edition This user guide is an introduction fo...

Page 3: ...3 Contents Use of the previous note 4 Key Layout and Definitions 5 6 Introduction to Desktop 7 28 Use Warning 29 31...

Page 4: ...ll not take any responsibility for the loss or removal of the information in the tablet which is caused by the operation maintenance or other accidents of the non normal operation of the software and...

Page 5: ...th electrical signal to CPU Front Camera Camera video 5 6 VOL Turn up the voice 7 VOL Turn down the voice 8 Power button To start or close touch screen panel You can also let the computer to sleep or...

Page 6: ...code from here pointing the light at one bit code two dimensional code will display the scanning content in the APP 15 User Defined Function Keys The function of user defined key is provided by custom...

Page 7: ...troduction to Desktop One Device initialized setting 1 Initial page 1 press the power key to reboot the system as the below picture you can change the language setting the click the start Language cha...

Page 8: ...8 2 touch the start icon then click skip for left picture and click skip for the right picture 3 click CONTINUE for left picture and click NEXT for the right picture...

Page 9: ...9 4 click NEXT for left picture and click Not now for the right picture 5 click SKIP ANYWAY for left picture and click I AGREE for the right picture...

Page 10: ...10 2 Initial desktop slide the arrow up and go to the desktop as below picture...

Page 11: ...esktop layout 1 Desktop Menu introduction this interface can start the application in a quick way enter the menu operation users can add shortcuts to the desktop according to their own needs as below...

Page 12: ...12 2 Menu bar layout all the application and user installation applications are here and all applications can be opened as below picture...

Page 13: ...13 Three System setting Settings The user can set up the system on this interface...

Page 14: ...14 1 suggestion Complete device setup click on the start icon to completed the device settings...

Page 15: ...15 2 network Internet Wi Fi setting In this interface can search Wi Fi input password can be connected under the advanced settings can be connected to the WLAN directly WLAN sleep state setting...

Page 16: ...16 3 connected devices Bluetooth setting Search this interface for Bluetooth pairing remove or cancel paired Bluetooth devices as the blew picture...

Page 17: ...17 4 Apps notifications View installed APP storage space size traffic usage stop using APP Set screen lock time default notification prompt...

Page 18: ...18 5 Battery check battery usage 6 Display Brightness adjustment desktop wallpaper replacement sleep time setting interactive screen saver font size screen rotation switch etc...

Page 19: ...ound Set media volume alarm volume notify volume size can also use physical keys to the corresponding interface directly to adjust do not disturb settings notification ringtone settings and other oper...

Page 20: ...20 8 Storage View system memory usage install and uninstall SD cards 9 DuraSpeed...

Page 21: ...21 10 Security location set screen locking mode with some encryption settings can manage unknown sources of application installation settings etc 11 Users accounts...

Page 22: ...ick with accessibility for quick settings of personal operation habits such as Caption magnification gesture front size display size power button ends call auto rotate screen speak password color inve...

Page 23: ...23 13 Google 14 system...

Page 24: ...24 1 languages input 2 Gestures...

Page 25: ...Date time Set the time and time zone and time format for 24 hours or 12 hours or turn on automatic confirmation which synchronizes automatically when the device is connected to the network 4 System up...

Page 26: ...26 5 Reset options...

Page 27: ...27 6 About tablet view status information device models Android version Android patch level base band version Device network module model kernel version software version number etc...

Page 28: ...lo ss or removal of the information in the tablet which is cau sed by the operation maintenance or other accidents of th e non normal operation of the software and hardware Please backup your importa...

Page 29: ...nstallation If this equipment does cause harmful interference to radio or television reception which can be determined by turning the equipment off and on the user is encouraged to try to correct the...

Page 30: ...y these requirements may not comply with FCC RF exposure requirements and should be avoided Body worn Operation This device was tested for typical body worn operations To comply with RF exposure requi...

Reviews: