background image

Overview

14

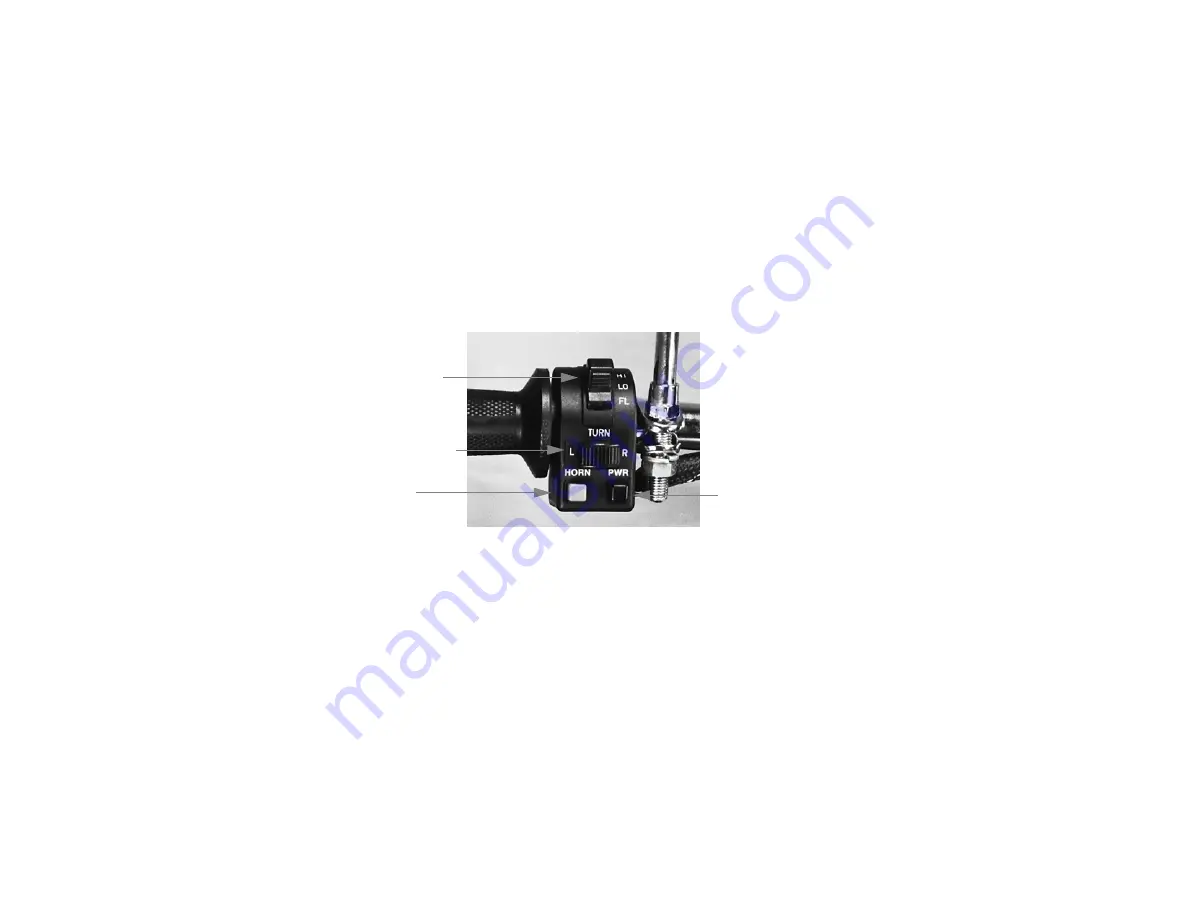
Left-hand Controls

The left-hand control assembly contains switches for high-beam, turn signals, horn, and power.

Right-hand Controls

The right hand control assembly contains a twist-grip throttle and the front brake lever.

Horn Button

Turn Signal Switch

Headlight Switch

Power Button

Summary of Contents for Lectra VR24 1998

Page 1: ......

Page 2: ...icle Information Dealer Information Owner Information Note The terms motorcycle and motorbike are used interchangeably in this manual VIN Number Model Dealer Purchase Date Name Addres City St Zip Phone No ...

Page 3: ...le to use variable reluctance technology This manual is designed to help acquaint the new owner with this very unique machine and to provide basic service information when it is required Electric Motorbike EMB Incorporated 6780 Depot Street Sebastopol California 95472 707 82E BIKE 823 2453 embinc aol com www motorbike org Copyright 1997 All rights reserved Printed in the USA ...

Page 4: ...d Controls and Instruments 10 Left side Controls and Features 11 Right Side Controls and Features 12 Instruments and Indicators 13 Left hand Controls 14 Right hand Controls 14 Battery Charging System 15 Energy Storage using Batteries 16 Description of VR24 Drive System 17 Loading 18 Tires 19 Optional Accessories 19 ...

Page 5: ...serve Mode Riding 23 Braking 23 Parking 25 Anti theft Guidelines 26 Maximizing Your Range 26 Maintenance 27 Maintenance Schedule 27 Maintenance Precautions 28 Electrical 30 Wheels and Tires 33 Front and Rear Brakes 39 Drive Chain 43 Side Stand 46 Lifting the Motorbike 47 Cleaning 48 Storage 49 ...

Page 6: ...Contents 4 Specifications 50 Warranty and Service 54 Service Manual 54 Maintenance Log 55 ...

Page 7: ...d wheels WARNINGS Vehicle Operation Always wear a helmet On road use only Not intended for freeway use Failure to follow all operating instructions may result in an accident Potential exists for electrical shock Potential exists for explosive gas mixture Batteries contain lead and caustic acid Keep batteries fully charged and follow all battery use recommendations READ THE OWNER S MANUAL CAREFULLY...

Page 8: ...he owner s manual and installation instructions before installing any accessory The weight of accessories cargo and rider must be added together to determine if the maximum weight capacity has been exceeded Fitting of large fork mounted or large handlebar mounted fairing is not recommended Tire Information Front Rear Tire Size 100 90 12 120 80 12 Cold Tire Pressures 25 psi 172 kPa 1 72 kg cm2 25 p...

Page 9: ...pen because the automobile driver does not see or hear you Make yourself conspicuous to help avoid an accident that wasn t your fault Wear bright or reflective clothing Don t ride in another motorist s blind spot 4 Obey all federal state and local laws and regulations Excessive speed is a factor in many accidents Obey the speed limits and NEVER travel faster than conditions warrant Signal before y...

Page 10: ...es are due to head injuries ALWAYS wear a helmet You should also wear a face shield or goggles as well as boots gloves and protective clothing 2 Do not wear loose clothing which could catch on the control levers footpegs drive chain wheels or other moving parts Modifications Modifications to your Lectra are not recommended WARNING Modification of the motorbike or removal of original equipment may ...

Page 11: ...the Motorcycle Safety Foundation 1 800 669 7994 Registration Your electric motorbike meets all applicable state and federal requirements for registering as a street legal motorcycle Your dealer can help you understand local registration requirements Insurance Your dealer has a list of local insurance agents providing coverage for your electric motorbike You may also contact EMB for assistance in o...

Page 12: ...verview The following illustrations show the location of the Lectra s controls and instruments Hand Controls and Instruments Front Brake Throttle Instrument Cluster Left Hand Controls Ignition Switch Reserve Button ...

Page 13: ...Overview 11 Left side Controls and Features Front Disc Brake Drive Chain Eccentric Cam Adjuster for Drive Chain Side Stand ...

Page 14: ...Overview 12 Right Side Controls and Features Receptacle for Charger Cord Eccentric Cam Adjuster for Drive Chain Rear Brake Pedal ...

Page 15: ...r State of Charger SOC meter the ignition switch the reserve power switch and the high beam turn neutral and temperature indicators Speedometer Odometer State of Charge Meter Ignition Switch Reserve Energy Switch Turn Signal Indicator High Beam Indicator Temperature Indicator Neutral Indicator ...

Page 16: ...control assembly contains switches for high beam turn signals horn and power Right hand Controls The right hand control assembly contains a twist grip throttle and the front brake lever Horn Button Turn Signal Switch Headlight Switch Power Button ...

Page 17: ...Charger optional 1 5 hours SOC Meter The SOC meter uses one red indicator and five green indicators to show the amount of energy storage remaining in the Lectra s battery pack Located on the instrument panel just above the ignition switch the meter includes a light sensor to adjust the indicator brightness levels for daytime and night time riding The green indicators are all lit at full charge and...

Page 18: ...vehicles these are deep cycle batteries specially designed for repeated deep discharges Also unlike starter batteries these batteries will perform better after a short break in period of 10 to 50 charging cycles With proper care these batteries are capable of maintaining their performance for more than 300 charging cycles Battery Capacity Number of Charge Discharge Cycles 100 80 100 200 300 ...

Page 19: ... advanced compact highly efficient and brushless electric motor The custom integrated controller provides both motor control and anti lock regenitive braking Regenitive electronic braking extends vehicle range and preserves brake life by using the vehicle s forward momentum to create electricity and provide some recharging during braking The anti lock feature prevents the regen braking from lockin...

Page 20: ...se guidelines when loading or adding accessories to your Lectra motorbike Check the warning lable on your Lectra s swingarm for tire size and cold tire pressures The combined weight of the rider cargo and additional accessories should not exceed 200 lbs 90 kg the maximum weight capacity Keep cargo and accessory weight low and close to the center of the motorbike As weight is located farther from t...

Page 21: ...ires Follow these guidelines for proper tire care Always maintain proper inflation Do not ride on excessively worn tires Always use replacement tires of the correct size See your Lectra dealer for tire replace ment choices Optional Accessories An optional 1300 watt charger for your Lectra motorbike may be purchased from your EMB dealer Please check with your dealer for availability ...

Page 22: ...rear brakes check operation make sure there is no brake fluid leakage in the front disk brake Make sure brakes are properly adjusted and operate smoothly 3 Tires check condition and pressure 4 Drive chain check condition and adjustment Adjust and lubricate if necessary 5 Throttle check for smooth operation of the hand throttle 6 Lights and horn check that the headlight tail light stoplight turn si...

Page 23: ...en neutral indicators are on 5 Check the State of Charge meter for at least 20 SOC 2 or more of the green SOC indicators lit 6 Press and hold the Power button to disengage neutral The green neutral indicator should extinguish 7 Release the brakes Note The motorbike will not run if the brakes are engaged 8 Twist the throttle grip to power the motorbike forward 9 You can now release the Power button...

Page 24: ... motion of the motorbike 3 If the motor is ever overheated which may happen on very hot days climbing steep hills or during high speed riding an automatic over temperature protection circuit in the drive system reduces power to the motor until the temperature returns to normal The hotter the motor gets the more the power is reduced A red temperature indicator will light whenever the power is being...

Page 25: ...the reserve mode follow these recommendations 1 For emergency use only 2 Use slow speeds to maximize range 3 If the motor cuts out let the bike rest for at least five minutes This will allow the batteries to regain some power 4 Recharge as soon as possible Braking Before riding your electric motorbike read and understand this description of the operation of its brakes WARNING Power to the rear whe...

Page 26: ...ng and for maximum range use regen braking 1 Regen braking is activated by partially depressing the rear brake pedal Further pressing on the rear brake peddle engages the rear drum brake for additional braking power 2 The amount of regen available is controlled by the movement of the rear brake pedal The more it moves the more regen braking occurs At Rest Regen Engages Drum Brake Engages ...

Page 27: ...hen the batteries are fully charged may damage the batteries 5 Regen braking will not lock up the rear wheel However the rear wheel can be locked up by the rear drum brake WARNING Excessive pressure on the rear brake pedal will cause the drum brake to lock the rear wheel Parking 1 After stopping the motorbike turn the ignition switch to OFF and remove the key 2 Use the side stand to support the mo...

Page 28: ...ke 1 Increase speed gradually instead of using jack rabbit starts 2 Maintain as steady a pace as possible 3 Try to anticipate stops and coast when possible 4 In stop and go traffic try to maintain a slow but steady pace Avoid repeated stopping and accelerating if possible 5 Avoid speeds over 30 mph 6 When braking make use of the electronic regen braking as much as possible 7 Try to plan your route...

Page 29: ...ge Parking the electric motorbike indoors in cold climates can help keep the batteries warmer which can increase your range The available range will decrease at battery temperatures under 70 F 11 Weight affects your range Keep load to a minimum 12 Reduce air resistance by leaning forward slightly with your head near the handlebars ...

Page 30: ...nformation and special tools Consult your authorized EMB Lectra dealer for more information The drive chain should be inspected daily and cleaned and adjusted at least once every 1 000 miles 1 600 km or more often under severe use conditions The batteries should be tested by your Lectra dealer annually The following items should be inspected serviced every 2 500 miles 4 000 km Brake fluid Brake sh...

Page 31: ... operation Have your authorized EMB Lectra dealer inspect the major components including frame suspension and steering parts for misalignment and damage that you may not be able to detect Turn off the ignition and support your Lectra on a firm level surface before per forming any maintenance Use new genuine EMB parts or their equivalent for maintenance and repair Parts which are not of equivalent ...

Page 32: ... a fully automatic battery charging system The charger is located under the Lectra s seat and can be viewed by looking forward under the seat from the right rear side of the motorbike Power Taper Charge Charger Indicators Fast Charge Over Temperature Charge Cord Receptacle ...

Page 33: ...n the batteries are fully charged all indicators will extinguish except for the Power indicator The more heavily you have discharged your Lectra s batteries the more time it will take to fully charge them Unplugging and then plugging in the charger will restart the battery charging cycle If the Temp indicator lights the batteries or the charger are overheating Unplug the charger and wait for the b...

Page 34: ...ing Fuses Lectra fuses are located under the dash panel and may be accessed by removing the dash Remove the dash panel using a 1 8 inch allen wrench See the Specifications in this manual for a list of fuse sizes and types Service Fuse Charger Fuse Head Tail Light Fuse Horn Fuse Turn Signal Fuse Brake Light Fuse ...

Page 35: ...tires have treadware indicators built into the tread Never ride on excessively worn tires Always use replacement tires of the correct size See your Lectra dealer for tire replace ment choices Removing the Front Wheel 1 Place a 2 x 4 piece of wood between the jack and the Lectra frame 2 x 4 Board Jack ...

Page 36: ...blocks WARNING Do not work on the Lectra if it is only supported by a jack 4 Remove the cotter pin securing the front axle nut then remove the nut from the axle 5 Pull the axle away from the wheel 6 Slide the front wheel down and forward to clear the brake disc from the front brake caliper Axle Nut Washer Thick Axle Spacer Thin Axle Spacer Speedometer Gearbox ...

Page 37: ...rse the removal procedure to install the front wheel Note that the thick axle spacer mounts on the left side of the wheel and the thin spacer mounts on the right Torque the axle nut to 30 ft lbs Always use a new cotter pin to secure the axle nut ...

Page 38: ... 1 Place a 2 x 4 piece of wood between the jack and the Lectra swingarm 2 Raise the Lectra until the rear wheel has 1 to 2 inches of clearance 3 Place blocks under the frame for support then lower the frame onto the blocks 2 x 4 Board Jack ...

Page 39: ... Do not work on the Lectra if it is only supported by a jack 4 Disconnect the brake radius arm from the rear brake housing 5 Remove the cotter pin securing the rear axle nut then remove the nut from the axle Brake Radius Arm ...

Page 40: ...from the rear of the motorbike Rear Wheel Installation Reverse the removal procedure to install the rear wheel Note the one rear axel spacer which mounts on the right side of the wheel Torque the axle nut to 30 ft lbs Always use a new cotter pin to secure the axle nut Washer Axle Nut and Cotter Pin Axle Spacer Rear Brake Drum and Sprocket Assembly ...

Page 41: ... rear drum brake Checking Front Brake Pads 1 Check the front brake pads by viewing them from the front of the wheel 2 Wear indicators which are small notches cut into the pads should be visible 3 If the indicators are gone have your brake pads replaced See your EMB Lectra dealer for service Brake Pad Wear Indicator ...

Page 42: ...o adjustments required but occasionally you may have to add fluid to the master cylinder The front brake fluid level is visible in the site gauge located on the front of the master cylinder 1 Make sure the motorcycle is in an upright position 2 Check that the brake fluid level is above the lower level mark in the site gauge Lower Level Mark ...

Page 43: ...inder 2 Carefully remove the top and set aside where the inside of the cover will not become contaminated 3 Add fluid until the indicated level is within the marks on the site gauge 4 Reinstall the cover 5 Tighten the screws securely WARNING Use only DOT 4 brake fluid from a sealed container Never allow contaminants such as dirt or water to enter the brake fluid reservoir ...

Page 44: ... Rear Drum Brake Adjustment When you notice a lack of rear brake stopping action adjust the rear brake using the cable adjuster provided on the swingarm Brake Arm Brake Cable Adjuster Looser Tighter Brake Adjustment ...

Page 45: ...stand 2 Check the slack in the lower drive chain run midway between the sprockets Drive chain slack should be adjusted to allow approximately 1 2 inch 13 mm vertical movement by hand Rotate the rear wheel and check the drive chain slack as the wheel turns Drive chain slack should remain constant as the wheel turns If the chain is slack only in certain sections some links are kinked and binding Bin...

Page 46: ...ocated on both sides of the swingarm 3 Adjust the chain by using a 1 4 inch drive socket wrench to turn the eccentric cams in a counter clockwise direction This moves the axle towards the rear of the bike to take up slack in the drive chain Eccentric cam movement Rear axle movement Eccentric cam Adjusting with a wrench ...

Page 47: ...s excessive when the rear axle is moved to the furthest limit of adjustment the drive chain is worn and must be replaced 5 Torque the rear axle nut to 30 ft lbs 6 Install a new cotter pin on the rear axle nut 7 Tighten the eccentric cam lock bolts located on the swingarm 8 Recheck the drive chain slack Chain Lubrication The EMB electric motorbike uses a standard motorcycle drive chain Chain lubric...

Page 48: ...Maintenance 46 Side Stand Check operation of the side stand for proper function 1 Check the spring for damage or loss of tension and the side stand assembly for freedom of movement Side Stand Spring ...

Page 49: ...o start and ride the motorbike If it starts stop immediately The motorbike should not start If the motorbike starts with the side stand down see your authorized dealer for ser vice Lifting the Motorbike When lifting the motorbike is required be sure to position the lifting device on the steel frame tubes and not on the bottom of a battery ...

Page 50: ...rinse the motorbike thoroughly with plenty of clean water Strong detergent residue may cause corrosion of alloy parts 3 Let it dry then use a polish to protect the chrome and use a wax or polish on the painted surfaces 4 Test the brakes before riding the motorbike again WARNING Braking efficiency may be temporarily impaired immediately after washing the motorbike Do not use high pressure spraying ...

Page 51: ...ome and unpainted steel surfaces with rust inhibiting oil 2 Inflate the tires to their recommended pressures Use blocks to raise the motorbike so that both tires are off the ground 3 Cover the motorbike with a material that breaths and store in a dry area 4 Every month recharge the batteries Removing the Motorbike from Storage 1 Uncover and clean the motorbike 2 Make sure the batteries are fully c...

Page 52: ...t 26 inches Ground clearance 5 inches Dry weight 340 lbs 154 kg Maximum weight 550 lbs 250 kg Motor Type variable reluctance 2 phase brushless Voltage 24 volts DC Cooling air cooled Peak power 8 hp Continuous power 2 5 hp Peak torque 8 ft lbs Charging System Input voltage 90 to 264 VAC 47 to 63 Hz ...

Page 53: ...ient temperature rating 20 to 40 centigrade Cooling convection and forced air Fuse protection external fuse on output internal fuse on input Suspension and Tires Front Suspension Tube diameter 30 mm Maximum wheel travel 4 inches Adjustments none Rear Suspension Type dual shock Maximum wheel travel 2 5 inches Adjustments spring preload Tires Size front 100 90 12 Size rear 120 80 12 Type Dunlop TT90...

Page 54: ...tic 50 ml Final drive 4 to 1 may vary Type chain Batteries Number 4 Battery voltage each 12V Pack voltage total 24V Maximum storage capacity 3 1 kWH Type deep cycle valve regulated sealed no spill Lights Headlight high low 4811 Tail stoplight 1662 Turn signal 13814 Speedometer 2741 Dash indicators 7387 soldered in place ...

Page 55: ...ses Main CNL400 Charger 30A 3AG slow blow GND 20A mini automotive Yellow Horn 10A mini automotive Red Head tail light 7 5A mini automotive Dark Red Turn 3A mini automotive Purple Brake speedometer 3A mini automotive Purple ...

Page 56: ...ires servicing Any authorized EMB dealer will honor your warranty during the warranty period Refer to the warranty booklet supplied with your motorbike Service Manual A service manual for your EMB electric motorbike is available from your local EMB dealer This manual is written for both the professional service technician and the owner mechanic Special tools and training may be necessary for some ...

Page 57: ...Maintenance Log 55 Maintenance Log Date Mileage Description ...

Page 58: ...Maintenance Log 56 Date Mileage Description ...

Reviews: