4
5
Operating Instructions
1.
Plug in power supply
2.
For Switch control: Plug in Switch box into CNT3. Press up button for screen
to go up, press down button for screen to extend and press the stop button for
the screen to stop.
3.
For RF Remote and IR Remote: point the handset to the screen housing and
press the (down, up or stop button).
4.
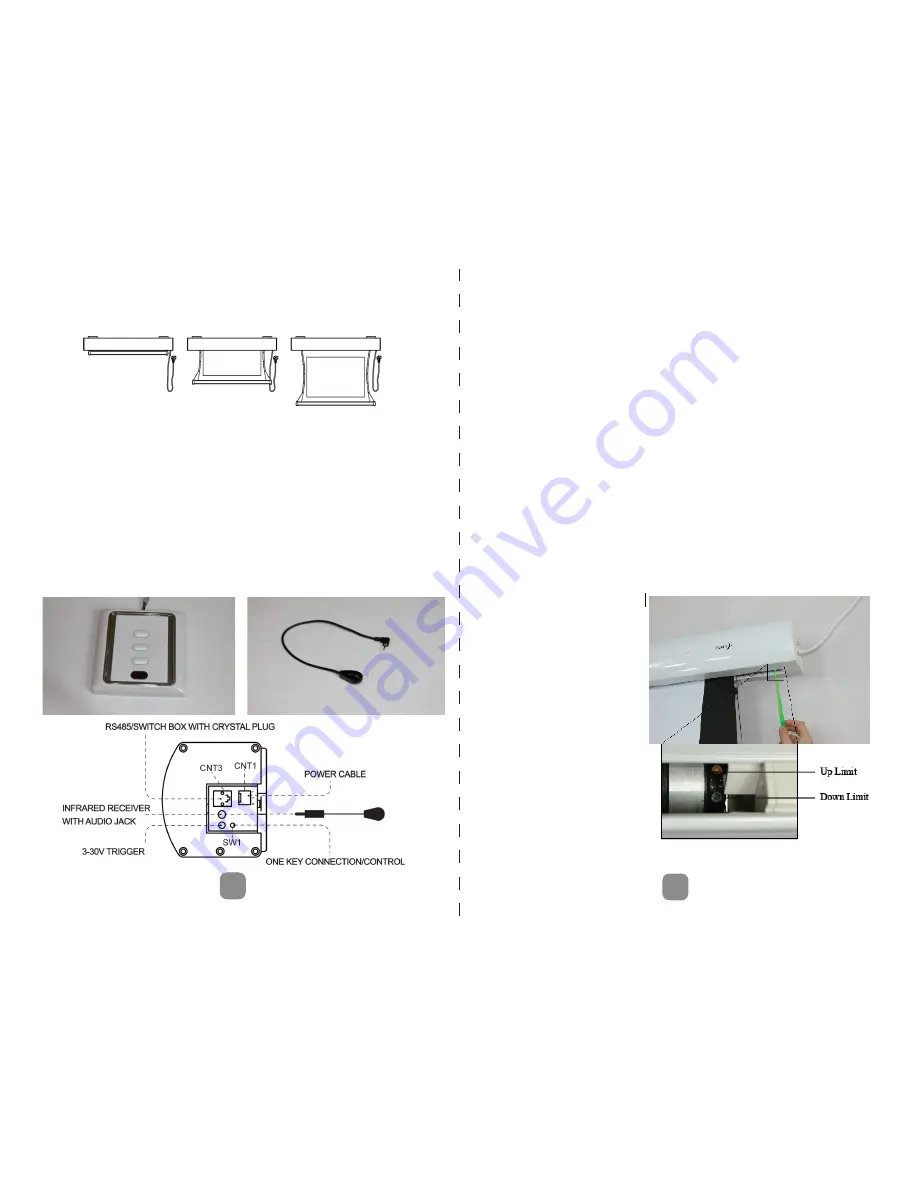
To use infrared remote, plug the IR receiver into the IR receiver jack(shown in
diagram below)
5.
For 3V-30V Trigger: plug in trigger cable from projector to the trigger
jack(shown below)
6.
For SW1 control: press the SW1 button to operate screen when remote/wall
panel is not present
7. Before rolling up the screen, please make sure the screen surface is free of
foreign matter.
1. The Limit Switch Controls which is in the right end of the screen is used to adjust
how far the screen goes down and up.
2. Looking at the photo, you will see a hexagonal screw head which mates with the
end of the green plastic wand given.
3. There are two hexagonal screen heads, one is in front of the other. The one clos
-
er to the front casing of the screen adjusts the up limit switch (yellow screw head).
The screw head closer to the back of the screen adjusts the down limit switch(gray
screw head).
4. To adjust the limit switches please use the green adjusting wand that’s included
with your screen.
5. Slide the adjusting wand into the end of the screen as shown by the picture. The
end of the wand needs to go into the screw head of the limit switch you want to
adjust.
6. Adjusting for the up limit position: When the screen retracts and you want to
change the position of where the bottom bar stops, use the adjusting tool to turn
the switch in the CW direction to make the screen drop more, and turn it in the
CCW direction and the screen will rise more into the casing. To see the result of the
adjustment, extend the screen all the way and then retract the screen to see the
new up position.
Setting the Limit Switches
7. Adjusting for the bottom limit po-
sition (how far the screen extends):
When the screen extends and you
want to change the position of
where the bottom bar stops, use
the adjusting tool to turn the switch
in the CCW direction to make
the screen extend further. Turn-
ing the switch in the CW direction
will retract the screen. To see the
result of the adjustment, extend
the screen all the way and note
the new bottom position. Repeat
adjustments as required.
8. Caution: Do not over adjust the
up limit switch in the up direction
as that will cause the screen to
retract too far into the casing and
damage the motor. Do not over
adjust the down limit switch in the
down direction as that will also
damage the screen.
Summary of Contents for Titon Tab Tension
Page 2: ...2 7 Exploded View ...
Page 6: ......


