Eltax Cinema DVD Home Theatre System Vision DVD Home Theatre System Instruction Manual Download Page 7

6

FRONT AND 

BACK PANELS

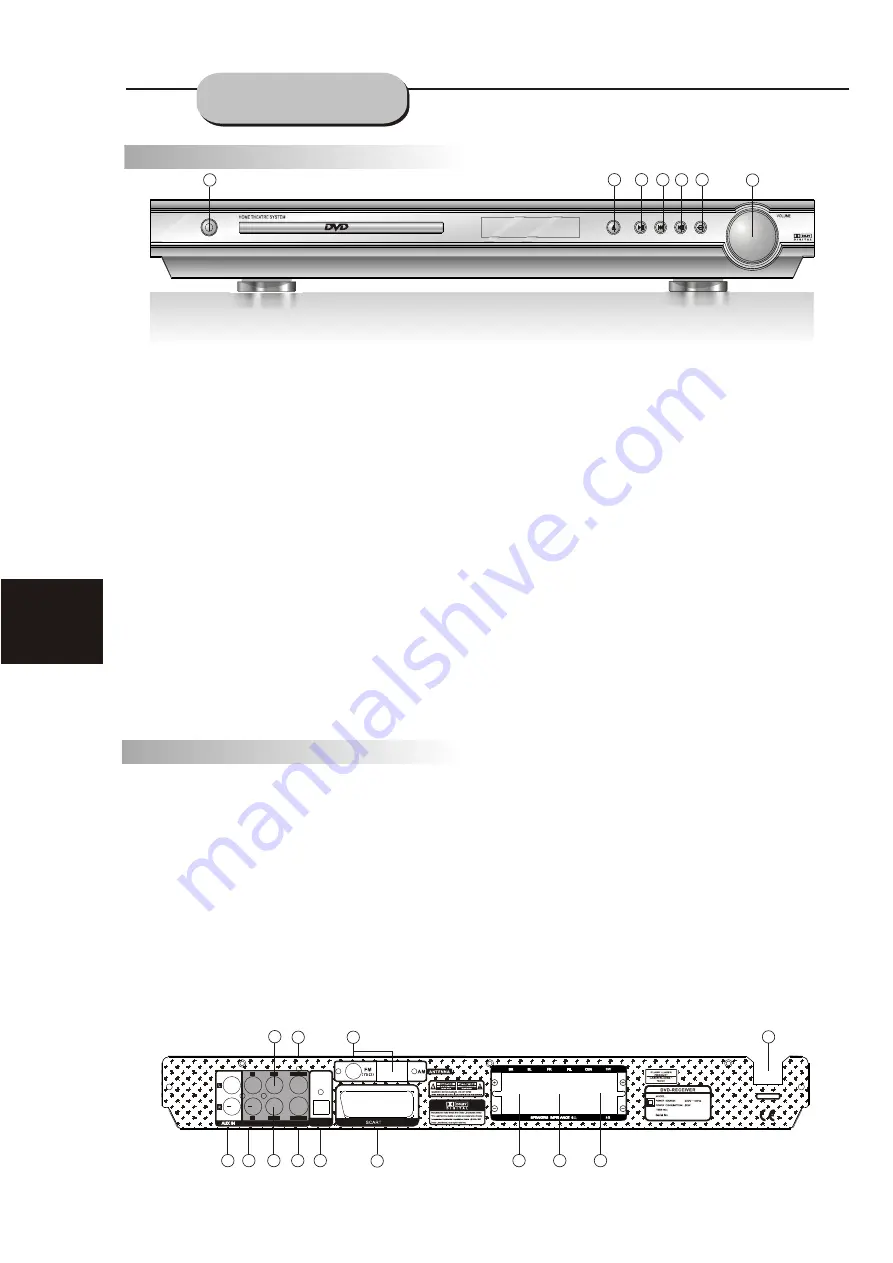
Front Panel Functions

Back Panel Functions

1.  ANTENNA

     For connection of the supplied AM and FM 

antennas.

2.  AUX IN

     For connection of external accessory 

equipment, such as a CD player.

3.  AUDIO OUT

     For connection of an external amplifier if you 

wish to hear the sound in another room.

4.  VIDEO OUTPUT
5.  S-VIDEO OUTPUT
6.  REAR
    

For connection of rear speakers.

7. FRONT/MAIN

     For connection of front speakers.

8. CENTER/SUBWOOFER

     For connection of center speaker and 

subwoofer. 

9. COAXIAL OUTPUT
10. 230V~50Hz

     This unit is supplied with a power cord. Make 

sure that the pins are dry before inserting the 
plug into a wall socket. Do not pull the cord or 
step on it.

11. SCART INPUT/OUTPUT
12. OPTICAL OUTPUT
13. OUTPUT FOR ACTIVE SUBWOOFER

For connection of an active subwoofer.

.

1  POWER

    All connections must be checked before the 

mains plug is inserted into the socket. Then     
insert the mains plug carefully into the socket. 
Press the POWER button on the front panel to 
turn on the unit. When the power is turned on for 
the first time, a short surge may disrupt the 
function of other electronic equipment in the 
same circuit. If so, connect the unit to a wall 
socket of another circuit.

2. OPEN/CLOSE

    This button is used to open and close the DVD 

tray.

3. PLAY/PAUSE /AUTO

    This button is used to start and pause playback 

in DVD mode.

    When the unit is in TUNER mode, the button can 

be used to initiate an automatic channel search

4.  PREV/DOWN

     This button is used to select the previous track 

when the unit is in DVD mode.

    In TUNER mode it can be used to initiate a 

manual search at lower frequencies.

5. NEXT/UP 


    This button is used to select the next track when 

the unit is in DVD mode.

     In TUNER mode it can be used to initiate a 

manual search at higher frequencies.

6. INPUT SIGNAL SOURCE

     This button is used to select the input source. 

Note:

 You may not hear any sound if the input 

selected has not been connected to any unit.

7.  VOLUME
    

This button is used to adjust the volume of all six 
channels simultaneously.

6

7

10

2

4

5

8

9

11

3

12

1

230V ~50Hz

OPTICAL

OUTPUT

OUTPUT

L

L

SW

SW

COAXIAL

S-VIDEO

VIDEO

R

13

1

4

2

3

5

7

6

Summary of Contents for Cinema DVD Home Theatre System Vision DVD Home Theatre System

Page 1: ...Instruction Manual Cinema DVD Home Theatre System Vision DVD Home Theatre System...

Page 2: ...system To prevent direct exposure to the laser beam do not open the enclosure Visible laser radiation is present when enclo sure is open DO NOT STARE INTO BEAM Additionally the use of controls or adj...

Page 3: ...to be walked on or pinched by items placed upon or against them paying particular attention to cords at plugs convenience receptacles and the point where they exit from the product Power Lines An outs...

Page 4: ...and Back panels 6 Front Panel 6 Back Panel 6 Remote Control 7 Operating the remote control 8 Connecting Devices 9 Speakers 10 Arrangement of speakers 10 Connecting speakers 11 Connecting antenna 12 Co...

Page 5: ...e following types of discs DVD MP3 CD CD R and CD RW with super error correction ability It is also capable of displaying picture CDs and digital photo albums It supports eight languages up to 32 subt...

Page 6: ...th Always keep the disc clean If you cannot wipe the dirt off lightly use a slightly moistened soft cloth and finish with a dry cloth Do not use any type of solvent such as Paint thinner benzene comme...

Page 7: ...front panel to turn on the unit When the power is turned on for the first time a short surge may disrupt the function of other electronic equipment in the same circuit If so connect the unit to a wal...

Page 8: ...7 REMOTE CONTROLLER...

Page 9: ...akage occurs wipe the battery liquid from the battery compartment then replace both batteries Always replace both batteries at the same time using new fully charged batteries Life expectancy of batter...

Page 10: ...t channel The white terminal marked L is for connecting the left channel The yellow terminal is for video connection Make sure all connections are securely made Improper connections may cause noise po...

Page 11: ...woofer will be assigned to the front and 3 D rear speakers to obtain the optimum 3 D surround sound effect The ideal surround sound speaker configur ation may vary according to room size and wall mate...

Page 12: ...on the left below Connecting Speaker Cables 1 Peel off approximately 1 2 of cable insulation 2 Tighten the wire end 2 below 3 Open cable terminal by pressing back on tab 4 Insert wire end into termina...

Page 13: ...vides the clearest reception Keep as far as possible from DVD receiver TV set and speaker and power cords If reception remains poor an outdoor antenna may be necessary To connect the AM loop antenna 1...

Page 14: ...a different circuit Selecting Sound Source 1 Press any function button DVD TUNER TV AUX to select the desired sound source The appropriate symbol will appear in the display 2 When the TUNER button is...

Page 15: ...ess When a station s signal is received it will appear in the display 3 To lock onto a station quickly hold the UP or DOWN button for two seconds The unit will start automatic tuning When a station is...

Page 16: ...ey to close tray The disc tray will close The disc type will appear in the upper left hand corner of the screen Once it has read the disc the unit automati cally will begin playback When playing a DVD...

Page 17: ...to 1 4 to 1 8 to 1 16 to reverse slow speed 1 2 to 1 4 to 1 8 to 1 16 to normal speed To resume normal playback press the PLAY key PLAY SLOW Screen Display While a disc is playing the status of vario...

Page 18: ...apability encoded into them Language The unit has the capability to show movies in one of eight languages 1 Press the AUDIO key The language menu will appear Select the desired language by pressing th...

Page 19: ...allows repeated playback of specific titles chapters tracks or segment It even allows switching between two items that are being repeated 1 Select the item to repeat 2 Press the REPEAT key CHAPTER TIT...

Page 20: ...the setup menu press the scroll key for up or down movement to select a desired item Once an item is selected press the PLAY key to confirm your entry and to move to the Sub entry 2 Use the left or r...

Page 21: ...uages may vary from disc to disc A Press ENTER to confirm your selection B Press SETUP to exit the setup menu Select DVD menu Menu language in the setup menu and press ENTER or to view the DVD menu su...

Page 22: ...4 3 LB Letter Box refers to pictures where a black bar is visible at the top and at the bottom of the screen 16 9 Refers to a picture that fills up the entire screen of a widescreen TV Note Not all DV...

Page 23: ...enu Dolby Digital settings Follow these instructions to set the analog and digital audio output formats for Dolby Digital sound A When the DVD has stopped press SETUP B Select Audio and press ENTER C...

Page 24: ...gnals when you wish to play other audio tracks A When the disc has stopped press SETUP B Select Audio and press ENTER C Select Others and press ENTER D Set Analog Out to 5 1 Channel Default For Dolby...

Page 25: ...tings The test tone can manually be set to right front speaker left front speaker center speaker right rear and left rear speakers A When the disc has stopped press SETUP B Select More Audio and press...

Page 26: ...the sound quality How to play an MP3 disc MP3 file menus When you play an Mp3 disc two to playback modes can be selected FILE LIST and PROGRAM 1 FILE LIST A list of the tracks on the disc will be disp...

Page 27: ...n turn back on No color picture 1 Check to see if the S connector is damag ed bent pin MP3 discs don t play 1 Use another software edition to re burn disc as the edition used may not be com patible wi...

Page 28: ...Selectance 50dB THD Monophonic 2 Stereo 3 Frequency Response 30Hz 10kHz 1dB Stereo Resolution 35dB 1kHz 30dB 100Hz 10kHz AM Tuner Tuning Range 522 1620KHz S N Ratio 35dB THD 3 Amplifier MAX Output Po...

Page 29: ...28...

Page 30: ......

Reviews: