background image

8

Installation and start-up

Actuators KNX R4 16 A and KNX R8 16 A

 • Version: 28.05.2020 • Technical changes and errors excepted.

Follow the guidelines and standards for SELV electric circuits 
while installing and cable laying of the KNX connection and 
inputs!

The physical address is assigned by the KNX software. There is a button with a control
LED for this on the actuator.

2.3.1. Insulation properties of the clamp groups

The 

Actuators KNX R4 16 A and KNX R8 16 A

 are assigned to Overvoltage cate-

gory III and Pollution degree 2 or 3 according to EN60664-1. According to this classifi-
cation, 
between 250 V power cables and FELV 4 kV surge voltage resistance and 
between 250 V power cables and SELV 6 kV surge voltage resistance 
must be provided. This provision must be observed during the installation.

With single insulation,
at pollution degree 2 a voltage of 400 V AC and
at pollution degree 3 a voltage of 250 V AC
is allowed between two channels.

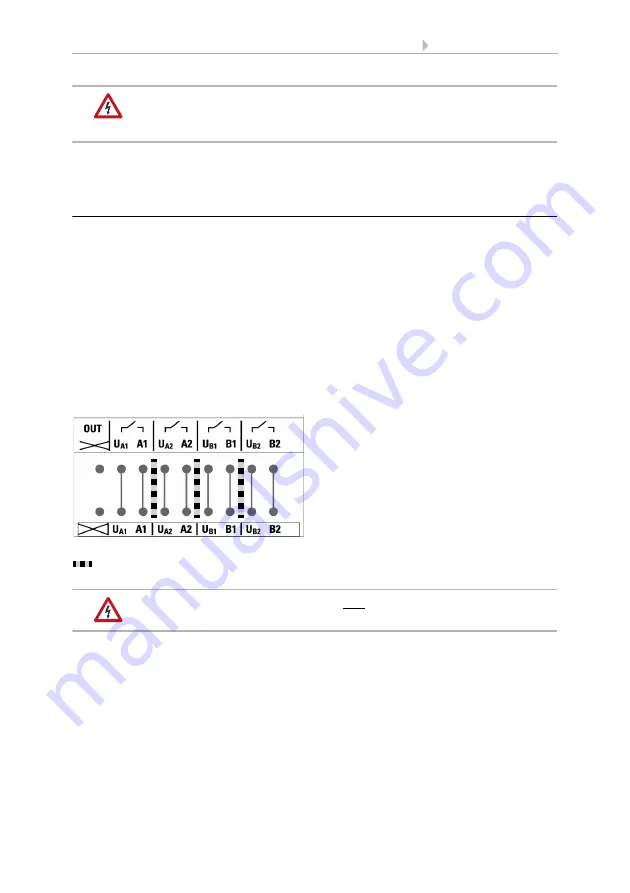
KNX R4 16 A:

Neighbouring clamp groups may not be used with mixed 
voltages, as there is only single insulation between them.

Non-labelled clamps (X) may not be used, to avoid influencing the insulation proper-
ties!

Fig. 3 KNX R4 16 A Insulation properties of the clamp groups

Insulation 4 kV (single insulation)

Summary of Contents for 70570

Page 1: ...EN Installation and Adjustment KNX R4 16 A and KNX R8 16 A Switching Actuators Item numbers 70571 KNX R4 16 A and 70570 KNX R8 16 A...

Page 2: ......

Page 3: ...ction 6 2 3 1 Insulation properties of the clamp groups 8 2 3 2 Connection examples 10 2 4 Instructions for assembly and operational start up 11 3 Addressing of the device at the bus 11 4 Disposal 12...

Page 4: ...eshooting of the device must only be carried out by a competent electrician Safety advice Safety advice for working on electrical connections components etc DANGER indicates an immediately hazardous s...

Page 5: ...ftware ETS 5 The product file can be down loaded from the ETS online catalogue and the Elsner Elektronik website on www els ner elektronik de in the Service menu 1 0 1 Scope of delivery Actuator 1 1 T...

Page 6: ...intentional use if it can be assumed that risk free operation is no longer guaranteed The device is only to be used for the intended purpose described in this manual Any improper modification or failu...

Page 7: ...arts driven by an electric motor Adhere to the relevant building regulations Ensure that the return path access to the building is not blocked if spending time outside the building danger of being loc...

Page 8: ...NX R4 16 A 1 Labeling field 2 Programming LED BUS and programming button PRG 3 Slot Bus connector KNX 4 LED output A1 A2 B1 B2 accordingly 5 Button on off output A1 A2 B1 B2 accor dingly 6 Power LED 7...

Page 9: ...or consumer is necessary out put free of potential Fig 2 KNX R8 16 A 1 Labeling field 2 Programming LED BUS and programming button PRG 3 Slot Bus connector KNX 4 LED output A1 A2 B1 B2 C1 C2 D1 D2 acc...

Page 10: ...2 or 3 according to EN60664 1 According to this classifi cation between 250 V power cables and FELV 4 kV surge voltage resistance and between 250 V power cables and SELV 6 kV surge voltage resistance...

Page 11: ...6 A The clamp groups A1 A2 B1 B2 and C1 C2 D1 D2 can be used with mixed voltag es as there is increased insulation between them Non labelled clamps X may not be used to avoid influencing the insulatio...

Page 12: ...t up Actuators KNX R4 16 A and KNX R8 16 A Version 28 05 2020 Technical changes and errors excepted 2 3 2 Connection examples Mains 230 V AC KNX R4 16 A A1 A2 B1 B2 Each terminal contact may be loaded...

Page 13: ...y of 95 Avoid condensation After the auxiliary voltage has been applied the device will enter an initialisation phase lasting a few seconds During this phase no information can be received or sent via...

Page 14: ...16 A and KNX R8 16 A Version 28 05 2020 Technical changes and errors excepted 4 Disposal After use the device must be disposed of or recycled in accordance with the legal reg ulations Do not dispose o...

Page 15: ...h 1 Bit 5 Channel A1 Start staircase light function Input WC 1 10 DPT_Start 1 Bit 6 Channel A1 Start stop staircase light function Input WC 1 10 DPT_Start 1 Bit 7 Channel A1 Linking Input WC 1 2 DPT_B...

Page 16: ...function Input WC 1 10 DPT_Start 1 Bit 25 Channel B1 Linking Input WC 1 2 DPT_Bool 1 Bit 26 Channel B1 Call up saving scenes Input WC 18 1 DPT_SceneCo ntrol 1 Byte 27 Channel B1 Local operation blocki...

Page 17: ...DPT_SceneCo ntrol 1 Byte 45 Channel C1 Local operation blocking object Input WC 1 1 DPT_Switch 1 Bit 46 Channel C2 Switching Input WC 1 1 DPT_Switch 1 Bit 47 Channel C2 Feedback Output R CT 1 1 DPT_Sw...

Page 18: ...Input WC 18 1 DPT_SceneCo ntrol 1 Byte 63 Channel D1 Local operation blocking object Input WC 1 1 DPT_Switch 1 Bit 64 Channel D2 Switching Input WC 1 1 DPT_Switch 1 Bit 65 Channel D2 Feedback Output R...

Page 19: ...Actuators KNX R4 16 A and KNX R8 16 A making their assignment more recognisable in the ETS Activate the switch function The actuator KNX R4 16 A has 2 channels A and B with double switch function eac...

Page 20: ...required activate the Block function menu in which you can define a block 6 3 1 Relationship between logic operation timer switch Block Application example Staircase light that is only to be switched...

Page 21: ...input active AND twilight ac tive 6 3 3 Switch on and off delay The menu item only appears if a switch on or switch off delay is selected in the settings for the switch function channel The menu item...

Page 22: ...function channel The staircase light time function ensures for example that light is on for a while and then switches itself off With staircase light timer switching the time base and time factor are...

Page 23: ...object Channel call save scenes of the actuator is linked to this group ad dress A scene is called then the scene number is communicated to the actuator The state stored in the actuator for this scen...

Page 24: ...20 Technical changes and errors excepted Specify a switch state If it is allowed to save scenes via the bus this state only applies after the ETS download until the first manual saving Afterwards the...

Page 25: ......

Page 26: ...bH Control and Automation Engineering Sohlengrund 16 75395 Ostelsheim Phone 49 0 70 33 30 945 0 info elsner elektronik de Germany Fax 49 0 70 33 30 945 20 www elsner elektronik de Technical support 49...

Reviews: