

0871 222 3456
(Mon- Fri national rate)
eMail Questions
Introduction
Please read this quick start guide
carefully to help you get the most
out of your eTouch™.
Package Contents
Before using your eTouch™, please
check your package contents to
ensure there aren’t any items
missing. If any of the listed items are
missing or damaged, please contact
your point of purchase for
assistance.
The package includes:
1.
10” eTouch™ Tablet
2.
Mains Power Adaptor
3.
Quick Start Guide
& Warranty Card
Setting up
Your tablet has a screen protector (a
thin film to protect the screen
during transit). Please use the tab to
slowly and very carefully remove
this from the screen as it will reduce
the quality of the screen image.
Battery Charging
Your eTouch™ has a built in
7100mAh rechargeable lithium
battery which provides around 6
Hours battery life
(depending on
usage)
.
The eTouch™ is supplied with no
charge in the battery and we
recommend that you charge the
battery for around
8 Hours
for its
first charge, to achieve the best
battery life. Without sufficient
charge the eTouch will not power
up and will vibrate until reset.
Memory &
Expansion
Your eTouch™ comes with 4GB of
built in storage but will also
support uo to a 32GB Micro SD card
to store your favourite music,
movies and photos.
To insert a micro SD Card
Insert the card with the metallic
connectors facing downward until
you feel a click which will lock the
card into place.
To remove a micro SD Card
Go to
Settings
>
SD Card and
device storage settings
then
choose the micro SD Card “
SD1
”
then tap ‘
Unmount SD1
’ to allow
you to safely disconnect the card
from the eTouch. Push the card
gently inwards until you hear a click
and then it will pop out.
Turning your eTouch™ on
Once you’ve charged the battery you can turn the eTouch™ ON by pressing
the power button and the Android™ OS will load. To unlock the screen
(its locked to avoid accidentally pressing buttons when not being used)
slide
the padlock icon upwards until it covers the green dot. The eTouch™
will then load you home screen for you to start navigating
to your chosen app. The screen will automatically
lock after a period of non-use (you can change the length of
this time period in the Settings menu)
To turn your Tablet
OFF
simply press and hold the
Power
button
for about 1 second and the ‘
power off screen
’ will
appear.
Slide
the power icon upwards until it covers the
green dot and the eTouch will power off.
Your Home Screen & Widgets
Your eTouch’s home screens let you personalise your working environment to
suit your lifestyle. For example you can set up one screen with widgets to your
favourite social networking sites and another page with the weather and news
feeds. To access your other home screens you can simply touch the screen and
swipe it left or right.
To add a widget
tap the menu button when you’re at the home screen and
press the widget button. A pop-up list will appear so you can choose your
widget which will appear on the home screen. To move it around the home
screen tap and hold the icon until it becomes larger, then drag it to where you
want it.
To delete a widget or app
tap and hold the icon, then drag it to the recycle
bin which will appear on the right hand side of the screen.
Android is a trademark of Google Inc. Use of this
trademark is subject to Google Permissions
About your
eTouch™
With its amazing LED backlit
touchscreen navigating around the
eTouch™ is as easy as a quick swipe of
your fingertips. The Android™ OS is
specifically designed with large
buttons and icons which suit the size
of your fingers, or alternatively you
can use the
built in stylus
which is
found docked in the corner of the
unit.
You can touch, tap and swipe the
screen, just like you’d use a mouse,
but please don't press too hard or use
any other sharp or pointed
instruments as you may damage the
screen.
GSensor
The eTouch™ has a built in G-sensor
which flips the screen into any
orientation, letting you use it for
games, in landscape, portrait or even
flip it over to show a friend.
Help & Support
To help you get the best out of your
product we provide you with a
limited 1 year Return to Base
Warranty and Support Helpdesk
(see www.elonex.com for more
details)
.
For all technical support please
contact our helpdesk using the
details below:
FAQ’s and Updates
www.elonex.com/support
If you have any problems or
questions please
DO NOT take your eTouch™
back to the store.
Please contact us for some
helpful advice.
(this does not affect your Statutory Rights)
Setting the Time
& Date
Some of the eTouch’s software and
widgets require the
date and time
to be correct to function correctly.
To set the time and date go to
Settings > Date & time. Uncheck the
Automatic setting then click Set
Date, use the + and - buttons to
change the date and then press Set.
Click Set Time, use the + and -
buttons to change the date and
then press Set.
Please Note:
If you run out of
battery life you will lose your time
and date settings.
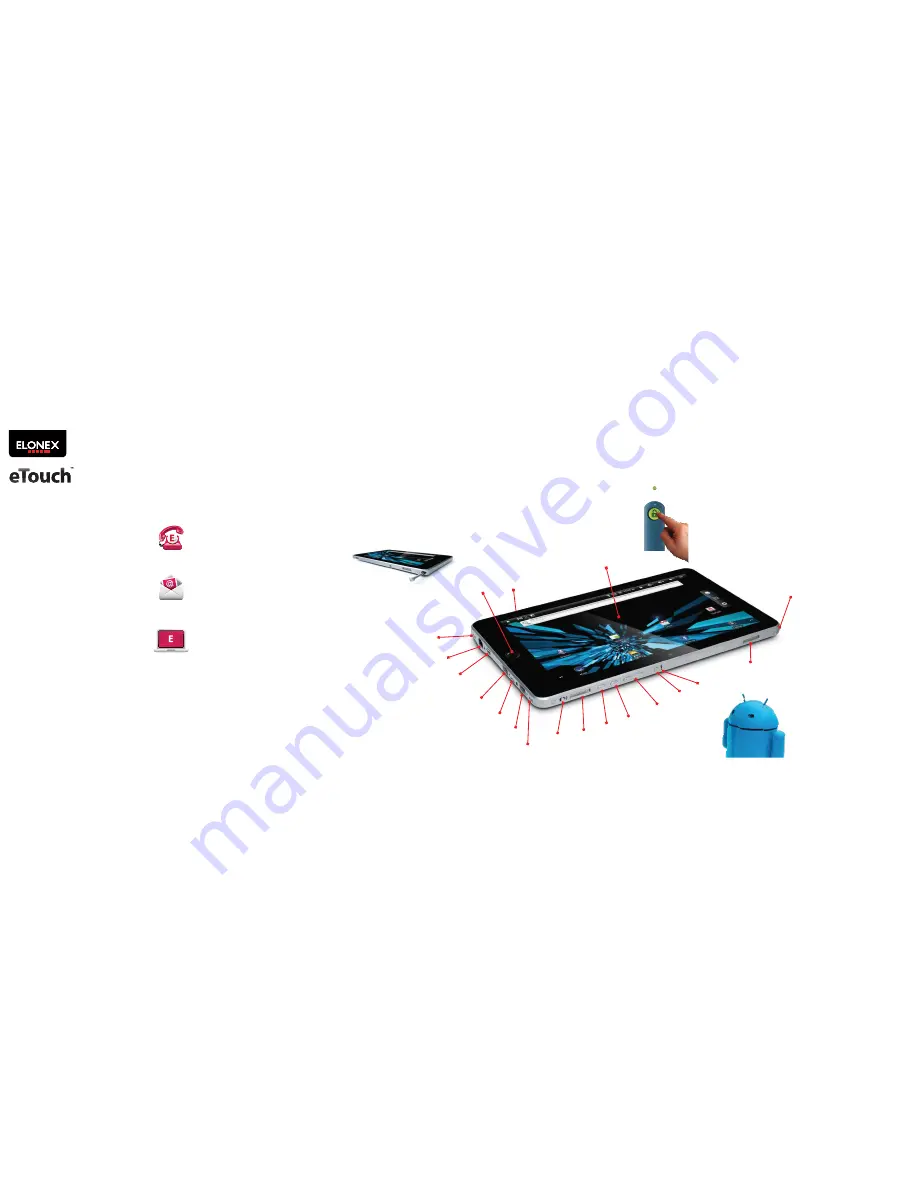
Wi-Fi
ON/Off
DC Power Input
5V, 2.2A
micro SD Slot
RJ45 Ethernet Port
miniHDMI Port
10” LCD Touchscreen
LED Backlit Touchscreen
USB Port
USB Port
Speaker
Home
Menu
/-
Power Button
Stylus
Back
Button
Reset
Button
3.5mm Headphone Port
Mic
Speaker


