Elo Touch Solutions 01 series User Manual Download Page 28

User Manual 

 IDS01 


SW601990 Rev. M,, page 22 of 47 


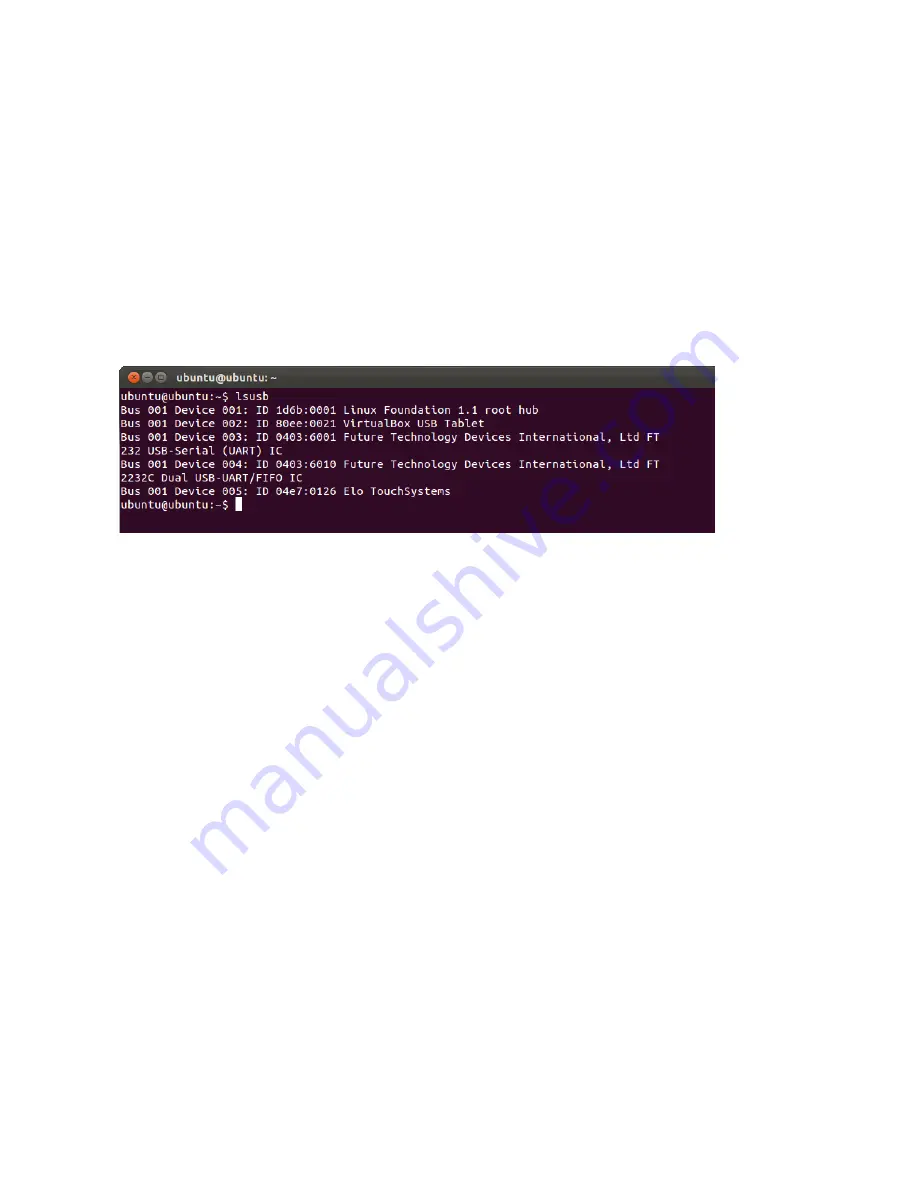
For Ubuntu versions that support touch:


These drivers are automatically installed when the system is connected to the monitor. To find information on the 
drivers: 

• 

Open a Terminal window and type “lsusb” as the command. A screen that looks like below will open. The available USB devices will be displayed. 


Summary of Contents for 01 series

Page 1: ...USER MANUAL Elo Touch Solutions Interactive Digital Signage IDS 01 Series...

Page 2: ...without notice Elo Touch Solutions Inc and its Afffiliates collectively Elo makes no representations or warranties with respect to the contents herein and specifically disclaims any implied warrantie...

Page 3: ...Table of Contents Section 1 Introduction 4 Section 2 Installation 5 Section 3 Mounting 10 Section 4 Operation 14 Section 5 Technical Support 27 Section 6 Safety Maintenance 29 Section 7 Regulatory Inf...

Page 4: ...OSD controls Computer modules designed specifically for this touchmonitor are available These computer modules are designed to slide into a bay on the rear of the monitor and turn your IDS touchmonit...

Page 5: ...llation Unpacking the Interactive Digital Signage Touchmonitor To unpack the IDS follow these steps 1 The carton should be oriented as prescribed by carton labeling 2 Open and remove all 4 hinged plas...

Page 6: ...protective film for its face Quick Install Guide User Manuals CD not included in all models Latest version of user guide is available at www elotouch com North America power Europe Korea power U K pow...

Page 7: ...0 Rev M page 7 of 47 Connector Panel Interfaces Remove the cable cover on the bottom rear when viewed in landscape orientation to access the touchmonitors connector panel Image of IDS01 monitor back I...

Page 8: ...r 1 Connect the HDMI cable between the monitor and the video source 2 Connect the USB touch cable between the monitor and the PC 3 Select the correct power cable for your region Connect it between the...

Page 9: ...om Operating System dropdown menu 3 Select the technology from Technologies dropdown menu 4 Click on the driver version required for your touchmonitor 5 Click Accept once you are directed to the Drive...

Page 10: ...least two people four are recommended for the ET7001L ET7001LT handle lift or move these touchmonitors Note Do NOT lay the display face down as this can cause damage to the monitor Portrait Mode When...

Page 11: ...ndscape Mode When rotating the monitor to landscape mode ensure it is done such that the Elo logo is oriented according to the pictures presented here Table Top Mode Table Top Refer to the Temperature...

Page 12: ...ovided on the rear of the monitor The VESA FDMI compliant mounting is coded VESA MOUNT PER MIS F 600 600 6MM For the 70 models A four hole 400x400mm mounting pattern is provided on the rear of the mon...

Page 13: ...Only Elo PN E455084 Optional Wall Mounts Kits detailed information available on the MS drawing for each size Refer to the wall mount user guide for detailed information Wall mount user guide is availa...

Page 14: ...perating systems normal power off procedure Power Status LED on the OSD Remote functions according to the following table TouchMonitor Computer Module Status LED Status OFF OFF SLEEP PULSING ON ON The...

Page 15: ...ET5501L ET5501LT ET5551LT 100 240Vac 50 60 Hz 5 2 1 A ET7001L ET7001LT 100 240Vac 50 60 Hz 5 2 1 A To keep the product operating at an optimum level please limit the product usage cycle to 18 hours f...

Page 16: ...desktop shortcut to open up the Elo Touchscreen Configuration screen Select Match Touch to Display to calibrate multiple monitors Optical Touchscreens Technology When connected to Windows 7 or Win 8...

Page 17: ...in the X and Y dimensions to fit the display s native resolution An unavoidable byproduct of the scaling algorithms is a loss of fidelity when the computer s output video image is scaled by the monito...

Page 18: ...lay OSD main menu Return to previous OSD menu Display OSD Audio source submenu Decrease value of selected parameter select previous menu item Hot key for changing video source Increase value of select...

Page 19: ...internal speakers or headphones can be adjusted Default Not Muted Volume at 50 Color Settings Displays the Color Adjust and Color Preference Menus HDMI Allows HDMI video to be displayed on the monitor...

Page 20: ...or down as needed to the displays Y resolution and scales the X dimension to maintain the aspect ratio and fills the rest of the display with equal black bars on the left and right When the input sou...

Page 21: ...rature Selects the displays color temperature The available color temperatures are 9300K 7500K 6500K 5500K and User Defined If the User Defined option is selected the user can change the color tempera...

Page 22: ...howing that temperature information Power Behavior See section below for power behavior information Video Port Discovery only for 7001LT If enabled the monitor will automatically switch video ports wh...

Page 23: ...information All touchmonitor adjustments made through the OSD are automatically memorized as soon as they are entered This feature saves you from having to reset your choices every time the touchmonit...

Page 24: ...ality For Remote Monitor Applications The touchmonitor has the ability to allow remote access from a host application This is done through the use of the Multiple Display Control command sets By insta...

Page 25: ...hardware and software installation techniques For the 5501L 5501LT and 7001L 7001LT units an external peripheral kit is available from Elo The list of RFID protocols that are supported and can be read...

Page 26: ...ng Systems After the computer finishes booting up follow these instructions to install the drivers Attach the external CD Rom drive to the monitor and turn the computer on Insert the drivers CD After...

Page 27: ...tem is connected to the monitor To find information on the drivers Open the Terminal window and under Hardware select USB A screen that looks like the image below will appear The available USB devices...

Page 28: ...support touch These drivers are automatically installed when the system is connected to the monitor To find information on the drivers Open a Terminal window and type lsusb as the command A screen tha...

Page 29: ...e of its operating range Example of OSD showing the Video Board Temperature In Thermal Protection Mode the monitor will reduce the backlight brightness to bring the internal temperature back within op...

Page 30: ...pted to shut off the monitor within sixty seconds if the temperature continues to rise after Thermal Protection Mode Step 2 has been enabled If the system is not manually turned off in sixty seconds t...

Page 31: ...01L 4201L 55 ET5501L ET5501LT 53 ET5551L 54 ET7001L ET7001LT 45 If Thermal Protection Mode Step 2 is reached the internal temperature needs to first decrease back to or below the Step 1 temperature fo...

Page 32: ...are stated in the table below Monitor Size Thermal Protection Mode Enabled Step 1 C Thermal Protection Mode Enabled Step 2 C Thermal Protection Mode Enabled Step 3 C Auto Shut Off Temperature C ET320...

Page 33: ...ppears Check thatthe signalsourcedeviceis turnedon Check that that there are no loose cable connections Monitor displays an Out Of Range message Adjust your computer s resolution timing mode to be wit...

Page 34: ...or worldwide technical support phone numbers Technical Specifications visit www elotouch com products for technical specifications for this device Online Self Help visit www elotouch com go websupport...

Page 35: ...specified environmental conditions listed in Section 7 Care and Handling The following tips will help keep your touchmonitor functioning at an optimal level Disconnect the AC power cable beforecleanin...

Page 36: ...ct should not be disposed of with household waste It should be deposited at a facility that enables recovery and recycling Elo has put in place recycling arrangements in certain parts of the world For...

Page 37: ...interference in a residential installation This equipment generates uses and can radiate radio frequency energy and if not installed and used in accordance with the instructions may cause harmful inte...

Page 38: ...he following measures i Move the digital device away from the affected receiver ii Reposition turn the digital device with respect to the affected receiver iii Reorient the affected receiver s antenna...

Page 39: ...Polybrominated Diphenyl Ethers PBDE Plastic Parts O O O O O O Metal Parts X O O O O O Wire and Cable Assembly X O O O O O LCD Panel X O O O O O Touch Screen Panel X O O O O O PCBA X O O O O O Softwar...

Page 40: ...for this product is 10 years The product will not leak or mutate under normal operating conditions listed below so that the use of this electronic information product will not result in any severe env...

Page 41: ...0 240Vac 3 6A ET5501L 5501LT ET5551L 100 240Vac 5A ET7001L ET7001LT 100 240Vac 5A Operating Conditions Temperature 0 C 40 C Portrait and Landscape 0 35 C Table Top Mode 0 35 C with OPS module Humidity...

Page 42: ...User Manual IDS01 SW601990 Rev M page 21 of 47 Section 8 Warranty Information For warranty information go to http support elotouch com warranty...

Page 43: ...User Manual IDS01 SW601990 Rev M page 22 of 47 Notes...

Page 44: ...User Manual IDS01 SW601990 Rev M page 23 of 47...

Page 45: ...User Manual IDS01 SW601990 Rev M page 24 of 47 Notes...

Page 46: ...User Manual IDS01 SW601990 Rev M page 25 of 47...

Page 47: ...letter To find out more about our extensive range of Elo touch solutions go to www elotouch com or call the office nearest you North America Tel 1 408 597 8000 Fax 1 408 597 8001 customerservice eloto...

Reviews: