41
No.
Name
Function
10
Camera
select
To switch between the USB camera images.
This icon appears when more than 2 USB cameras are connected.
11
Settings
To display the USB camera settings screen.
(⇒
12
Hide menu
bar
To hide the menu bar.
◆
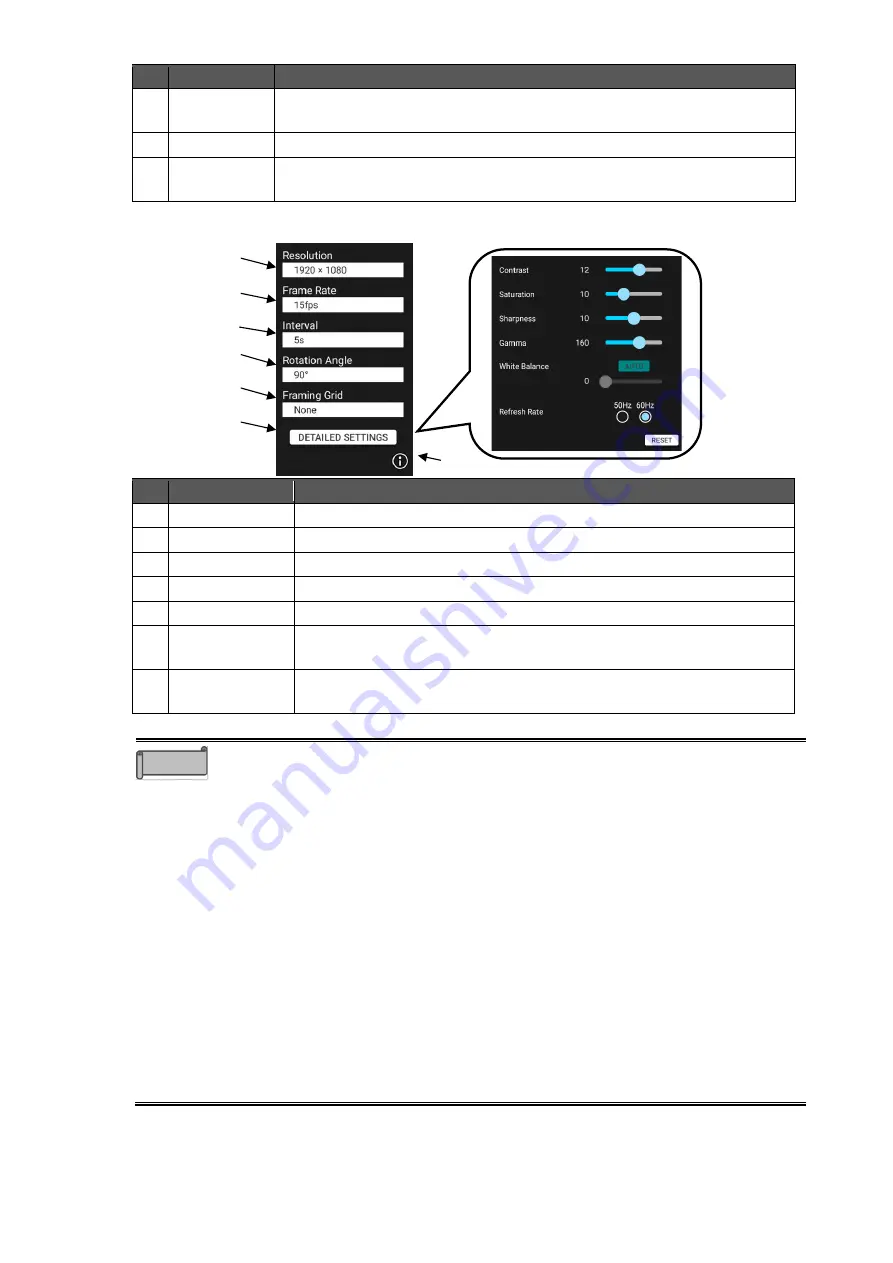
USB Camera Settings Screen
No.
Name
Function
1
Resolution
To set the resolution of the USB camera.
2
Frame Rate
To set the frame rate of the USB camera.
3
Interval
To set the interval for the interval shooting.
4
Rotation Angle
To set the rotation angle for the image rotation.
5
Framing Grid
To display grid-like frame lines on the screen.
6
DETAILED
SETTINGS
To configure the detailed settings such as the contrast setting and
saturation setting.
7
Information
To display the version information and license information of the USB
Camera app.
⚫
The following products can be controlled with the Camera control function on
the menu bar:
L-12F, L-12W, L-12iD, MA-1, MO-2, MX-P3, MX-P, OX-1, PX-30E, etc.
For details about models that support the Camera control function, contact
the dealer from whom you purchased the product or the nearest ELMO sales
office.
⚫
The MX-P2 does not support USB3.0.
When using the MX-P2, connect it to the USB 2.0 port on the side of the
display monitor. When connecting to the USB3.0 port, use a USB 2.0 cable.
The zoom and brightness of the MX-2 cannot be controlled by the Camera
control function on the menu bar. Use the buttons of the MX -P2 to control the
zoom and brightness of the MX-P2.
⚫
Depending on the USB camera, it may not be possible to output images.
⚫
To record when using the Overlay app (
⇒
P.37), use the Screenshot icon on
the overlay toolbar or the Screenshot button on the front of the display
monitor.
⚫
In rare cases, the ELMO Camera app may freeze when the USB camera is
disconnected. In that case, restart the app.
Caution
1
2
3
4
5
6
7


