background image

Elkay Manufacturing Company 

38 

Installation & Maintenance Manual (1000005506 Rev D)

2

3

1

13

4

17

10

73

4

19

4

20

4

17

8

44

4

718

Item

Part No.

Description

1

1000004672

BASE WELDMENT

2

1000004670

RIGHT FRAME ASSEMBLY

3

1000004671

LEFT FRAME ASSEMBLY

4

1000005522

CHILLER SUPPORT

13

1000004839

FEET - 1/4-20 THREADED HEAVY 

DUTY

17

1000004858

SCREW -1/4-20 x 3/8" SOCKET HD 

18-8 SS

Item

Part No.

Description

19

1000004868

WASHER - FLAT 18-8 SS FOR #10 

SCREW

20

1000005381

SCREW - M5 X 0.80 mm TORX 

BUTTON HD 18-8 SS

44

1000005555

WASHER - CUSHION

73

DSCN155

CARBONATION CHILLER 14 GPH

Summary of Contents for Smartwell DSSW1808FSC

Page 1: ...Smartwell Beverage Dispenser DSSW1808FSC Installation Maintenance Beverage Dispenser WARNING Read the instructions in this manual and retain for future reference ...

Page 2: ......

Page 3: ...on 4 1 3 Contact Information 4 1 4 Notice of Changes 4 1 5 Disclaimer 4 2 Safety 5 2 1 General 5 2 2 Safety Alert Symbol and Signal Words 5 2 3 Safety Signal Words 5 2 4 Personal Safety 5 3 Key Components 7 4 Installation Preparation 8 5 Installation 9 5 1 Tools Required 9 5 2 Required Installer Supplied Parts 9 5 3 Installation Procedure 9 6 Set Up Instructions 14 6 1 Initial Settings 14 6 2 Flav...

Page 4: ...cated on the back of the unit in the upper left corner Use this serial number when contacting us with questions concerning the installation of this product 504 1 3 Contact Information Contact your dealer or lease provider if you have any questions relating to the installation or operation of this unit or if there are damaged or missing parts If your dealer or lease provider cannot answer your ques...

Page 5: ... on potential hazards The signal words used in this manual are WARNING CAUTION NOTICE SAFETY INSTRUCTION and Note The safety messages must be followed to prevent personal injury or death as well as prevent product damage 2 3 Safety Signal Words WARNING Indicates a potentially hazardous situation which if not avoided could result in death or serious injury CAUTION Indicates a potentially hazardous ...

Page 6: ...cation away from any source of heat Chain or secure the cylinders in an upright position when in use or storage Store full and empty cylinders separately Never lay the cylinders on its side Liquid CO2 entering the gas regulator may cause problems rupture the tank or gas line due to rapid expansion of the liquid CO2 The gas regulator could freeze up preventing the regulator from shutting down allow...

Page 7: ...e bank inlet Water inlet Smartwell power switch and circuit breaker reset CO2 inlet Chiller power switch Temperature control dial Alcove Locks Touchscreen Hood Lower cabinet door Ice bank overflow 489 489 Power On Off Water Temp Control 461 CO2 inlet Water inlet from filter Ice bank filler inlet 456 ...

Page 8: ...r any shipping damage and report it immediately to your dealer or lease provider Installation of a damaged product will void the warranty b Confirm that all accessory parts have been included for the proper installation of this product Contact your dealer or lease provider if damaged parts are found 491 Factory Supplied Parts Description Part Number Qty Coil of 3 8 O D water tubing blue 1000002708...

Page 9: ...arbon Dioxide Tank The CO2 tank should be mounted or restrained per local code and following any manufacturer s supplier s recommendations Refer to section 5 3 Installation Procedure on page 9 for detailed instructions CAUTION Refer to the Safety section for additional precautions concerning CO2 8 Internet Connections The unit connects to the internet using either an Ethernet cable or Ethernet to ...

Page 10: ...ess tubing can be curled up and fastened to the back of the unit in order to be able to pull the unit away from the wall if necessary for service NOTICE To prevent water damage make sure the water line is stored in a manner that prevents it from being pulled out of the unit or damaged CAUTION Make sure the water inlet line is stored and secured behind the unit and does not become a tripping hazard...

Page 11: ...ide panel and set it aside 470 f Make sure the chiller s power switch is in the OFF position g Remove four Phillips screws and the cover from the back of the chiller 465 h Remove the plug from the fill port of the ice bank Insert the 3 8 water line from a water supply source into the ice bank inlet connection 466 i Slowly fill the ice bank until the water reaches the maximum fill line on the overf...

Page 12: ...he rear of the unit after the next step b Make sure the shut off valve is in the OFF position and connect the end of the long tube into the in wall water supply connection 492 OFF c Open the water supply valve and purge the trapped air from the water lines Note To flush out trapped air allow water to run continuously until the flow is free of air bubbles 9 Connect an Internet router s Ethernet cab...

Page 13: ...tainer under the dispenser nozzle b Press the Still water button on the touch screen and begin dispensing water c Dispense a minimum of two gallons of still water to purge trapped air from the internal water line and the filter This will also fill the filter cartridge and flush out fine carbon particles from the new filter d Press the Sparkling Water button on the touch screen and dispense about 1...

Page 14: ...sure Exceeding the maximum pressure will cause internal damage and void the warranty OPEN 463d 6 Set Up Instructions 6 1 Initial Settings 1 Make sure the water filter has been installed and if Sparkling water is desired that the CO2 tank has been installed and connected Refer to section 5 Installation on page 9 for complete details 2 Make sure the Ethernet cable is connected to a local Internet ro...

Page 15: ...d to the Internet Press Try again will continue with previous step Note The user has an option to skip the updates by pressing skip and setup later The right hand screen will appear if the unit is connected to the Internet Press Update to continue Note If there is any issue with connecting after setup unplug the Wi Fi Extender from the wall power outlet and plug back in to wall outlet to reboot th...

Page 16: ...d press the Save button to continue 8 After several seconds the sign in screen will appear Enter your pin to 0101 Press sign in to follow the flavor setup screen 6 2 Flavor Setup The following set up is to configure the unit with the startup pouches which are supplied with all new units 1 Install the flavor and enhancement pouches supplied with the unit Note Slot 1 is the furthest to the left 2 Or...

Page 17: ...the Tank Capacity screen will appear Select the either the 5 10 15 20 lb tank capacity being installed Press confirm Note If the CO2 tank is not installed there is currently no warning that pops up instructing customer to add CO2 tank This might be added in the screens 7 Press confirm to continue The Priming screen will appear and the unit will begin to dispense the contents from each pouch This p...

Page 18: ...of the screen to access the Sign In screen Enter 0101 and press the Sign In button b A pinch dialogue screen appears with a caution message to avoid the potential damage to the lid Press dismiss Elkay smartwell touchless screen will appear Accept the terms and condition Press submit c Press the Set Up button on the admin screen and the Flavor Concentration screen will appear 1 Select the desired c...

Page 19: ...te The filter head has an internal shutoff valve that stops the flow of water when the filter is removed It is not necessary to shut off the water supply however it is recommended 1 Access the Admin screen 0101 and follow the screen prompts to replace the filter This will ensure proper tracking of the filter life in the unit and on the customer portal 2 Turn the used filter counterclockwise to the...

Page 20: ... Home screen touch the upper right hand corner of the screen to access the Sign In screen Enter 0101 and press the Sign In button 2 From the admin screen touch the CO2 Tank button Two options will appear 1 Replace CO2 and 2 Remove CO2 Note If the CO2 tank is removed dispensing Sparkling water will no longer be an option 3 To eliminate the CO2 tank option a Press the Remove CO2 button and the Thank...

Page 21: ...ze of the tank being installed b Choose either the 5 10 15 or 20 pound capacity tank option 5 10 15 20 c The Thank You screen should now appear Press the OK button to return to the admin screen where the green bar under the CO2 Tank button is completely filled d Press the Back Arrow button to return to the Home screen Since the CO2 tank has been replaced both the Still Water and the Sparkling Wate...

Page 22: ...will elapse while unit s date and time are updated Press the Back Arrow button to return to the Home screen 7 4 Changing Water Flow Parameters The taste of the beverage is based on the ratio of water to flavor concentration There are three options for the flavor concentration low medium and high There are also two entries for the flow of water through the dispenser in milliliters per second This n...

Page 23: ... ounces of water dispensed then dividing by dispensed time 10 sec For example 9 ounces of water dispensed in 10 seconds then the water flow rate is 9 x 29 57 10 27 ml sec So 27 needs to entered in the display field d If dispensed water is measured in ml then the water flow rate can be calculated by dividing 10 seconds For example 270 milliliters of water dispensed in 10 seconds then the water flow...

Page 24: ...een to appear f Open the valve of the CO2 tank by turning the knob counterclockwise Make sure the pressure setting is between 55 to 60 psi g Select Sparkling Water and touch the PRESS button h Dispense three 8 ounce glasses of sparkling water to ensure the CO2 is once again mixing into the water i If the water is still not carbonating contact your Unilocal dealer or lease provider 7 7 Unit Diagnos...

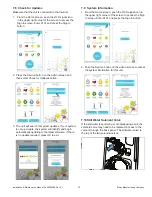
Page 25: ...is not up to date the system will identify and begin automatically updating to the latest software If there is no update required press OK to exit 7 9 System Information 1 From the Home screen push the Wi Fi signal icon in the upper right corner of the screen to access the Sign In screen Enter 0101 and press the Sign In button 2 Push the Service button on the admin screen to reveal the system info...

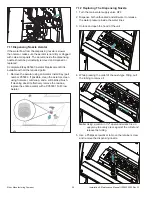
Page 26: ...2 If possible clean the aerator screen using hot water mild soap and a soft bristled brush If cleaning doesn t effectively remove the residue replace the entire aerator with a P053031 Full Flow Aerator 486 7 12 Replacing The Dispensing Nozzle 1 Turn the main water supply valve OFF 2 Dispense both carbonated and still water to release the water pressure inside the water lines 3 Unlock and open the ...

Page 27: ...stat one level at a time Start by reducing the temperature to Level 4 3 To access the adjusting screw remove the right side panel 396 4 Use a flat blade screwdriver to adjust the setting 1 2 3 4 5 6 7 OFF COLDER 397 7 14 Fuse Replacement 1 If the display screen is blank the fuse may be blown The fuses are located in the back of the unit Remove the back panel to check and replace the fuse marked wi...

Page 28: ...Elkay Manufacturing Company 28 Installation Maintenance Manual 1000005506 Rev D ...

Page 29: ...Installation Maintenance Manual 1000005506 Rev D 29 Elkay Manufacturing Company 8 Service Log Service Log Part Serviced Date Installed Installed By ...

Page 30: ...Wi Fi adapter by unplugging the adapter from the power source waiting five seconds and then plugging back in 3 Next disconnect the Ethernet cable from the back of the Smartwell unit and from the Wi Fi adapter and reconnect it Make sure the cable clicks when being reconnected 4 Reboot the Smartwell unit After it boots up and the home screen appears confirm the Internet status indicator shows the un...

Page 31: ...to section 7 6 Carbonated Water Solenoid Valve on page 23 The CO2 line has trapped air inside Refer to section 7 6 Carbonated Water Solenoid Valve on page 23 Flavor or enhancement buttons appear gray on touch screen The pouch is empty 1 Thoroughly wash your hands with warm soapy water 2 Confirm contents by unlocking the hood and locating the indicated pouch in the unit 3 Replace with new pouch 4 I...

Page 32: ... configuration or default configuration is not loading Reboot the unit and try again If the issue continues contact Smartwell Customer Care Flavor Selection Dispense Flavor is selected however no flavor is dispensed when the PRESS button is pushed only water is dispensing 1 Open the hood and make sure the selected pouch is not empty Replace the pouch if it is empty 2 If a new pouch was not complet...

Page 33: ...selected pouch is in the right slot and in the indicated position on the touch screen 2 Reenter the pouch flavor and location 3 If this issue continues dispense the flavor manually for 20 seconds and see if its dispensing Factory Reset Wrong Pin Entry message or you forgot the pin number 1 Try entering the correct factory preset pin number 0101 2 If the login pin has been changed contact Smartwell...

Page 34: ...t selectable Enhancements and water are selectable 1 The flavor pouch is empty Replace with a new pouch 2 The citric acid pouch is empty Replace with a new pouch 3 Reboot the unit and wait for the home screen to appear and try again 4 If the issue continues contact Smartwell Customer Care Flavor Selection Dispense Flavor or enhancement selection is not selectable after 3 seconds The user must touc...

Page 35: ... back up from a particular touch screen or return to Home screen 1 Tap the back arrow on the top left corner of the touch screen 2 Tap the CLOSE button on the top right corner of the touch screen 3 Wait 30 seconds The unit should reset to the Home Screen If it does not reboot the unit 4 If the issue continues contact Smartwell Customer Care ...

Page 36: ...cturer or its agent is found to be defective but does not include any obligation to provide labor or to pay labor costs incurred in connection with the replacement The Manufacturer s obligations also include cost of outbound freight but not express freight of the part or parts from the factory repair department to but not beyond the port in the United States from which the part or parts are shippe...

Page 37: ...506 Rev D 37 Elkay Manufacturing Company 11 Parts 66 66 67 68 71 69 717 Item Part No Description 66 1000004928 DECAL SMARTWELL 67 96810C LABEL DATA 68 90679C LABEL DANGER 69 1000005052 LABEL MAIN SWITCH 71 1000005054 LABEL CO2 INLET PRESSURE ...

Page 38: ...00004670 RIGHT FRAME ASSEMBLY 3 1000004671 LEFT FRAME ASSEMBLY 4 1000005522 CHILLER SUPPORT 13 1000004839 FEET 1 4 20 THREADED HEAVY DUTY 17 1000004858 SCREW 1 4 20 x 3 8 SOCKET HD 18 8 SS Item Part No Description 19 1000004868 WASHER FLAT 18 8 SS FOR 10 SCREW 20 1000005381 SCREW M5 X 0 80 mm TORX BUTTON HD 18 8 SS 44 1000005555 WASHER CUSHION 73 DSCN155 CARBONATION CHILLER 14 GPH ...

Page 39: ...m Part No Description 2 1000004670 RIGHT FRAME ASSEMBLY 8 1000005344 ASSY INTERNAL ALCOVE BASE 17 1000004858 SCREW 1 4 20 x 3 8 SOCKET HD 18 8 SS 27 1000005637 CONCENTRATE RACK 28 2000000007 MODUL SMARTWELL FLAVOR DISPENSE 39 1000004870 SCREW 8 32 X 1 2 PHILLIPS TRUSS HD 18 8 SS 77 1000005304 POWER BRACKET ASSY ...

Page 40: ...9 1000004793 DISPLAY LINK 10 1000004799 TOP COVER ASSEMBLY 11 1000005345 ASSY DISPLAY 17 1000004858 SCREW 1 4 20 x 3 8 SOCKET HD 18 8 SS Item Part No Description 18 1000004844 SCREW 5 16 DIA x 3 16 SHOULDER 1 4 20 THRD PIVOTS A 22 1000004837 STUD SHOCK BALL 23 1000004911 LOCKNUT 5 16 18 NYLON INSERT 18 8 SS 24 1000004805 LEFT DISPENSE FACIA 25 1000004806 RIGHT DISPENSE FACIA 63 1000004845 SCREW 5 ...

Page 41: ...P REAR 12 1000004802 ENCLOSURE DOOR 14 1000004851 CAM LOCKS SMARTWELL 17 1000004858 SCREW 1 4 20 x 3 8 SOCKET HD 18 8 SS 18 1000004844 SCREW 5 16 DIA x 3 16 SHOULDER 1 4 20 THRD PIVOTS A Item Part No Description 22 1000004837 STUD SHOCK BALL 23 1000004911 LOCKNUT 5 16 18 NYLON INSERT 18 8 SS 26 1000004836 SHOCKS 40 STROKE 30 1000005268 ETHERNET SINGLE GANG FACEPLATE 72 1000005080 CAMLOCK FLAT 95 1...

Page 42: ...D 16 15 17 4 7 17 8 722 Item Part No Description 4 1000005522 CHILLER SUPPORT 7 1000004778 ENCLOSURE REAR 8 1000005344 ASSY INTERNAL ALCOVE BASE 15 1000004804 ENCLOSURE RIGHT Item Part No Description 16 1000004803 ENCLOSURE LEFT 17 1000004858 SCREW 1 4 20 x 3 8 SOCKET HD 18 8 SS ...

Page 43: ... 70841C FITTING UNION BULKHEAD 33 1000002683 BULKHEAD CONNECTOR 3 8 TUBE 34 70818C FITTING ELBOW 3 8 STEM X 3 8 TUBE 35 1000002476 FITTING 1 2 FIP X 3 8 OD 36 1000002467 REGULATOR WATER PRESSURE 50 PSI 37 70817C ELBOW 1 4 STEM X 1 4 TUBE 38 56331C CONNECTOR Item Part No Description 40 P05031 FULL FLOW HIDDEN AERATOR 42 1000004843 FITTING 1 4 TWO WAY DIVIDER 43 70772C PLUG DRAIN 45 50090C INSULATIO...

Page 44: ...2683 BULKHEAD CONNECTOR 3 8 TUBE MIDEA 35 1000002476 FTTNG 1 2 FIP X 3 8OD 36 1000002467 REGULATOR WATER PRESSURE 50 PSI 37 70817C ELBOW 1 4 STEM 1 4 TUBE Item Part No Description 39 1000004870 SCREW 8 32 X 1 2 PHILLIPS TRUSS HD 18 8 SS 41 1000005330 SCREW 8 18 x 3 8 PHIL PAN HD 410SS THREAD CUTTING FOR PLASTIC 42 1000004843 FTTNG 1 4 TWO WAY DIVIDER 73 DSCN155 CARBONATION CHILLER 14 GPH 74 100000...
Page 45: ...000004823 HDMI CABLE 14 1000005266 DUPLEX RECEPTACLE 15 1000004825 RJ45 PANEL MOUNT 16 1000005268 PANEL MOUNT PLATE Item Part No Description 17 N A GROUND STUD 18 1000005183 HARNESS ASSEMBLY 1 19 1000005184 HARNESS ASSEMBLY 2 20 1000005185 HARNESS ASSEMBLY 3 21 1000005186 HARNESS ASSEMBLY 4 22 1000005187 HARNESS ASSEMBLY 5 23 1000005190 WIRE SCREEN TO POWER SUPPLY 24 1000005191 WIRE DISPENSE SWITC...

Page 46: ...Elkay Manufacturing Company 46 Installation Maintenance Manual 1000005506 Rev D This page intentionally left blank ...

Page 47: ...Installation Maintenance Manual 1000005506 Rev D 47 Elkay Manufacturing Company This page intentionally left blank ...

Page 48: ...1000005506 Rev D 05 21 1333 Butterfield Road Suite 200 630 574 8484 elkay com 2020 Elkay Manufacturing Company ...

Reviews: