Page 3
1000004301 (Rev. D - 07/19)
LZS8WS_2FWR, LZWSR_2CWR
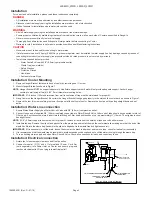
Figure 1
Installation: Bottle Filler Mounting
Figure 2
Figure 3
Figure 4
F
E
A
B
7/
1
6
" X 3
/
4"
O
BR
O
UND
(11mm X 1
9
mm) H
O
LES (
6
)
C
D
E
9/
32"
O
H
O
LES
(
7
mm) (12)
FINISHED FL
OO
R
L
C
7
"
1
7
8mm
7
"
1
7
8mm
1
7
7/
8"
454mm
6
3
/
8"
1
6
2mm
6
3
/
8"
1
6
2mm
2"
51mm
2"
51mm
5 3
/
4"
14
6
mm
13 15
/
1
6
"
354mm
1
7
7/
1
6
"
443mm
1
9
"
483mm
28 13
/
1
6
"
7
32mm
51
9/
1
6
"
1310mm
18
7/
8"
4
79
mm
12 1
/
2"
318mm
31 5
/
1
6
"
796
mm
RI
M
HEI
G
HT
32
7/
8"
835mm
O
RIFICE
HEI
G
HT
21
7/
8"
55
6
mm
2"
51mm
3
7/
8"
9
8mm
7
"
1
7
8mm
7
"
1
7
8mm
28 13
/
1
6
"
7
32mm
2"
51mm
2
7/
8"
7
3mm
15"
381mm
2
7
"
6
8
6
mm
ADA
REQUIRE
M
ENT
8 1
/
1
6
"
205mm
1
9
"
483mm
3
9/
1
6
"
9
0mm
5
7/
8"
150mm
3"
77
mm
2"
51mm
38 1
/
2"
979
mm
ACTIVATI
O
N
SENS
O
R
HAN
G
ER BRACKET
Rough-In: LZS8WSS2KWR
7/16” BOLT HOLES FOR
FASTENING UNIT TO WALL
UNIT CENTER LINE
TOP COVER
MOUNTING
SCREWS
29
1.
Remove two (2) mounting screws with 5/32” Allen wrench holding
top cover to Bottle Filler (see Fig 3). Remove top cover. Note: do not
discard mounting screws; they will be needed to reinstall top cover.
2. Remove wall mounting plate from Bottle Filler. Place wall plate
against wall on top of basin. Center the wall plate side to side with
the basin. Mark the six (6) mounting holes with a pencil (See Fig 1).
3.
Remove wall mounting plate from wall. NOTE: Mounting plate
MUST be supported securely. Add fixture support carrier if wall
will not provide adequate support.
4.
Install wall mounting plate to wall using six (6) 7/16” oval mounting
holes (mounting bolts not included) (See Fig 2). Use appropriate
fasteners for your wall type.
5.
Feed 3/8” water line through hole in tower/basin gasket (See Fig 4).
6. Install gasket on bottom of bottle filler tower with gasket support
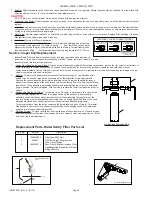
bracket & (2) screws (See Fig 5).
7.
Feed modular (C-13) end of International Power Cord Set up
through basin hole and hole in gasket, and connect to Power Inlet
on Bottle Filler. Do not plug into electrical outlet.
8.
Lay Bottle Filler on water cooler basin and cut insulation from tube
even with bottom of gasket, remove this insulation from the 3/8”
tube, but do not discard. Feed the waterline through the hole on
top of water cooler. NOTE: To prevent scratching the basin, place
a towel or soft cloth over the entire basin when working above it.
Figure 5
Bracket & Screws
A = Water Mains Supply, 3/8” (9.5mm) O.D. compression outlet of Shut-off Valve (not provided) to be 3” (76mm) from Wall.
B = Waste Outlet, 1-1/4” (31.8mm) O.D. Drain tube terminating 2” (51mm) maximum from wall.
C = 1-1/4” (31.8mm) Trap (not provided).
D = Electrical Mains Supply Outlet, 3-wire in Recessed Box. Must have Ground Fault Circuit Interrupter (GFCI) protection.
E = Ensure proper ventilation by maintaining 6” (152mm) minimum clearance from cabinet louvers to wall.
F = 7/16” (11mm) Bolt holes for fastening unit to wall.


