background image

     HOW TO USE YOUR AIR FRYER                       


1.


Carefully pull out the Drawer Pan (A) from the Main Fryer Body by 
pulling forward on the Handle (B). 

TIP: Never place food directly into the Drawer Pan (A) without the 
Frying Rack (C) inside. In place of using the Frying Rack (C), an 
oven-safe plate or bowl (not included) can be placed onto a wire 
rack (not included) into the Drawer Pan (A). 
CAUTION: Never place anything on top of the Main Body, for this 
will block the air flow and reduce the effect of hot air heating. 

2.


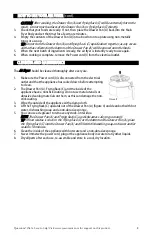
Place the Frying Rack (C) into the Drawer Pan (A) (figure 3).


3.


Place ingredients onto Frying Rack (C).   

TIP:  Do not fill the Drawer Pan (A) over the MAX fill position.   If cooking food that expands, 
make sure the cooked capacity will not exceed the MAX fill position.


4.


Slide Drawer Pan (A) back into the Main Body. 
 

HOW TO PROGRAM FRYING TIME AND TEMPERATURE: 
 
1.


Plug Power Cord (I) into an electrical outlet.   

2.


Turn the Temperature Control Knob (F) to the desired temperature and then turn the Timer 
Control Knob (G) to the desired time setting (the Timer must be set in order for the unit to 
begin heating). 

TIP: It is recommended to preheat the air fryer on empty for 3 min. if the appliance is cold or 
you can add 3 min to your desired time setting in order to pre-heat.  The initial 15 minutes of 
use may result in minimal smell and smoke.  This is normal and harmless and comes from the 
protective substance applied to the heating elements during manufacturing.   

3.


The Power Indicator (E) will illuminate. 

4.


The Air Fryer will automatically Pause if the Drawer Pan (A) is removed during the cooking 
cycle.  Once replaced back into the fryer, the unit will continue its cooking cycle.


CAUTION: Do not touch the Drawer Pan (A) during and immediately after use, as it gets very 
hot. Only hold the Drawer Pan (A) by the Handle (B).


NOTE: Any excess oil from food will collect at the bottom of the Drawer Pan (A). 
 

DURING THE COOKING/FRYING PROCESS: 


1.


Some recipes require stirring/mixing the contents mid-way through cooking (see Cooking 
Time Chart on page 9).   You can do this in the middle of the cooking process by pulling the 
Drawer Pan (A) out from the Main Fryer Body.  Shake or stir the contents of the basket using a 
non-metallic utensil and then slide Drawer Pan (A) back into the Main Fryer Body. 

TIP:  If you set the timer to half the required cook time, you will hear the timer indicator when 
you have to stir the ingredients. However, this means that you will need to set the timer again 
to the remaining cook time after stirring.


2.


The air fryer will resume cooking once the Drawer Pan (A) is closed. 

CAUTION: During cooking, the Drawer Pan (A) and Frying Rack (C) will be very hot, only use 
the Drawer Pan Handle (B) or oven mitts.  


WHEN COOKING/FRYING IS COMPLETE: 


1.


When the timer completes its countdown, the timer bell will ring and the air fryer will stop 
heating - this signals it is time to remove your food.  (Please note that the fan motor will 
continue to operate in order to cool down the Drawer Pan (A) and the Frying Rack (C), this will 
stop within approximately 60 seconds). 

NOTE: You can also switch off the appliance manually by turning the Timer Control Knob (G) 
to 0 at any time during the cooking process. 

2.


Carefully pull out the Drawer Pan (A) from the Main Fryer Body by pulling forward on the 
Drawer Pan Handle (B) and place on a flat, heat resistant surface. 

CAUTION: When sliding out the Drawer Pan (A), be careful of hot air and steam.  Keep hands 
and face away from the opening. 

Questions? We're here to help! Visit: www.maxi-matic.com for support on this product.

7

Summary of Contents for PLATINUM EAF-801A

Page 1: ......

Page 2: ...PARTS IDENTIFICATION 5 HOW TO USE THE CONTROL PANEL 6 PREPARING YOUR AIR FRYER FOR USE 6 HOW TO USE YOUR AIR FRYER 7 CLEANING MAINTENANCE 8 COOKING TIME CHART 9 HINTS TIPS 10 TROUBLESHOOTING 11 WARRANTY CUSTOMER SERVICE 12 Questions We re here to help Visit www maxi matic com for support on this product 1 ...

Page 3: ...Return appliance to the nearest authorized service facility for examination repair or adjustment 10 Never attempt to repair the appliance yourself otherwise the warranty becomes invalid 11 This appliance is not intended for use by persons including children with reduced physical sensory or mental capabilities or lack of experience and knowledge unless they have been given supervision or instructio...

Page 4: ... not been provided with the appliance 29 This appliance is intended to be used indoors Do not use outdoors 30 Clean and wipe and dry the pan and the frying rack before placing food inside 31 Always unplug the appliance when not in use 32 If the appliance is of the grounded type the extension cord should be a grounded cord 33 To ensure continued protection against risk of electric shock connect to ...

Page 5: ...ds are available and may be used if care is exercised in their use If an extension cord is used 1 the marked electrical rating of the extension cord should be at least as great as the electrical rating of the product 2 the extension cord should be arranged so that it will not drape over the countertop or tabletop where it can unintentionally be pulled on or tripped over by children or pets POLARIZ...

Page 6: ...TION The Frying Rack A consists of a non stick surface To avoid scratching the non stick surface please use wooden or plastic utensils Questions We re here to help Visit www maxi matic com for support on this product 5 ...

Page 7: ...S NOT A DEEP FRYER DO NOT FILL THE APPLIANCE OR ITS DRAWER WITH OIL OR FRYING FAT 3 Place the appliance on a flat horizontal and stable surface make sure surface is heat resistant Place away from walls and other appliances Leave approximately 4 inches of space from nearby objects TEMPERATURE CONTROL KNOB Use this knob to set the temperature between 180 F up to 400 F figure 1 TIMER CONTROL KNOB Use...

Page 8: ...Do not touch the Drawer Pan A during and immediately after use as it gets very hot Only hold the Drawer Pan A by the Handle B NOTE Any excess oil from food will collect at the bottom of the Drawer Pan A DURING THE COOKING FRYING PROCESS 1 Some recipes require stirring mixing the contents mid way through cooking see Cooking Time Chart on page 9 You can do this in the middle of the cooking process b...

Page 9: ...trical outlet and that the appliance has cooled down before attempting to clean 2 The Drawer Pan A Frying Rack C and the inside of the appliance have a nonstick coating Do not use metal utensils or abrasive cleaning materials on them as this can damage the non stick coating 3 Wipe the outside of the appliance with a damp cloth 4 Lift the Frying Rack C upwards out of the Drawer Pan A figure 4 and c...

Page 10: ...made potato chips 10 9 10 320 Meat Poultry Steak 6 18 9 12 355 Pork chops 6 18 11 14 355 Hamburger 6 18 8 14 355 Drumsticks 6 18 19 22 350 Chicken Wings 15 20 16 18 400 Chicken Strips 6 18 12 15 355 Snacks Egg rolls 6 18 9 10 395 Stir Use oven ready Frozen chicken nuggets 6 18 7 10 400 Stir Use oven ready Frozen fish sticks 6 14 7 10 400 Use oven ready Fish fillet in batter 6 18 8 14 355 Stir Batt...

Page 11: ...k frozen raw foods in the air fryer NOTE When cooking baking foods that rise i e cakes quiches or muffins the Basket should not be filled more than halfway NOTE Add 3 minutes to the cooking time if you begin cooking while the air fryer is still cold BAKING CAKES QUICHES OR STEAMING FOODS Place a wire rack not included onto the bottom of the Drawer Pan A and place an oven safe dish onto the wire ra...

Page 12: ...hite smoke is emitted out of the appliance during use You are preparing food with a high oil content When cooking with oily foods oil will drain into the pan When the air fryer heats up the pan heats up the oil and produces white smoke This does not adversely affect the air fryer or your cooking process The pan has built up oil residue from previous uses White smoke is caused by oil leftover in th...

Page 13: ...k of proper care and maintenance or incorrect current or voltage Lost or missing parts of the product Parts will need to be purchased separately Damages of parts that are not electrical i e cracked or broken plastic glass scratched dented inner pots Damage from service or repair by unauthorized personnel Extended warranties purchased via a separate company or reseller Acts of God such as fire floo...

Page 14: ...ber of the unit and the problem you are having Enclose in an envelope and tape directly to the unit before the box is sealed and d Any parts or accessories related to the problem 3 Maxi Matic USA recommends that you ship the package via UPS ground service for tracking purposes We cannot assume responsibility for lost or damaged products returned to us during incoming shipment For your protection a...

Page 15: ......

Page 16: ......

Reviews: