background image

9

CHAPTER 1: 

 Assembly and Startup

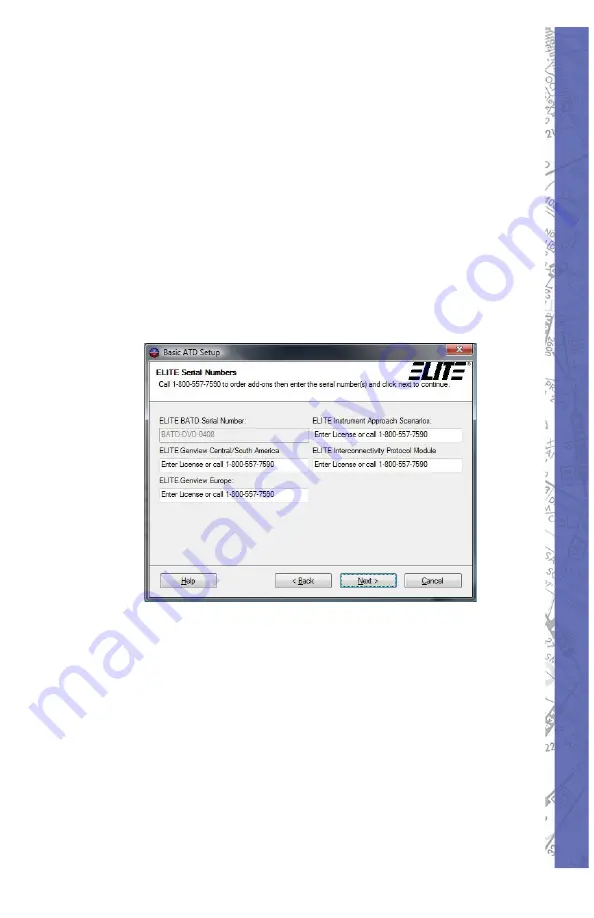
In this step of the setup you are being asked 

6. 

to enter the serial numbers of the software 
you have purchased. If you have purchased 
Genview or other database add-ons, you will 
need to enter each serial number in order 
to activate them. The number will be found 
on your invoice next to the product add-on 
you have ordered. If you wish to purchase 
add-ons, you may contact ELITE by calling 
1-800-557-7590. Once you have entered all 
the serial numbers to the products you own, 
select 

Next

 to continue.

Summary of Contents for PI-121

Page 1: ... PI 121 PC AVIATION TRAINING DEVICE ELITE MODEL PI 135 BASIC AVIATION TRAINING DEVICE OPERATOR S HANDBOOK Software Version _____________________ Serial Number _____________________ www flyelite com 1 800 557 7590 ...

Page 2: ...Intentionally Left Blank ...

Page 3: ...ix LICENSE AGREEMENT xx CHAPTER 1 ASSEMBLY AND STARTUP SYSTEM FEATURES 1 General 1 Navigation Data 2 Avionics Instrumentation and Hardware 2 Malfunctions 2 Weather 3 Mapping and Evaluation 3 LIST OF COMPONENTS 4 Main Component 4 1 Flight Controls 4 2 Avionics 4 3 Computer System Optional 4 4 Administrative Support Items 5 INSTALLING THE SOFTWARE 6 SOFTWARE INSTALLATION 6 Windows XP or VISTA 6 GenV...

Page 4: ...ALLATION 26 Multi Monitor Setup 26 Two Displays 26 Three Displays 27 Tips For using Multiple Screens 27 General Settings 28 Aircraft Module 28 Navigation Databases 29 HARDWARE CONFIGURATION 29 Changing System Settings 29 Flight Controls Calibration 29 Limits 30 Null Zone 30 Power Quadrant 31 Changing Throttle Quadrants 32 USB Button 36 Second Monitor 37 INSTRUMENT CONFIGURATION 38 CHAPTER 2 INSTRU...

Page 5: ... Map Cursors 52 Map Information 53 Map Borders 53 Reposition 53 Multiple ILS Deselection 56 Aircraft Snapping 59 Map Zoom Levels 60 Show Facilities 61 Transponder Tag 63 MAP Page Spot Weather Feature 63 Navigation Databases 64 Instrument Approach Scenarios IAS 68 State Panel 71 Heading Panel 72 Altitude Panel 72 Airspeed Panel 73 Profile Button 73 Route Button 84 Print Button 84 Heading Distance C...

Page 6: ... Reference Meteo Time 109 Metar Page 111 Active Metar 111 Wind and Gusts 112 Using the METAR Page 112 Using Existing METAR Data 112 Downloading METAR Files 114 Station Plot 118 Wind Barb Description in the Northern Hemisphere 119 Aerodrome Actual Weather METAR And SPECI Decode 120 Malfunctions Page 122 Instruments and Systems Failures 124 Failure Time Window 124 Immediate Failure 125 Specific Time...

Page 7: ...ime Difference LT To UTC 144 ATD Detection Report 145 Activating Failures With Keyboard 145 Measurement for Weight Fuel 146 Changing Hanging Color Of Numbers 146 Sound and Volume Control 147 3D Sound 147 Aircraft Information 147 Modification Page 149 Creating Facilities 149 Modifying Facilities 150 Deleting Facilities 150 Undo Changes 151 Facility Info 152 CHAPTER 3 EXTERNAL VISUAL DISPLAY GENVIEW...

Page 8: ...uts 163 Visual 163 Simulation Speed 163 Control 163 Engine Sound 163 Mouse Control 164 Pushing Buttons 164 Knobs and Rotary Dials 165 Switches 165 Power Levers 166 Wheels 166 PROGRAM MENU 166 Malfunctions Page 168 Meteo Page 168 Metar Page 168 Modification Page 168 Configuration Page 168 Map Page 169 Control Page 169 Instrument 169 FREEZE 169 Quit 170 INSTRUMENT SCREEN 171 GENVIEW VISUAL DISPLAY 1...

Page 9: ...8 Altimeter 178 Vertical Speed Indicator 178 Gyro Compass 178 Horizontal Situation Indicator 179 VOR LOC Glideslope Indicator 180 Radio Magnetic Indicator 180 Moving Dial Indicator 181 Moving Map 181 Radio Navigation Receivers 183 NAV COMM 183 DME Receiver 184 Frequency Mode 184 GS T Mode 185 RMT Mode 185 ADF Receiver 186 Marker Receiver 186 Transponder 187 GPS Receiver 187 GX55 188 GX50 188 GX60 ...

Page 10: ... 150 only 197 Altitude Vertical Speed Selector 198 SINGLE ENGINE 200 Cessna 172R 200 Cockpit Functions 201 Aircraft Checklist 207 Aircraft Settings Panel 210 Climb 211 Cruise 212 Cessna 182S 213 Aircraft Checklist 214 Aircraft Settings Panel 219 Cessna 182RG 223 Aircraft Checklist 224 Piper Archer III 230 Cockpit Functions 231 Archer Carb Heat Lever 232 Archer CH Choice 232 Aircraft Checklist 233 ...

Page 11: ...unctions 272 TB20 Landing Gear 272 TB20 Rudder Trim 272 Aircraft Checklist 273 Climb 276 Aircraft Settings Panel 280 Bonanza A36 281 Cockpit Functions 282 Aircraft Checklist 286 Aircraft Settings Panel 290 MULTI ENGINE AIRCRAFT 295 King Air B200 297 Operational Limitations 298 Load Voltmeter Panel 298 Battery Generator Switches 298 Firewall Shutoff Valves 298 AP 3000 Avionics Panel 300 NAV1 NAV2 T...

Page 12: ...17 Aircraft Checklist 320 Aircraft Settings Panel 325 Beech Baron 58 331 Cockpit Functions 332 Aircraft Checklist 336 Aircraft Settings Panel 340 CHAPTER 6 TROUBLE SHOOTING SOFTWARE ISSUES 345 HARDWARE ISSUES 346 ERROR MESSAGES 347 CONTROLS 351 INDEX 353 SUPPLEMENTS 367 ...

Page 13: ...replacement or repositioning of original flight control components avionics or switches not in accordance with manufacturer specifications will void the FAA approval for logging flight time credit Only ELITE ATD software may be used with this training device for certification purposes The instructions and limitations detailed in the FAA letter of approval pertaining to this model of advanced aviat...

Page 14: ...inserted in direct sequence with the same common numbered page GENERAL ELITE MODEL PI 121 PC AVIATION TRAINING DEVICE The PI 121 was initially evaluated and approved by the FAA in July 1997 in accordance with AC 61 126 as a PCATD Personal Computer Aviation Training Device The trainer consists of the following components Pro Panel SE Flight controls yoke a rudders throttles and ancillary switches b...

Page 15: ... instructional use toward an Instrument Rating additional credit for Instrument Experience under Section 61 57 c 1 currency and Private Pilot Certificate 2 5 hours under 61 109 i 1 was granted The trainer consists of the following components Pro Panel II Flight controls yoke rudders f throttles and ancillary switches g Avionics King Silver Crown style Rudder Pedals h Optional Instructor i Operator...

Page 16: ...ls with correct performance characteristics to practice simulated flight tasks and procedures under instrument meteorological conditions Data modeling and performance characteristics however represent actual aircraft specifications Aircraft represented include Cessna 172R Cessna 182 RG Cessna 182S Piper Archer III Piper Arrow Mooney M20J Socata TB 10 and TB 20 Piper Seneca III Beech Bonanza A 36 a...

Page 17: ...xvii PREFACE Piper Arrow Mooney M20J Socata TB 10 Socata TB 20 Piper Seneca III Bonanza A 36 Baron 58 ...

Page 18: ...d re loaded The software contains utilities to monitor record and replay flights over a map page displaying the horizontal and vertical flight paths in real time The navigation data is from the FAA National Flight Data Center US only or Jeppesen The data includes airways intersections published holding patterns navaids and airports and airport frequencies Though designed for instrument training an...

Page 19: ...rmation in this manual is accurate ELITE Simulation Solutions AG is not responsible for printing or clerical errors All terms mentioned in this manual that are actually known to be trademarks or service marks are listed below ELITE Simulation Solutions AG cannot attest to the accuracy of this information Use of a term in this manual should not be regarded as affecting the validity of any trademark...

Page 20: ...one copy of the Software on the PI 135 in accordance with the terms of the Agreement You may not install the software on a network or on a computer other than the one that came as a component of the PI 135 Advanced ATD without express written permission from ELITE Simulation Solutions Restrictions on Use and Transfer You may not use the software on another computer 6 or loan rent transfer or assig...

Page 21: ... the Software Any implied warranties on the Software are limited to 90 days Some states do not allow limitations on duration of an implied warranty so the above limitation may not apply to You LICENSOR DISCLAIMSALL OTHER WARRANTIES 12 EITHER EXPRESS OR IMPLIED INCLUDING BUT NOT LIMITED TO IMPLIED WARRANTIES OF MERCHANTABILITY FITNESS FORAPARTICULAR PURPOSE AND NON INFRINGEMENT WITH RESPECT TO THE ...

Page 22: ...entation given to You by Licensor or its dealers distributors agents or employees This Agreement is governed by the laws of the State of Florida U S A and Switzerland whichever is applicable If any provision of this Agreement is found to be invalid by any court of competent jurisdiction the balance of this Agreement shall remain in full force and effect If You have any questions concerning this Ag...

Page 23: ...al Screen high resolution accurately detailed life sized instrument panels Graphical instructor s station Hot Plates approach chart viewer Accurately detailed runway environments and lighting Automatic local UTC time set and offset Enhanced 3D sound Combinable pre programmed aircraft weather and malfunction state files ...

Page 24: ...imble 2000 Approach Plus GPS Apollo Series GPS Selectable HSI RMI and DG ADF Moving map display Autopilot flight director Altitude vertical speed preselect Radar altimeter Electric pitch trim Rudder trim Toe brakes w proportional braking MALFUNCTIONS Fully programmable instrument power plant avionics gear flap and system failures Set immediate timed gradual and random failures Accurately modeled i...

Page 25: ...ING AND EVALUATION Plan profile and extended profile views Gear flap position graph and airspeed plot FlightDataRecorderwithVCR styleplayback control Virtual airport facility directory Transponder tag w squawk code heading and altitude readout Spot WX station model display symbology wind temp visibility and pressure display Quick click and drag aircraft repositioning Real time and or recorded flig...

Page 26: ...e includes USB cable master power key and 9v Power Supply 300 to 500 mA ELITE Rudder Pedals with USB cable 10 ft SEL Single Engine Land Throttle Quadrant 2 AVIONICS AP3000 Avionics Panel includes USB cable and 9v Power Supply 1 2 Amp AP3 Quick Start Guide 3 COMPUTER SYSTEM OPTIONAL Main computer with pre loaded ELITE ATD software and USB WIBU key NOTE ELITE computers are preconfigured with the nec...

Page 27: ...software is pre installed and ready to run Software CDs and DVDs are for archival purposes only Do not install software until you contact ELITE Technical Support 407 359 8488 Please contact ELITE Customer Support for missing components 407 359 8767 If operational assistance is required to set up and run the BATD call ELITE Technical Support 407 359 8488 e mail support flyelite com or visit our Sup...

Page 28: ...program and a new copy of the software will be necessary Other add ons require a serial code to be purchased and entered when prompted during the install NOTE Before proceeding with installation disable or exit any running programs SOFTWARE INSTALLATION WINDOWS XP OR VISTA ELITE software can be installed on computers operating Windows XP Home Pro or Windows Vista using the following procedures Ins...

Page 29: ...auto launch or if the DVD is already in the CD DVD drive then run the SETUP EXE program file located on the disc This or a similar box will appear Select 3 Next to begin Agree to the ELITE 4 license agreement to proceed otherwise you will exit the installation Select Next ...

Page 30: ...ardware including older ELITE Serial connected products and other manufacturers equipment For the best performance it is recommended to use ELITE hardware which uses high speed USB connectors Choose the option that best describes your hardware then select Next to continue ...

Page 31: ...sed Genview or other database add ons you will need to enter each serial number in order to activate them The number will be found on your invoice next to the product add on you have ordered If you wish to purchase add ons you may contact ELITE by calling 1 800 557 7590 Once you have entered all the serial numbers to the products you own select Next to continue ...

Page 32: ...eady be selected by default while others are optional As noted your purchased add ons will install automatically Select Next to continue Now you can decide where you wish the 8 ELITE software to be installed on your computer By default it will install on the C Disk Drive and should only be changed by advanced users Select Next to continue ...

Page 33: ...on is correct If not select Back to return to previous setup prompts and change entries or select Next to continue with the installation This screen reflects the progress of the 10 installation and will continue to the next prompt when it has completed You may abort the install at any time by selecting Cancel ...

Page 34: ...pear with the following prompt on top At this point insert the Wibu key into an open USB port Click OK to continue The Wibu software installation begins This 12 needs to be installed for ELITE to function completely otherwise it will remain in Demo Mode with a three minute operating time Select Next to continue ...

Page 35: ...and Startup You may now select your language of 13 preference English is the default language Select Next to continue This next screen displays what components 14 will be installed onto your computer Select Next to continue ...

Page 36: ...will be 15 disabled and the files being installed display and will scroll within the screen Once the Wibu files have been successfully 16 installed the following screen will appear You can open the Readme information or deselect the option Select Finish to continue ...

Page 37: ...15 CHAPTER 1 Assembly and Startup Once both the ELITE and Wibu software 17 have been installed you will be prompted to register your software online with ELITE Select Next to continue ...

Page 38: ...TOR S MANUAL 16 Your default Web Browser will open to the 18 ELITE Product Registration page within the ELITE Web Site Fill out the information as prompted You must have an internet connection for this to function ...

Page 39: ...your software has been completely installed Select Finish to exit You will be prompted to reboot your computer 20 This will need to be done before the ELITE software can operate NOTE The Wibu key must be inserted in order for the ELITE software to operate beyond the Demo Mode ...

Page 40: ...tallation After installation has finished REMOVE the 22 DVD from the drive DESKTOP ICONS After installation you should have two ELITE v8 0 Program icons on your desktop as well as several additional ELITE document icons The ELITE BATD or ELITE BATD GV program icons are used to run ELITE v8 x with GenView HARDWARE INSTALLATION Connect USB key to a free USB port The 1 USB key MUST be connected befor...

Page 41: ...B ports If the computer does not have enough USB ports for 3 PI 135 components plus mouse and keyboard a powered USB hub may be necessary not included The main monitor and instructor monitor connects to the video out ports on the computer The basic layout follows The ELITE software is designed to accommodate a separate graphical instructor station second monitor When using your own computer you mu...

Page 42: ...he keyboard independent of the simulation a separate instructor station monitor is not required for certification purposes but because of the training value it is highly recommended CONNECTING POWER The PI 135 is powered by 2 AC Adapters One is for the AP3000 and the other is for the Pro Panel II Flight Console The AP3000 comes with a 9v DC 1 2 amp negative center power supply It can also power th...

Page 43: ...th ELITE and other manufacturer controls from within the ELITE program in order for them to function properly STARTING THE PI 135 Turn on the main computer 1 and monitors Turn on the 2 Pro Panel II flight console main power key Check the right corner of the console and insure you see two lights a solid green light showing power connection and a flashing yellow light showing data transmissions On t...

Page 44: ...he 7 flight controls This is a simple exercise to teach the software the range of values from the pitch roll yaw brake and throttle movements To calibrate the flight controls Bring up the program menu selections a on the instructor LCD right mouse click anywhere on the screen Choose b CONFIGURATION Left mouse click on c CONTROLS CALIBRATION The calibration dialog box will open d left mouse click o...

Page 45: ...brake and you are ready to fly The flight controls switches levers and knobs perform the same function as their counterpart in the real aircraft At this point you can change frequencies adjust instruments and perform all procedures for flight as you would in the actual aircraft The flight may be paused at any time by pressing the FREEZE button on the AP3000 avionics panel or by using the main scre...

Page 46: ...structor 4 Monitor NOTE The hour meter continues to run when the Pro Panel flight console master key is ON CONFIGURATION It is recommended that this page be reviewed carefully After configuring to your satisfaction press the SAVE button to keep all values These selections are stored in a PREF folder in the program directory These values will be read when starting the program Once set you will seld...

Page 47: ...is brings up the ELITE Main Menu Click on CONFIGURATION PAGE or use the keyboard shortcut alt G The Configuration Page consists of nine sections General Settings 1 Hardware Configuration 2 Controls 3 Units 4 Handling 5 Color for Digits 6 Aircraft Information 7 Sounds 8 and Instrument 9 This section will cover the basics to get the PI 135 up and running Other information from this screen will be co...

Page 48: ...ndows XP or 2000 ELITE can be set up to operate using up to three displays On a single monitor setup ELITE switches between the instrument map and other control screens using the menu at the bottom right of the main instrument screen When starting the program with multiple displays detected it will prompt for the arrangement of the displays as shown TWO DISPLAYS One display will stay fixed to the ...

Page 49: ...either the second screen or third screen using the Startup button Then quit and restart the program for the change to take effect TIPS FOR USING MULTIPLE SCREENS There are a few rules that should be known for using multiple screens Anytime the menu is selected with the mouse 1 the simulator will freeze momentarily If you wish to switch screens while a student is flying without interrupting the fli...

Page 50: ... features in the startup sequence set change passwords set LT UTC offset toggle ATD detection report and activate failure control from the keyboard These settings are retained until changed or reset AIRCRAFT MODULE When Ask for Aircraft Module at program start button is ON orange ELITE will ask you on every startup to select an aircraft module Easy open of aircraft modules allows you to choose an ...

Page 51: ... you would like for subsequent startups then turn OFF both Ask forAircraft module and Ask for Navigation databases at program start buttons HARDWARE CONFIGURATION CHANGING SYSTEM SETTINGS Do NOT USE Changing System Settings unless instructed to do so by ELITE Technical Support personnel Adjustments to computer configuration can render the PI 135 BATD inoperative FLIGHT CONTROLS CALIBRATION Calibra...

Page 52: ...ft and right aileron The cross hairs have now traced a blue box graphically representing the limits of the control device being used If rudder pedals are connected apply FULL left and right rudder You will see a small vertical line move with the application of rudder input Click SET to store the new limits settings NULL ZONE The center Null Zone panel allows the user to define a box within which t...

Page 53: ...rudder Yaw Null zone NOTE Clicking the RESET button returns ALL Null zone settings to default Individual Null zones can be adjusted without clicking RESET by simply pressing R P or Y keys respectively POWER QUADRANT Under Power Quadrant click RESET Now physically move the Mixture Prop and Throttle levers if applicable on your power quadrant or similar device to their halfway position Do NOT use li...

Page 54: ...aft transition before starting your IFR practice Remember the less is more adage and make small pitch and roll corrections for variation in altitude and or heading Do NOT chase the VSI Monitor instrument needle trend not just movement This makes for smooth precise instrument flight and prevents awkward action reaction responses CHANGING THROTTLE QUADRANTS The ELITE PI 135 comes with both a single ...

Page 55: ...e left and right thumbscrews by 2 turning counterclockwise supporting the throttle quadrant with a free hand Remove the throttle quadrant making sure 3 not to pull on the gray cable Loosen the connector thumbscrews by 4 turning counterclockwise ...

Page 56: ...ove the plug from the rear of 5 the throttle quadrant Note the orientation of the receptacle 6 While holding the new throttle quadrant in 7 a free hand gently insert the plug into the receptacle and tighten the thumbscrews by turning clockwise ...

Page 57: ...insert the throttle quadrant into the 8 console making sure not to bind or bend the gray cable Reinstall and tighten the two thumbscrews 9 by turning clockwise Note DO NOT OVER TIGHTEN SCREWS Turn ON 10 Master Panel Power by using the key switch ...

Page 58: ...rve the green 11 POWER light illuminates steady Observe the amber 12 TRANSMIT light flashes Open on the ELITE program by double 13 clicking the ELITE icon on your desktop USB BUTTON Press USB button to see ELITE USB hardware connected ...

Page 59: ...ew dampening values after adjustment Numbers between 0 00 no dampening and 0 20 maximum dampening change the sensitivity of flight control devices SECOND MONITOR If you are using an ELITE system with a 2nd instructor s station monitor an additional display panel will appear below the Color for Digits panel Pressing the 2ND SCREEN button assigns the program menu to the 2nd monitor This allows someo...

Page 60: ...on s instrument configurations power units and external switches unique to that module Clicking on a black arrow opens a drop down menu displaying all available changeable options for that section Drag the fingertip to the option desired and release the mouse button to make your selection The selected option will be indicated replacing the previous selection ...

Page 61: ...gram you will enter the simulation in the cockpit in front of the Instrument panel The MENU button at the bottom right of your instructor screen is your access to the many features Click and hold on the MENU button to open the menu While holding your mouse button move the cursor to the menu selection and release As you move through each selection the item to be opened will be highlighted Keyboard ...

Page 62: ...ctions Page Active METAR Weather Page Nav Data Modification Configuration Page Map Page Control Page Instrument Panel Helps Tips Simulation Freeze Unfreeze The following is only an overview of the MENU layout For detailed capabilities and operations see Program Features ...

Page 63: ... Operator s Station IOS MALFUNCTIONS PAGE The MALFUNCTIONS Page is used to create failure scenarios You have the opportunity to selectively or randomly fail individual instruments systems avionics engines gear flaps and more ...

Page 64: ...ATOR S MANUAL 42 METEO PAGE The METEO meteorological Page is used to create the weather environment Various parameters such as visibility ceiling wind turbulence pressure and temperature can be adjusted as desired ...

Page 65: ...METAR Page is used to download real time weather reports from METAR reporting stations for use in ELITE GenView When METAR weather is engaged activated to function in ELITE the weather dynamically changes when flying between METAR reporting stations and METAR time ...

Page 66: ...MANUAL 44 MODIFICATION PAGE The MODIFICATION Page is used to add delete or modify navigation data base facilities Fifty modifications additions are possible for each navigation data base The US is divided into nine areas ...

Page 67: ...eferences adjust control sensitivity change units of measurement for fuel and weight turn sounds on off adjust volume levels calibrate flight control devices load new aircraft modules save instrument configurations where applicable Aircraft operational characteristics and limitations are also shown but cannot be modified ...

Page 68: ...craft symbol showstheflightpathinrealtime bothhorizontalandvertical profile views that can be replayed saved and printed for evaluation Over 15 map features can be displayed at 8 separate zoom levels The aircraft flight parameters magnetic heading altitude and IAS can be set from the map page In addition you can also save and load training states or load Instrument Approach Scenarios IAS ...

Page 69: ...t date and time of day airport lighting features and runway markings Activate yaw control for using rudder pedals adjust fuel loading and aircraft weight configuration and call sign Save and load training situations you created training states or load optional Instrument Approach Scenarios IAS ...

Page 70: ...ameters i e power settings frequency changes OBS selections etc can still be changed and the Hobbs meter continues to run When first entering ELITE the program is in the FREEZE mode as indicated by a red MENU bar in the lower right corner of the screen When FREEZE mode is released the aircraft engine s will be ON QUIT Selecting QUIT ends the program and returns you to the operating system ...

Page 71: ...P page is ELITE s command center Its use is primarily to setup the aircraft s initial position for a given flight or procedure monitor the flight path and to review the flight once you have finished flying The MAP page allows the instructor to monitor the progress of a flight in real time Similar in appearance to an IFR Low En route chart and laid out in approach plate like format the MAP page is ...

Page 72: ...iew on an approach plate Other knobs buttons and data windows located around the periphery of the main map display are used to control the following items discussed in detail later in this section Aircraft HEADING Aircraft ALTITUDE Aircraft AIRSPEED Flight path CLEAR MAP Page PRINT Flight PATH save load ROUTE save load RADIAL compass rose display PROFILE view display Flight path REPLAY Aircraft RE...

Page 73: ...CALE The actual scale of the Map is indicated on the top right of the screen The scale appears in green The scale indication changes according the actual MAP view level which can be changed with the ZOOM function NAV DATA SYMBOLS The following Nav Data Symbols are visible on the Map page FIX with identification NDB with identification VOR with identification VOR DME with identification DME with id...

Page 74: ...e cursor changes for different functions on the MAP page Normal cursor fingertip Zoom in cursor Alt Key Zoom out cursor Shift Alt Zoom limit either enlarging or reducing Heading Distance Shift key Add point Route planner Control key Remove point Route planner Control Alt Change Move Point Route planner Shift Control keys Active Runway Click on the box for other shortcuts ...

Page 75: ...veral facilities nearly occupy the same location or are colocated Information on these facilities is layered Clicking the same spot repeatedly cycles through these layers to reveal information about each specific facility MAP BORDERS Border types Flight Information Region FIR borders appear in brown Country borders appear in green Waterways and lake boundaries appear in blue States appear in gray ...

Page 76: ...ect an airport and runway by clicking its identifier runway combination Notice that the airport runway lat lon is now highlighted and the airport s name is indicated just below the scrollable viewing area The example above shows Portland International PDX runway 10L selected Click on CHOOSE to position the aircraft at the threshold of the selected runway Cancel repositioning by clicking on CANCEL ...

Page 77: ... 216 Click on the airport runway you would like to make the default then click DEFAULT Notice the airport identifier and runway selected DEN 35R now appear in the Default Runway box at the bottom left To actually go to the default runway now or at any time in the future simply click on TO DEFAULT With a default airport runway now saved ELITE will automatically position the aircraft there on each s...

Page 78: ...ve the same ILS frequency for both ends of the runway For example Runway 27 and runway 9 at XYZ airport may have 109 90 as the ILS frequency If runway 27 is used for approaches the tower will turn off the ILS transmitter for runway 9 to prevent any false ILS indications As within the real world you must deactivate or deselect the unused ILS should there be an ILS frequency conflict If you are flyi...

Page 79: ...ously 1 The finger pointer will change to the select 2 deselect icon Using your mouse place the x over the apex 3 of the ILS you wish to deselect and push the left mouse button The ILS antenna icon will change color from blue to amber The navaid databox will display showing the 4 ILS is disabled ...

Page 80: ...LT and J simultaneously 1 The finger pointer will change to the select 2 deselect icon Using your mouse place the x over the 3 apex of the ILS you wish to reactivate and push the left mouse button The ILS antenna icon will change color from amber back to blue ...

Page 81: ...o possible to scroll the MAP view without dragging the aircraft symbol This is accomplished by clicking anywhere on the MAP page NOT occupied by a facility or MAP element and dragging the cursor fingertip toward the edge of the visible display Scroll speed is controlled by varying the distance of the cursor to the edge of the screen and is dependent on the amount of data to be moved The four arrow...

Page 82: ...ed in page 220 MAP ZOOM LEVELS Displays current ZOOM level controlled by I in O out and N normal keys respectively or magnifying glass buttons When you first enter the MAP page the display will be in normal zoom level defined as the 100 view Click on the ZOOM IN or ZOOM OUT buttons to increase or decrease the zoom level The zoom percentage is indicated on the display relative to the 100 view level...

Page 83: ...hanged anytime by simply following the procedure above to overwrite with a new value NOTE ZOOM level cannot be increased beyond 1250 maximum With ZOOM level at maximum you will NOT be able to marquee a selection area to ZOOM in further Marquee selection and ZOOM IN are disabled when maximum ZOOM level is reached The ZOOM function is screen centered NOT aircraft centered If the aircraft is not in t...

Page 84: ...t clutter and maintain map readability NOTE You may determine which MAP elements facilities are displayed for corresponding ZOOM levels Click on the appropriate buttons to activate or deactivate the information to be shown in each ZOOM level Yellow buttons indicate an active button Click OK and your selections will take effect Click CANCEL to return to the Map with no changes Click STANDARD for a ...

Page 85: ...eature to aid in monitoring a student sflightprogressbyverifyingthecorrecttransponder code heading and altitude assignments The tag itself will appear dark gray in color when the transponder switch is in the OFF or SBY standby position With the switch in the ON position the tag will turn green after sufficient time has elapsed for warm up The tag will turn red when the IDENT button has been presse...

Page 86: ... in the direction FROM which the wind is blowing relative to True North In the following example the aircraft is at 3500 feet wind is from the southeast at 15 knots OAT is 47 Fahrenheit ambient pressure is 26 34 inches and visibility is 25 statute miles Note that unlike the station model used on Surface Analysis charts no sky cover information is provided To turn ON OFF aircraft spot weather simpl...

Page 87: ... Gray boxes indicate data is available but not loaded Red boxes indicate the data within its boundary is loaded and ready for use Note Each NAV database region is labeled for identification The label USNW shown below is for the United States North West NAV DATA Disclaimer We do our best to ensure the accuracy of the NAV data in the software Unfortunately inaccuracies originating from the data sour...

Page 88: ...e and release the mouse button When data has successfully loaded the gray boundary box will turn to red Click on arrow symbol once again and notice that Load Database is now grayed out and no longer available for selection but you can choose to release it to free memory or unlock it for modification to be covered later NOTE Multiple NAV databases regions can be loaded simultaneously as desired To ...

Page 89: ...ng the Open Navigation Databases window another smaller pop up window will appear giving you the option to choose either add or replace To Add the selected database to those already loaded click onADD To replace a currently loaded database with the selected one click on REPLACE Click OK to complete the operation NOTE The last database loaded with the Load function is kept in memory and also used a...

Page 90: ...e NAVset and click SAVE In the example above we first loaded the USNW USSE USSW database regions then saved them as one custom NAVset named MySet1 This NAVset will now appear with the other available databases and NAVsets at program startup It will also be available for loading from the Open Navigation Databases window described earlier INSTRUMENT APPROACH SCENARIOS IAS The Instrument Approach Sce...

Page 91: ...ou would like to fly in Select and open the desired Instrument Approach Scenario from those listed NOTE Adescription of each scenario can be viewed before it is opened by highlighting any scenario file name with a SINGLE MOUSE CLICK Follow on screen dialog box instructions to start scenario Important IAS notes Make sure to load and or verify that the appropriate Navigation Database IASEC3 IASSE3 e...

Page 92: ...ions to properly execute the approach CTRL K Press CTRL K to acknowledge and or answer a request from the program One example of this might be if a controller asks you to report field in sight Since there is no way to actually converse with the virtual controllers CTRL K is used by the program as a communication trigger This is similar to a quick double click of a push to talk switch in a real air...

Page 93: ...e the option of storing Navigation Meteo weather and Malfunction data as well The saved state file can then be loaded at anytime in the future and instantly position the aircraft where it was with the same settings when the file was saved State files are very useful when you want to practice the same approach procedure flight or situation repeatedly Individual pilots and instructors often create a...

Page 94: ...e Click in the Heading window to instantly get the reciprocal of the displayed value ALTITUDE PANEL Aircraft Altitude can easily be changed with the TRUE ALT panel Altitude in feet MSL is displayed in the window next to the altitude adjust knob To change altitude in 10 foot increments click and drag on the altitude adjust knob until the desired value is indicated Single click for 500 foot incremen...

Page 95: ...ention to the particular aircraft s V speeds Speeds appropriate to the desired flight condition should be selected Keep in mind that it is possible to dial in speeds near or below stall PROFILE BUTTON Clicking the PROFILE button brings up the MAP profile Similar to the profile view on an instrument approach plate the MAP profile is a side view plot of aircraft altitude and flight path over time Th...

Page 96: ...LS frequency has been tuned in and the approach begun Color coding is used to represent course deviation as follows Yellow lines half scale Red lines full scale Altitude Grid The A altitude grid button toggles the altitude grid lines These lines are used in conjunction with and are extensions of the altitude scale markings on the right side of the profile display Profile Scroll The two arrow butto...

Page 97: ...Y 7 approach into Orlando Executive ORL airport For illustration purposes the glideslope was tracked to the non precision Minimum Descent Altitude MDA and NOT to Decision Height DH A level off at MDA and subsequent missed approach was started shortly thereafter Level off at MDA Aircraft at Glideslope Intercept Glideslope Missed Approach Actual Aircraft Track Profile view of ILS RWY 7 approach into...

Page 98: ...ach into Orlando Executive airport Top Profi le view with glideslope limits overlay turned ON Bottom Profi le view with altitude grid lines turned ON Full scale course deviation Half scale course deviation Altitude Grid Lines G Button ON A Button OFF A Button ON G Button OFF ...

Page 99: ...ons immediately Expanded MAP profile view with EXTENDED button Notice gear flap and airspeed graphs in addition to altitude plot Gear Position Flap Position Airspeed Plot ACFT Information While viewing the MAP profile even more detailed aircraft information is accessible for any position along the plotted flight path First verify ELITE is in the FREEZE mode and the replay function is not activated...

Page 100: ...n The Radial feature allows you to place a compass rose around any FIX or NAVaid facility in the database Before clicking the RADIAL button look at the BEARING TO or RADIALandDISTANCEwindowsnearthebottom leftofthe MAP screen They should both have dashes in them Now click the RADIAL button then click on any FIX or NAVaid in view on the MAP ELITE instantly draws a compass rose around the selected FI...

Page 101: ...aving the MAP page To toggle BEARING TO or RADIAL indication just click on the value displayed inside the adjacent window In the example below the compass rose is visible around the selected UBG VOR Click inside window to toggle BEARING TO RADIAL Virtual Flight Data Recorder VCR style buttons control playback of the Virtual Flight Data Recorder VFDR Replay As you fly ELITE continuously records you...

Page 102: ...ast Forward buttons Rewind Button CLICK AND HOLDtomoveBACKWARDthroughrecorded flight path DOUBLE CLICK to jump to BEGINNING of recorded flight path NOTE Profile and extended profile data traces will still be plotted from left to right even when rewinding Fast Forward Button CLICK AND HOLD to move FORWARD through recorded flight path DOUBLE CLICK to jump to END of recorded flight path Slow Button C...

Page 103: ...lder of the student if he she wants to observe the instrument presentations By having the instruments displayed on the MAP page this problem is eliminated The instructor no longer has to worry about the proximity of the Instructor s Station to the main system and can easily monitor the flight by concentrating solely on the MAP page In addition both student and instructor can review a recorded flig...

Page 104: ...hen where how the instruments are displayed Change or modify the initial replay settings as desired These settings can be changed modified at any point in the future by simply clicking on the settings button at the bottom of the MAP page under REPLAY ...

Page 105: ...he MAP page for analysis Click the PATH button to bring up the following box Save To save the flight path just flown click the SAVE button to bring up the Save Path files window Type a name in the File name box BCRWY25 in the example for the flight path file then click Save to complete the operation Load To load a flight path click the LOAD button and select a path from the previously saved paths ...

Page 106: ... button captures an image of the MAP page Once captured you can then print the image or save it to disk for viewing later Set MAP ZOOM level and select PROFILE as desired to customize the MAP to your taste before clicking the PRINT button Print To print the MAP page click PRINT and follow the print dialog boxes specific to your operating system Save To save the MAP page image click SAVE and type a...

Page 107: ... the selected point will appear In addition the TIME SPEED DISTANCE information box appears as shown on the next page The upper portion of the TIME SPEED DISTANCE information box contains the actual location of the aircraft and selected point mouse position displayed as coordinates in degrees lat lon The lower portion of the TIME SPEED DISTANCE information box contains magnetic track aircraft head...

Page 108: ...TANCE information box figures recalculated ROUTE PLANNER The route planner is a special tool for quick flight planning Use the keyboard commands described on the next page to design a route Add Point Push the CTRL control key on the keyboard and the cursor changes to add point Click on any location from which you will start your route and you get the first route point 1 The next click displays rou...

Page 109: ...h the mouse to another location Release the mouse button and changes take effect Route Info Click and hold on individual route points to get route and leg information Point coordinates as well as track and distance information are displayed in an accompanying window as long as the mouse button is held down SHORTCUTS To display the Shortcuts Information window click on the button The Shortcuts wind...

Page 110: ...way has been determined runway lights are turned ON for that runway You can however override this automatic selection by manually selecting the active runway following the procedure below PressALT Ato engage or disengage mode Once engaged enables you to manually select ELITE s active runway by clicking on the threshold of desired runway runway color changes to green to identify that it is active Y...

Page 111: ... associated airports and NAV facilities are in the database As described earlier in the chapter the MAP page also functions as a virtual A FD airport facility directory Click and hold on the symbol in the center of the runway complex A Communication box will come up displaying information and number of frequencies available at this airport Frequency Column While holding down the mouse button move ...

Page 112: ...vice ATIS AWO Automatic Weather Observing Station AWOS CLD Clearance Delivery CPT Clearance Pre Taxi CTL Control DEP Departure Control DIR Director Approach Control Radar EMR Emergency FSS Flight Service Station GND Ground Control GTE Gate Control HEL Helicopter Frequency INF Information MUL Multicom ODP Parametres French Radio OPS Operations RDO Radio RDR Radar Only Frequency RFS Remote Flight Se...

Page 113: ...cast TWEB TWR Air Traffic Control Tower UAC Upper Area Control Center UNI Unicom VOL VOLMET Column 1 The following characters may appear in Column 1 A Airport Advisory Service C Community Aerodrome Radio Station CARS D Departure Service F Flight Information Service FIS I Initial Contact IC L Arrival Service S Aerodrome Flight Information Service AFIS T Terminal Control Area ...

Page 114: ...O Column G The following characters may appear in Column G G Guard T Transmit Both blank Column R This column indicates if radar service is available R Yes N No Column H Indicates if 24 hours service is available Y Yes N No HOTPLATES HotPlates is a handy feature that allows you to view an approach plate any time you are in the INSTRUMENT cockpit Screen Press the P plates key on your keyboard to br...

Page 115: ...t be stored in this folder to be viewed with the HotPlates viewer In addition to approach plates other items such as check lists can be placed in this folder for viewing Three approach plates are included with ELITE These are the plates for the three sample Instrument Approach Scenarios at Bakersfield California To select a plate for viewing choose one from those listed and click on it As you buil...

Page 116: ... that or any other set click on the Set Load button Select a set from those listed in the Load plate set dialog box and click Open Any file formatted as described below and placed in the Plates folder will be available for display in the HotPlates viewer Files must be in bitmap bmp format to be viewed by the HotPlates viewer In general files with a resolution of 144dpi dots per inch tend to look g...

Page 117: ...Clouds Page HELP Tips are available anytime by pressing ALT H Move the help cursor over any on screen item that you would like more information about When the help cursor reveals its document icon help is available for that item Simply click on the item to display related help tips ...

Page 118: ...strong winds and turbulence without a problem The METEO page is extremely flexible and provides an opportunity for an almost infinite amount of weather possibilities Please feel free to experiment GENERAL LAYOUT GENVIEW The METEO page is rather comprehensive and might look a bit intimidating at first glance Actually it is set up quite logically and is easy to use once you understand its layout The...

Page 119: ...To set the initial From weather simply click on the appropriate UP and DOWN arrow buttons to adjust the value of the desired weather parameter s Repeat this in the same way to set the To parameters It is important to remember that the intensity or rate of change of the weather is also controlled by the procedure described in the previous section For example large parameter variances in relatively ...

Page 120: ...s over time and location As both dynamic and static weather are reflected it is easy to get a quick picture of the weather with just a glance Static Weather To set static unchanging weather use the To weather column ONLY and do NOT set in a time interval If a time interval is set then the From weather automatically becomes the current weather NOTE Remember it is possible to use any combination of ...

Page 121: ... on the panels Note that the top of the bottom wind layer is also the base of the mid wind layer The top of the mid wind layer is also the base of the top wind layer TRANSITION ZONES GenView Transition Zones are available for each of the three Cloud Layers and can only be selected when overcast OVC coverage is in use A Transition Zone creates a gradual visual transition to and from the cloud condi...

Page 122: ...rection is always MAGNETIC and can be set in 10 increments by clicking the UP and DOWN arrow buttons To make the wind direction variable with respect to the selected direction simply press the button When setting up dynamic changing winds it is possible to have the winds change in a clockwise or counter clockwise manner The CW clockwise button is a toggle switch that when depressed will change to ...

Page 123: ... turbulence levels can be set for each of the three corresponding Wind Layers CEILING STANDARD VIEW Ceiling in feet Above Ground Level is set by clicking the UP and DOWN arrow buttons To make the ceiling variable with respect to the selected height simply press the button VISIBILITY GENVIEW Above Cloud Layer 1 Select visibility using UP DOWN arrows as desired ...

Page 124: ...VERCAST With an OVERCAST layer programmed selected visibility will become the controlling visibility above the TOP of the OVERCAST up to the next highest OVERCAST layer programmed This then becomes the visibility between the OVERCAST layers If no higher OVERCAST layer is programmed then the selected visibility will become the controlling visibility for all altitudes from the TOP of the OVERCAST up...

Page 125: ...y to 30 statute miles Preset buttons can be used to jump quickly to 1 2 1 and 30 statute mile values respectively and then further adjusted as desired Visibility value selected will become the visibility from the surface up to the next highest OVERCAST OVC cloud layer programmed If no OVERCAST layer is programmed this will be the controlling visibility for all altitudes from the surface up to FL40...

Page 126: ...nation visibility ceiling presets that allow you to quickly choose Precision Non Precision or CAVOK minimums respectively Once selected these preset values can then be further adjusted as necessary These preset minimums are as follows Precision 200ft ceiling 1 2 Mile visibility Non Precision 500ft ceiling 1 Mile visibility CAVOK 5000ft ceiling 5 Miles visibility ALTIMETER Altimeter setting in hect...

Page 127: ...by clicking the UP and DOWN arrow buttons Note that this is NOT setting the temperature directly but is actually adding to or subtracting from the ISA International Standard Atmosphere values If your performance tables call for an ISA or X day simply dial in X to increase or decrease the OAT temperature by X amount At the lower left of the METEO Page you will find a grouping of functions that are ...

Page 128: ...or indications that may be symptomatic of icing The goal of any simulation is to sharpen your situational awareness This is not only geographic positional awareness but how are things going awareness ELITE s intent is not to prepare you for how to exactly react to an icing encounter that is best learned from the POH aircraft manufacturer experience but rather to enhance your ability to recognize t...

Page 129: ...se an intensity 2 level Light Moderate Severe to activate temperature moisture dependent icing Ice will begin forming at the intensity chosen anytime the aircraft is in visible moisture and at a temperature of approximately 32 degrees Fahrenheit and lower For the purposes of the simulation visible moisture is defined as 1 4 statute mile visibility and less or flying in an overcast OVC layer With e...

Page 130: ...ed by a rather quick loss of airspeed indication Airframe icing MAY be a bit harder to detect initially depending on accretion rate icing type etc NOTE Active METAR does NOT modify the chosen Icing Settings You still have to ENABLE or ENFORCE Icing manually SAVING LOADING METEO FILES The SAVE and LOAD buttons next to Meteo state are extremely powerful Let s say you have set up a weather scenario o...

Page 131: ...ynamic weather The Ref Meteo Time RESET button sets the Reference Meteo Time back to zero minutes This is used in conjunction with the interval settings to control dynamic weather as explained next REFERENCE METEO TIME The Reference Meteo Time is simply an elapsed time counter that runs as the aircraft is flown The dynamic weather time intervals discussed previously use this time to determine when...

Page 132: ...s that do NOT have a time interval set static weather remain constant The Reference Meteo Time can be RESET back to zero at any time in the flight This will allow dynamic weather scenarios to be easily repeated One important point to keep in mind is that if you have been flying a given sim session for an extended period of time then set up some dynamic weather make sure to either RESET the Referen...

Page 133: ...AR reporting stations for use in ELITE When METAR weather is engaged activated the weather dynamically changes when flying between METAR reporting stations and over the time span covered by the METAR reports Sky conditions visibility wind speed wind direction and turbulence are accurately integrated into the simulation from these reports METAR weather conditions represent the actual weather derive...

Page 134: ...eported ELITE will set the appropriate wind speed and turbulence to level 2 for a short period USING THE METAR PAGE Open the METAR page through the menu bar in the lower right corner or type alt R on your keyboard NOTE Active METAR is only available with GenView visual databases Once in the METAR page you have the choice of selecting existing METAR conditions which have been previously downloaded ...

Page 135: ...ARs are updated very frequently and 4 have only the zulu time you have to link your selection to a specific date Click the OK button to continue To activate the METAR conditions click the 5 ENGAGE button in the METAR Page When you are flying you can check the 6 actual Weather at current position on the METEO page Once the METAR is active all other weather 7 conditionspreviouslyselectedontheMETEO p...

Page 136: ...4 DOWNLOADING METAR FILES Basic Method Recommended Press the 1 D LOAD button on the METAR or METEO page Press 2 Download button on the METAR dialog box to begin download METAR reports will be downloaded and engaged automatically ...

Page 137: ...load page has a default internet addresses ready This will connect you to the Internet Select a file you wish to download i e 2 1300Z 1300Z represents the UTC time of the report NOTE Downloading METAR data from the Internet requires a currently active Internet connection NOTE METAR files cover the entire world Click the METAR File 3 Download button to start the download process Click SAVE to put t...

Page 138: ...aded NOTE ELITE will only open the METAR files corresponding to your installed GenView Navigation data Once the file is selected click the 6 BACK button to leave the directory list METAR reports are updated frequently and 7 correspond to specific UTC times and dates These reports however can be linked to any specific date To link your selection to a specific date choose the date and click the OK b...

Page 139: ...ditions with a ceiling below 1 000 ft and or visibility less than 3 miles Blue indicates stations under MVFR conditions with a ceiling 1 000 to 3 000 ft and or visibility 3 to 5 miles Green indicates stations under VFR conditions with ceiling greater that 3 000 ft and visibility greater than 5 miles On the MAP page METAR stations are marked with a red circle Clicking on the red symbol opens an inf...

Page 140: ...information STATION PLOT Temperature F Cloud Cover and Flight Conditions IFR VFR MVRF Altimeter in of HG 005 30 05 Airport Identifier Wind Barb 170 degrees 10 kts Visibility 1 2 mile Dewpoint Temperature F 88 005 DEN 61 1 2 NOTE Temperatures are in C or F Altimeter settings are either hPa or iHg ...

Page 141: ...119 CHAPTER 2 Instructor Operator s Station IOS WIND BARB DESCRIPTION IN THE NORTHERN HEMISPHERE ...

Page 142: ...ility is 10 km or more 2 No cumulonimbus cloud and no cloud below 1500 meters 5000 ft or below the highest minimum sector altitude whichever is greater and 3 No precipitation thunderstorm sandstorm shallow fog or low drifting dust sand or snow Temperature in whole degrees Celsius if below 0 C preceded by M Temp and Dew Point T 1 T 1 T 1 d T 1 d Dew point temperature in whole degrees Celsius if bel...

Page 143: ...121 CHAPTER 2 Instructor Operator s Station IOS ...

Page 144: ...item Simply click on the item to display related help tips The MALFUNCTIONS Page is used to create failure scenarios The ability to set up and practice realistic failures is one of the most powerful features in any simulation Many of these failures would be impractical impossible or unsafe to recreate in an actual aircraft Yet exposure to these same situations in a simulated environment can give y...

Page 145: ...NCTIONS Page might appear complex at first glance similar to the METEO Page it is actually quite easy to use and is one of the most comprehensive available You have the opportunity to selectively or randomly fail individual instruments systems avionics engines gear flaps and much more Elements of the MALFUNCTIONS page will be covered in greater detail in the following paragraphs but to get started...

Page 146: ...ntain wings level as it the AI slowly tumbles is one example of the consequences of this type of failure FAILURE TIME WINDOW The Between column is used to set the failure time window interval The values entered in minutes 00 99 are compared to the Ref Failure Time and determine when or during what time period window the corresponding ARMed failure will occur If for example we want the Attitude Ind...

Page 147: ...ure time window intervals use the Ref Failure Time and as such will be affected SPECIFIC TIME FAILURE To invoke a failure at a specific future time enter the SAME values minutes in BOTH Between windows If we had been flying for fifteen minutes and wanted the Pitot Tube to freeze over with an accumulation of ice three minutes from now we would simply enter 18 and 18 respectively in the Between colu...

Page 148: ...e to orange in color RECEIVERS GEAR AND FLAPS FAILURES Failures in this panel are set up in much the same way as previously discussed except that immediate failures are invoked by using the ARM buttons in the immediate column To set a specific failure time or a failure time window interval you must use the ARM buttons in the Timed column ...

Page 149: ...tudentisincludingengineinstruments in his her scan is to invoke an Oil Pressure failure and see if the student notices the pressure dropping To really bring the point home set up a scenario in which the Oil Pressure drops followed by an increase in Oil Temperature and subsequent power loss NOTE The Power Loss window shows the power available NOT the percentage of power loss If for example the powe...

Page 150: ...e window Then dial in the number of failures you would like to occur If for example we entered in a failure time window of between 3 and 12 minutes then entered 2 in the Instruments window ELITE would randomly fail two of the six instruments each at some random time between 3 and 12 minutes NOTE Engines does NOT refer to the number of engines but rather to the number of possible engine failures De...

Page 151: ...discretion once he is comfortable that the student has recognized and acknowledged the failure To place an instrument cover on one or more instruments simply click on the desired instrument s ARM button The button will turn orange and subsequently display Fail to indicate the instrument has been covered Note that the Instrument INOP feature is activated almost immediately after ARM has been presse...

Page 152: ...for use anytime Create a failure scenario state and tweak it until you are satisfied then click the SAVE button to open the Save Malfunction files dialog box Type a unique name in the File name box such as OilPressLoss then click Save to complete the operation To load this failure state or any other in the future just click on the LOAD button to open the Open Malfunction files dialog box Select a ...

Page 153: ...tons back to ARM much easier than having to reset each individual Fail button Use the Clear all failures button to RESET the entire MALFUNCTIONS page including failure time intervals Ref Failure Time The Ref Failure Time RESET button sets the Reference Failure Time back to zero minutes This is used in conjunction with the failure time window interval settings as described previously The MALFUNCTIO...

Page 154: ...en item that you would like more information about When the help cursor reveals its document icon help is available for that item Simply click on the item to display related help tips Use the CONTROL page to configure aircraft load and fuel control visual settings load Instrument Approach Scenarios save load STATE files and more VISUAL PANEL ...

Page 155: ... time of the area flown in THIS IS NORMAL LMT is used to calculate accurate sunrise and sunset times Depending on aircraft location within the specific Time Zone flown in and Daylight Saving Time LMT may be off by as much as 2 Hrs Use this time only as a reference for setting day night flying conditions To change time of day click and drag on hours minutes adjust knobs located below LMT display wi...

Page 156: ...imulation to run sluggish on relatively slower computers The Visual Detail panel allows you to tweak these settings to get the best performance possible from a given system Simply CTRL click on any one of the LOW MEDIUM or HIGH buttons turns orange and its corresponding Visual Detail preset will become activated Presets can then be modified manually as desired by selectively turning ON OFF items i...

Page 157: ...the simulation to be less than smooth Pressing the Detailed button under Scenery simply adds a grid of city lights for enhanced surface visual reference To fly without this grid simply press the Basic button Engine Startup The engine s start automatically at initial program startup when the ON button is active Aircraft Panel The heading altitude and airspeed panels found on the MAP page are duplic...

Page 158: ...you use the knob increments will be by 500 ft Click again in the window to deactivate Feature will deactivate itself in 5 seconds if there is no activity Fuel Imbalance When ENABLED allows for flight characteristics to be affected by lateral asymmetric fuel loading Set aircraft load weight change from KGs to LBS on CONFIGURATION page under UNITS Variable fuel loading Overload indicator Total aircr...

Page 159: ...unway centerline on take off Aircraft Identification You can customize the aircraft identification placard Click on the SET button in the Identification panel Another dialog box will appear Enter the aircraft Registration number to be displayed on the instrument panel in the cockpit NOTE This identification number is NOT reflected in the Instrument Approach Scenario call sign ...

Page 160: ... back to your assigned altitude or heading The scenarios generally begin with the aircraft at a predetermined altitude and positioned 15 20 miles from the IAF initial approach fix of the selected approach scenario There is 1 IAS sampler approach included in each ELITE package an ILS approach into Champaign Illinois The Approach chart can be found in the Supplements section of this manual or viewed...

Page 161: ...stabilize the aircraft When the heading and altitude have stabilized you can continue to use the autopilot or disengage it to manually fly the approach NOTE If you miss an ATC instruction you can have it repeated by pressing CTRL R R for repeat on the keyboard If you elect to have the copilot change frequencies it s always a good idea to verify them anyway Some copilots are better than others Load...

Page 162: ...iles are very useful when you want to practice the same approach procedure flight or situation repeatedly Individual pilots and instructors often create a library of state files which allow them to conveniently return to a desired lesson without having to setup the aircraft again manually State files can be saved at any time Before saving a state file make sure that the aircraft is set up just the...

Page 163: ...o bring up the Save State file window Type in a name for the state file and click Save Select state file options as desired then click OK Loading States To load an aircraft state file click the LOAD button to bring up the Open State files window Highlight the state file you wish to load from those listed then click OPEN ...

Page 164: ...OPERATOR S MANUAL 142 TIME FLOWN PANEL The Time Flown panel always indicates the elapsed time ELITE has been flown Time automatically stops when the flight is frozen or while not flying on the Instrument panel ...

Page 165: ...ly click on the item to display related help tips Use this page to configure flight controls hardware instrumentation and sound Some of these have already been covered during the Startup procedures in Chapter One STATE FILES When the Ask for State File at Program Start button is ON ELITE will display a dialog box on every startup allowing you to choose any training State File previously saved You ...

Page 166: ...new password select OK with the password field blank TIME DIFFERENCE LT TO UTC For ELITE to properly calculate daylight sunrise and sunset times you must set the difference between your local time LT and UTC Zulu time First verify that your computer s clock is set correctly Click on the SET button Calculate your local time using 12 00UTC as a reference For example in Orlando Florida UTC 5 you woul...

Page 167: ...d a warning message will appear during program start advising the system may NOT be used for flying credit allowed by the FAA ACTIVATING FAILURES WITH KEYBOARD Failures Activating with Keyboard ON allows the user to fail specific instruments and systems via the keyboard completely independent of the simulation This is especially useful for system configurations not incorporating a separate graphic...

Page 168: ...ent are displayed for weight and fuel values as desired Weight in pounds or kilos Fuel in liters U S gallons or Imperial gallons CHANGING HANGING COLOR OF NUMBERS For readability you can change the color of numbers shown on all pages except the instrument panels Click on RED or YELLOW as desired ...

Page 169: ... audio environment stereo sound card and speakers required The Sounds control panel illustrated on previous page lets you tailor or mix individual sound elements giving you complete control of your ELITE sound experience Engine sound can also be switched ON or OFF with the E key on the keyboard 3D SOUND When enabled allows for an enhanced audio experience on 3D compatible sound systems AIRCRAFT IN...

Page 170: ...PI 135 OPERATOR S MANUAL 148 Example ...

Page 171: ... its document icon help is available for that item Simply click on the item to display related help tips The Modification Page allows you to create or modify up to 200facilities fixes NAVaidsorholdingpatterns in each navigation database worldwide CREATING FACILITIES The desired facility can be created by clicking on the appropriate button When a button is clicked a window will appear showing the d...

Page 172: ...TE A deletion or modification does not modify the original database file on your hard disk but only a copy of the data If you choose to delete an original facility that has already been modified a pop up window asks for verification to delete the modification If you choose to delete a self created facility the pop up window will ask you if you really want to irrevocably delete your self created fa...

Page 173: ...appear on the screen Now select and choose to undo changes To restore an original facility that had been deleted hold the ALT key while clicking on the DELETE button The following pop up window will appear on the screen You can now undo a previous facility deletion and it will once again be displayed on the Map Deleting an existing original facility counts as one change Deleting a self created or ...

Page 174: ...tion click on the runway threshold When facilities are in the same location or covered by other ones click on the same spot once more and information about the next facility will appear Intheexampleabove severalfacilitiesnearlyoccupythesame location or are co located Information on these facilities is layered Clicking the same spot repeatedly cycles through these layers to reveal information about...

Page 175: ...153 CHAPTER 2 Instructor Operator s Station IOS ...

Page 176: ...PI 135 OPERATOR S MANUAL 154 ...

Page 177: ...155 CHAPTER 2 Instructor Operator s Station IOS ...

Page 178: ...PI 135 OPERATOR S MANUAL 156 ...

Page 179: ...rther enhances the realism of flight by providing 3 D obstructions to visibility cloud coverages and several transition zones or layers for IFR MVFR SVFR or VFR on top Utilizing actual downloadable METAR reports you can create a real time flight experience and save the most challenging weather scenarios for recurrent training GENVIEW VECTOR DATA Elements in the digital elevation model depicts rive...

Page 180: ... you want a to start least recommended especially if you are in a hurry Go to the b MAP Page Click on the aircraft symbol and hold the mouse button Press the ALT key and drop the aircraft at the runway end and it will reposition to the taxiway parallel to the active runway Go to the c MAP Page Click on the aircraft symbol and hold the mouse button Press the SHIFT key and drop the aircraft at the r...

Page 181: ...play GenView The length of the runway defines the amount 4 of taxiway exits Runway length smaller 2500 ft 2 exits Runway length smaller 4500 ft 3 exits Runway length smaller 6500 ft 4 exits Runway length equal or longer 6500 ft 5 exits ...

Page 182: ...PI 135 OPERATOR S MANUAL 160 Intentionally Left Blank ...

Page 183: ... operations in the cockpit Mooney M20J The avionics and instrumentation in the ELITE Photo Realistic aircraft modules are extremely accurate in every operational detail to give you the best procedural training possible on a PC based simulator As with every ELITE version it is assumed that the operator is a pilot and familiar with operating aircraft avionics and controls Our intent is to show you h...

Page 184: ...der pedals are optional but are highly recommended for single engine operations in the twin engine aircraft KEYBOARD CONTROL The keyboard is not used to fly the aircraft but rather only to provide shortcut key commands to assist the user in general operations and map functions These functions can be found on the MAIN MENU dialog box scrolling to MAP screen and pressing the at the bottom of the scr...

Page 185: ...p center Custom Zoom Ctrl Click in Zoom level Window Store Actual zoom level Click in Zoom level Window Set stored zoom level GENERAL SHORTCUTS Visual T Look Down G Look Center B Look Up Shift Left Arrow Look to left Shift Up Arrow Looks to Front Shift Right Arrow Look to Right Simulation Speed S Slower F Faster Control V Toggle Visual Alt F Freeze Alt Q Quit Alt H Help Engine Sound E On Off ...

Page 186: ...ition and then release the mouse button Always hold the mouse perpendicular to the computer display This is best accomplished by sitting in front of the screen and holding the mouse at about the position where the power controls are mounted relative to the cockpit seat If you hold the mouse at the wrong angle the hand does not move in a natural way PUSHING BUTTONS Push Buttons control many cockpit...

Page 187: ...tton down and then moving the mouse diagonally Right movement turns the dial to the right clock wise and in creases numbers movement to the left has the opposite effect In order to continue turning a rotary dial changes to auto scroll when the fingertip is held at the edge of the screen and can t be moved further The button keeps turning as long as the fingertip stays at the edge area or as long a...

Page 188: ...r over the wheel press and hold the mouse button rotate the wheel by moving the fingertip Release the mouse button when the settings are as desired NOTE The mouse holds the lever or wheel as long as the mouse button is held even after the fingertip has left the lever or wheel symbol PROGRAM MENU After starting the program you will enter the simulation in the cockpit in front of the Instrument pane...

Page 189: ...ld be OFF NOTE The simulation is in the FREEZE mode if Menu or FREEZE is colored red The following is only an overview of the MENU layout For detailed capabilities and operations see Chapter 4 Program Features Exits Program Malfunctions Page Active METAR Weather Page Nav Data Modification Configuration Page Map Page Control Page Instrument Panel Helps Tips Simulation Freeze Unfreeze ...

Page 190: ...ad real time weather reports from METAR reporting stations for use in ELITE GenView When METAR weather is engaged activated to function in ELITE the weather dynamically changes when flying between METAR reporting stations and METAR time MODIFICATION PAGE The MODIFICATION Page is used to add delete or modify navigation data base facilities Fifty modifications additions are possible for each navigat...

Page 191: ...de and IAS can be set from the map page In addition you can also save and load training states or load Instrument Approach Scenarios IAS CONTROL PAGE The CONTROL Page allows you to set date and time of day airport lighting features and run way markings Activate yaw control for using rudder pedals adjust fuel loading and aircraft weight configuration and call sign Save and load training situations ...

Page 192: ...ELITE OPERATOR S MANUAL 170 When FREEZE mode is released the aircraft engine s will be ON QUIT Selecting QUIT ends the program and returns you to the operating system ...

Page 193: ... runways can appear gradually out of fog As the aircraft descends below the programmable cloud base the runway and ground be come visible When the aircraft is above the established ceiling it is in the clouds which show as a grey window This window shows a runway with a British CALVERT II high intensity approach light system in a night approach The visibility is set such that the entire runway is ...

Page 194: ...everal transition zones or layers for IFR MVFR SVFR or VFR on top Utilizing actual downloadable METAR reports you can create a real time flight experience and save the most challenging weather scenarios for recurrent training GENVIEW VECTOR DATA Elements in the digital elevation model depicts rivers lakes highways railroads and built up areas such as cities towns villages etc GENVIEW RUNWAY DEFINI...

Page 195: ...ry Go to the b MAP Page Click on the aircraft symbol and hold the mouse button Press the ALT key and drop the aircraft at the runway end and it will reposition to the taxiway parallel to the active runway Go to the c MAP Page Click on the aircraft symbol and hold the mouse button Press the SHIFT key and drop the aircraft at the runway end and it will reposition perpendicular to the active runway T...

Page 196: ...the visual display with a simple click and drag on the dash board scroll of a mouse wheel or keyboard for increased viewing area The keyboard commands to lower and raise the instrument panel are Control Page Up Control Page Down Control Home Control End Use Shift left arrow and Shift right arrow for a maximum of 150 side view to each side and Shift up cursor for front view Use the Shift Ins for a ...

Page 197: ...on screen until a page is selected or you click the mouse outside of the menu box When the instrument panel is lowered the main menu tab will disappear To access the menu selection box when the instrument panel is lowered right mouse click at any location on the aircraft instrument panel The menu selection box will disappear when a page is selected or a mouse click is made outside of the menu box ...

Page 198: ...ELITE OPERATOR S MANUAL 176 Intentionally Left Blank ...

Page 199: ...trument flying It displays pitch and bank in the usual way Pitch lines are spaced 5 apart AIRSPEED INDICATOR The Airspeed Indicator ASI is indicated in knots on the ASI instrument The white green and yellow arcs as well as the red line have the standard meaning True airspeed may be calculated by applying the usual techniques assuming ISA temperature Air speed indicator window adjustments for TAS f...

Page 200: ... for rudder application ALTIMETER The Altimeter is the conventional three pointer type The air pressure is indicated in inches Hg on the right side and millibar in hPa on the left side Be aware that the instrument only shows the true altitude when its pressure setting corresponds to the QNH setting in the Environment panel on the Meteo screen VERTICAL SPEED INDICATOR The Vertical Speed Indicator V...

Page 201: ...do this HORIZONTAL SITUATION INDICATOR The Horizontal Situation Indicator HSI is connected to the NAV1 receiver It consists of a turning compass card a yellow course pointer CDI turned by the left rotary dial an orange heading bug moved by the right rotary dial and a yellow glide slope mark on both sides when on ILS The actual course is indicated by the white lubber line on the compass card The HS...

Page 202: ...spointer layout It is connected to the NAV receivers NAV1 or NAV2 The compass card is rotated by the OBS knob in the conventional manner Receiver is set to a VOR Receiver is set to an ILS RADIO MAGNETIC INDICATOR The Radio Magnetic Indicator RMI incorporates a slaved self rotating compass card a green single pointer and a yellow double pointer The green single pointer may be switched between NAV1 ...

Page 203: ...er indicates relative or magnetic bearing to station as selected by HDG knob If the relative heading of north is manually selected under the lubber line by the pilot then the bearing pointer indicates the relative bearing to the station If the aircraft s magnetic heading is selected under the lubber line by the pilot then the bearing pointer indicates the magnetic bearing to the station MOVING MAP...

Page 204: ... AIRCRAFT The aircraft symbol is at the fixed centered position and is always oriented to the top of the map screen The aircraft symbol is oriented in the direction of heading A track representing the last two minutes of flight will be shown ZOOM The plus button zooms in and the minus button takes you out The facilities shown on the instrument panel moving map screen are the same as on the MAP pag...

Page 205: ... O M M 1 N A V 1 COMM2 NAV2 NAV COMM Nav Comm KX 165 TSO Power On Off Change Frequency Pull to Ident Flip Flop Radial click to see radial Change Frequency On the COMM1 NAV1 COMM2 NAV2 and the ADF receivers the right window displays the stand by frequency and the left one displays the active frequency Setting a frequency is done in the same way as on a real receiver Use the rotary to count up or do...

Page 206: ...he NAV1 or NAV2 receiver is activated the actual radial from the VOR station is displayed in place of the standby frequency While in the radial mode direct tuning of the active frequency is available using the methods described above There is of course no radial available when an ILS frequency is tuned DME RECEIVER DME KN 62A Click on King Crown to Turn on Moving Map On Off Switch Mode Switch Remo...

Page 207: ...is mode prevents accidental rechanneling of the DME when the frequency is not displayed RMT Mode Distance Ground Speed and TTS of remote frequency are displayed By activating the R1 or R2 button the corresponding frequency is automatically taken from the NAV1 or the NAV2 receiver Search time is about one second When no ground station can be locked dashes will be displayed Distance Ground Speed and...

Page 208: ...to a frequency the closest NAVaid with this frequency is received When two facilities in the same area have identical frequencies ELITE will show a dialog box to select the desired one MARKER RECEIVER The Marker Receiver can be switched to LO HI and TEST The LO selection may be made to set marker reception to low sensitivity i e markers will only receive data at a short distance such as during the...

Page 209: ... radar interrogations at 1030 MHz it returns a coded response of pulses to ground based radar on frequency of 1090 MHz GPS RECEIVER UPS Apollo GX Series GPS Click on GPS data card Eject button to change area coverage North America or International Power Switch Function Keys Outer Knob Inner Knob Smart Keys Information Display Smart Key Annunciator The Apollo GX products are high performance GPS pr...

Page 210: ...he Apollo GX65 possesses the same features as the GX60 except it is not certified for IFR approaches You can find the manuals for all GX models in the ELITE directory in the folder MANUALS Trimble 2000 Approach Plus GPS The Trimble 2000 Approach Plus GPS receiver is a powerful navigation management system GPS Global Positioning System is a navigation system based on satellite ranging from a conste...

Page 211: ...es the exact program code and navigational data that the real Trimble 2000 GPS uses The navigational data supplied by Jepessen is intentionally shipped expired expires every 56 days Even though the data has every detail that is used in the real GPS we use the Database Expired message as a reminder that the data is not to be used for real world navigation Included in back of this manual is a quick ...

Page 212: ...Track Indicator PTK OBS HLD Button OBS HLD Indicator APPRCH enabled Indicator APPRCH active Indicator With Trimple GPS Push switch to select GPS Message MSG Alert GPS Waypoint WPT alerts waypoint arrival GPS approach mode APR is armed when lit NAV GPS indicator shows which navigation mode is displayed on Number 1 CDI Annunciator lamp test switch Hold HLD alerts active flight plan is suspended at t...

Page 213: ...odules To use the Silver Crown Plus avionics system simply go to the CONFIGURATION Page of that particular aircraft module and select the Bendix King Silver Crown Plus option from the item labeled Avionics Stack in the Instrument Configuration column ELITE must be restarted to activate the Silver Crown Plus avionics system for use The Silver Crown Plus avionics system will automatically be the def...

Page 214: ...de direction indicator respectively while the CP 470 is a separate control panel for the EADI The EFS 40 EFIS is selectable in the following aircraft TB10 TB20 Baron 58 Seneca III Bonanza A36 Arrow IV Mooney M20J King Air B200 To select and add the EFS 40 EHSI by itself or the EHSI EADI combination to any aircraft listed above simply go to the CONFIGURATION Page and select the corresponding option...

Page 215: ...bendixking com or www flyelite com Refer to the Pilot s Guide for specific operational techniques Some of the EFS 40 functions are briefly outlined in the following diagrams Please note that although most of the actual EFS 40 features functions have been implemented in the ELITE EFS 40 unit due to the numerous real world installation options configurations possible not all features functions are a...

Page 216: ...of knob to automatically set heading bug to current aircraft heading EHSI Display Brightness Adjust 1 Bearing Pointer Select System 1 2 Select 2 Bearing Pointer Select CP 470 EADI Control Panel Select single cue v bar or double cue cross bar Flight Director command bars EADI Display Brightness Adjust Decision Height SET Radar Altimeter Test The EFS 40 EADI utilizes the CP 470 control panel picture...

Page 217: ...efore each use please press the TEST button and wait for the system to perform its self test function AP ENG The most basic form of autopilot operation is to engage only the auto pilot engage AP ENG mode button In this mode with no other modes selected the aircraft will maintain the pitch attitude existing at the time of AP ENG engagement and will fly with the wings level Use of the vertical trim ...

Page 218: ...ther go immediately into NAV mode directly To use the navigation feature of the autopilot with an HSI first tune the navigation frequency Use the Course Set Knob to select the desired course line value Set the intercept angle by placing the heading bug on the desired heading and press the HDG button if not already in HDG mode Now press NAV button and fly the selected heading until course capture T...

Page 219: ...Altitude adjustments may be made in ALT mode by using the vertical trim UP DN switch Moving this switch in either direction while in ALT mode will cause the aircraft to climb or descend at approximately 500 fpm When the switch is released the autopilot will maintain the new altitude CWS The control wheel steering CWS button located on the control yoke allows the pilot to maneuver the air craft in ...

Page 220: ...the ARM button to arm the altitude capture mode This will cause ARM to appear on the indicator Use pitch attitude hold or select a vertical speed to guide the aircraft to the desired altitude As the aircraft nears the desired altitude the system computes a roundout and will indicate altitude capture CAPT as the aircraft levels off Once the aircraft has leveled off the vertical speed mode disengage...

Page 221: ...not pull the inner concentric knob when using a mouse or flip the toggle switch to V S when using an ELITE avionics panel Use the knob s to select the desired vertical speed The indicated up down arrows show whether a climb or descent has been selected To engage the selected rate press ENG and VS will appear on the indicator Engaging the vertical speed function will cancel the ALT mode if being us...

Page 222: ...ELITE OPERATOR S MANUAL 200 SINGLE ENGINE CESSNA 172R ...

Page 223: ...ent knobs and drag mouse to adjust TAS set aircraft symbol or adjust altimeter EGT Fuel flow gauge indicator serves as a visual aid to help adjust mixture through monitoring of exhaust gas temperature Click mouse on screw and drag to adjust peak EGT indicator ...

Page 224: ...lect Button Lower LCD Window SELECT CONTROL Button The unit may be tested by holding the SELECT button down for 3 seconds Proper operation is indicated by the display 88 88 and activation of all four annunciators O A T Voltmeter Operation The upper portion of the LCD window is dedicated to O A T and voltmeter operations The voltmeter reading is preselecteduponstartupandisindicatedbyan E following ...

Page 225: ...to enter the set mode with a single mouse click When ELITE is NOT in the FREEZE Mode the tens of hours digit will start flashing The CONTROL button has full control of the flashing digit and each button push increments the digit Once the tens of hours is set the SELECT button selects the next digit to be set After the last digit has been selected and set with the CONTROL button a final push of the...

Page 226: ...t mode The tens of hours digit will start flashing The set operation is the same as for UT When actual flight time equals the alarm time the dis play will flash Pressing either the SELECT or CONTROL button will turn the flashing off and zero the alarm time Flight time is unchanged and continues counting Setting Elapsed Time Count Up 5 Use the SELECT button to select elapsed time ET Press the CONTR...

Page 227: ...alizer Needle Glideslope Needle TO FROM NAV Flag Azimuth Card OBS Knob CDI Needle Bearing Pointer Heading Knob HDG Rotates card to set in relative or magnetic heading of aircraft Compass Card Manually rotatable card that indicates relative or magnetic heading of aircraft as selected by HDG knob GS Flag ...

Page 228: ...l knobs Engine driven mechanical tachometer is calibrated in increments of 100 RPM and indicates both engine and propeller speed An hour meter in the dial records elapsed engine time in hours and tenths The meter stops when the simulation is in FREEZE mode Master Avionics Switch Park Brake Trim Wheels Ignition Switch Master Switches ...

Page 229: ...iary Fuel Pump Switch ON Mixture ADVANCE to obtain 3 5GPH fuel flow then return to IDLE CUT OFF position Ignition Switch START Mixture ADVANCE smoothly to RICH as engine fires Oil Pressure CHECK Auxiliary Fuel Pump OFF Beacon Light ON Avionics Power Switch ON Radios ON Before Takeoff Parking Brake SET Flight Instruments CHECK and SET Fuel Quantity CHECK Mixture RICH Fuel Selector Valve RECHECK BOT...

Page 230: ... Brakes RELEASE Takeoff Normal Wing Flaps 0 10 Throttle FULL OPEN Mixture RICH Elevator Control LIFT NOSE WHEEL at 55 KIAS Climb Speed 70 80 KIAS Wing Flaps RETRACT after reaching safe altitude and 60 KIAS En Route Climb Airspeed 70 85 KIAS Throttle FULL OPEN Mixture RICH Cruise Power 2000 2400 RPM Elevator Trim ADJUST Mixture LEAN Descent Power AS DESIRED Mixture ADJUST Fuel Selector Valve BOTH ...

Page 231: ...LS FIRST Landing Roll LOWER NOSE WHEEL GENTLY Braking MINIMUM REQUIRED Balked Landing Throttle FULL OPEN Wing Flaps RETRACT to 20 Climb Speed 55 KIAS Wing Flaps 10 RETRACT after reaching safe altitude and 60 KIAS After Landing Wing Flaps UP Securing Airplane Parking Brake SET Avionics Power Switch Electrical Equipment OFF Mixture IDLE CUT OFF Ignition Switch OFF Master Switch OFF Fuel Selector Val...

Page 232: ...ELITE OPERATOR S MANUAL 210 Aircraft Settings Panel Configuration Page ...

Page 233: ...211 CHAPTER 5 AIRCRAFT Climb ...

Page 234: ...ELITE OPERATOR S MANUAL 212 Cruise ...

Page 235: ...213 CHAPTER 5 AIRCRAFT CESSNA 182S ...

Page 236: ...itch ON Auxiliary Fuel Pump Switch ON Mixture ADVANCE to full rich for 3 4 seconds then return to IDLE CUT OFF position Ignition Switch START Mixture Advance smoothly to RICH hen engine fires NOTE If engine floods turn off auxiliary fuel pump place mixture in idle cut off open throttle 1 2 to full and crank engine When engine fires advance to full rich and retard throttle promptly Oil Pressure CHE...

Page 237: ...op should not exceed 150 RPM on either magneto or 50 RPM differential between magnetos Propeller CYCLE from high to low RPM return to high RPM Suction Gauge CHECK Engine Instruments CHECK Ammeter CHECK Throttle 800 1000 RPM Throttle Friction Lock ADJUST Strobe Lights AS DESIRED Radios and Avionics SET Wing Flaps SET for takeoff 0 20 Cowl Flaps OPEN Brakes RELEASE Takeoff Normal Takeoff Wing Flaps ...

Page 238: ...laps RETRACT slowly after reaching 70 KIAS Normal Climb Airspeed 85 95 KIAS Power 23 in Hg or FULL THROTTLE which ever is less and 2400 RPM Mixture 15 FULL RICH which ever is less Fuel Selector Valve BOTH Cowl Flaps OPEN as required Cruise Power 15 23 Hg 2000 2400 RPM Elevator Rudder Trim ADJUST Mixture LEAN Cowl Flaps CLOSED Descent Power AS DESIRED Mixture ENRICHEN Cowl Flaps CLOSED Fuel Selecto...

Page 239: ... 70 80 KIAS flaps UP Wing Flaps AS DESIRED Airspeed 60 70 KIAS FULL flaps Power REDUCE to idle when obstacles cleared Trim ADJUST Touchdown MAIN WHEELS FIRST Landing Roll LOWER NOSE WHEEL GENTLY Braking MINIMUM REQUIRED Balked Landing Power FULL THROTTLE and 2400 RPM Wing Flaps RETRACT to 20 Climb Speed 55 KIAS Wing Flaps RETRACT Cowl Flaps OPEN After Landing Wing Flaps UP Cowl Flaps OPEN ...

Page 240: ...ELITE OPERATOR S MANUAL 218 Securing the Airplane Parking Brake SET Throttle IDLE Electrical Equipment OFF Mixture IDLE CUT OFF Ignition Switch OFF Master Switch OFF Fuel Selector Valve LEFT ...

Page 241: ...219 CHAPTER 5 AIRCRAFT Aircraft Settings Panel Configuration Page ...

Page 242: ...ELITE OPERATOR S MANUAL 220 ...

Page 243: ...221 CHAPTER 5 AIRCRAFT ...

Page 244: ...ELITE OPERATOR S MANUAL 222 ...

Page 245: ...223 CHAPTER 5 AIRCRAFT CESSNA 182RG ...

Page 246: ...ropeller HIGH RPM Mixture RICH Master Switch ON Auxiliary Fuel Pump ON check for rise in fuel pressure then OFF Ignition Switch START Oil Pressure CHECK Avionics Power Switch ON Radios ON Before Takeoff Parking Brake SET Flight Instruments CHECK and SET Fuel Quantity CHECK Mixture RICH Fuel Selector Valve RECHECK BOTH Elevator Trim SET for Takeoff Throttle 1800 RPM a Magnetos CHECK b Suction Gauge...

Page 247: ...ure RICH Elevator Control LIFT NOSE WHEEL at 55 KIAS Climb Speed 70 80 KIAS Wing Flaps RETRACT after reaching safe altitude and 60 KIAS En Route Climb Airspeed 70 85 KIAS Throttle FULL OPEN Mixture RICH Cruise Power 2000 2400 RPM Elevator Adjust Mixture LEAN Descent Power AS DESIRED Mixture ADJUST Fuel Selector Valve BOTH Before Landing Fuel Selector Valve BOTH Mixture RICH ...

Page 248: ... LOWER NOSE WHEEL GENTLY Balked Landing Throttle FULL OPEN Wing Flaps RETRACT to 20 Climb Speed 55 KIAS Wing Flaps 10 RETRACT after reaching safe altitude and 60 KIAS After Landing Wing Flaps UP Securing Airplane Parking Brake SET Avionics Power OFF Electrical Equipment OFF Mixture IDLE CUT OFF Ignition Switch OFF Master Switch OFF Fuel Selector Valve LEFT or RIGHT ...

Page 249: ...227 CHAPTER 5 AIRCRAFT ...

Page 250: ...ELITE OPERATOR S MANUAL 228 ...

Page 251: ...229 CHAPTER 5 AIRCRAFT ...

Page 252: ...ELITE OPERATOR S MANUAL 230 PIPER ARCHER III ...

Page 253: ... oil pressure fuel pressure tri gauge to the EGT gauge simply click on the center of the instrument or press F2 on the keyboard Toggle back in the same manner To display the ceiling mounted switch panel press F1 on the keyboard NOTE Due to FAA regulation changes the amber light on the Annunciator Panel labeled PITOT HEAT OFF INOP will remain illuminated Selecting pitot heat ON will extinguish the ...

Page 254: ...ding gear control to operate the carburetor heat function Moving the landing gear handle to the UP position will cause the carburetor heat to be OFF The carburetor heat will be ON when the landing gear lever is in the DOWN position Selecting CHT Handle will activate the carburetor heat control found on some consoles manufactured by Precision Flight Controls Selecting the Carb Heat Quadr Throttle L...

Page 255: ...DESIRED TANK Normal Start Throttle 1 4 in OPEN Battery master switch ON Alternator switch ON Magnetos ON Electric fuel pump ON Mixture FULL RICH Propeller CLEAR Starter ENGAGE Throttle ADJUST Oil Pressure CHECK Warm up Throttle 800 1000 RPM Taxiing Taxi area CLEAR Parking brake RELEASE Throttle APPLY SLOWLY Brakes CHECK Steering CHECK Ground Check Parking Brake SET Throttle 2000 RPM ...

Page 256: ...tric fuel pump OFF Fuel pressure CHECK Throttle RETARD Before Takeoff Battery master switch verify ON Alternator switch verify ON Magnetos verify ON Flight instrument CHECK Fuel selector PROPER TANK Electric fuel pump ON Engine gauges CHECK Carburetor heat OFF Mixture SET Flaps SET Trim SET Takeoff Normal Technique Flaps SET Trim SET Accelerate to 57 KIAS Control wheel BACK PRESSURE to smoothly ro...

Page 257: ... Normal Throttle 2500 RPM Airspeed 122 KIAS Mixture RICH Carburetor heat ON if required Power Off Carburetor heat ON if required Throttle CLOSED Airspeed AS REQUIRED Mixture AS REQUIRED Power verify with throttle every 30 seconds Approach and Landing Fuel selector PROPER TANK Electric fuel pump ON Mixture SET Flaps SET 102 KIAS max Initial approach speed 75 KIAS Final approach speed flaps 40 66 KI...

Page 258: ...ANUAL 236 Stopping Engine Flaps RETRACT Electric fuel pump OFF Avionics master switch OFF Electrical switches OFF Throttle CLOSED Mixture IDLE CUT OFF Magneto switches OFF Alternator switch OFF Battery master switch OFF ...

Page 259: ...237 CHAPTER 5 AIRCRAFT Aircraft Settings Panel Configuration Page ...

Page 260: ...ELITE OPERATOR S MANUAL 238 ...

Page 261: ...239 CHAPTER 5 AIRCRAFT ...

Page 262: ...ELITE OPERATOR S MANUAL 240 PIPER ARROW IV ...

Page 263: ...ER 5 AIRCRAFT Cockpit Functions To adjust TAS click on knob and drag up or down Arrow IV CONFIGURATION page allows you to choose between HSI RMI or DG ADF Dual VORs You can also choose a slaved or non slaved ADF ...

Page 264: ...ELITE OPERATOR S MANUAL 242 Click on instrument face to change ADF to Nav 2 and vice versa Assign 1 needle to Nav 1 or Nav 2 receiver ...

Page 265: ...CH OPEN ALTR Switch ON BATT MASTR Switch ON Electric Fuel Pump ON Mixture RICH then IDLE CUT OFF Starter ENGAGE Mixture FULL RICH Throttle ADJUST Oil Pressure CHECK Warm Up Throttle 1400 to 1500 RPM Ground Check Parking Brake SET Propeller FULL INCREASE Throttle 2000 RPM Magnetos CHECK Vacuum 4 8 to 5 1 inches Hg Oil Temperature CHECK Oil Pressure CHECK Ammeter CHECK Annunciator Panel PRESS TO TES...

Page 266: ...N Flight Instruments CHECK Fuel Selector PROPER TANK Electric Fuel Pump ON Engine Gauges CHECK Alternate Air CLOSED Mixture SET Propeller SET Flaps SET Trim SET Takeoff Normal Flaps SET Trim SET Accelerate 65 to 75 KIAS Control Wheel ROTATE to CLIMB ATTITUDE Climb Best Rate Gear Up Flaps Up 90 KIAS Best Angle Gear Up Flaps Up 78 KIAS En Route 104 KIAS Electric Fuel Pump OFF at desired altitude ...

Page 267: ...PROPER TANK Electric Fuel Pump ON Mixture SET Propeller FULL INCREASE Gear DOWN 29 KIAS max Flaps SET 103 KIAS max Trim to 75 KIAS Stopping Engine Flaps RETRACT Electric Fuel Pump OFF Avionics OFF Electrical Switches OFF Propeller FULL INCREASE Throttle CLOSED Mixture IDLE CUT OFF Magnetos OFF ALTR Switch OFF BATT MASTR Switch OFF ...

Page 268: ...ELITE OPERATOR S MANUAL 246 Aircraft Settings Panel Configuration Page ...

Page 269: ...247 CHAPTER 5 AIRCRAFT Climb Performance ...

Page 270: ...ELITE OPERATOR S MANUAL 248 Cruise Performance ...

Page 271: ...249 CHAPTER 5 AIRCRAFT MOONEY M20J ...

Page 272: ...ELITE OPERATOR S MANUAL 250 ...

Page 273: ...ing warning annunciator panel alternate air source standby vac to the gear safety bypass switch Gear safety bypass switch overrides the safety features of the airspeed switch which automatically prevents retraction below approximately 65 knots Choose between standard or digital altimeter see Sec III Instrument Configuration Fully integrated cowl flaps ...

Page 274: ...M Mixture IDLE CUTOFF Cowl Flaps VERIFY OPEN Parking Brakes SET Flap Switch Centered Flaps UP Fuel Selector FULLEST TANK ELT ARM Landing Gear Switch DOWN Starting Engine Normal Throttle OPEN Propeller HIGH RPM Mixture FULL FORWARD RICH Master Switch ON Alternator Field Switch ON Annunciator Lights PRESS TO TEST Fuel Boost Pump ON to establish pressure then OFF Mixture IDLE CUTOFF Magneto Starter S...

Page 275: ...f Parking Brake SET Throttle 1200 RPM Propeller HIGH RPM Mixture RICH Full Forward Cowl Flaps FULL OPEN Magneto Starter Switch GROUND CHECK Throttle 1900 2000 RPM Magnetos CHECK Propeller CYCLE Throttle IDLE Trim Takeoff Setting Wing Flaps CHECK OPERATION then takeoff setting Avionics CHECK Annunciator Lights Press to Test Lights ON Parking Brake RELEASE Takeoff Normal Electric Fuel Boost Pump ON ...

Page 276: ...700 RPM Mixture FULL RICH Cowl Flaps FULL OPEN Airspeed 88 KIAS Cruise and Descent See Mooney manual for full details Approach for Landing Landing Gear XTEND below 132 KIAS Mixture FULL RICH Propeller HIGH RPM Fuel Boost Pump ON Fuel Selector FULLEST TANK Wing Flaps AS DESIRED FULL DOWN below 115 KIAS Trim AS DESIRED Parking Brake OFF Go Around Balked Landing Power FULL THROTTLE and 2700 RPM Mixtu...

Page 277: ...S Landing Normal Airspeed on Final 71 KIAS Full Flaps Brakes Minimum required Wing Flaps RETRACT after clearing runway Boost Pump OFF after landing Trim TAKEOFF position Shutdown Parking Brake SET Throttle 1000 to 1200 RPM to drop cylinder head temps Radio Master OFF Magneto Starter Switch Grounding Check Mixture IDLE CUTOFF Magneto Starter Switch OFF Alternator Field Switch OFF Master Switch OFF ...

Page 278: ...ELITE OPERATOR S MANUAL 256 Aircraft Settings Panel Configuration Page ...

Page 279: ...257 CHAPTER 5 AIRCRAFT ...

Page 280: ...ELITE OPERATOR S MANUAL 258 ...

Page 281: ...259 CHAPTER 5 AIRCRAFT SOCATA TB10 TOBAGO ...

Page 282: ...tank selector is in the off position Parking Brake light Illuminates when the parking brake is set Low Oil Pressure Warning light Illuminates when oil pressure is low or the engine is not running Test Switch Click on this switch to test all annunciator lights Dim Switch Dims all lights for use at night Fuel Pump light Illuminates when the electric fuel pump is activated Pitot Heat light Illuminate...

Page 283: ...red fuel tank The top position shuts off the fuel supply Turn knob to set and release the parking brake Fuel Pump Turn Coordinator Power Supply Beacon Nav Lights Pitot Heat Taxi Light Landing Light Carburetor Heat Flap Lever Generator Master Switch ...

Page 284: ...FULL FORWARD Mixture FULL RICH Main switch ON Fuel pump ON Pump warning light ON Fuel pressure Green sector Injection Throttle operated a few times Throttle OPEN Magneto start selector START Magneto selector BOTH when engine starts Oil pressure Green sector Fuel pump OFF Engine 1000 to 1200 RPM After Starting Engine Electrical Generation Check Alternator switch OFF a Generation warning light ON b ...

Page 285: ...g Parking brake RELEASE Flight instruments Checked Taxi light As required Engine Run up Parking brake SET Oil temperature Green sector Oil pressure Green sector Fuel pressure Green sector Mixture FULL RICH Carburetor heating OFF Fuel selector Set to fullest tank Propeller Check Propeller FULL FORWARD Throttle 2000 RPM Propeller Cycle twice and return to HIGH RPM Magneto Check Throttle 2000 RPM Mag...

Page 286: ...m Power Check Full throttle 2700 RPM Before Take off Pitch trim TAKE OFF Flaps TAKE OFF Magneto selector BOTH Propeller FULL FORWARD Carburetor heating OFF Mixture FULL RICH Fuel selector Check to fullest tank Fuel pump ON Oil temperature Green sector Oil pressure Green sector Fuel pressure Green sector Voltmeter Green sector Altimeter SET Heading indicator SET Horizontal attitude gyro SET Parking...

Page 287: ...imb speed 73 KIAS Flaps RETRACT At 1000 Feet Fuel pump OFF Climb Mixture FULL RICH Throttle FULL POWER Propeller FULL FORWARD 2700 RPM Optimum climb speed 78 KIAS Cruise Power As required Pitch trim As required Mixture As required Descent Power setting as required for descent Approach Landing Final Airspeed 78 KIAS Flaps TAKE OFF ...

Page 288: ...Around Carburetor heating OFF Throttle FULL POWER Airspeed 70 73 KIAS When climb rate is positive Flaps TAKE OFF Airspeed 73 KIAS Flaps RETRACTED Climb 78 KIAS After Landing Fuel pump OFF Flaps RETRACTED Trim TAKE OFF Radio equipment As required Carburetor heating OFF Shutdown Securing Airplane Parking brake SET Turn and Bank indicator OFF Radio master OFF Throttle REDUCE ...

Page 289: ...267 CHAPTER 5 AIRCRAFT ...

Page 290: ...ELITE OPERATOR S MANUAL 268 ...

Page 291: ...269 CHAPTER 5 AIRCRAFT ...

Page 292: ...ELITE OPERATOR S MANUAL 270 Aircraft Settings Panel Configuration Page ...

Page 293: ...271 CHAPTER 5 AIRCRAFT SOCATA TB20 TRINIDAD ...

Page 294: ...including the red in transit light The red light will also illuminate if the throttle is closed with the gear in the up position TB20 Rudder Trim The rudder trim knob is only functional when used in conjunction with rudder pedals or if the Yaw Control feature is Enabled on the CONTROL Page If the Yaw Control is Disabled the ELITE software locks out the rudder trim and the aircraft maintains coordi...

Page 295: ...t ON Main switch ON Propeller FULL FORWARD Throttle OPEN Mixture IDLE CUT OFF Fuel pump FULL RICH until fuel flow displayed then IDLE CUT OFF Magneto selector BOTH when engine starts Oil pressure CHECK After Starting Engine Electrical Power Check ALTr FLD switch breaker OFF a ALTr warning light ON b Voltmeter Yellow sector ALTr FLD switch breaker ON ALTr warning light OFF a Voltmeter Green sector ...

Page 296: ...axiing Parking brake RELEASE Flight instruments Checked Taxi light As required Engine Run up Parking brake SET Oil temperature Green sector Oil pressure Green sector Mixture FULL RICH Fuel selector Set to fullest tank Propeller Check Propeller FULL FORWARD Throttle 2000 RPM Propeller Cycle twice and return to HIGH RPM Magneto Check Throttle 2000 RPM Magneto selector L then BOTH R then BOTH Maximum...

Page 297: ...ch trim TAKE OFF Rudder trim TAKE OFF Flaps TAKE OFF Magneto selector BOTH Propeller FULL FORWARD Mixture FULL RICH Fuel selector Check to fullest tank Fuel pump ON Oil temperature Green sector Oil pressure Green sector Voltmeter Green sector Altimeter SET Heading indicator SET Horizontal attitude gyro SET Parking brake RELEASE Takeoff Throttle FULL POWER Standard Airspeeds Rotation 68 KIAS Initia...

Page 298: ...b Mixture FULL RICH Throttle FULL POWER Propeller FULL FORWARD 2575 RPM Optimum climb speed 95 KIAS Cruise Power As required Pitch trim As required Mixture As required Descent Power setting as required for descent Approach Landing Final Airspeed 86 92 KIAS Flaps TAKE OFF below 129 KIAS Landing gear lever DOWN Fuel pump ON Mixture FULL RICH ...

Page 299: ...tle FULL POWER Airspeed 76 81 KIAS When climb rate is positive Landing gear lever UP Flaps TAKE OFF Airspeed 90 KIAS Flaps RETRACTED Climb 95 KIAS After Landing Fuel pump OFF Flaps RETRACTED Trim TAKE OFF Radio equipment As required Shut down Securing Airplane Parking brake SET Turn and bank indicator OFF Radio master OFF Throttle REDUCE ...

Page 300: ...ELITE OPERATOR S MANUAL 278 ...

Page 301: ...279 CHAPTER 5 AIRCRAFT ...

Page 302: ...ELITE OPERATOR S MANUAL 280 Aircraft Settings Panel Configuration Page ...

Page 303: ...281 CHAPTER 5 AIRCRAFT BONANZA A36 ...

Page 304: ...ws you to change the avionics configuration HSI with slaved ADF HSI with non slaved ADF Directional Gyro DG with slaved ADF When in the ADF slaved or non slaved mode click on the ADF instrument face to change it to a VOR 2 Possible changes to the avionics configuration and type of altimeters can be chosen on the Bonanza s Configuration Page ...

Page 305: ...283 CHAPTER 5 AIRCRAFT DG with ADF DG with CDI 2 NOTE The HSI RMI mode comes with the KFC 150 Flight Director Autopilot When in the DG mode the Autopilot is changed to the KAP150 mode ...

Page 306: ...ision Height DH bug The DH light on the radar altimeter and attitude indicator will light when designated height above ground is reached Click and drag switch to change OAT from Fahr to Cent Push to change from time to timer mode Push to Start and Stop timer Push to reset timer Vacuum Pressure Gauge Clock ...

Page 307: ...aps Flap Position Indicator Flap Switch Alternator Load Meter Fuel Gauges Land ing Gear Lights An nun ci a tor Test Magnetos Starter Switch Electric System Switches Fuel Pump Switch Fuel Selector Environmental Control Alternate Air Parking Brake Bonanza cockpit switches and controls ...

Page 308: ... Landing Gear Position Lights CHECK Starting Engine Mixture FULL RICH Propeller HIGH RPM Throttle FULL OPEN Fuel Boost Pump HI then OFF Throttle CLOSE then open inch Magneto Start Switch START position and release Throttle 900 1000 RPM Oil Pressure 10 PSI within 30 seconds Warm up 900 1000 RPM Alternator Switch ON Loadmeters and Voltmeter CHECK for battery charge Voltmeter CHECK for 28 volts Red S...

Page 309: ...Selectors CHECK ON Starter Annunciator Light CHECK Throttles 2200 RPM Propellers EXERCISE Throttles 1700 RPM Magnetos CHECK Throttles 1500 RPM Propellers FEATHERING CHECK Throttles IDLE Throttles 900 1000 RPM Trim As Required for Take off Flaps CHECK Parking Brake OFF Takeoff Take off Power FULL THROTTLE 2700 RPM Oil Temperature CHECK at 24ºC Minimum Airspeed Accelerate to Take off Speed Landing G...

Page 310: ...t Pumps OFF Cruise Cowl Flaps CLOSED Power SET Fuel Boost Pumps OFF Mixtures SET using EGT Descent Altimeter SET Mixture FULL RICH Cowl Flaps CLOSED Flaps As Required Power As Required Before Landing Fuel Selector Valves CHECK ON Fuel Boost Pumps OFF Cowl Flaps As Required Mixture Controls FULL RICH Flaps APPROACH Landing Gear DOWN Flaps FULL DOWN Airspeed Normal Approach Speed Propellers HIGH RPM...

Page 311: ...Flaps As Required After Landing Lights As Required Flaps UP Trim Tabs RESET Cowl Flaps OPEN Fuel Boost Pumps As Required Shutdown Parking Brake SET Propellers HIGH RPM Throttles 1000 RPM Fuel Boost Pumps OFF Electrical Switches Avionics OFF Mixture Controls IDLE CUT OFF Magneto Start Switches OFF Battery Alternator Switches OFF ...

Page 312: ...ELITE OPERATOR S MANUAL 290 Aircraft Settings Panel Configuration Page ...

Page 313: ...291 CHAPTER 5 AIRCRAFT ...

Page 314: ...ELITE OPERATOR S MANUAL 292 ...

Page 315: ...293 CHAPTER 5 AIRCRAFT ...

Page 316: ...ELITE OPERATOR S MANUAL 294 ...

Page 317: ...ncluding non precision approaches NDB VOR localizer and backcourse and precision approaches ILS All instruments are displayed on the screen and be have exactly like their real counterparts Instrument scanning and handling may thus be exercised in the same way as in the aircraft Proper navigation training can only be achieved with a training device which exactly represents the real cockpit The purp...

Page 318: ...aircraft ELITE gives all indications and flight characteristics of an engine loss with exception of feel Stereo sound how ever was added to provide an audible detection of engine loss to enhance the realism Needless to say a stereo sound card and speakers are required Best sounds are achieved with high quality speakers with a good bass subwoofer ...

Page 319: ...297 CHAPTER 5 AIRCRAFT KING AIR B200 ...

Page 320: ...T and Generator GEN 1 GEN 2 switches simply click on the master switch cover The cover will close automatically after several moments Firewall Shutoff Valves To access the firewall shutoff valves simply click on either red switch cap to expose the firewall fuel cutoff toggle The switch caps will close automatically after several moments External power for engine starting may be simulated by pressi...

Page 321: ...spectively The DH button on the Radar Altimeter can be pressed to reset To cancel the Landing Gear Warning Horn press the F4 key To quick start the engines when not previously selected click on either Ignition Start switch and drag to the other Ignition Start switch This will immediately start both engines ...

Page 322: ...ELITE OPERATOR S MANUAL 300 AP 3000 Avionics Panel Using the Collins radio with the AP 3000 Avionics Panel ...

Page 323: ...adios may also be used in direct tuning mode simply by pressing and holding with the mouse the ACT button located in the lower right corner of each radio head for two seconds Activating the direct tuning mode will cause the lower display to change to a series of dashes and the upper display now becomes the frequency in use and where all changes are made To store COMM NAV and ADF frequencies use th...

Page 324: ...e sure that the HSI is in DIST mode to read distance The transponder may be programmed to hold a pre selected squawk frequency as well Simply depress the PRE button for two seconds and then dial in the desired squawk code with either the mouse or by using the four control knobs on the AP 3000 When done press the PRE button again This will save the desired code and may be retrieved at any time simp...

Page 325: ...controls the Radar Altimeter The ALT knob adjusts the altimeter setting The NAV 2 knob is non functional on the King Air module The CRS knob with corresponding toggle switch in CRS mode moves the course selector on the HSI CRS knob in OBS mode moves the three position selector on the lower left corner of the HSI The DIST TTC or SPD readout is indicated in the top left portion of the HSI and will p...

Page 326: ...PPR localizer track function BC button engages the AP CPLD autopilot coupled function AP ENG button engages the autopilot and yaw damper ENG button engages the VS function ARM button engages the ALT SEL function To operate in flight director mode simply press ALT and HDG NAV or APR The command bars will be present only if HDG NAV or APR is selected No flight director function is available with ALT...

Page 327: ...ing this mode of flight control To operate in basic autopilot mode simply press the AP ENG button on the avionics panel This activates the Yaw Damper YD and Autopilot AP which by itself is the most basic functional mode In this mode you may depress and hold the Control Wheel Steering CWS button on the left side of the yoke to make pitch and heading changes When the CWS button is released the aircr...

Page 328: ...pressed to cause the aircraft to level off at the SET ALTITUDE value Using the VS function in a climb or descent will cause the aircraft to pitch as necessary to maintain the desired vertical speed should throttle and or configuration changes occur If the VS function is not used then the aircraft will maintain the original pitch attitude causing the vertical speed and airspeed indications to chang...

Page 329: ... pressing the NAV GPS button on the GPS NAV CONTROL box located above the Attitude Indicator and then pressing NAV on the autopilot The1 2BKfunctionshouldbeusedwhendesiredtoprevent excessive banking during tracking operations especially when close to a VOR as in station passage The autopilot automatically utilizes this function once established on a LOC course in both NAV and APR modes although th...

Page 330: ...tery Right Ignition Engine Start ON R FUEL PRESS annunciator OFF Right Condition Lever LOW IDLE after N1 indicates 12 minimum ITT and N1 MONITOR Right Oil Pressure CHECK Right Condition Lever HIGH IDLE Right Ignition Engine Start OFF at 50 N1 or above Right Generator RESET then ON CHARGE BATTERY until load meter reads approximately 50 then OFF Left Ignition Engine Start ON L FUEL PRESS annunciator...

Page 331: ...s Loadmeters ON AC Voltage Frequency CHECK Avionics Master ON Lights AS REQUIRED Instruments CHECK Brakes CHECK Before Takeoff Runup Avionics CHECK Autopilot CHECK Electric Elevator Trim Control CHECK Trim Tabs SET Engine Control Friction Locks SET Flaps CHECK AND SET Instrument Vacuum CHECK at 1800 RPM Fuel Quantity CHECK Flight Engine Instruments CHECK Before Takeoff Final Items Annunciator Ligh...

Page 332: ...istance and climb data Climb Landing Gear UP Flaps UP Yaw Damp ON Climb Power SET Propeller 1900 RPM Propeller Synchrophaser ON Autofeather MONITOR Cruise Cruise SET per CRUISE POWER TABLE Engine Instruments MONITOR Auxiliary Fuel Gauge MONITOR Descent Altimeter SET Power AS REQUIRED Before Landing Autofeather Switch ARM Flaps APPROACH Landing Gear DOWN Lights AS REQUIRED ...

Page 333: ...WHEN LANDING ASSURED Flaps DOWN 100 Yaw Damp OFF Condition Levers HIGH IDLE Propeller Levers FULL FOR WARD AFTER TOUCHDOWN Power Levers LIFT and REVERSE Condition Levers LOW IDLE Balked Landing Power MAXIMUM AVAIL ABLE Airspeed ESTABLISH 100 KNOTS Flaps UP Landing Gear UP After Landing Landing and Taxi Lights AS REQUIRED Engine Auto Ignition OFF Electrical Load OBSERVE LIMITS Trim SET Flaps UP ...

Page 334: ...aster OFF Inverter OFF Autofeather Switch OFF Light Switches OFF Battery CHARGED ITT STABILIZED AT MIN TEMP for one MIN Condition Levers FUEL CUTOFF Propellers FEATHERED Standby Boost Pumps Crossfeed OFF DC Volt Loadmeters CHECK VOLTAGE Battery generator Switches OFF below 15 N1 ...

Page 335: ...313 CHAPTER 5 AIRCRAFT Aircraft Settings Panel Configuration Page ...

Page 336: ...ELITE OPERATOR S MANUAL 314 ...

Page 337: ...315 CHAPTER 5 AIRCRAFT ...

Page 338: ...ELITE OPERATOR S MANUAL 316 PIPER SENECA III ...

Page 339: ...TER 5 AIRCRAFT Cockpit Functions Click mouse to lower mag guards and access mag switches Click and drag to open close cowl flaps Push Pull Park Brake Nav 1 Nav 2 Electrical System Control Engine Start Switches ...

Page 340: ...TOR S MANUAL 318 Click on instrument or press F1 to toggle instrument from EGT to Fuel Flow Click on gauge or press F2 to toggle between suction and amp meter Emergency gear release switch restart program to reset ...

Page 341: ...heit and Celsius and timer The chronometer digital display shows Time and OAT information as provided on the Control page time and Meteo page OAT CONTROL Page METEO Page SEL button toggles between UTC OAT and timer modes When in the OAT mode Fahr to Cen can be changed by pressing the CTL button In the timer mode pressing CTL will start or stop timer Holding CTL for approximately 2 seconds will res...

Page 342: ...Air Controls OFF Cowl Flaps OPEN Fuel Selectors ON Radio Master Switch OFF Electrical Switches OFF Starting Engine Battery Master Switch ON Gear Lights Green Throttles HALF OPEN Propeller Controls FULL FORWARD Mixtures FULL RICH Magneto Switches ON Starter ENGAGE Throttle 1000 RPM Oil Pressure CHECK Second Engine Repeat Procedure Alternator Output CHECK Both Left and Right Gyro Vacuum CHECK Warm U...

Page 343: ...ound Check Parking Brake SET Mixtures FULL RICH Propeller Controls FULL FORWARD Throttles 1000 RPM Engine Instruments CHECK Propeller Controls FEATHER CHECK Throttles 2300 RPM Propeller Controls EXERCISE Throttles 2000 RPM Magnetos CHECK Alternator Output CHECK Both Left and Right Annunciator Panel Lights OUT Gyro Vacuum Gauge 4 8 5 1 IN Hg Throttles IDLE CHECK Throttles 800 1000 RPM Before Takeof...

Page 344: ...omplete Annunciator Panel Lights Press to Test Parking Brake RELEASE Takeoff Flaps UP Brakes HOLD Power 2800 RPM 40 IN Hg MP Mixture FULL RICH Brakes RELEASE Rotate Speed KIAS Gear UP Climb Speed 92 KIAS Climb Mixture FULL RICH Power 2600 RPM 33 IN Hg MP Climb Speed 120 KIAS Cowl Flaps As Required Cruising Power SET per CHART Mixture Controls ADJUST Cowl Flaps As Required ...

Page 345: ...ontrols FULL RICH Propeller Controls FULL FORWARD Landing Gear Below 130 KIAS DOWN Landing Gear Lights 3 GREEN Go Around Throttles FULL POWER Propeller Controls FULL FORWARD Mixtures FULL RICH Climb Speed 85 KIAS Flaps RETRACT SLOWLY Gear UP Cowl Flaps As Required Trim As Required Normal Landing Flaps Below 115 KIAS FULL DOWN Airspeed 90 KIAS Trim As Required Throttles As Required Touchdown Main W...

Page 346: ...fter Landing Flaps RETRACT Cowl Flaps FULL OPEN Lights As Required Stopping Engine Radio Master Switch OFF Electrical Equipment OFF Throttles IDLE Mixtures IDLE CUTOFF Magneto Switches OFF Alternator Switches OFF Battery Master OFF ...

Page 347: ...325 CHAPTER 5 AIRCRAFT Aircraft Settings Panel Configuration Page ...

Page 348: ...ELITE OPERATOR S MANUAL 326 ...

Page 349: ...327 CHAPTER 5 AIRCRAFT ...

Page 350: ...ELITE OPERATOR S MANUAL 328 ...

Page 351: ... 22 8 21 9 21 5 29 7 28 8 28 0 27 0 26 2 25 3 8000 1 24 8 24 0 23 0 22 4 21 6 21 2 29 4 28 4 27 7 26 8 25 7 25 0 10000 5 24 4 23 7 22 8 22 0 21 4 21 0 28 3 27 5 26 5 25 5 24 7 12000 9 24 0 23 3 22 5 21 7 21 2 20 9 28 3 27 2 26 3 25 3 24 6 14000 13 23 0 22 3 21 4 21 1 20 8 27 2 26 2 25 2 24 4 1600 17 22 0 21 3 21 0 20 6 25 9 25 0 24 3 18000 21 21 2 20 9 20 5 25 0 24 2 20000 25 21 2 20 8 20 4 24 2 2...

Page 352: ...2 8 31 5 30 5 33 6 32 4 6000 3 32 5 31 2 30 3 33 4 32 2 8000 1 32 3 31 0 30 1 33 1 32 0 10000 5 32 0 30 9 30 0 33 0 31 9 12000 9 31 8 30 7 29 8 32 5 31 8 14000 13 30 5 29 7 31 7 1600 17 30 4 29 5 31 6 18000 21 29 4 20000 25 29 3 22000 28 To main tain con stant pow er add ap prox i mate ly 1 for each 6 C above stan dard Sub tract ap prox i mate ly 1 for each 6 C be low stan dard Do not ex ceed 34 M...

Page 353: ...331 CHAPTER 5 AIRCRAFT BEECH BARON 58 ...

Page 354: ...e Baron s Configuration page The standard configuration for the Bar on 58 is the HSI and RMI The Configuration page allows you to change the avionics configuration HSI with slaved ADF HSI with non slaved ADF Directional Gyro DG with slaved ADF When in the ADF slaved or non slaved mode click on the ADF instrument to change it to a VOR 2 ...

Page 355: ...RAFT For pilots of older Baron models external throttle controls prop and throttle can be configured to match the aircraft quadrant structure Configuration page Instrument Options CONFIGURATION page Prop Synch Indicator ...

Page 356: ...ELITE OPERATOR S MANUAL 334 DG with ADF DG with VOR 2 NOTE The HSI RMI mode comes with the KFC 150 Flight Director Autopilot When in the DG mode the Autopilot is changed to the KAP ...

Page 357: ...335 CHAPTER 5 AIRCRAFT Click and drag switch to change OAT from Fahr to Cent Push to change from time to timer mode Push to Start and Stop timer Push to reset timer Switch Array Audio Panel ...

Page 358: ...ting Engine Mixture FULL RICH Propeller HIGH RPM Throttle FULL OPEN Fuel Boost Pump HI then OFF Throttle CLOSE then open inch Magneto Start Switch START position and release Throttle 900 1000 RPM Oil Pressure PSI within 30 seconds Warm up 900 1000 RPM Alternator Switch ON Loadmeters and Voltmeter CHECK for battery charge Voltmeter CHECK for 28 volts Red START Annunciator Light CHECK Start other en...

Page 359: ...2200 RPM Propellers EXERCISE Throttles 1700 RPM Magnetos CHECK Throttles 1500 RPM Propellers FEATHERING CHECK Throttles IDLE Throttles 900 1000 RPM Trim As Required for Take off Flaps CHECK Parking Brake OFF Takeoff Take off Power FULL THROTTLE 2700 RPM Oil Temperature CHECK at 24ºC Minimum Airspeed Accelerate to Take off Speed Landing Gear RETRACT when rate of climb positive Airspeed Establish De...

Page 360: ...owl Flaps CLOSED Power SET Fuel Boost Pumps OFF Mixtures SET using EGT Descent Altimeter SET Mixture FULL RICH Cowl Flaps CLOSED Flaps As Required Power As Required Before Landing Fuel Selector Valves CHECK ON Fuel Boost Pumps OFF Cowl Flaps As Required Mixture Controls FULL RICH Flaps APPROACH Landing Gear DOWN Flaps FULL DOWN Airspeed Normal Approach Speed Propellers HIGH RPM ...

Page 361: ...Flaps As Required After Landing Lights As Required Flaps UP Trim Tabs RESET Cowl Flaps OPEN Fuel Boost Pumps As Required Shutdown Parking Brake SET Propellers HIGH RPM Throttles 1000 RPM Fuel Boost Pumps OFF Electrical Switches Avionics OFF Mixture Controls IDLE CUT OFF Magneto Start Switches OFF Battery Alternator Switches OFF ...

Page 362: ...ELITE OPERATOR S MANUAL 340 Aircraft Settings Panel Configuration Page ...

Page 363: ...341 CHAPTER 5 AIRCRAFT ...

Page 364: ...ELITE OPERATOR S MANUAL 342 ...

Page 365: ...343 CHAPTER 5 AIRCRAFT ...

Page 366: ...ELITE OPERATOR S MANUAL 344 Intentionally Left Blank ...

Page 367: ...m features and easier installation setup and program navigation Serial Numbers Do Not Match The USB key and the software are encoded with the same serial number If they do not match you will receive a warning message Check the USB key key chain and the diskette to see if they match Also check the bottom left corner of the program startup screen for the serial number of the program If these numbers...

Page 368: ...ows an instructor to monitor a persons flight path give radar vectors invoke failures and change weather all without stopping and interrupting the student s flight What flight control devices sticks yokes rudders are compatible with ELITE Just about any stick yoke or rudder pedals that are recognized by the operating system will be compatible with the ELITE program ELITE uses Direct Input from the...

Page 369: ...l see a window with your serial number Compare the number displayed with the one on your software If there is no serial number the UCI is not communicating with the program To fix this disconnect the power on the UCI for 5 seconds and connect it again resets the UCI If problem persists your com ports might be disabled in your system BIOS If you do not have any com ports to select from on the menu ...

Page 370: ...ed to download the latest driver for the video card or replace the video card for one that supports OPEN GL such as NVIDIA For more information on this topic visit www nvidia com Serial number of ELITE and control interface do not match Please contact our support department for a control RMA Number The UCI has encountered an internal power surge and the serial chip will have to be replaced You can...

Page 371: ...dware tab When you click on device manager you will see a list of hardware Look for an unknown device Double click on the unknown device and click the reinstall driver button Select the advanced option In the window include this location in the search C Program Files Elite ELITE PCATD 8 Drivers ELITEUSB Press next several times then finish and your hardware should be online DISK FULL Hard drive sp...

Page 372: ...lled ELITE SERIAL NUMBER MISMATCH ELITE serial number not the same Check physical number on the software to the one on the USB key or UCI to be the same If not contact support dept ERROR IN LOADING INSTRUMENT PICTURES Problem in the memory configuration MAC ONLY Allocate at least 15000K 25000K of memory to ELITE AVIONICS PANEL NOT DISPLAYED ON INSTRUMENT PANEL External avionics selected on digital...

Page 373: ...th your stick yoke or stick yoke and pedals listed Highlight the stick yoke and hit the SELECT button under Main Flight Controls then click the CONFIGURE button beneath it This will open the Flight Control Configuration screen On this screen all the axes of the stick yoke will be listed on the top and the buttons on the bottom When you push a button or rocker HAT switch it will turn red Once it is...

Page 374: ... ELITE Directory Then you can click on the pedals Press configure under Rudder and click RVS under the brakes L R to fix the reversed AXIS don t forget to restart the ELITE software My left throttle is not working on my quadrant how do I fix this More than likely you have set in the program to use the Yoke s quadrant as the one in operation Go to the configuration screen then CPU set then game con...

Page 375: ...nd 92 Airlift Command Post 90 Airport Advisory Service 91 airport facility directory 89 Airport Frequency Information 89 Communication box 89 Frequency Column 89 Airport Radar Service Area 91 Airspeed 208 209 216 217 225 226 235 254 255 265 266 276 277 287 288 289 311 323 337 338 339 Airspeed Indicator 177 Airspeed Panel 73 Air Traffic Control Tower 91 ALT button 304 Alternate Air 243 244 273 275 ...

Page 376: ...Service 90 Automatic Weather Observing Station 90 Autopilot 2 195 217 309 ALT 197 Altitude Vertical Speed Selector 198 AP ENG 195 APR 196 197 BC 196 197 CWS 197 199 FD 197 GS 196 197 HDG 195 KAP 150 195 KAS 297B 198 KFC 150 195 197 NAV 196 auto pilot engage 195 autopilot mode 305 Auxiliary Fuel Gauge 310 Auxiliary Fuel Pump 207 214 224 322 323 avionics 346 Avionics xv xvi 233 243 245 253 286 287 2...

Page 377: ...ircraft Checklist 214 Aircraft Settings Panel 219 C172R xvi C182 RG xvi C182S xvi Circuit Breakers 233 286 336 CLD See Clearance Delivery Clearance Delivery 90 Clearance Pre Taxi 90 Climb 266 Climb Power 310 Climb speed 208 209 216 217 225 226 254 265 322 323 Collins Flight Control System 304 Collins Pro Line II 301 COMM1 NAV1 183 COMM2 NAV2 183 Community Aerodrome Radio Station 91 Condition Lever...

Page 378: ...Instruments 287 337 Engine gauges 234 Engine Gauges 244 Engine Instruments 208 215 224 310 321 Engine Runup 322 Engine Startup 135 Engine Temperatures 288 338 Control screen 27 Control Screen State Files 140 control sensitivity adjusting 37 Control wheel 234 244 Control Wheel Steering 304 Copyright xix Cowl Flaps 214 215 216 217 224 252 253 254 255 286 288 289 303 320 322 323 324 336 338 339 CPT S...

Page 379: ... Fuel Boost Pump 252 254 286 287 288 289 336 337 338 339 Fuel Flow Indicator 253 Fuel Imbalance 136 Fuel Indicators 287 337 Fuel Load Panel 136 Fuel pressure 234 244 262 263 264 Fuel pump 262 264 265 266 273 275 276 277 Fuel Quantity 207 308 309 322 Fuel Quantity Indicators 286 336 Fuel selector 233 234 235 244 245 252 253 254 262 263 264 273 274 275 286 287 321 322 323 336 337 Fuel Selector Valve...

Page 380: ... See Initial Contact IDENT button 63 Ignition 308 309 Ignition Annunciators 310 Ignition Switch 207 209 214 224 226 ILS 56 INF See Information Information 90 Initial climb 265 275 Initial Contact 91 Injection 262 Instructor Operator Station 39 Instrument 48 169 Instrument Approach Scenarios 68 138 Instrument Configuration 38 Instrument Panel Adjusting 174 Instruments 177 309 321 Airspeed Indicator...

Page 381: ...nse Agreement xx Lights 289 321 339 Light Switches 312 Limits 30 Loadmeters 286 309 336 local time 203 local time LT 144 LOD See Level of Detail LT See local time M MAG HDG See Heading Panel Magnetos 207 215 224 233 234 243 245 253 287 321 337 Magneto selector 262 263 264 273 274 275 Magneto Start selector 262 Magneto Start switch 252 253 255 286 289 336 339 Magneto switch 236 320 324 Main switch ...

Page 382: ...ITCH 298 MDI See Moving Dial Indicator MDI knob 303 Menu 166 175 Metar Files Downloading METAR Files Advanced Method 115 Metar Page 43 111 168 Downloading METAR Files 114 Basic Method 114 METAR Data 112 Wind and Gusts 112 Meteo Files 108 Load 108 Save 108 Meteo Page 42 95 168 319 Actual Weather Column 97 Ceiling Standard View 101 Clouds Page 95 96 Dynamic WX 97 Layout GenView 96 Static Weather 98 ...

Page 383: ... Deselection 56 N National Flight Data Center xviii NAV1 179 180 NAV1 NAV2 Toggle 302 NAV2 180 NAV button 304 NAV COMM 183 NAV Data Changing 66 Loading 66 NAV database 55 Nav Data Symbols 51 Airport Symbol 52 Communication frequencies 52 DME 51 FIX 51 Glide Path Track 51 Glideslope transmitter 52 Holding 51 Localizer transmitter 52 Marker 51 NDB 51 Runway with displaced threshold 52 VOR 51 VOR DME...

Page 384: ... 275 276 Pitot 177 Pitot Heat 252 PITOT HEAT 177 Power Levers 166 308 311 POWER light 36 Power Quadrant 31 Product Registration 16 Profile Button 73 Profile Scroll 74 Program Menu 39 Pro Panel II 21 Propeller 214 215 217 224 233 243 244 245 252 253 254 262 263 264 265 266 273 274 275 276 277 286 287 288 289 310 312 336 337 338 339 Propeller Area 214 Propeller Controls 308 320 321 323 Propeller Lev...

Page 385: ...ITUDE 306 Shortcuts General 163 Control 163 Engine Sound 163 Simulation Speed 163 Visual 163 MAP Screen 162 Custom Zoom 163 HDG Dist 163 Position 163 Route 162 Scroll 162 Zoom 162 Show Facilities 61 63 Single Engine Land 4 SKC See Sky Clear Sky Clear 103 Socata TB 10 xvi xvii TB10 Tobago 259 Aircraft Checklist 262 273 Aircraft Settings Panel 270 Cockpit Functions 260 TB 20 xvi xvii TB20 Trinidad 2...

Page 386: ... trim wheels 166 TRS See Terminal Radar Service Area TRSA See Terminal Radar Service Area Turn and bank indicator 263 266 273 277 Turn Coordinator See Turn Indicator Turn Indicator 178 TWE See Transcribed Weather Broadcast TWEB See Transcribed Weather Broadcast TWR See Air Traffic Control Tower U UAC See Upper Area Control Center UCI box 347 UNI See Unicom Unicom 91 universal time 203 Upper Area C...

Page 387: ...l 146 Wheels 166 Wibu key 12 17 Wibu Key 6 WIBU key 4 Wind Barb Description 119 Windows 345 346 Windows Vista 6 Windows XP 6 26 Wing Flap 208 209 215 216 217 225 226 253 254 255 X Y Yaw Control 137 Yaw Damp 310 311 Yaw Damper 305 YD See Yaw Damper Z ...

Page 388: ...PI 135 OPERATOR S MANUAL 366 Intentionally Left Blank ...

Page 389: ...ENTS SUPPLEMENTS This section will include supplemental instructions for standard equipment for the PI 121 and PI 135 and also be used for the insertion of optional products or future product additions or releases ...

Page 390: ...PI 135 OPERATOR S MANUAL 368 Intentionally Left Blank ...

Reviews: