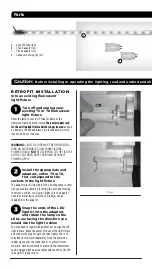
Fig. 1
Parts
Caution:
Before installing or operating the lighting, read and understand all safety instructions and warnings.
rEtroFIt InstallatIon
Into an existing fluorescent
light fixture
Turn off and unplug your
existing T5 or T8 fluorescent
light fixture
Allow the lamp to cool for 15 minutes. Remove the
fluorescent lamp from the fixture.
The power supply cord
for the existing light fixture will no longer be used
and can
be tied up or bound and placed in a location where it will
stay dry and out of the way.
WARNING:
LIGHT FIXTURE MUST BE UNPLUGGED–
BIND OR DISCONNECT CORD FROM FIXTURE.
POWER SHOULD
NOT
BE DELIVERED TO THE FIXTURE
AS THE LED TUBES HAVE THEIR OWN SEPARATE
POWER SUPPLY.
Install the appropriate end
adaptors, either T5 or T8,
that correspond to the
sockets in the light fixture
The adaptor pins will install into the existing lamp sockets
like you would a lamp, by inserting the pins and rotating
them into position.
See Figure 1. Make sure the adaptor
openings are facing so that the LED tube(s) can be
snapped into the adaptor.
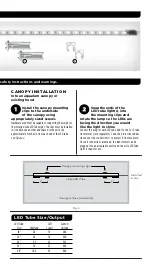
Snap the ends of the LED
light(s) into the adaptors
and rotate the lamp so the
LEDs are facing the direction you
would like the light to shine
You may need to support the adaptor as you snap the LED
light in place. Route the power cord out of the light fixture
and connect the plug for each LED tube light to the 1 or 3
tube transformer (sold separately). Slide the protective
rubber sleeve over the connection(s) to protect it from
moisture. Once all connections are made, the transformer
can be plugged into an acceptable outlet and the eLite LED
Tube Light is ready for use.
A – eLite LED tube light
B – T5 end adaptor (x2)
C – T8 end adaptor (x2)
D – Canopy mounting clip (x2)
A
B


