05072020JA
2
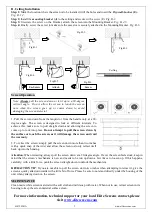
B. Ceiling Installation
Step 1:
Mark the location where the screen is to be installed, drill the holes and insert the
Dry-wall Anchor (E).
Fig. B- 1,2.
Step 2:
Install the
mounting bracket (A)
to the ceiling and secure with a
screw (E). Fig. B-3.
Step 3:
Un-screw the screw on the Bracket, attach the screen into the Mounting Bracket.
Fig. B- 4,5.
Step 4:
Finally, screw the screw to make sure the case slot is securely attached to the Mounting Bracket.
Fig. B- 6
.
Screen Operation
1. Pull the screen down from the lanyard or from the handle only at a 90-
degree angle. The screen is designed to lock at different intervals. To
achieve this, make sure to pull straight down and allowing the screen to
come up to lock into place.
Do not attempt to pull the screen down by
the surface or touch the screen, as it will damage the screen and void
the warranty
.
2. To retract the screen, simply pull the screen down more than two inches
with a quick snap of the wrist and allow the screen to slowly retract itself
back up into the housing.
Attention
: When retracting, always pull the screen down at a 90-degree angle. If ever the screen feels stuck, keep in
mind that the screen’s mechanism is new and needs to be run up/down a few times to loosen up. If this happens,
carefully, with a little force, yank the screen straight down to unlock the mechanism.
RETRACTION TIP
: If you are not able to pull the screen down two inches when attempting to retract it, give the
screen a quick yank downwards with a little bit of force. Please be sure to not stand directly under the housing of the
unit when yanking down on the screen.
MAINTENANCE
Clean matte white screen material with a soft cloth and mild soap with water. When not in use, retract screen in its
housing to keep the screen material surface clean.
For more information, technical support or your local Elite Screens contact, please
Note: Always pull the screen down or let it up in a 90-degree
vertical angle. Do not allow the screen to touch the screen
case when the screen goes up or comes down to avoid
damaging the screen material
Fig.B-2
Fig.B-1
Fig.B-3
Attach
Fig.B-5
Fig.B-4
Un-Screw
Fig.B-6
Screw
Ceiling


