


Rev.041014-JA
www.elitescreens.com
2
Push
Push
Short frame
Short frame
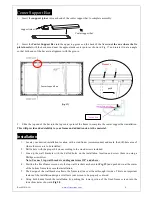
2.
Insert the other 1/2 horizontal frame piece to the
center joint
connector and fasten it with two
M5x15 screws
.
Repeat steps 1 and 2 for assembling the second horizontal frame.
Note: a. 2 long frames should be assembled for a screen.
b. Do not tighten the screws completely until all frame pieces have been assembled correctly.
3. Insert both
elbow joint
connectors into the long horizontal frame and then fasten it with two
M5x15 screws
(see
Fig.1).
Then insert the vertical short frames and fasten them with screws (fig.1.2)
bevel connection
½
Long Frame
Push
Horizontal Long Frame
M5
×
15 screws
M5
×
15 screws
M5
×
15 screws
Screw
( fig.3)
(Fig.1.1)
Push
Push
Joint
Long frame
( fig.1)
(Fig.1.2)


